Infrastructure Cost Optimization with Lambda

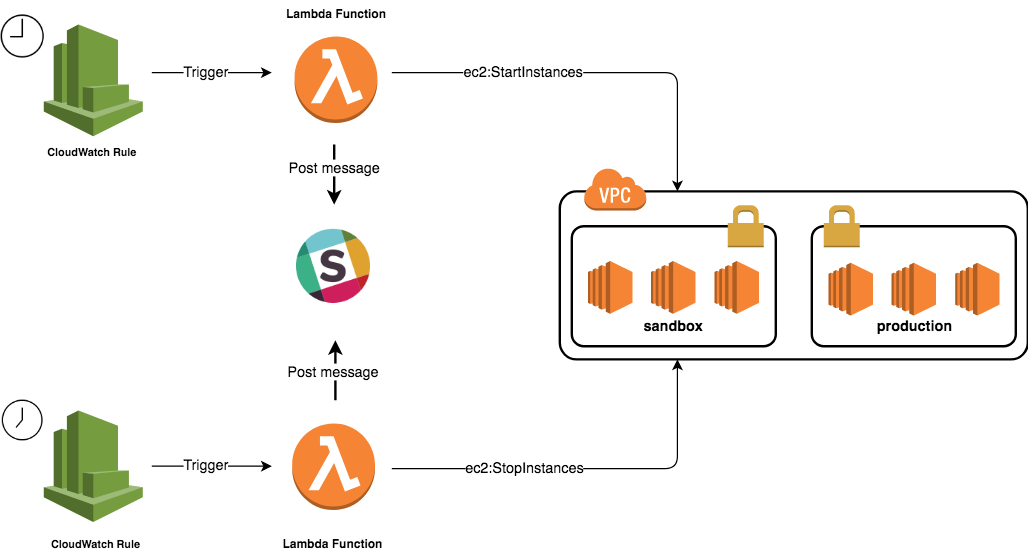
Having multiple environments is important to build a continuous integration/deployment pipeline and be able to reproduce bugs in production with ease but this comes at price. In order to reduce cost of AWS infrastructure, instances which are running 24/7 unnecessarily (sandbox & staging environments) must be shut down outside of regular business hours.

The figure below describes an automated process to schedule, stop and start instances to help cutting costs. The solution is a perfect example of using Serverless computing.


Note: full code is available on my GitHub.

2 Lambda functions will be created, they will scan all environments looking for a specific tag. The tag we use is named ‘Environment’. Instances without an Environment tag will not be affected:

1
2
3
4
5
6
7
8
9
10
11
12
13
14
15
16
17
18
19
20
21
22
23
24
25
26
27
28
29
30
31
32
func getInstances(cfg aws.Config) ([]Instance, error) {
instances := make([]Instance, 0)

svc := ec2.New(cfg)
req := svc.DescribeInstancesRequest(&ec2.DescribeInstancesInput{
Filters: []ec2.Filter{
ec2.Filter{
Name: aws.String("tag:Environment"),
Values: []string{os.Getenv("ENVIRONMENT")},
},
},
})
res, err := req.Send()
if err != nil {
return instances, err
}

for _, reservation := range res.Reservations {
for _, instance := range reservation.Instances {
for _, tag := range instance.Tags {
if *tag.Key == "Name" {
instances = append(instances, Instance{
ID: *instance.InstanceId,
Name: *tag.Value,
})
}
}
}
}

return instances, nil
}

The StartEnvironment function will query the StartInstances method with the list of instance ids returned by the previous function:

1
2
3
4
5
6
7
8
9
10
11
12
13
14
15
16
func startInstances(cfg aws.Config, instances []Instance) error {
instanceIds := make([]string, 0, len(instances))
for _, instance := range instances {
instanceIds = append(instanceIds, instance.ID)
}

svc := ec2.New(cfg)
req := svc.StartInstancesRequest(&ec2.StartInstancesInput{
InstanceIds: instanceIds,
})
_, err := req.Send()
if err != nil {
return err
}
return nil
}

Similarly, the StopEnvironment function will query the StopInstances method:

1
2
3
4
5
6
7
8
9
10
11
12
13
14
15
16
func stopInstances(cfg aws.Config, instances []Instance) error {
instanceIds := make([]string, 0, len(instances))
for _, instance := range instances {
instanceIds = append(instanceIds, instance.ID)
}

svc := ec2.New(cfg)
req := svc.StopInstancesRequest(&ec2.StopInstancesInput{
InstanceIds: instanceIds,
})
_, err := req.Send()
if err != nil {
return err
}
return nil
}

Finally, both functions will post a message to Slack channel for real-time notification:

1
2
3
4
5
6
7
8
9
10
11
12
13
14
15
16
17
18
19
20
21
22
23
24
25
26
27
28
29
func postToSlack(color string, title string, instances string) error {
message := SlackMessage{
Text: title,
Attachments: []Attachment{
Attachment{
Text: instances,
Color: color,
},
},
}

client := &http.Client{}
data, err := json.Marshal(message)
if err != nil {
return err
}

req, err := http.NewRequest("POST", os.Getenv("SLACK_WEBHOOK"), bytes.NewBuffer(data))
if err != nil {
return err
}

resp, err := client.Do(req)
if err != nil {
return err
}

return nil
}

Now our functions are defined, let’s build the deployment packages (zip files) using the following Bash script:

1
2
3
4
5
6
7
8
9
10
11
12
13
14
15
#!/bin/bash

echo "Building StartEnvironment binary"
GOOS=linux GOARCH=amd64 go build -o main start/*.go

echo "Creating deployment package"
zip start-environment.zip main
rm main

echo "Building StopEnvironment binary"
GOOS=linux GOARCH=amd64 go build -o main stop/*.go

echo "Creating deployment package"
zip stop-environment.zip main
rm main

The functions require an IAM role to be able to interact with EC2. The StartEnvironment function has to be able to describe and start EC2 instances:

1
2
3
4
5
6
7
8
9
10
11
12
13
14
15
16
17
18
{
"Version": "2012-10-17",
"Statement": [
{
"Effect": "Allow",
"Action": [
"logs:CreateLogStream",
"logs:PutLogEvents",
"logs:CreateLogGroup",
"ec2:DescribeInstances",
"ec2:StartInstances"
],
"Resource": [
"*"
]
}
]
}

The StopEnvironment function has to be able to describe and stop EC2 instances:

1
2
3
4
5
6
7
8
9
10
11
12
13
14
15
16
17
18
{
"Version": "2012-10-17",
"Statement": [
{
"Effect": "Allow",
"Action": [
"logs:CreateLogStream",
"logs:PutLogEvents",
"logs:CreateLogGroup",
"ec2:DescribeInstances",
"ec2:StopInstances"
],
"Resource": [
"*"
]
}
]
}

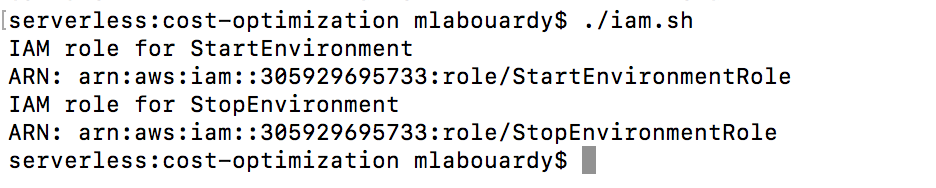
Finally, create an IAM role for each function and attach the above policies:

1
2
3
4
5
6
7
8
9
10
11
12
13
#!/bin/bash

echo "IAM role for StartEnvironment"
arn=$(aws iam create-policy --policy-name StartEnvironment --policy-document file://start/policy.json | jq -r '.Policy.Arn')
result=$(aws iam create-role --role-name StartEnvironmentRole --assume-role-policy-document file://role.json | jq -r '.Role.Arn')
aws iam attach-role-policy --role-name StartEnvironmentRole --policy-arn $arn
echo "ARN: $result"

echo "IAM role for StopEnvironment"
arn=$(aws iam create-policy --policy-name StopEnvironment --policy-document file://stop/policy.json | jq -r '.Policy.Arn')
result=$(aws iam create-role --role-name StopEnvironmentRole --assume-role-policy-document file://role.json | jq -r '.Role.Arn')
aws iam attach-role-policy --role-name StopEnvironmentRole --policy-arn $arn
echo "ARN: $result"

The script will output the ARN for each IAM role:


Before jumping to deployment part, we need to create a Slack WebHook to be able to post messages to Slack channel:


Next, use the following script to deploy your functions to AWS Lambda (make sure to replace the IAM roles, Slack WebHook token & the target environment):

1
2
3
4
5
6
7
8
9
10
11
12
13
14
15
16
17
18
19
20
21
22
23
24
25
26
27
#!/bin/bash

START_IAM_ROLE="arn:aws:iam::ACCOUNT_ID:role/StartEnvironmentRole"
STOP_IAM_ROLE="arn:aws:iam::ACCOUNT_ID:role/StopEnvironmentRole"
AWS_REGION="us-east-1"
SLACK_WEBHOOK="https://hooks.slack.com/services/TOKEN"
ENVIRONMENT="sandbox"

echo "Deploying StartEnvironment to Lambda"
aws lambda create-function --function-name StartEnvironment \
--zip-file fileb://./start-environment.zip \
--runtime go1.x --handler main \
--role $START_IAM_ROLE \
--environment Variables="{SLACK_WEBHOOK=$SLACK_WEBHOOK,ENVIRONMENT=$ENVIRONMENT}" \
--region $AWS_REGION


echo "Deploying StopEnvironment to Lambda"
aws lambda create-function --function-name StopEnvironment \
--zip-file fileb://./stop-environment.zip \
--runtime go1.x --handler main \
--role $STOP_IAM_ROLE \
--environment Variables="{SLACK_WEBHOOK=$SLACK_WEBHOOK,ENVIRONMENT=$ENVIRONMENT}" \
--region $AWS_REGION \


rm *-environment.zip

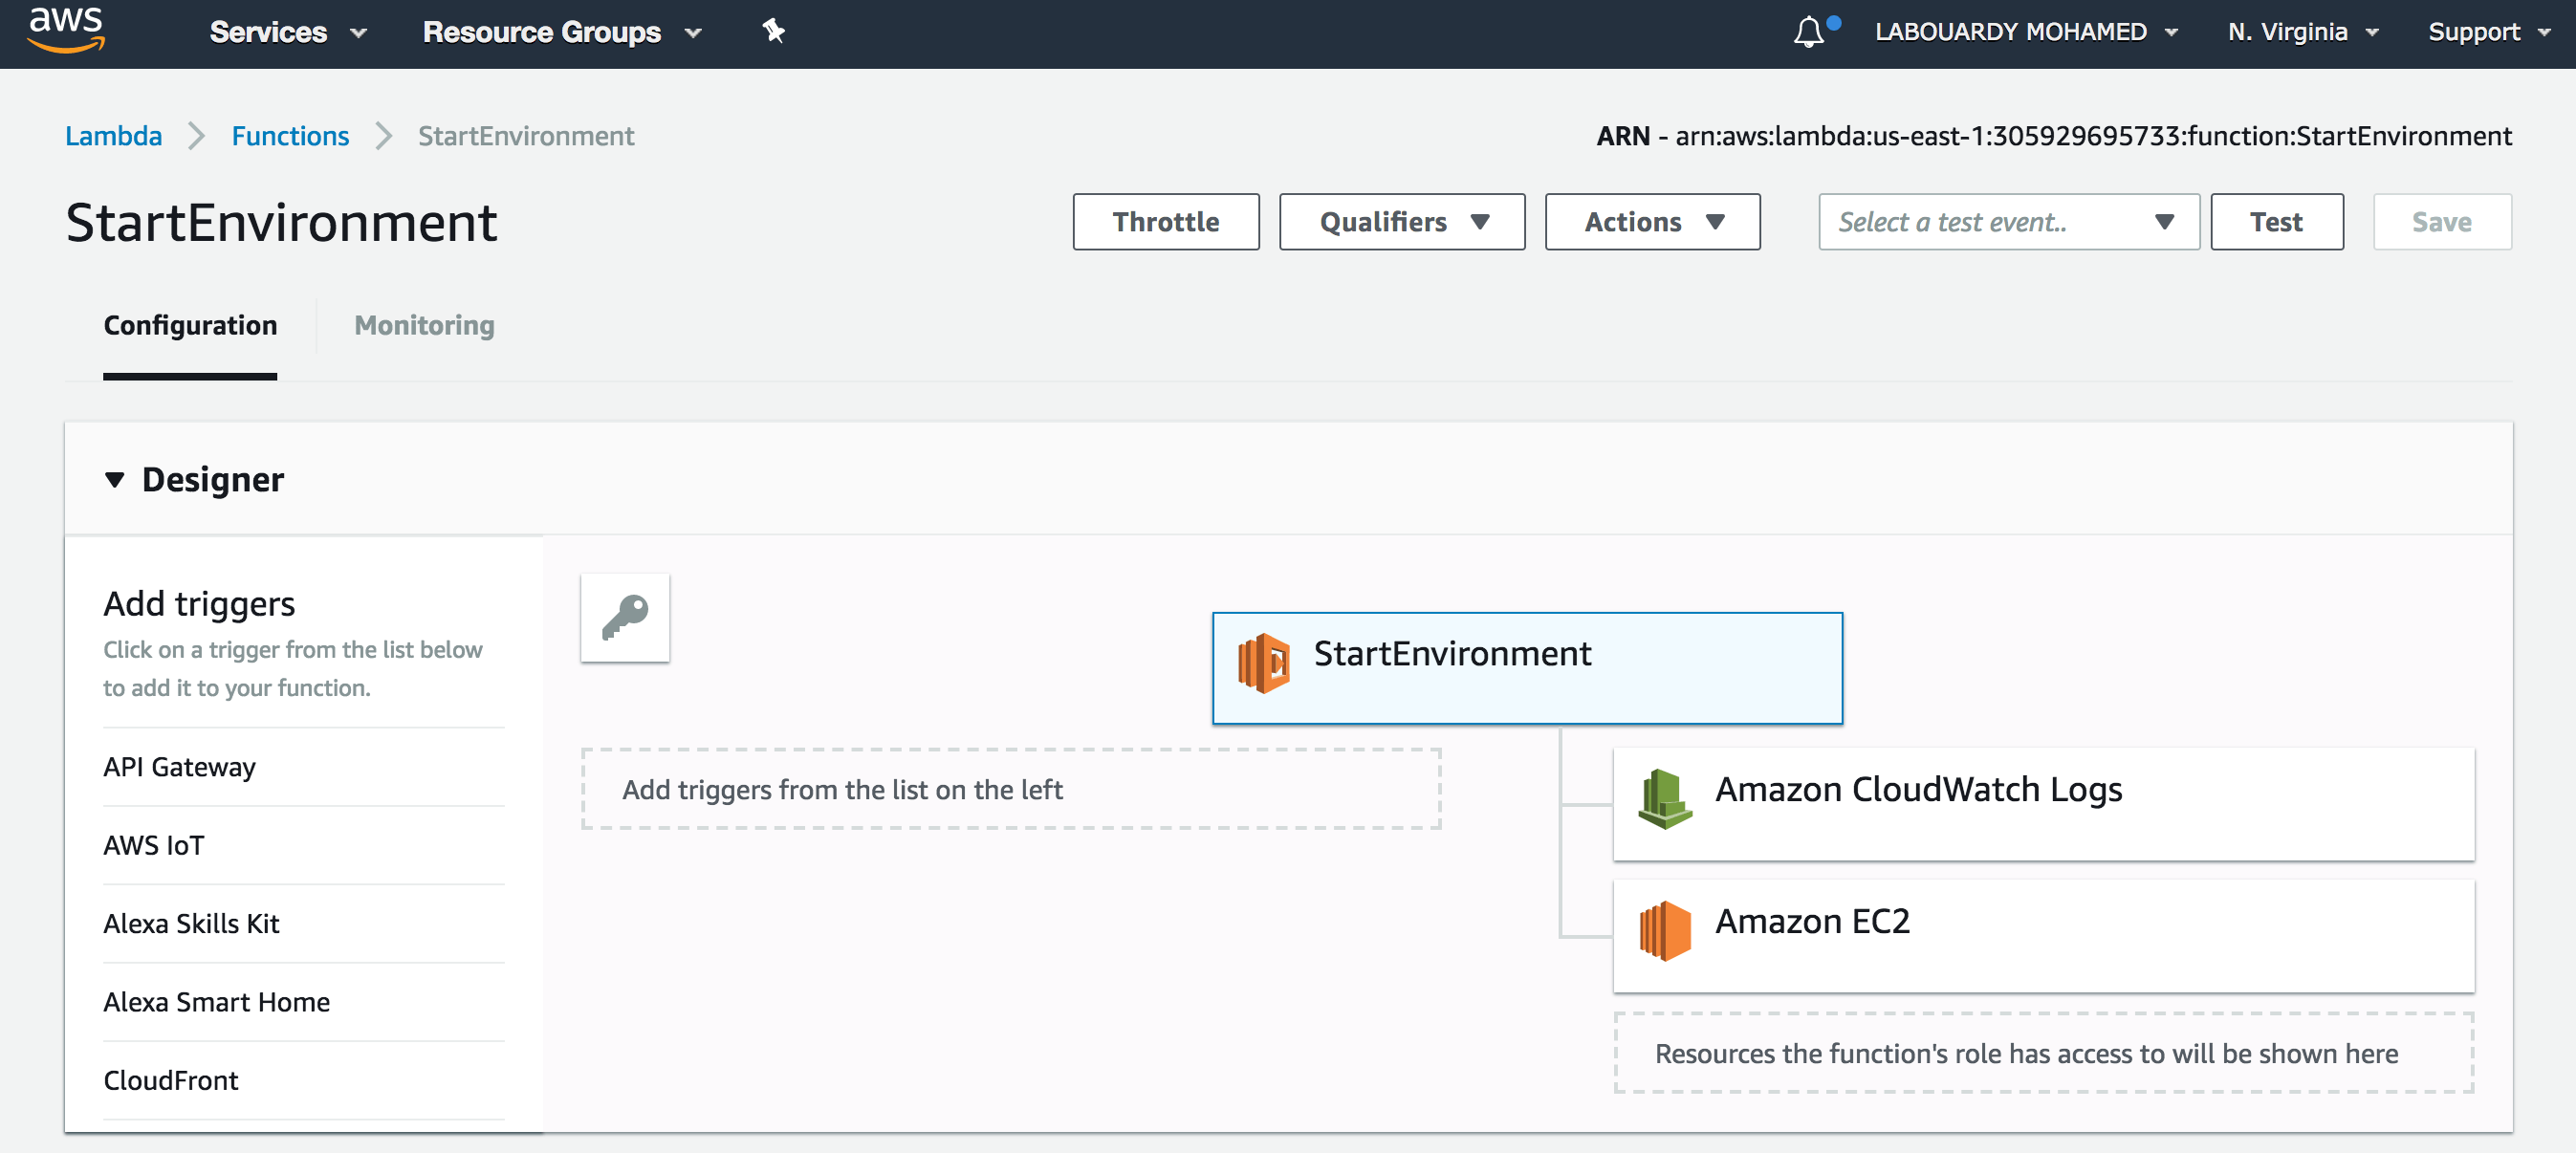
Once deployed, if you sign in to AWS Management Console, navigate to Lambda Console, you should see both functions has been deployed successfully:

StartEnvironment:


StopEnvironment:


To further automate the process of invoking the Lambda function at the right time. AWS CloudWatch Scheduled Events will be used.

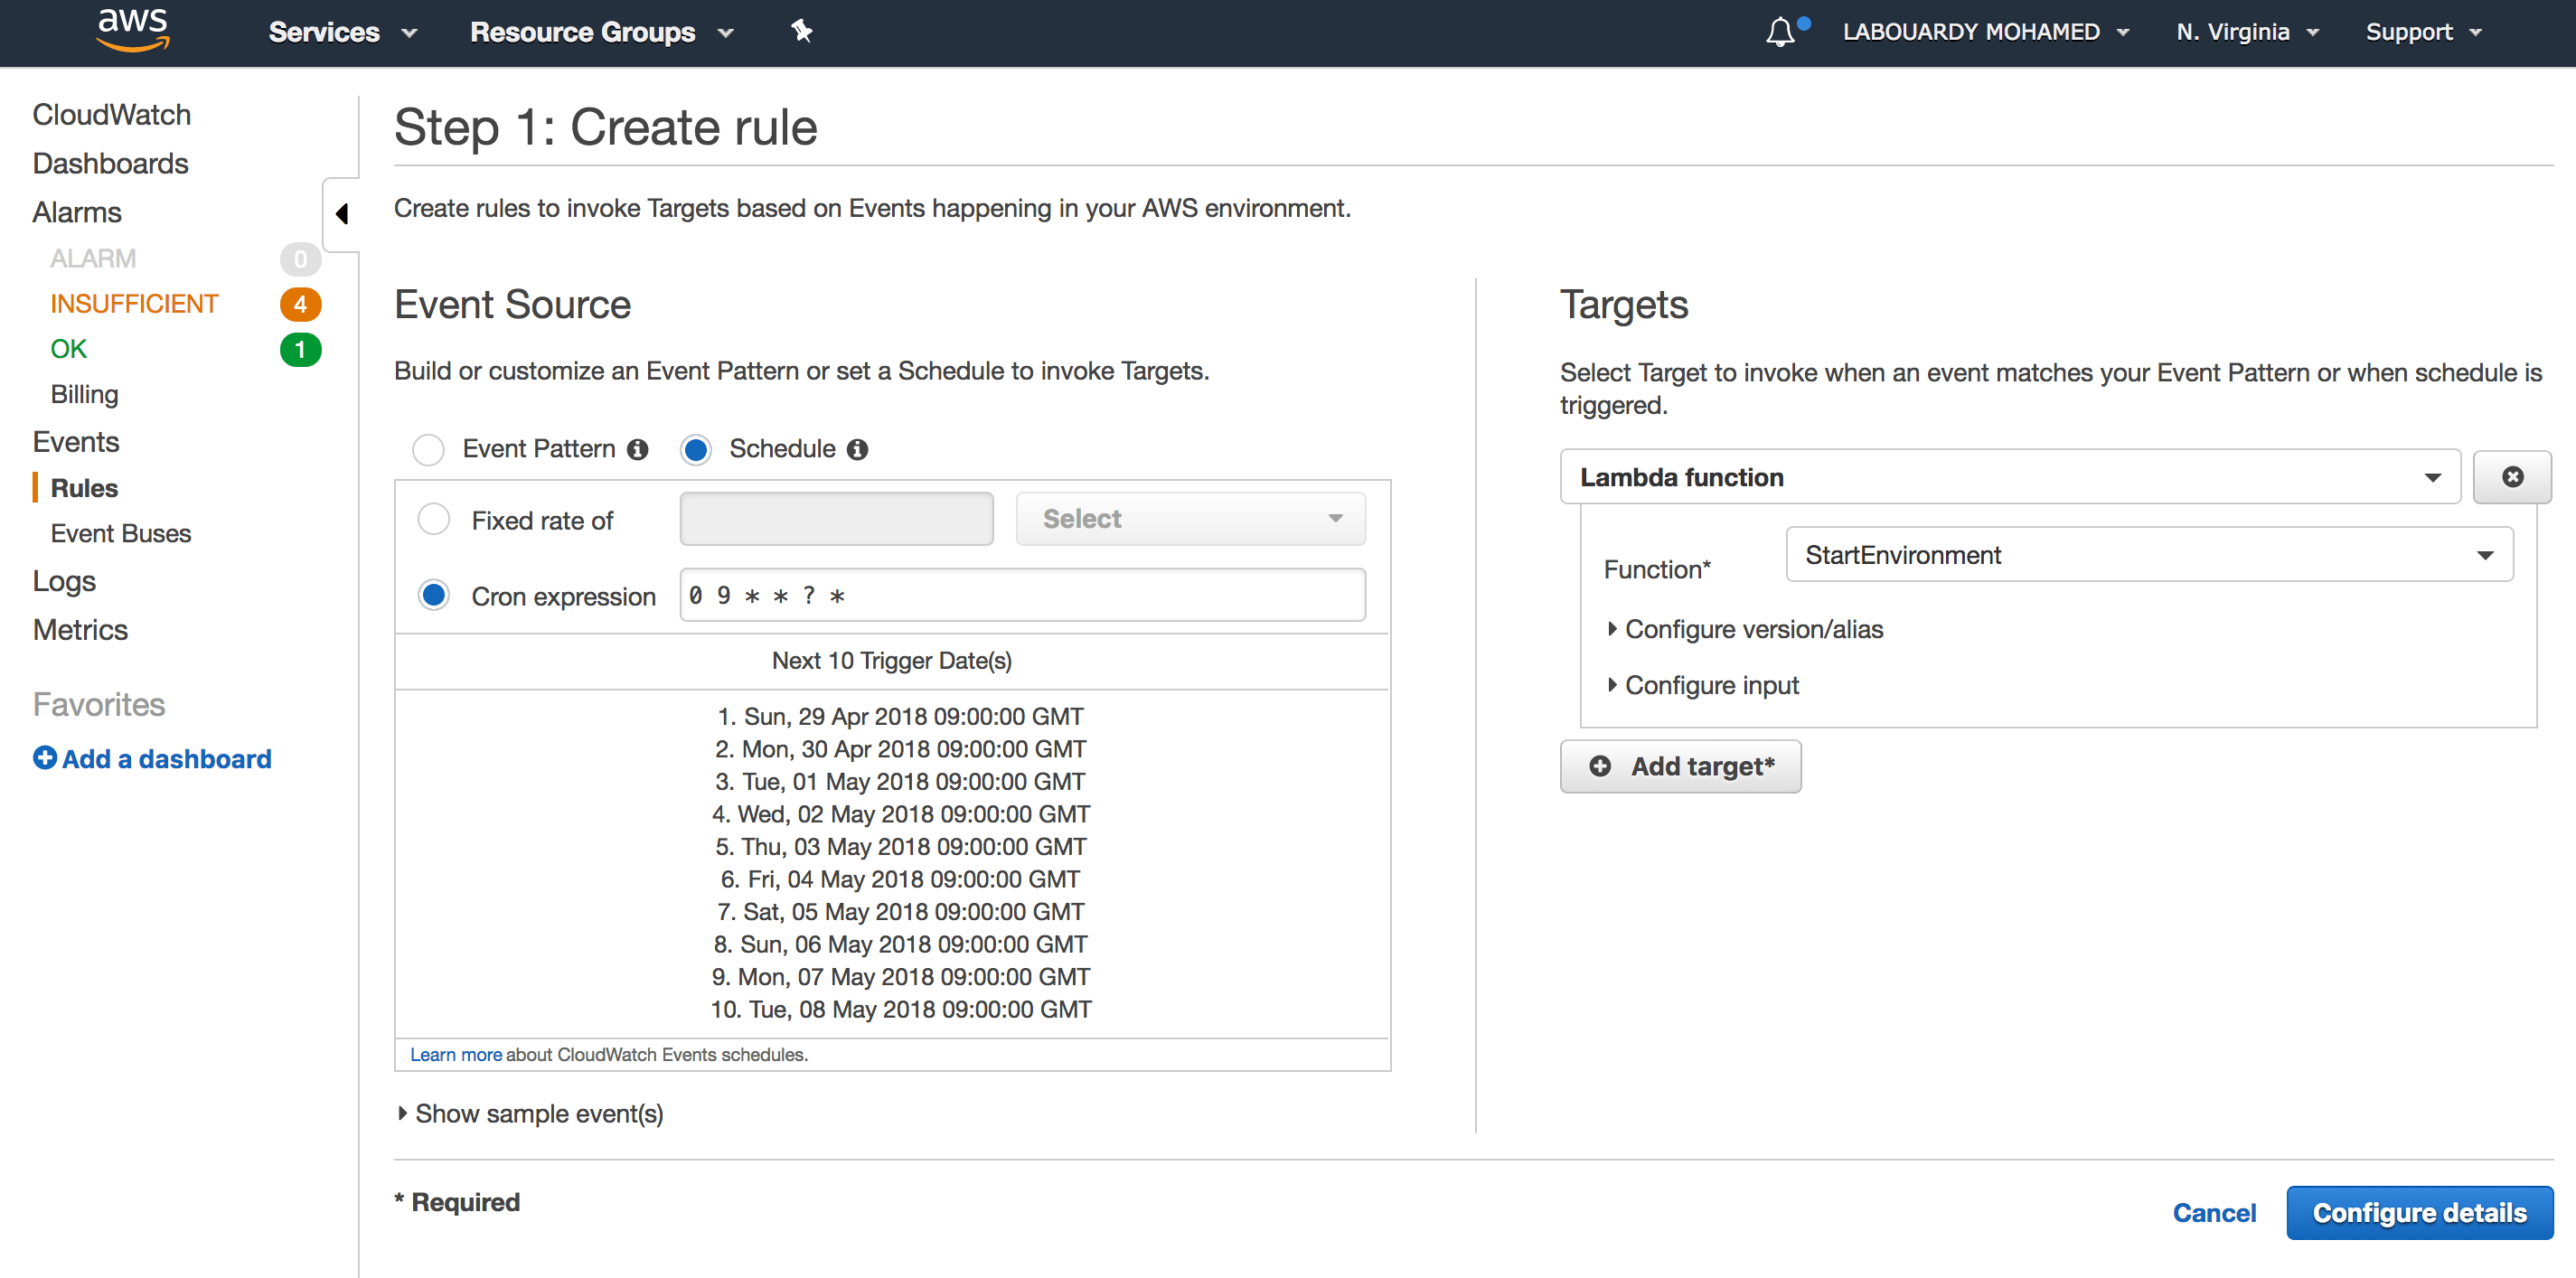
Create a new CloudWatch rule with the below cron expression (It will be invoked everyday at 9 AM):


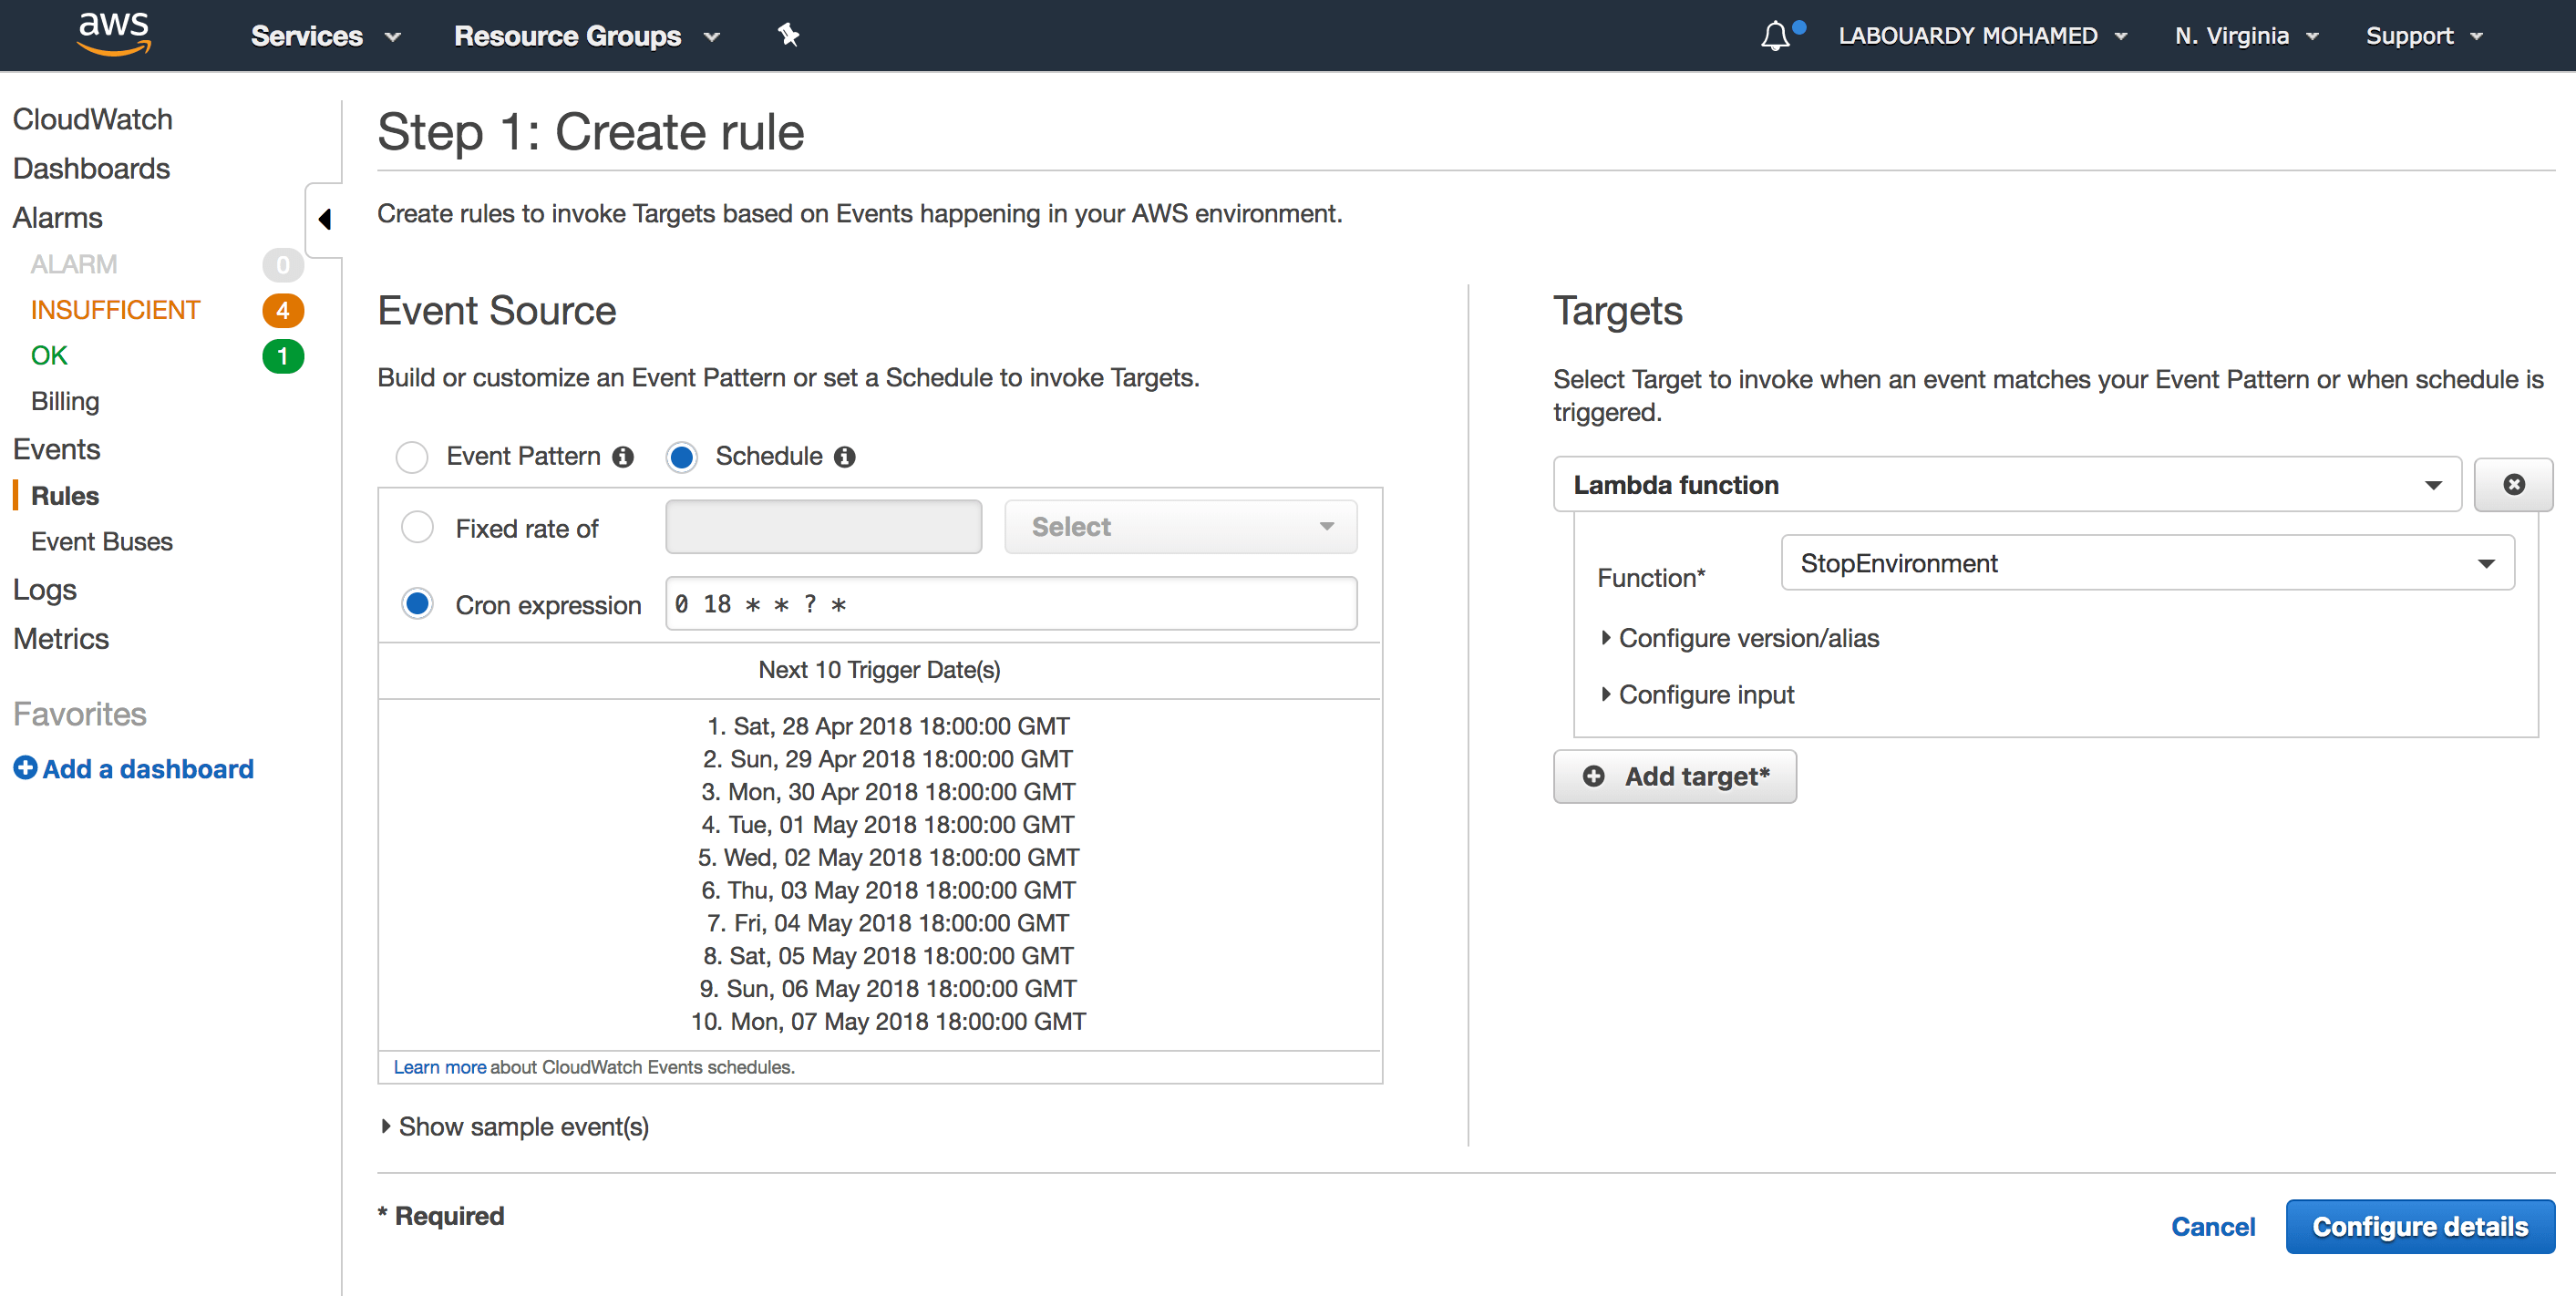
And another rule to stop the environment at 6 PM:


Note: All times are GMT time.

Testing:

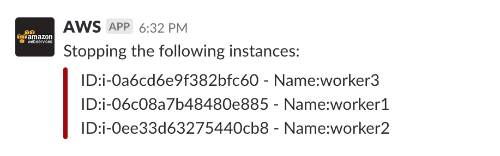
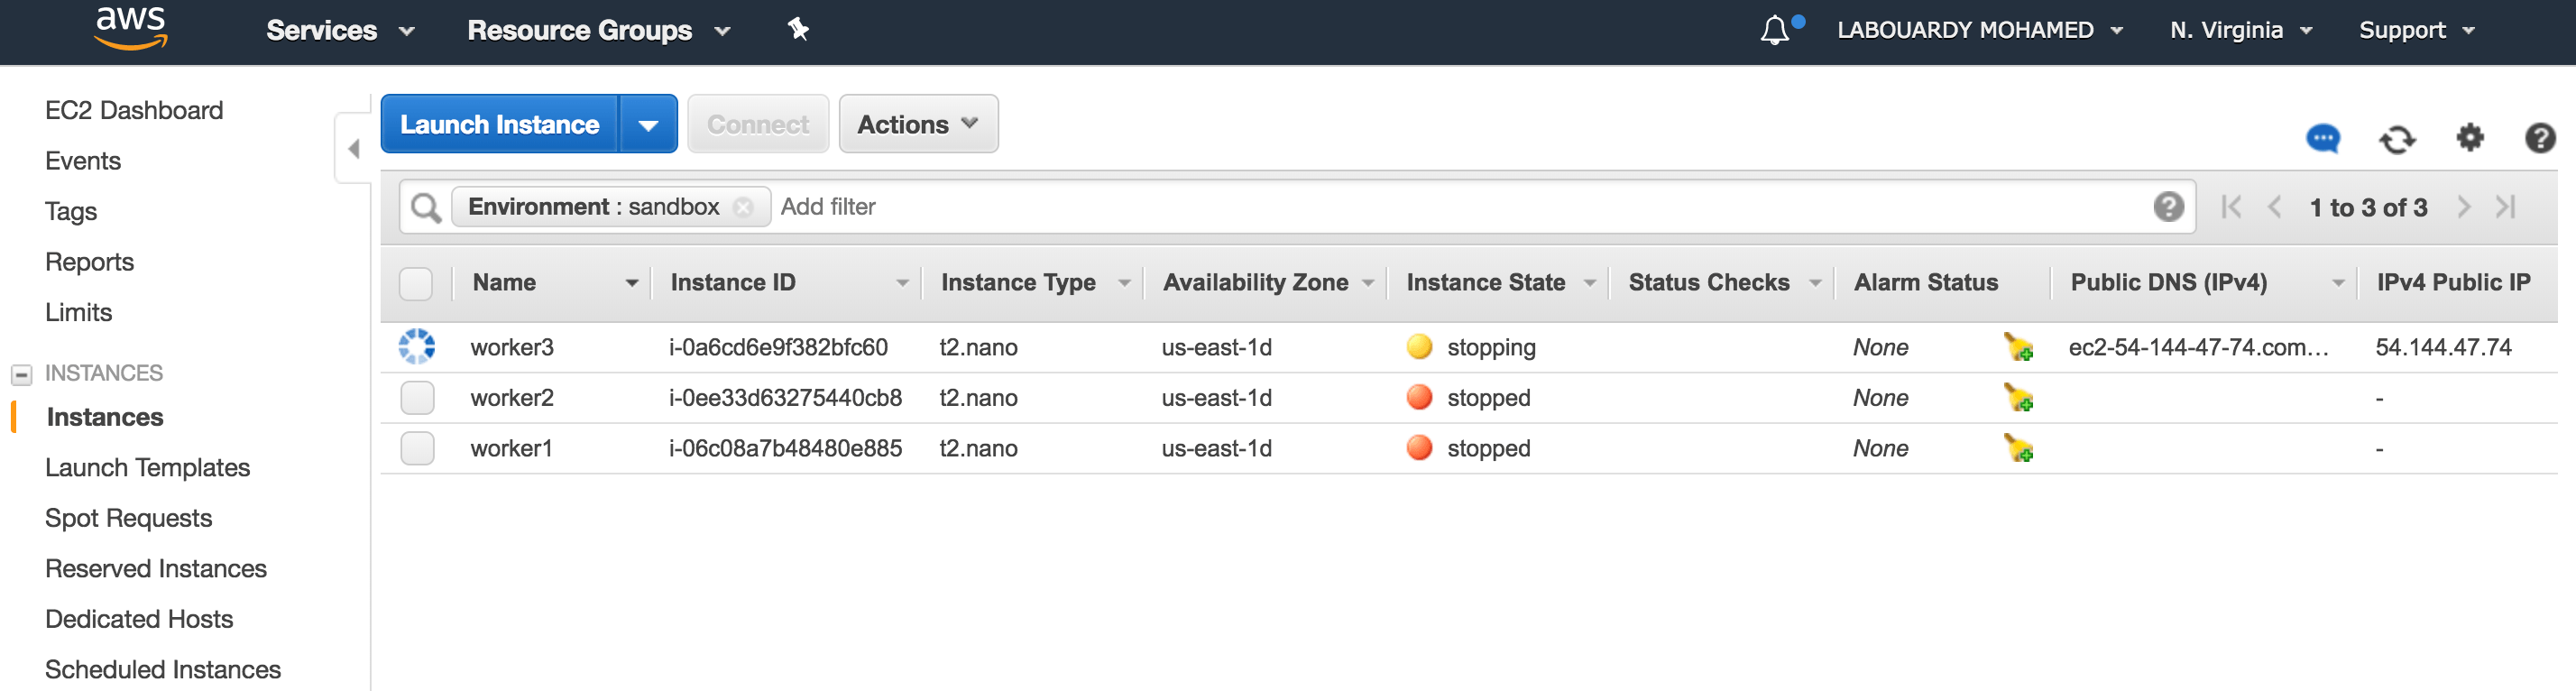
a – Stop Environment


Result:


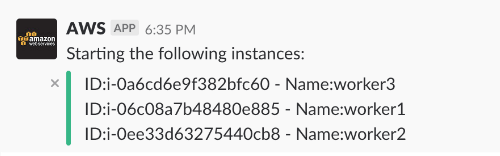
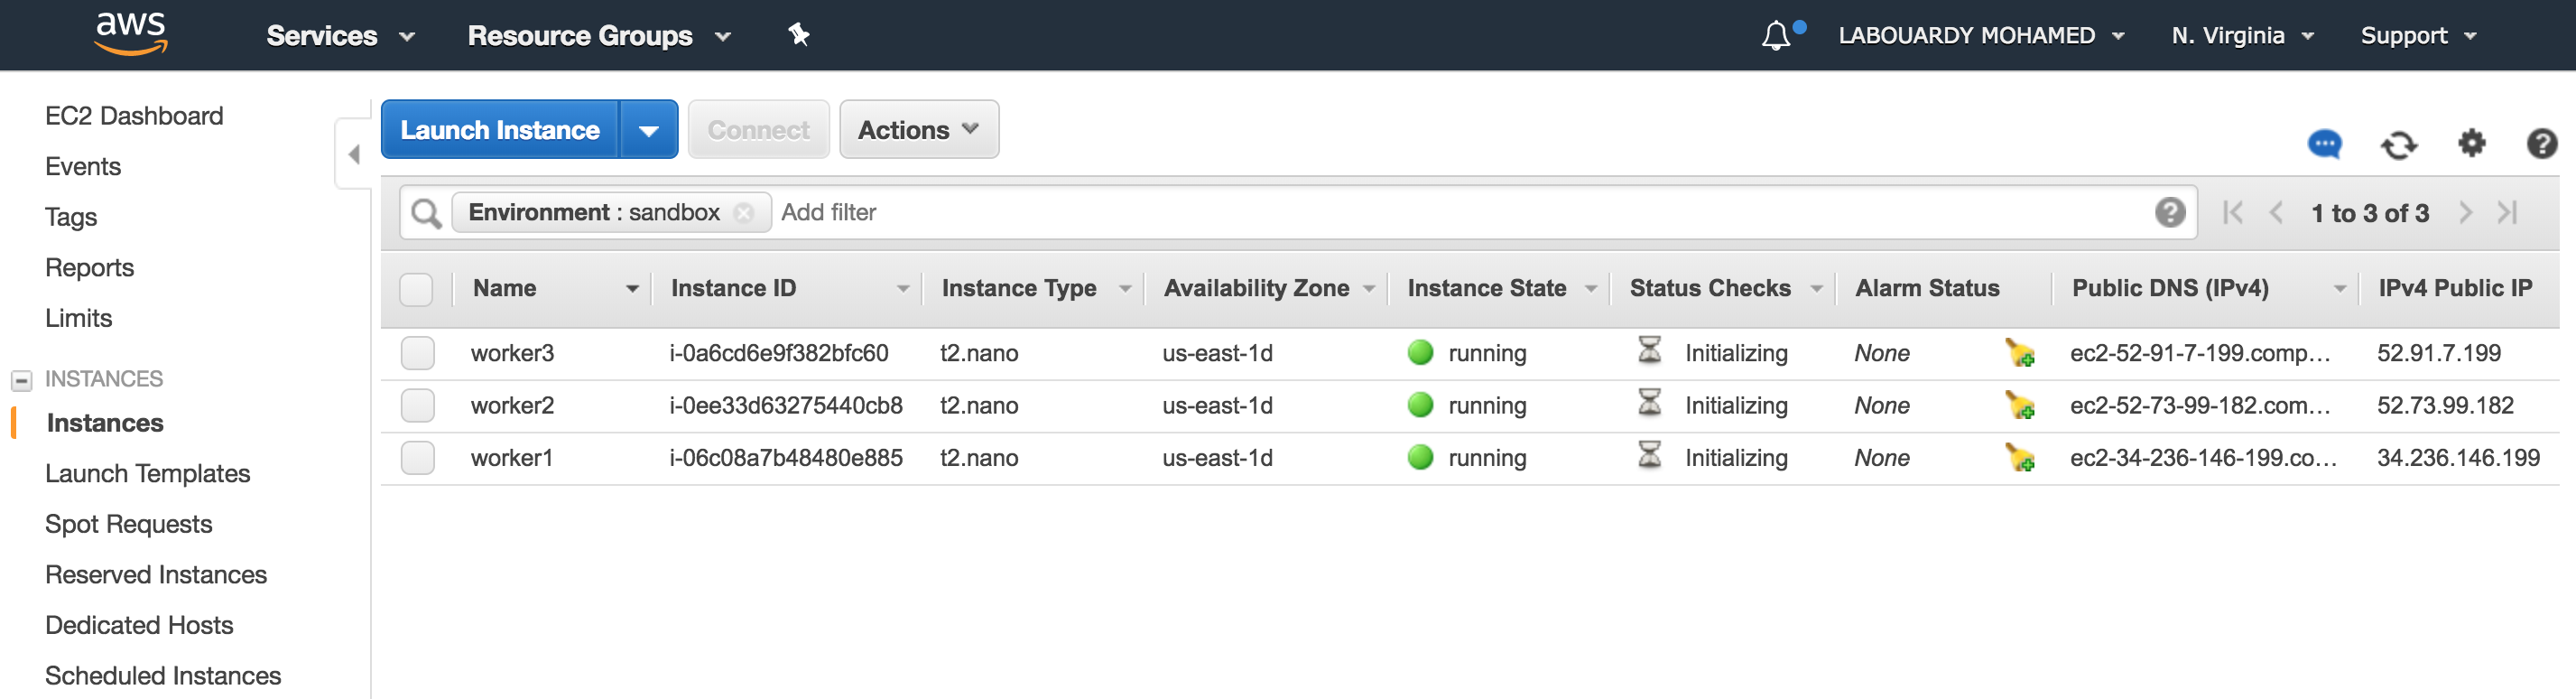
b – Start Environment


Result:


The solution is easy to deploy and can help reduce operational costs.

Full code can be found on my GitHub. Make sure to drop your comments, feedback, or suggestions below — or connect with me directly on Twitter @mlabouardy.

Deploy a Swarm Cluster with Alexa

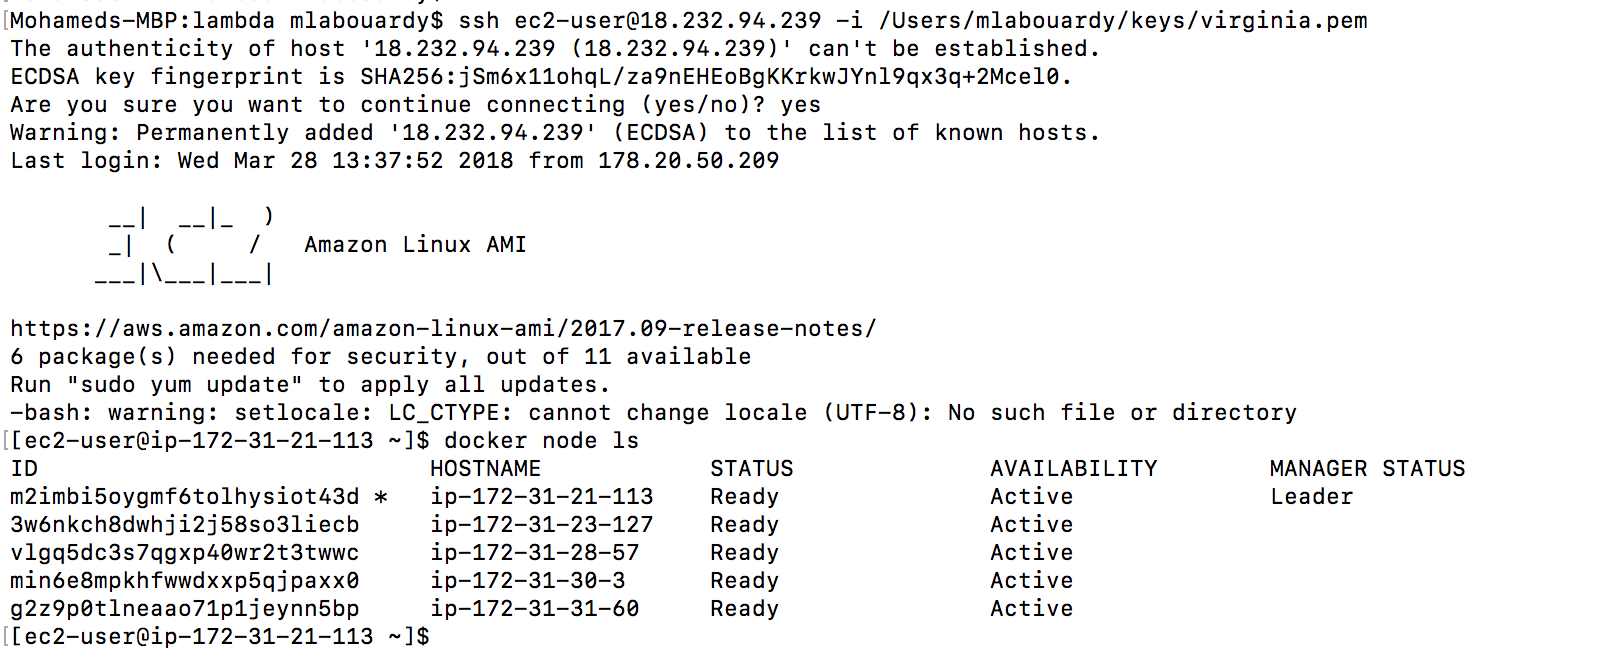
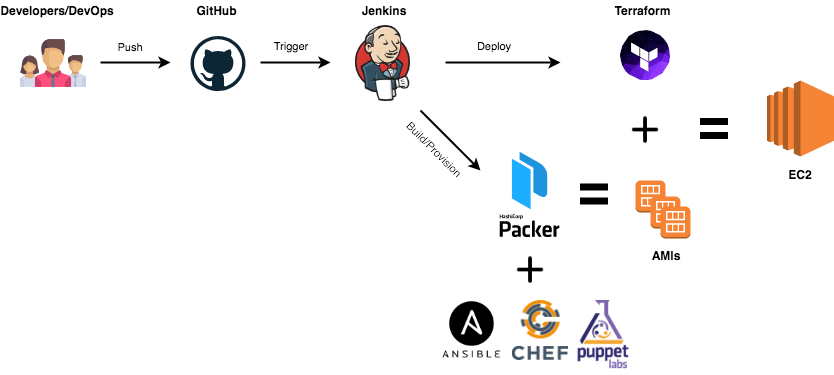
Serverless and Containers changed the way we leverage public clouds and how we write, deploy and maintain applications. A great way to combine the two paradigms is to build a voice assistant with Alexa based on Lambda functions – written in Go – to deploy a Docker Swarm cluster on AWS.

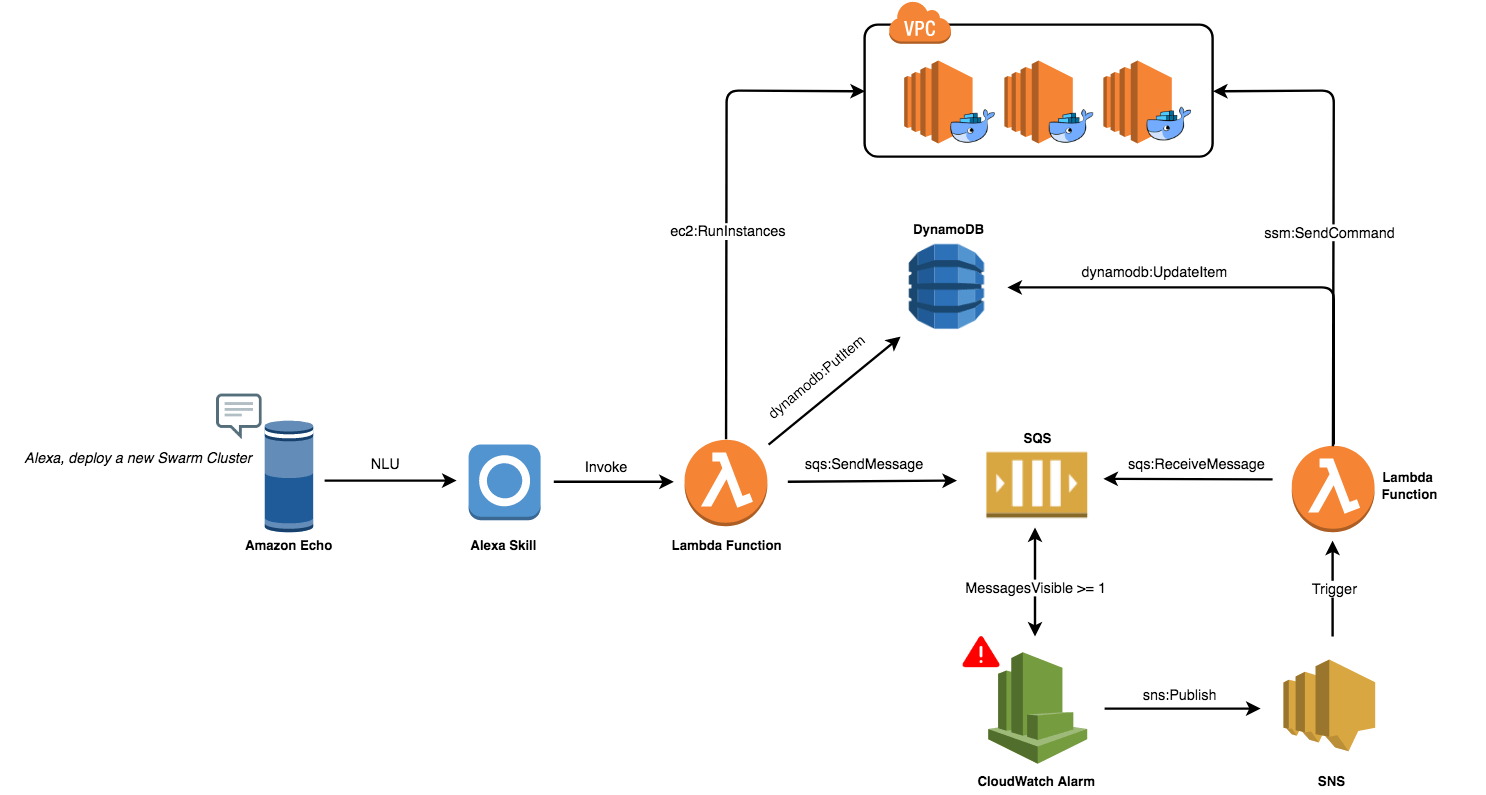
The figure below shows all components needed to deploy a production-ready Swarm cluster on AWS with Alexa.


Note: Full code is available on my GitHub.

A user will ask Amazon Echo to deploy a Swarm Cluster:


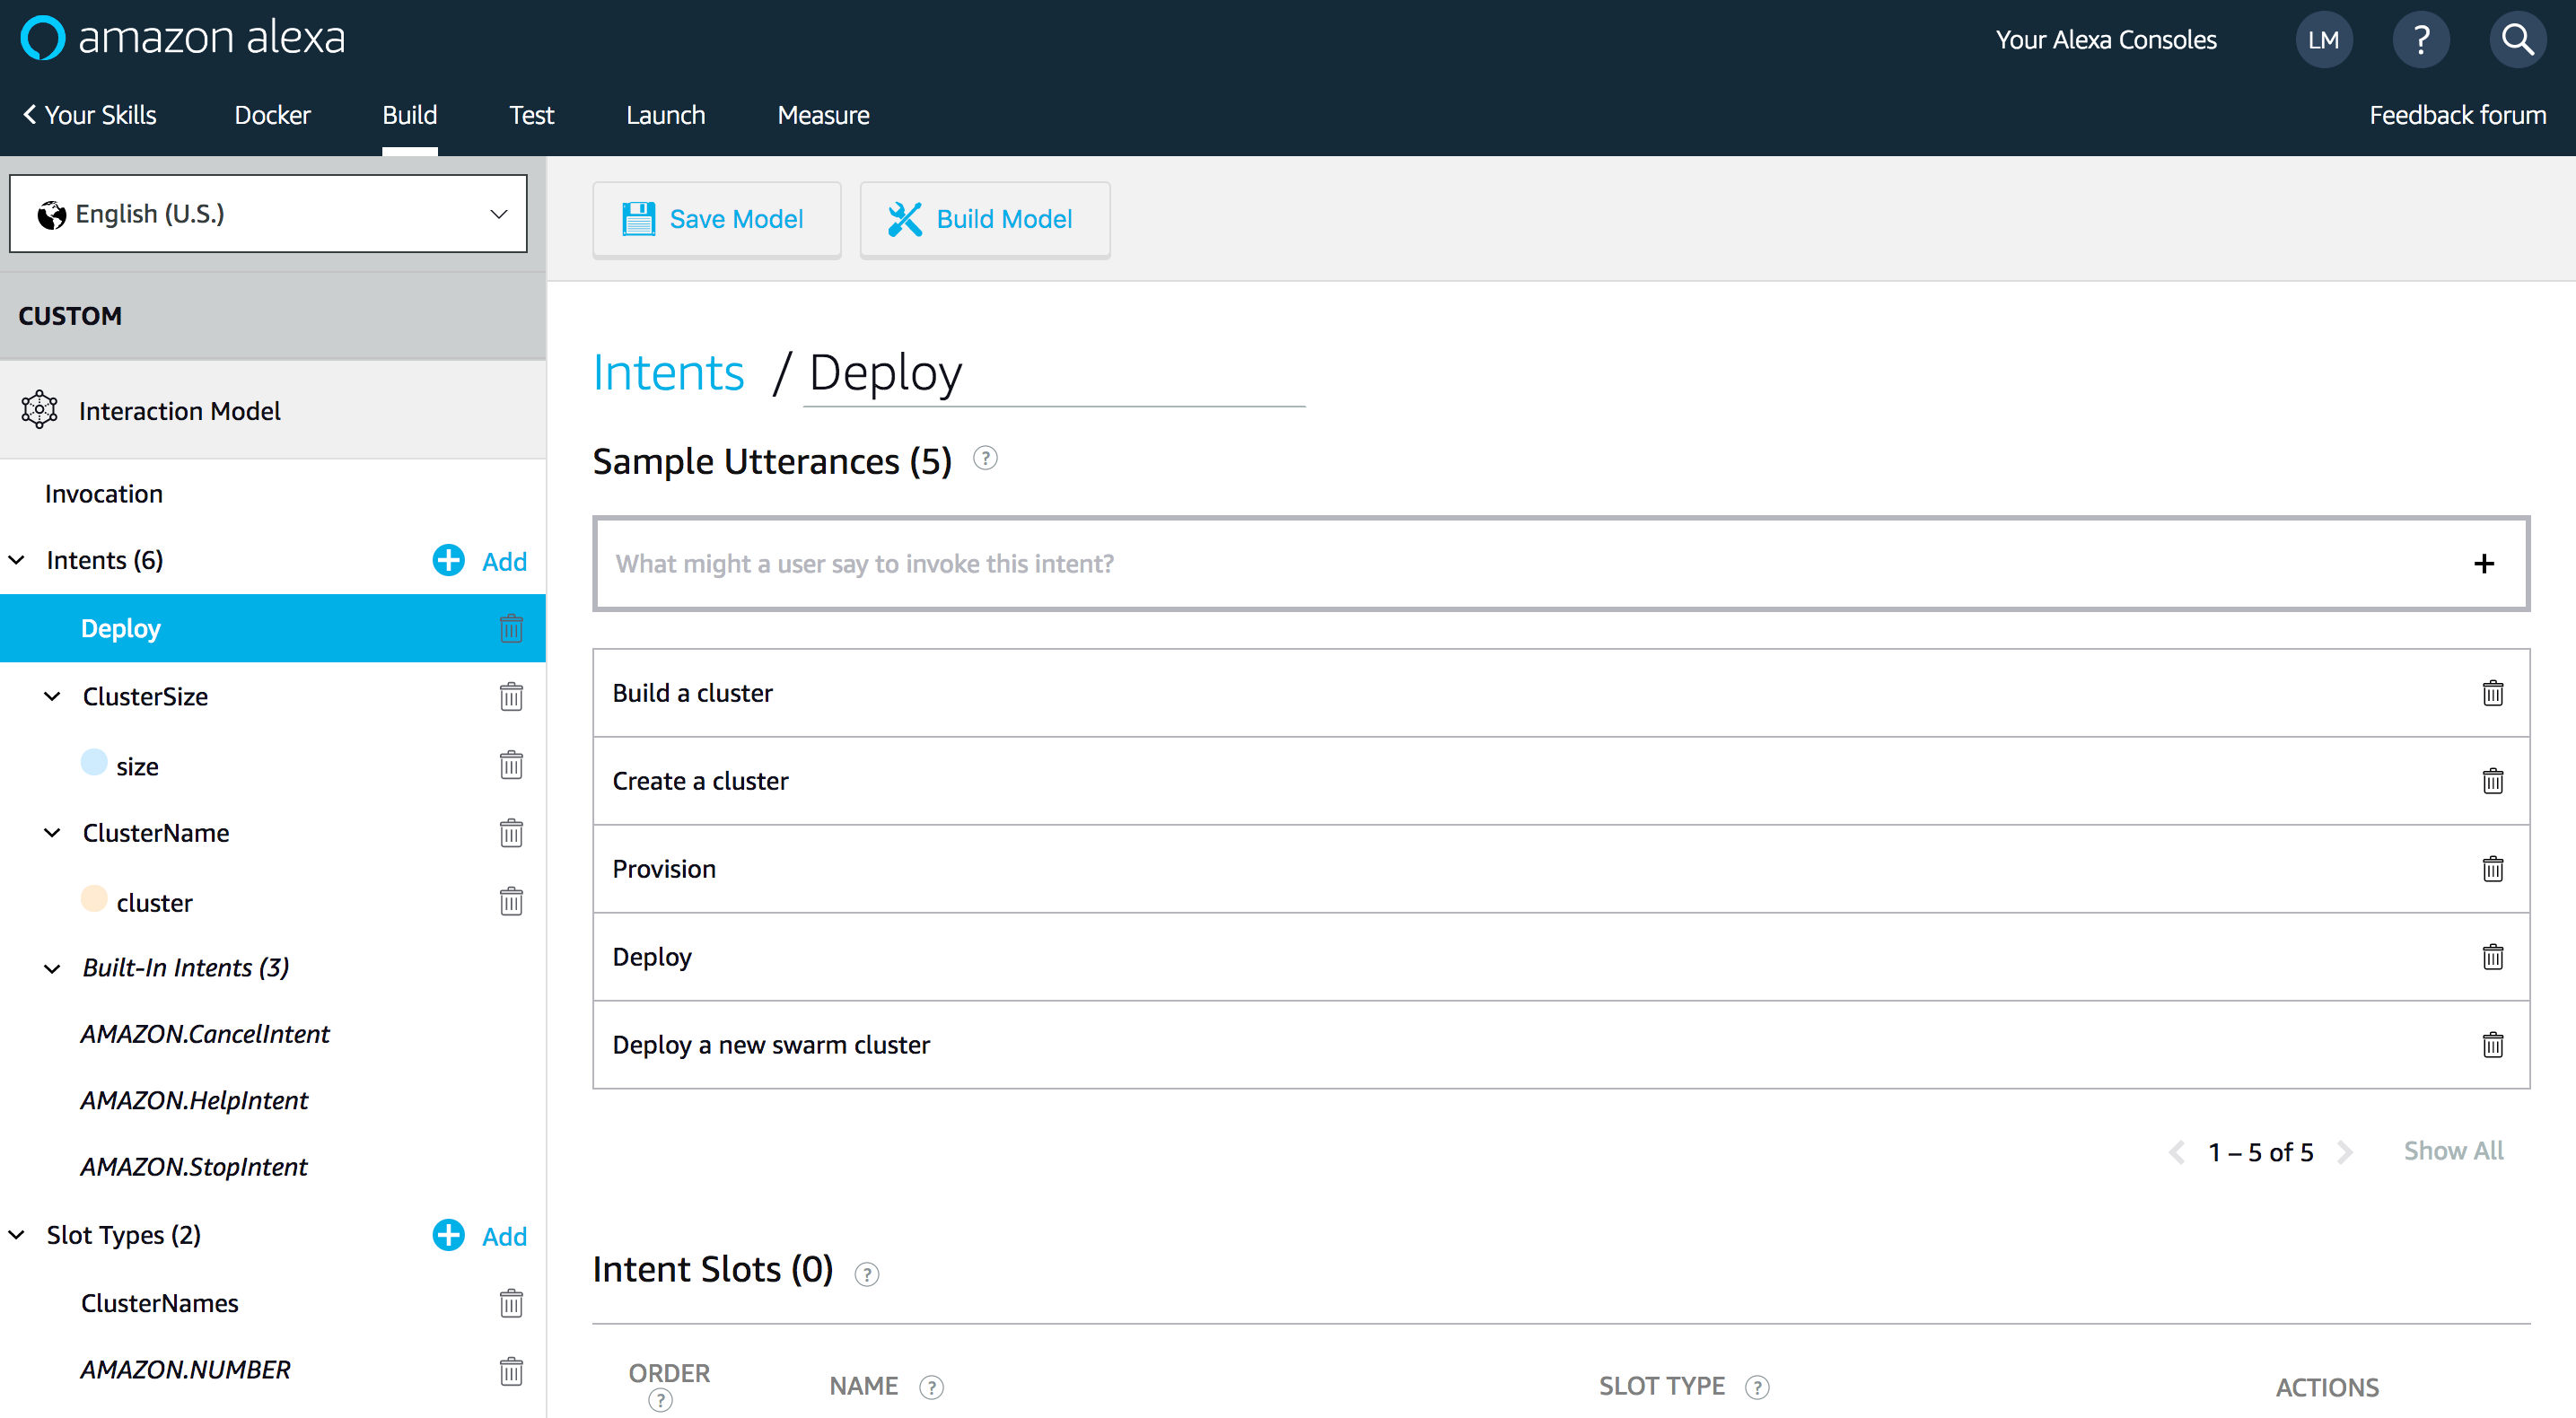
Echo will intercept the user’s voice command with built-in natural language understanding and speech recognition. Convey them to the Alexa service. A custom Alexa skill will convert the voice commands to intents:


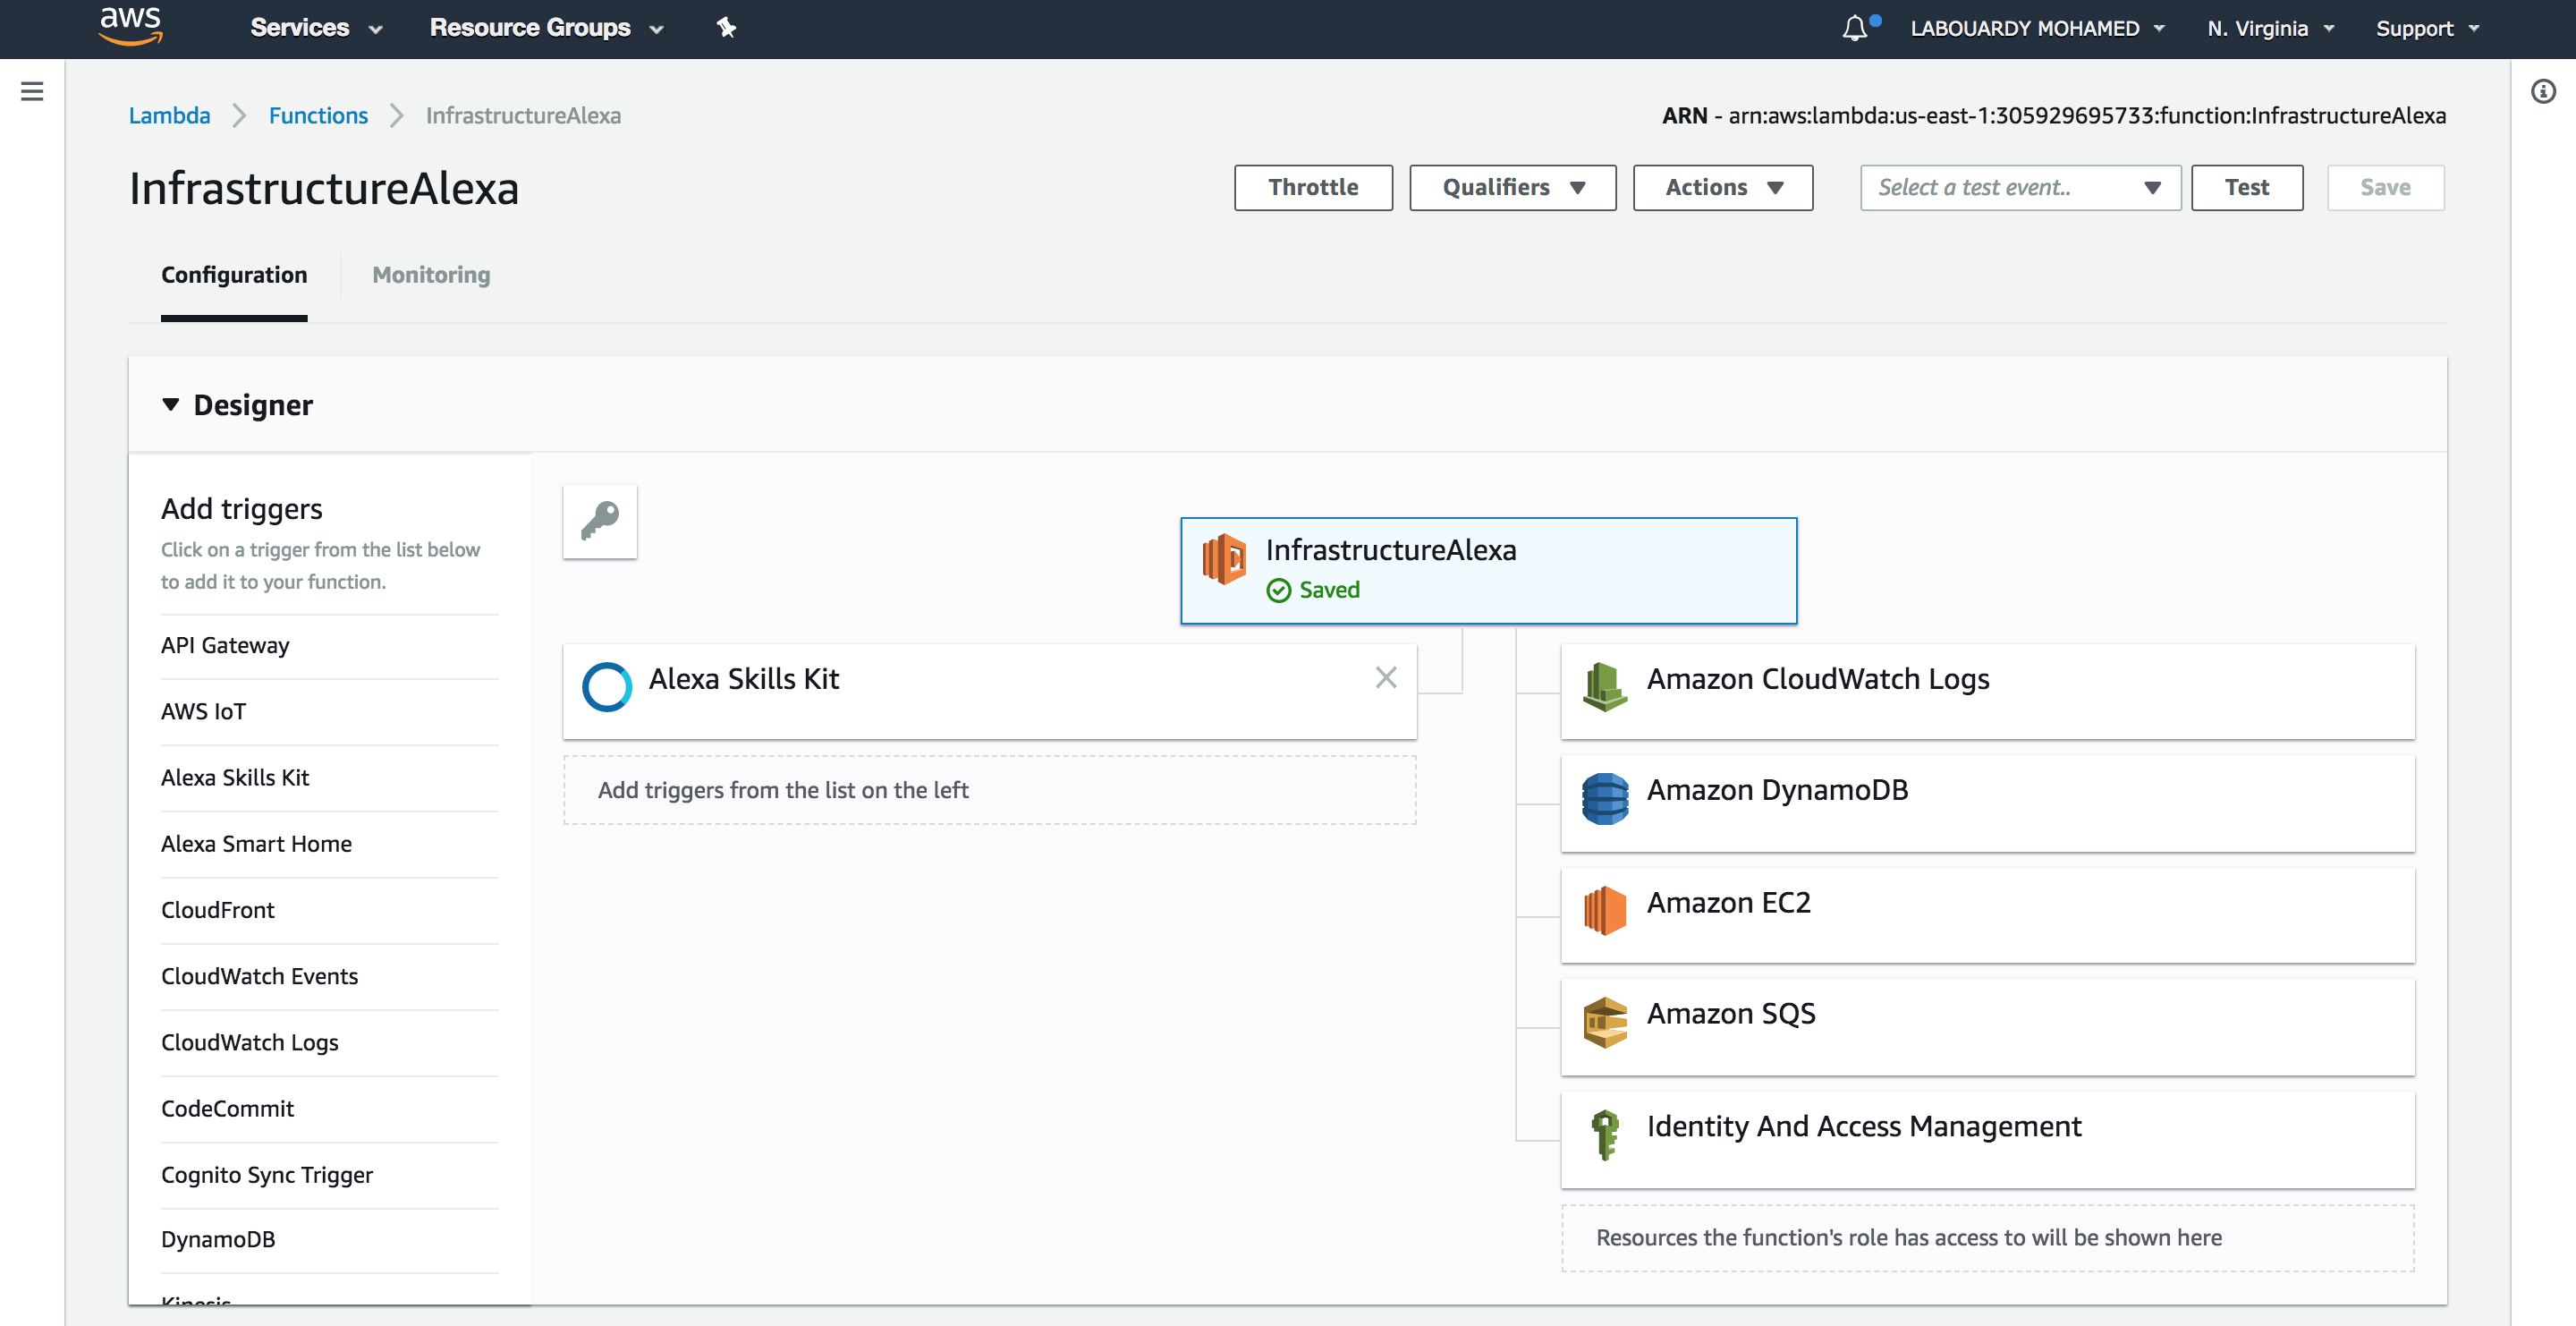
The Alexa skill will trigger a Lambda function for intent fulfilment:


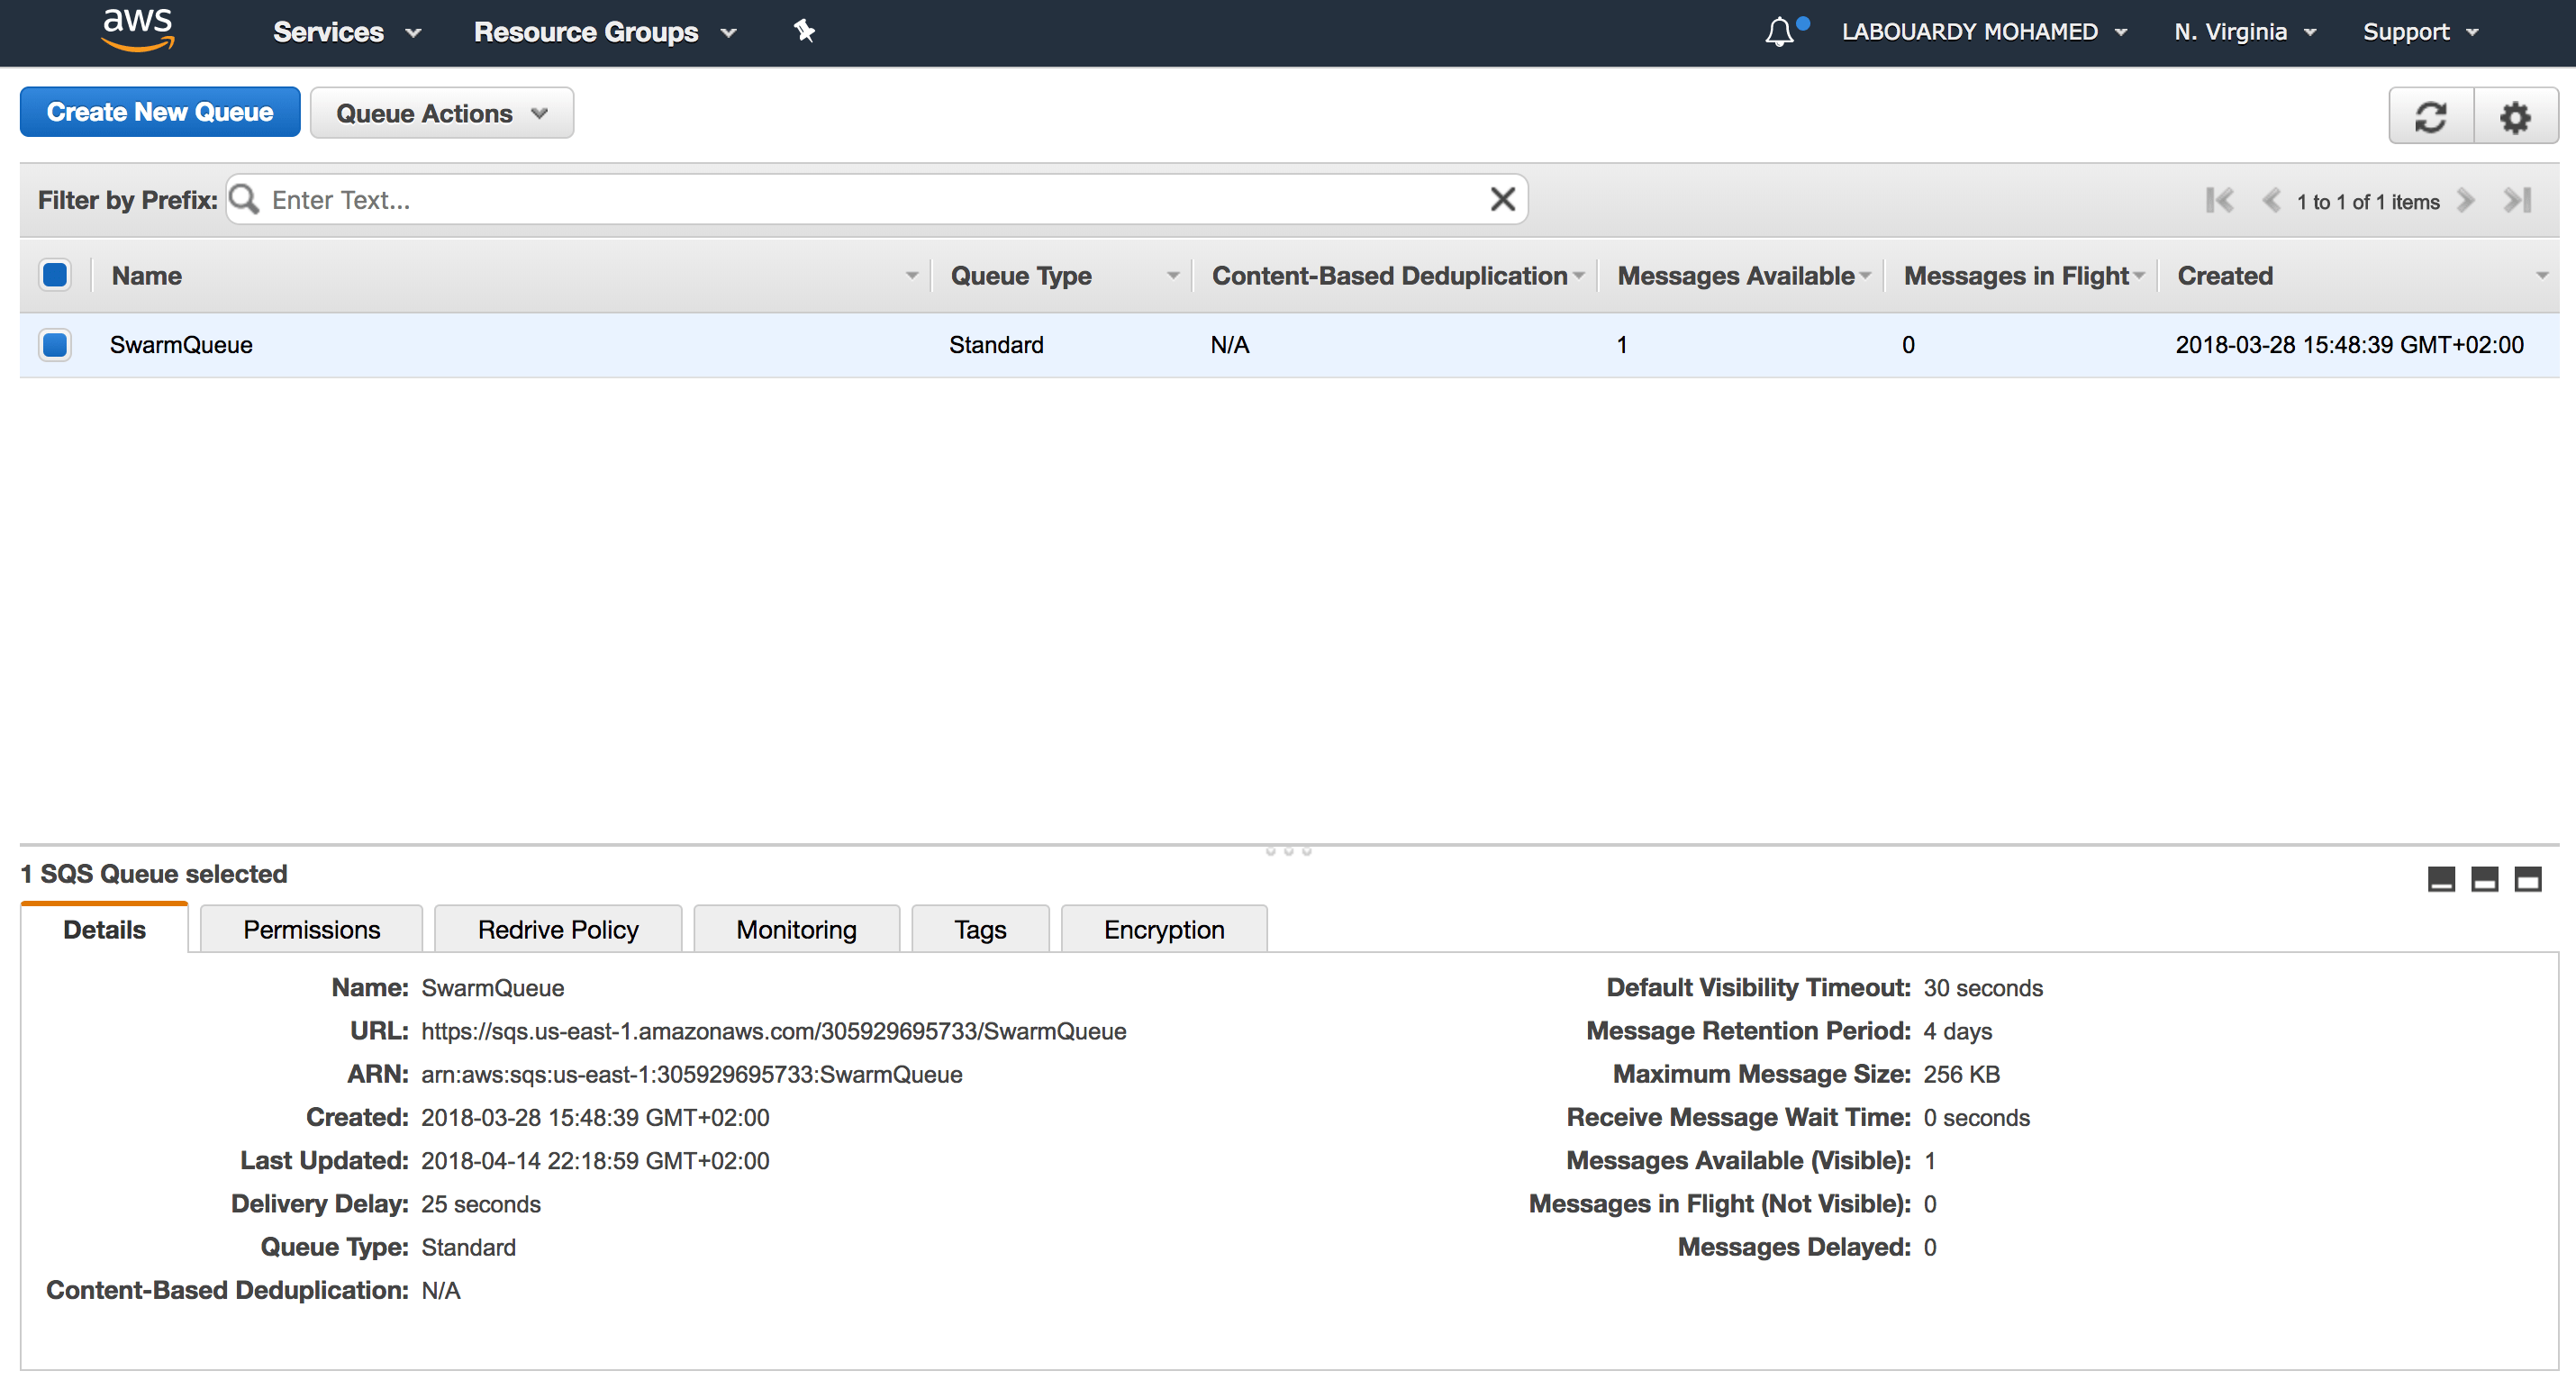
The Lambda Function will use the AWS EC2 API to deploy a fleet of EC2 instances from an AMI with Docker CE preinstalled (I used Packer to bake the AMI to reduce the cold-start of the instances). Then, push the cluster IP addresses to a SQS:


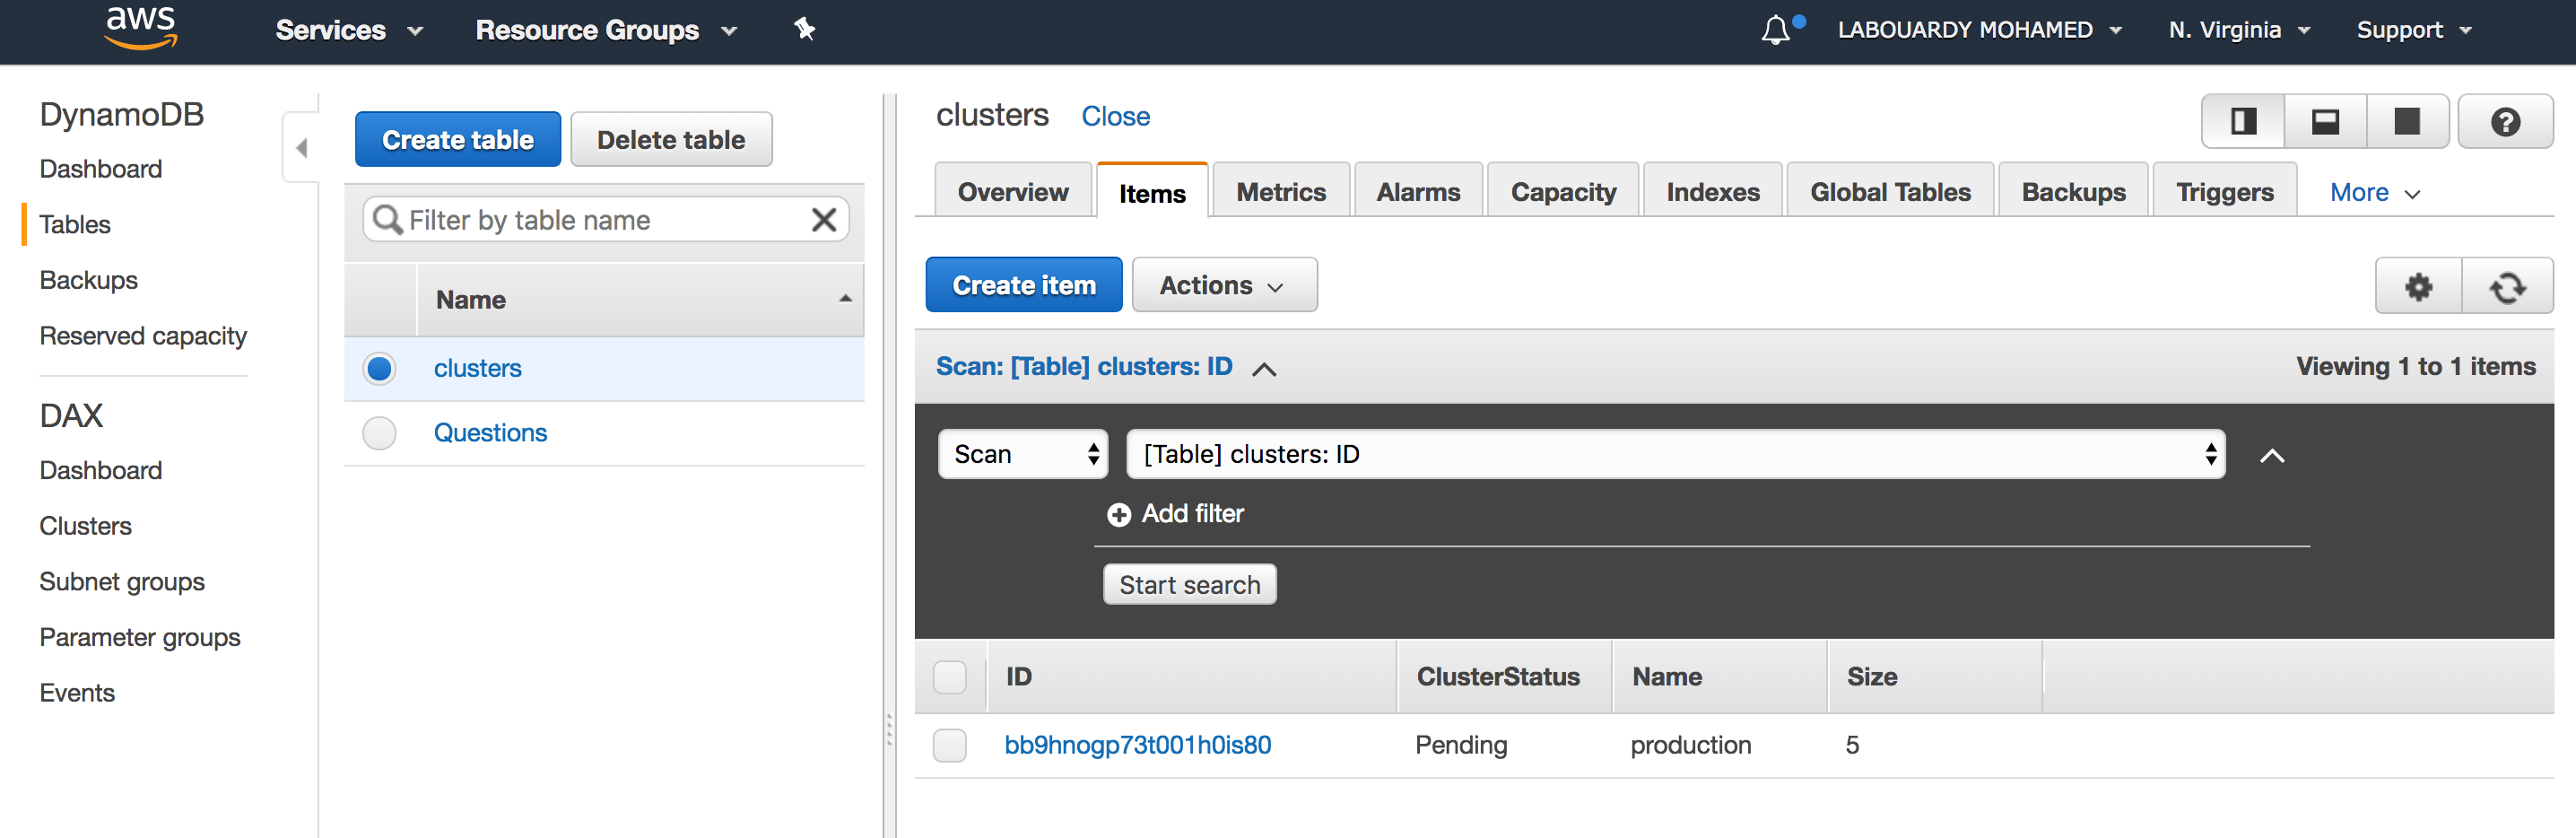
Next, the function will insert a new item to a DynamoDB table with the current state of the cluster:


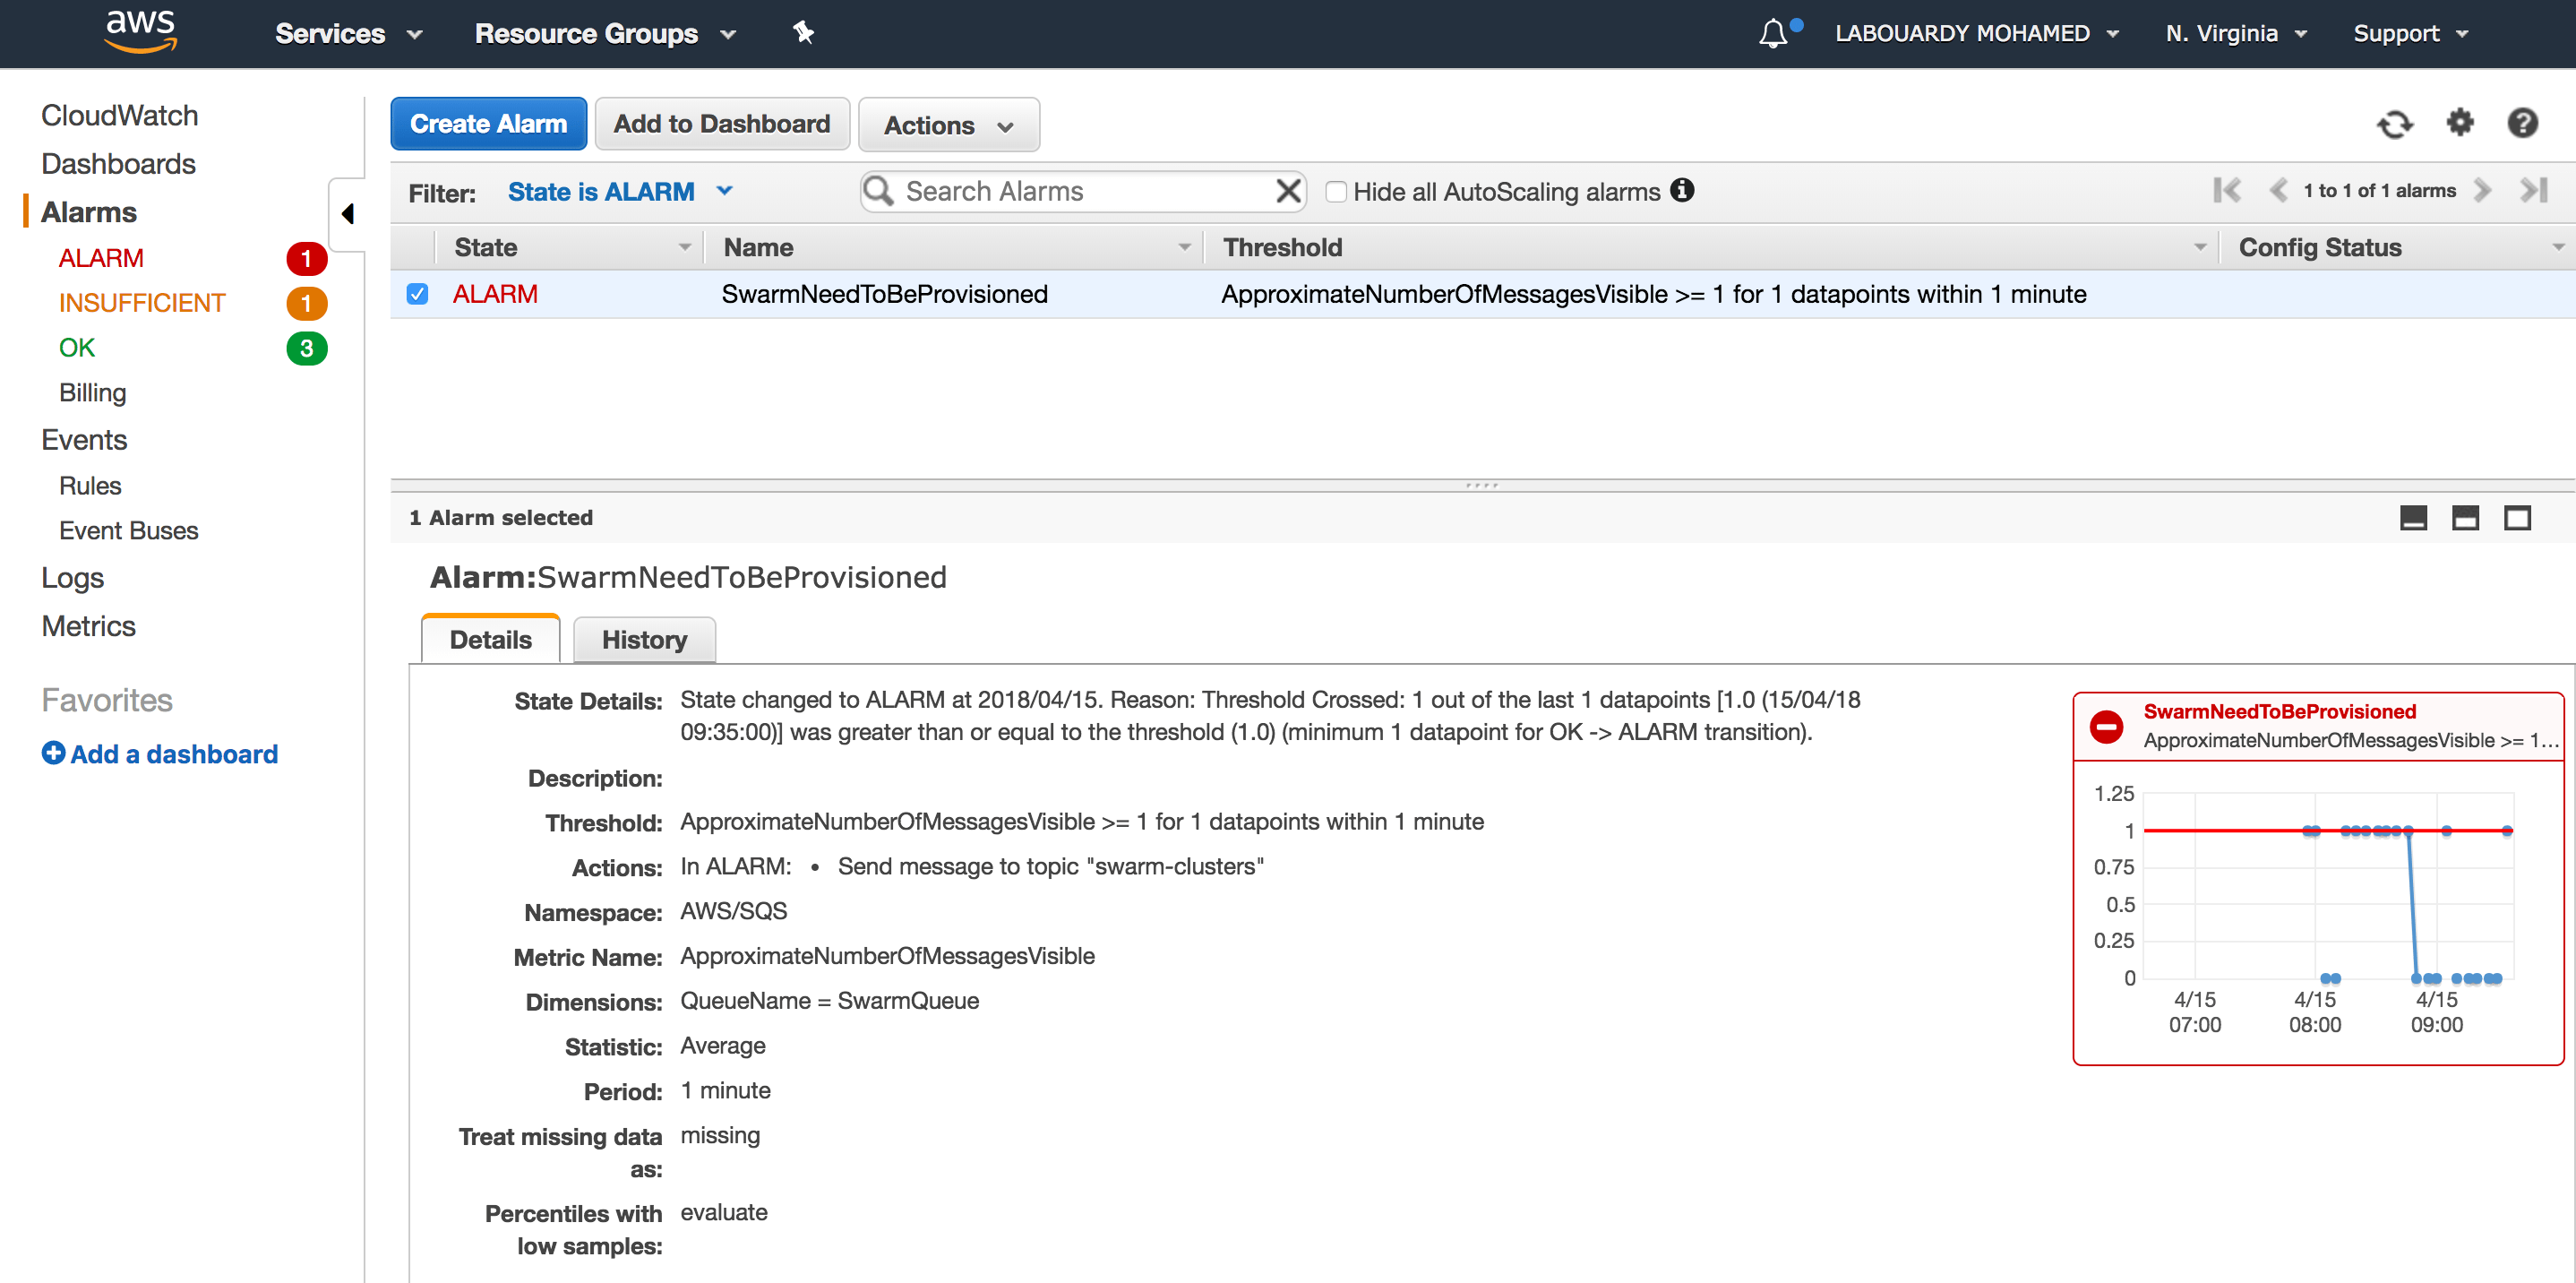
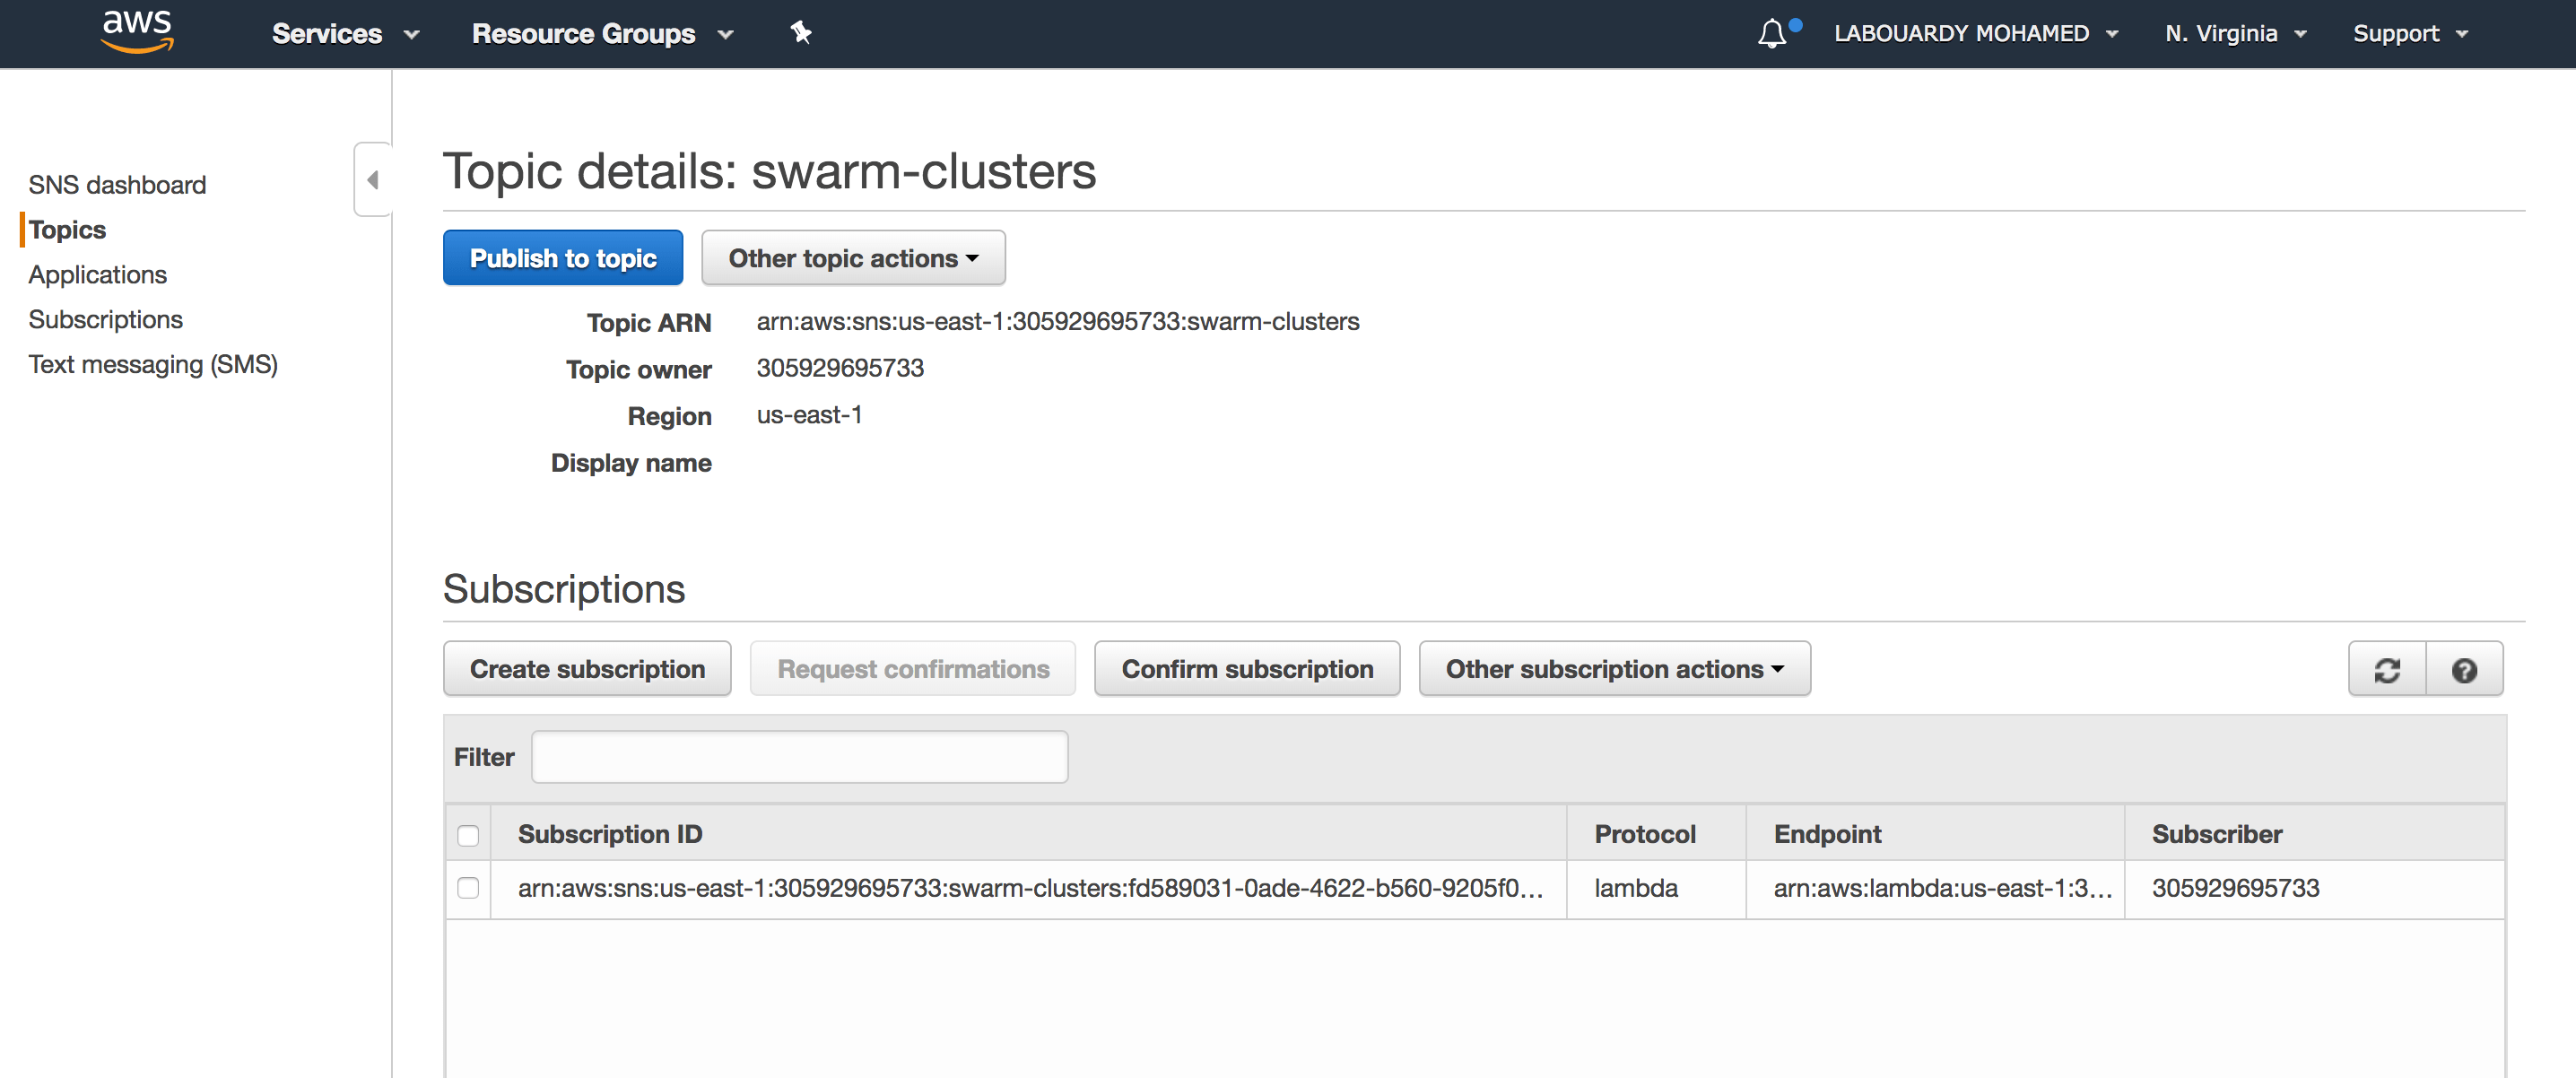
Once the SQS received the message, a CloudWatch alarm (it monitors the ApproximateNumberOfMessagesVisible parameter) will be triggered and as a result it will publish a message to an SNS topic:


The SNS topic triggers a subscribed Lambda function:


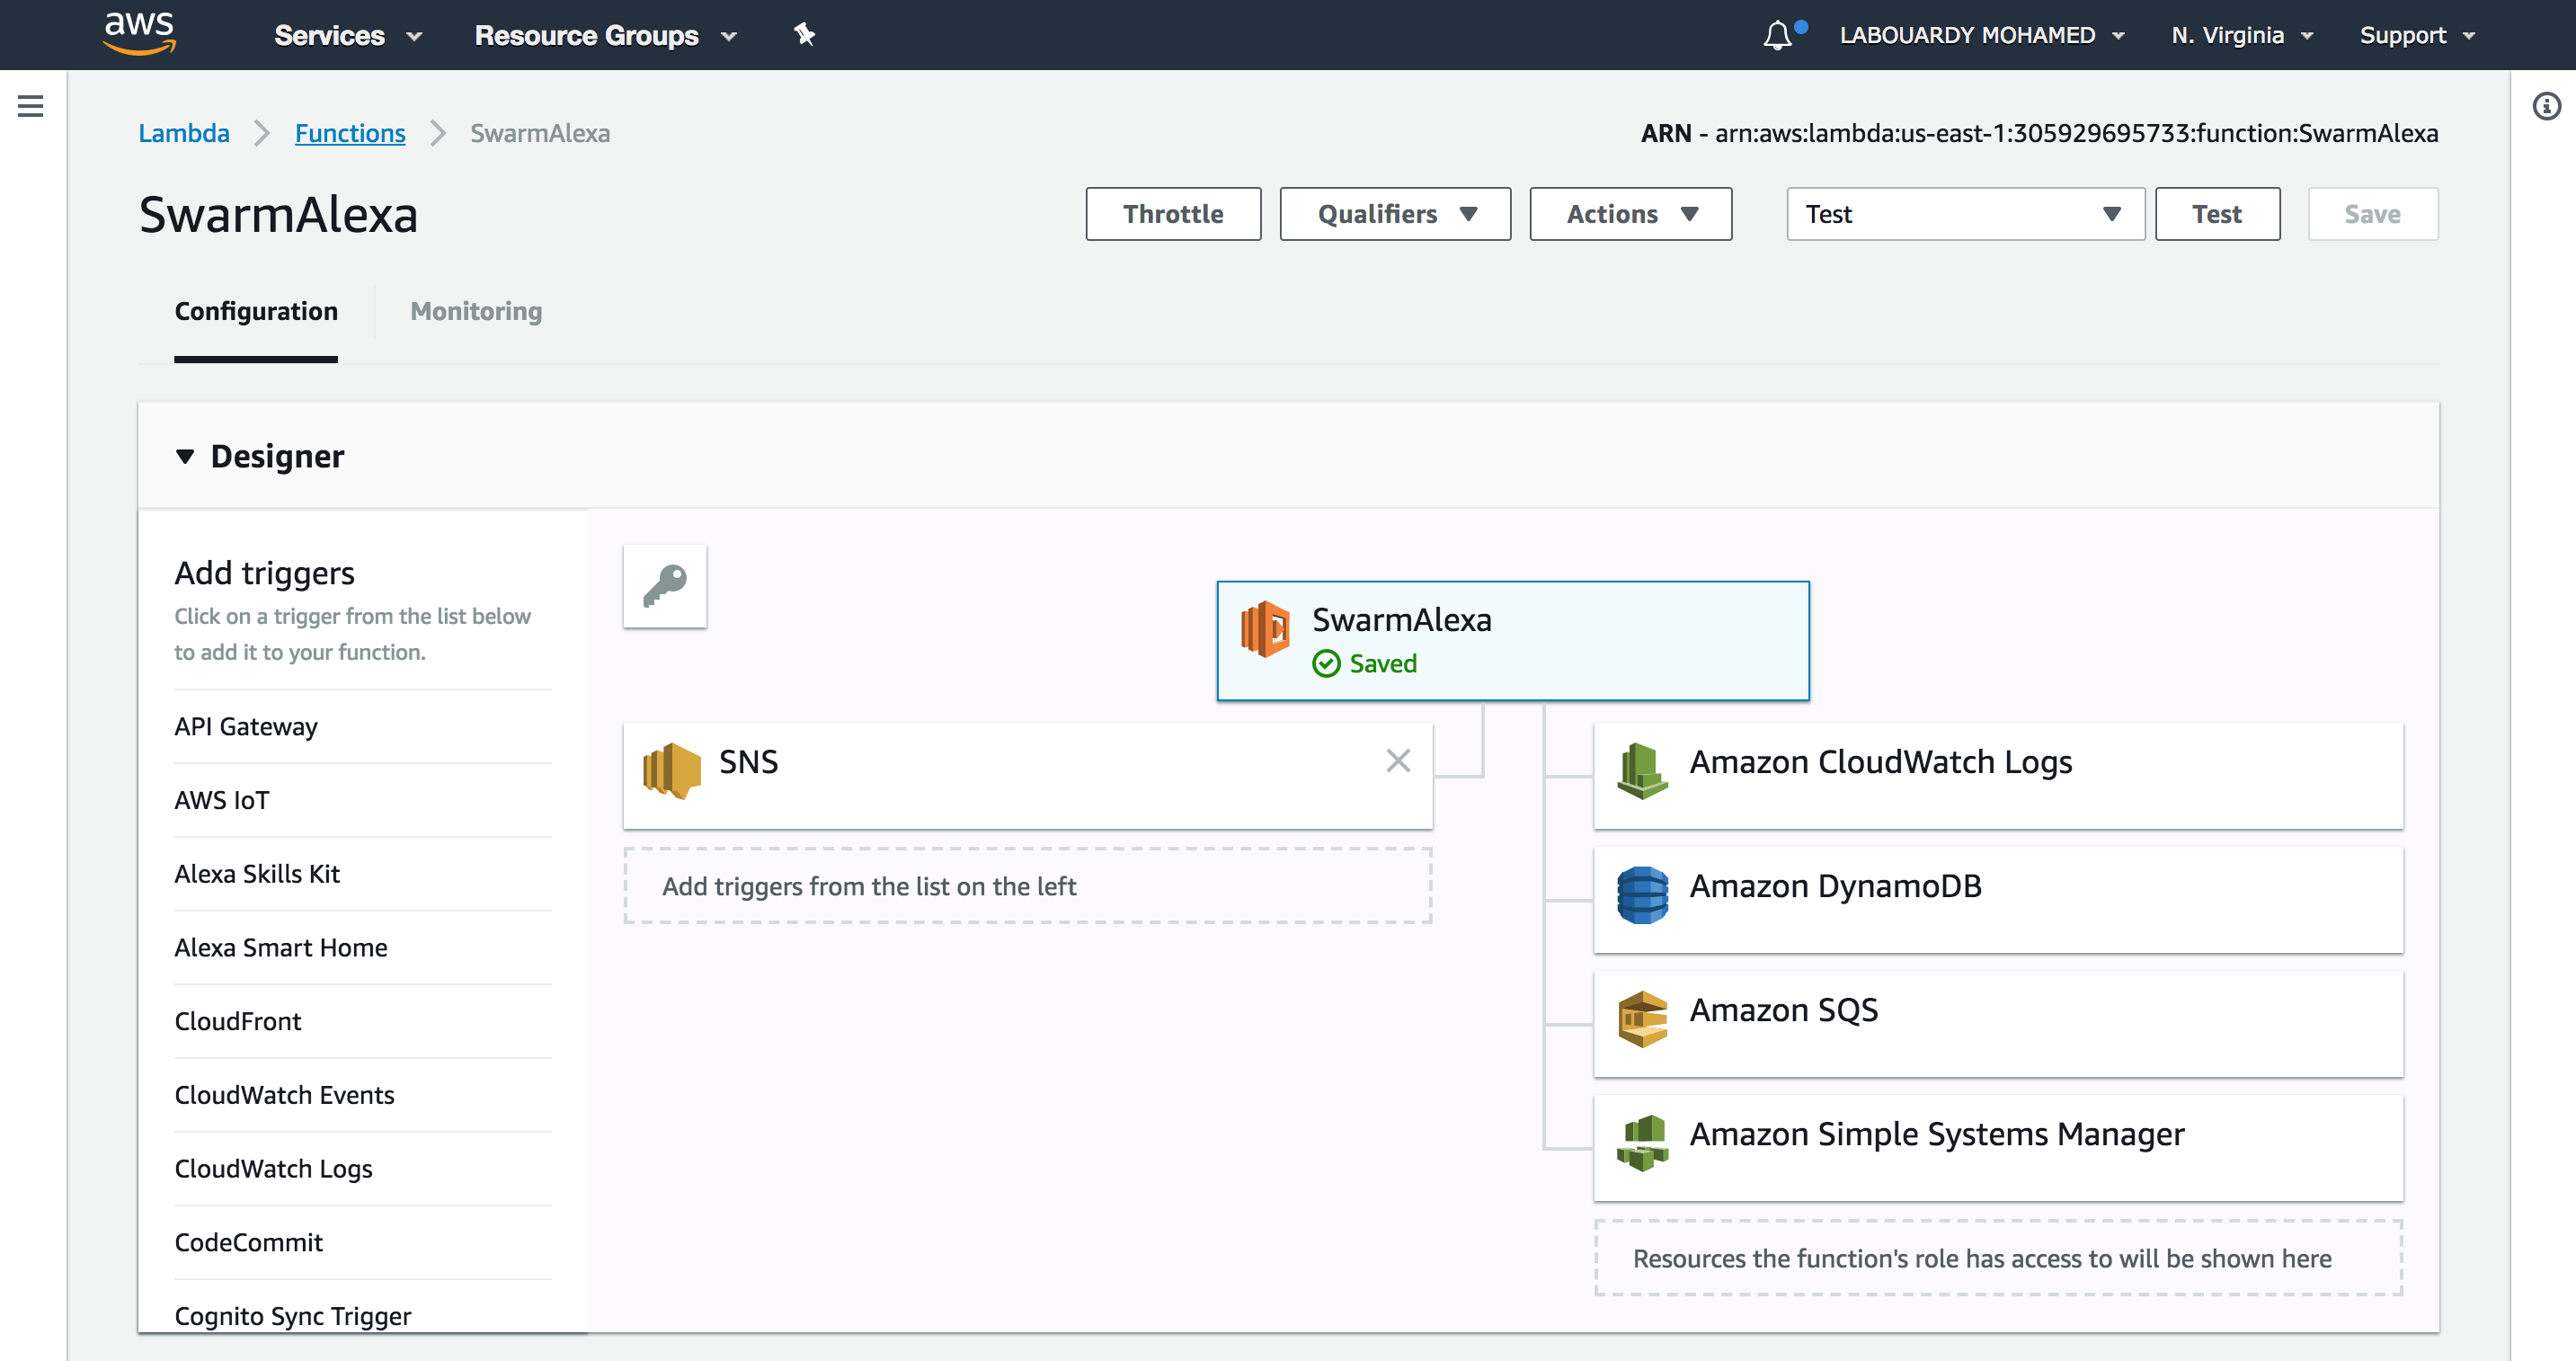
The Lambda function will pull the queue for a new cluster and use the AWS System Manager API to provision a Swarm cluster on the fleet of EC2 instances created earlier:


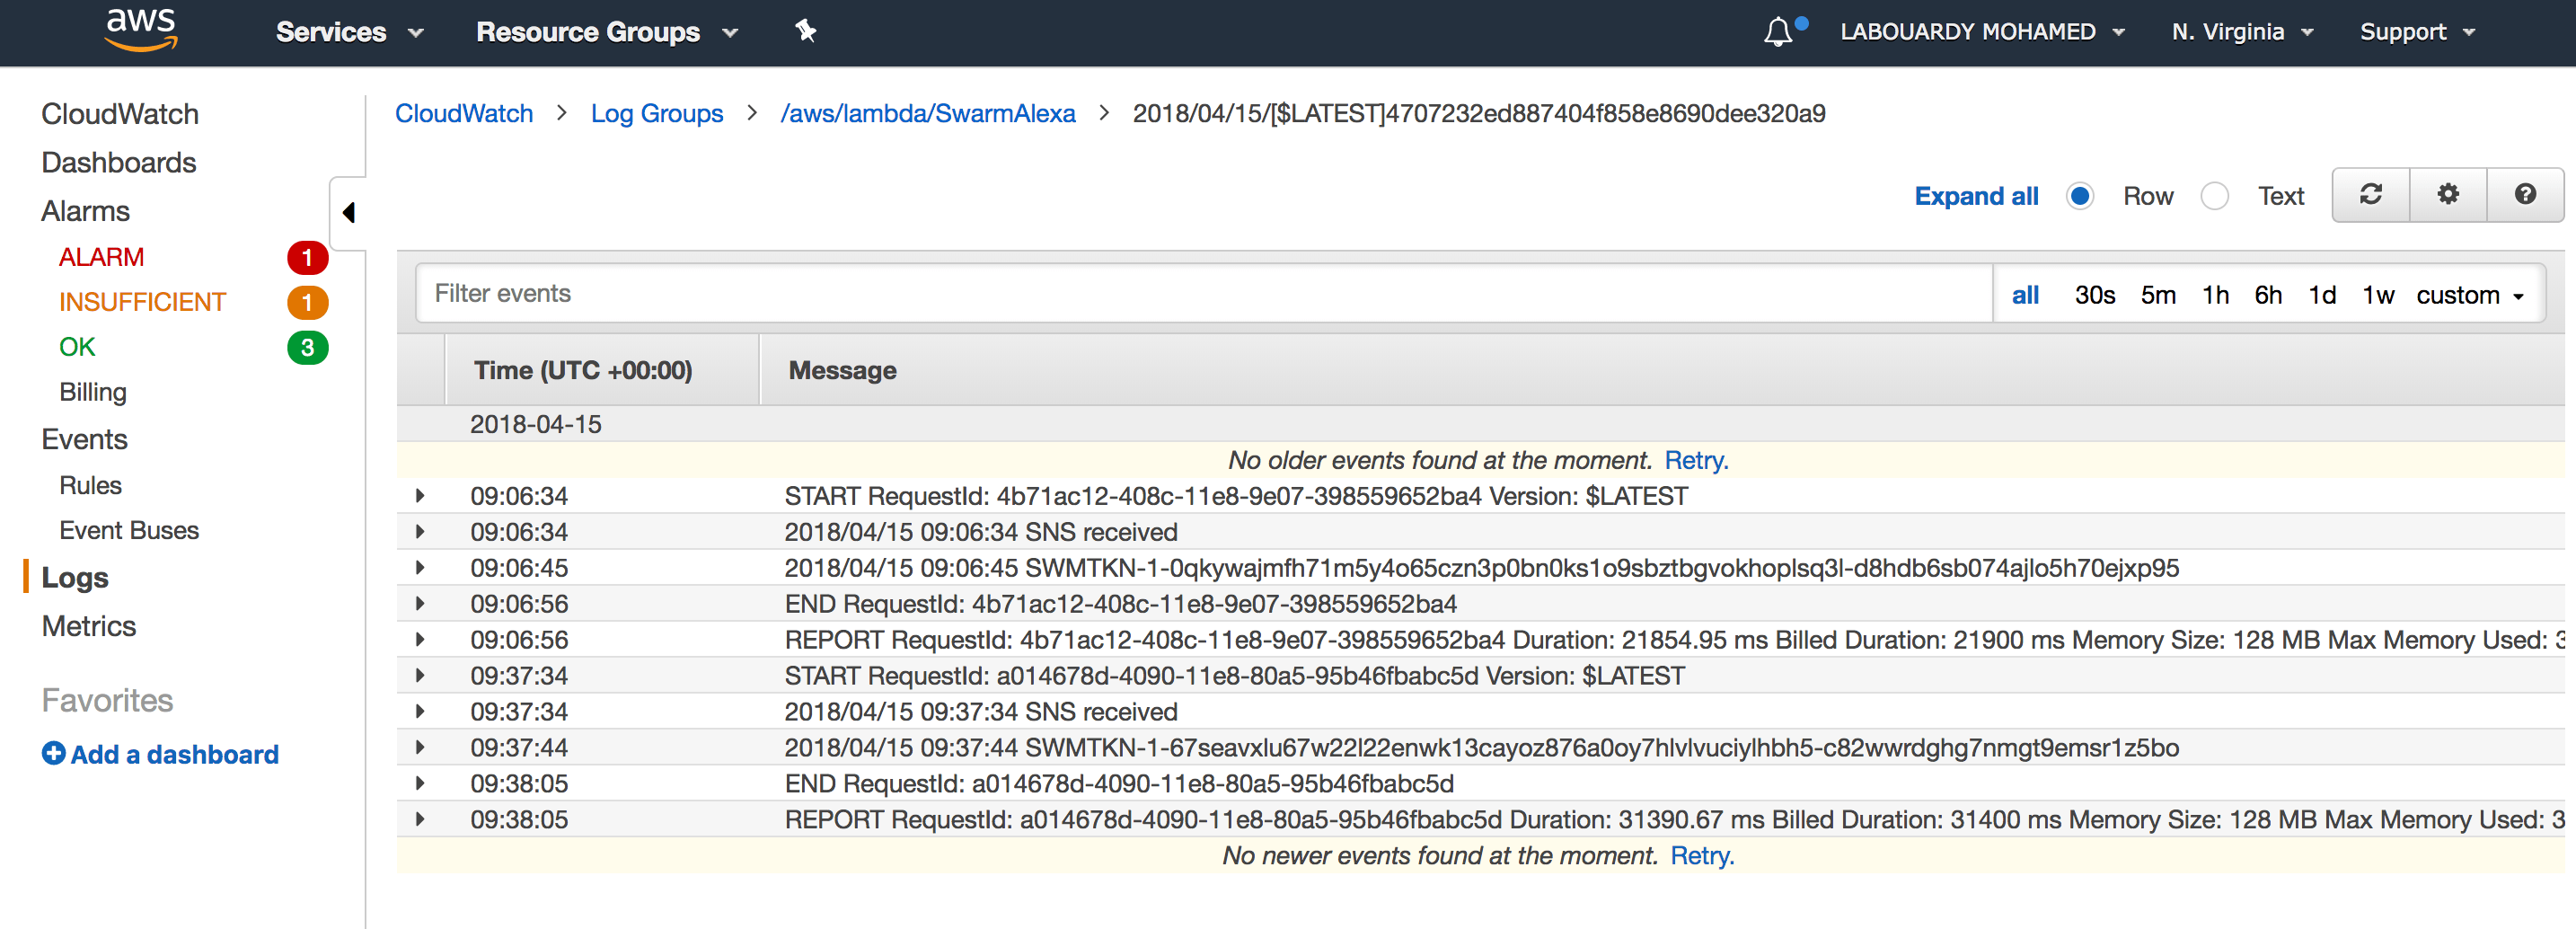
For debugging, the function will output the Swarm Token to CloudWatch:


Finally, it will update the DynamoDB item state from Pending to Done and delete the message from SQS.

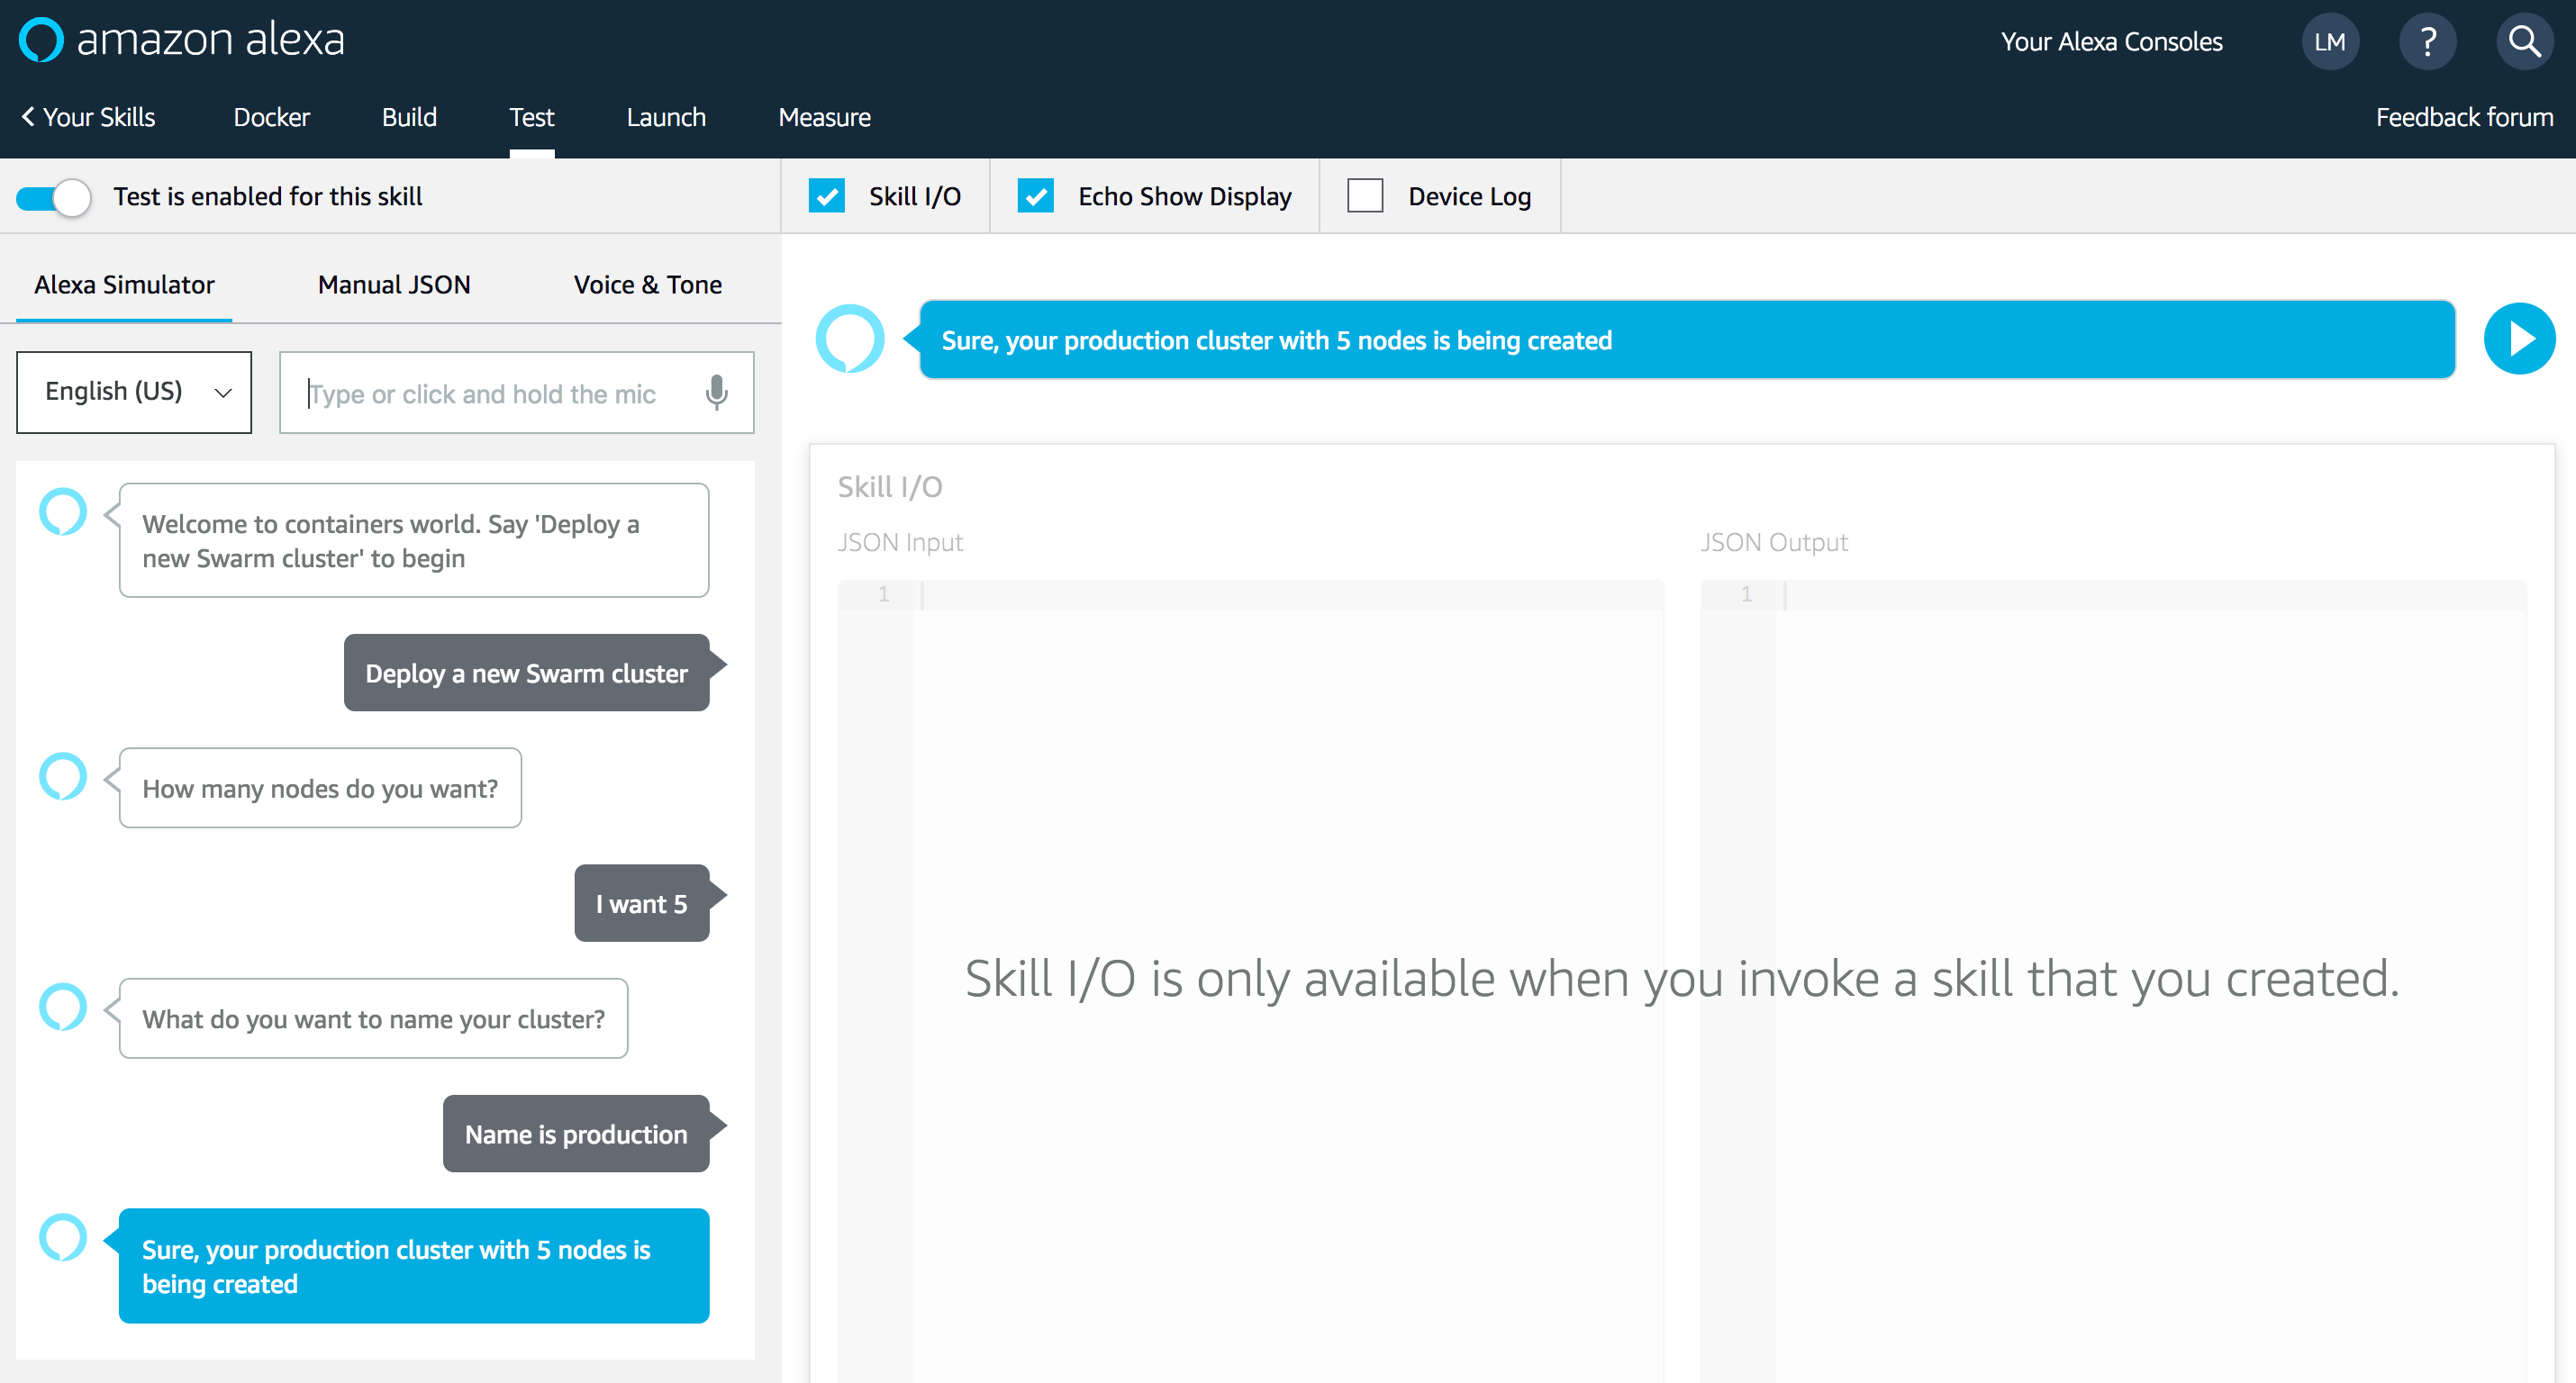
You can test your skill on your Amazon Echo, Echo Dot, or any Alexa device by saying, “Alexa, open Docker


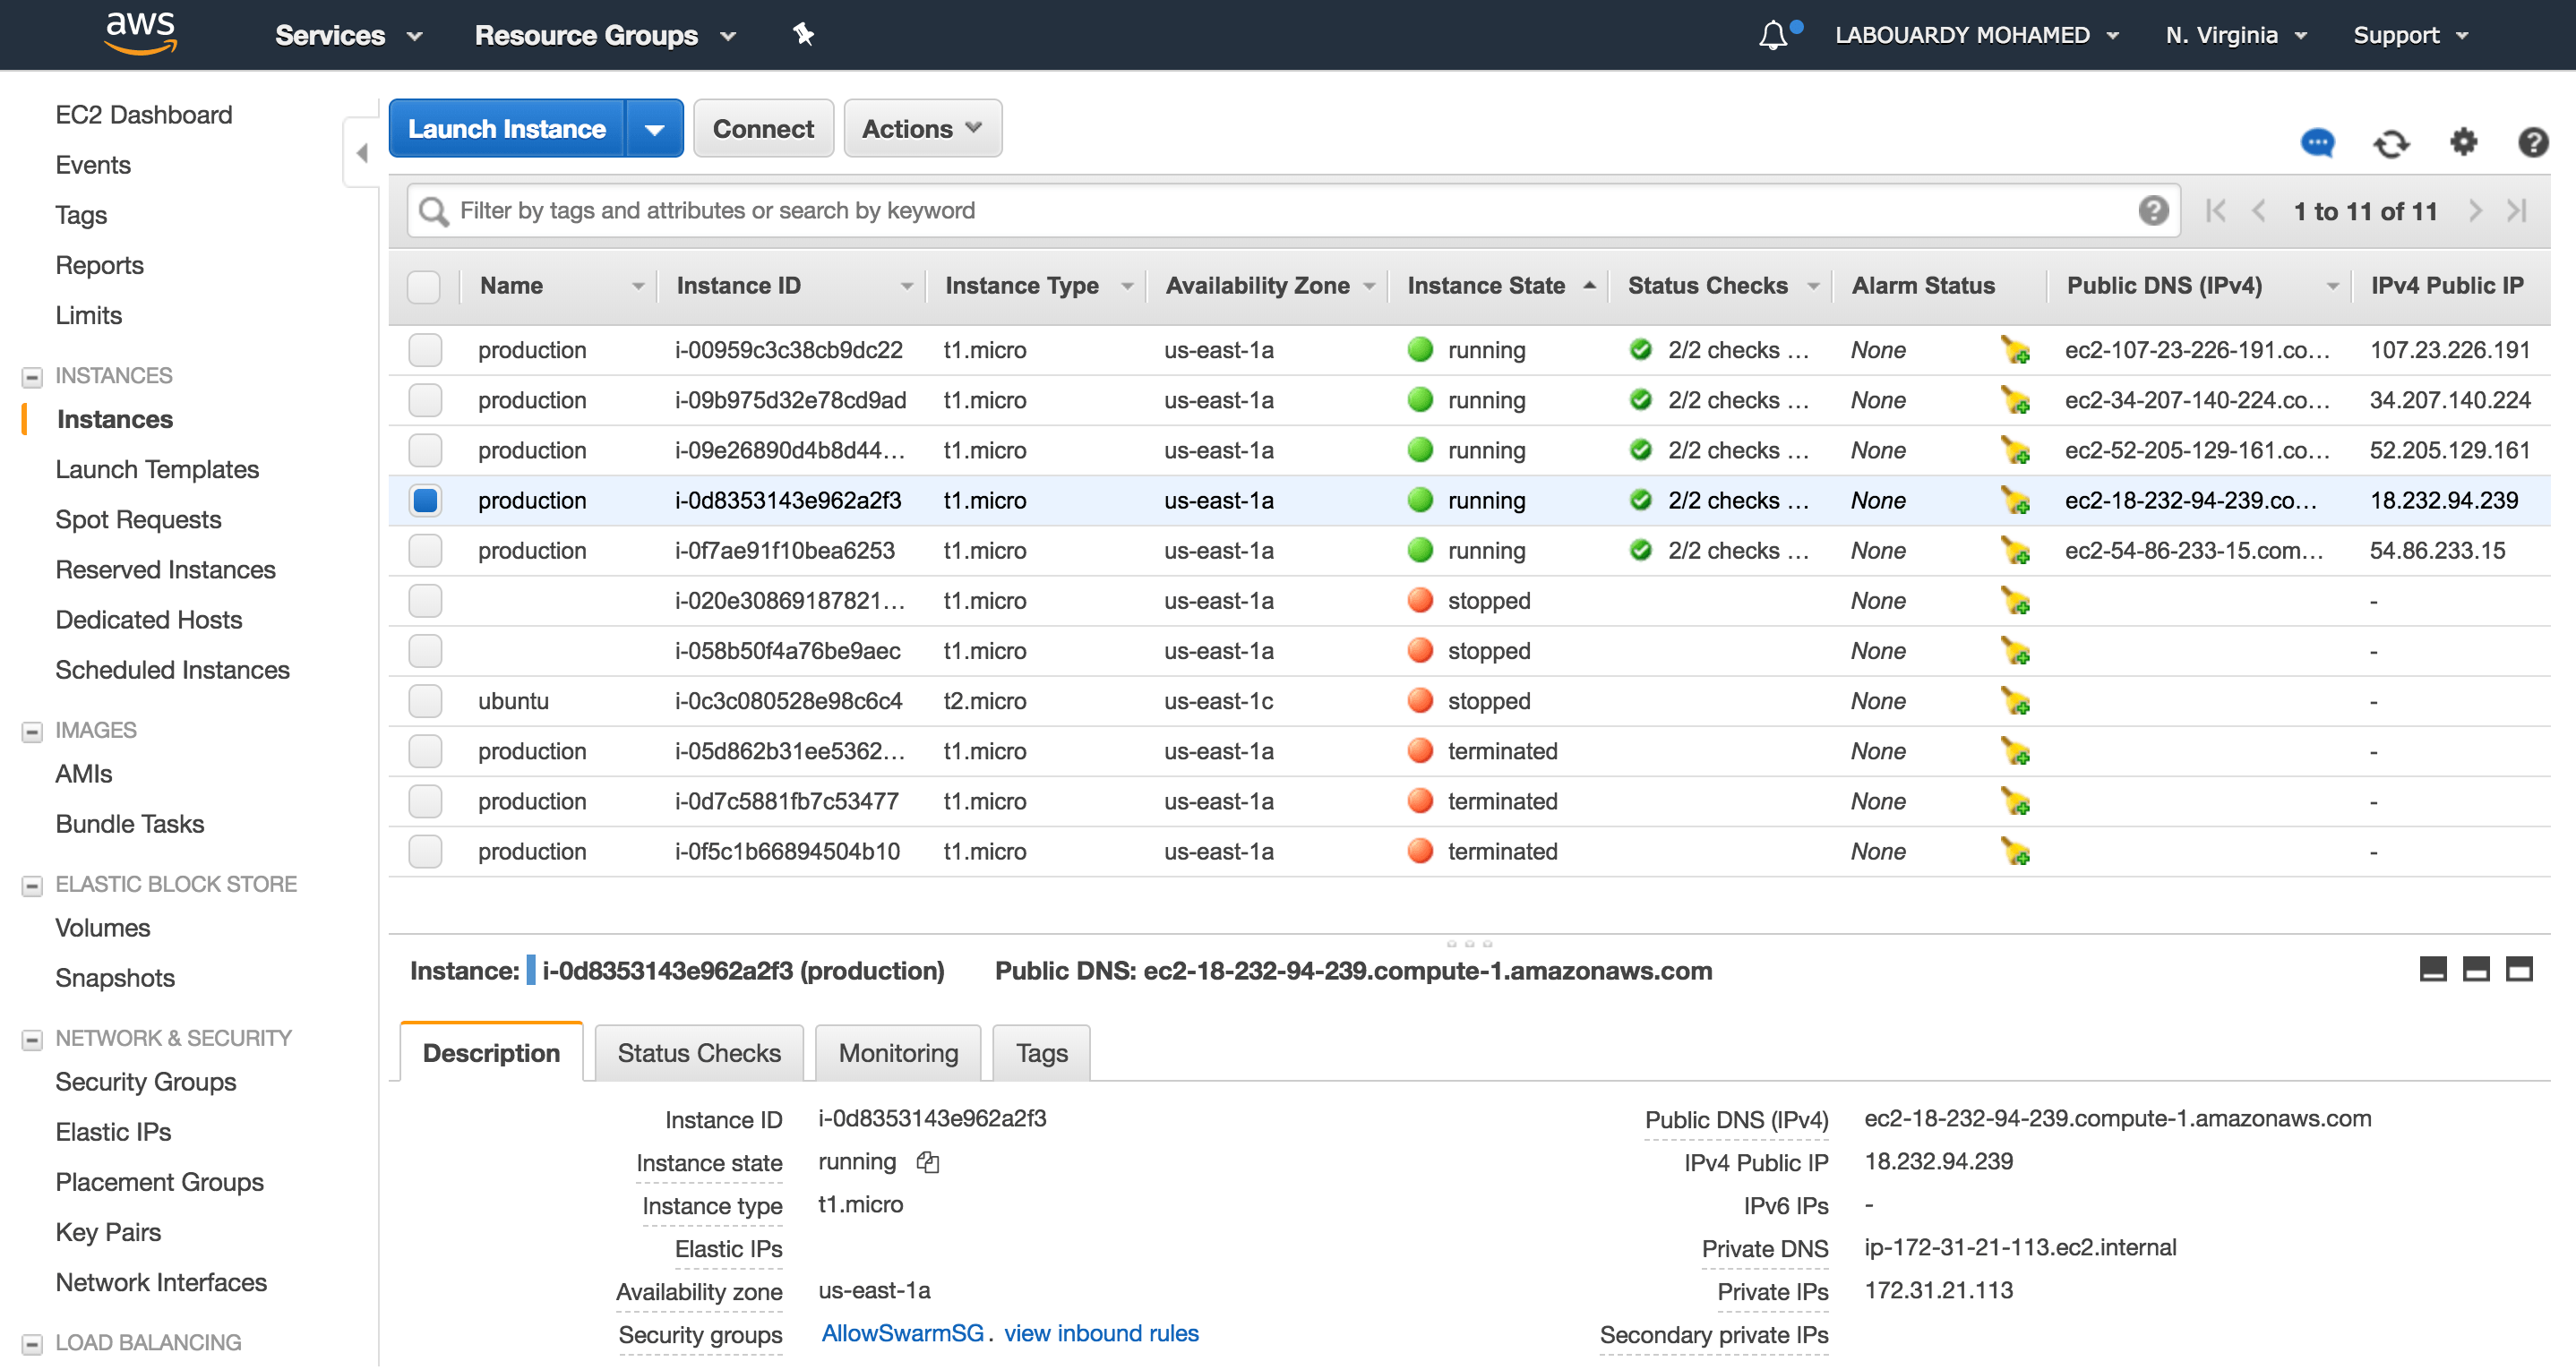
At the end of the workflow described above, a Swarm cluster will be created:


At this point you can see your Swarm status by firing the following command as shown below:


Improvements & Limitations:

  • Lambda execution timeout if the cluster size is huge. You can use a Master Lambda function to spawn child Lambda.
  • CloudWatch & SNS parts can be deleted if SQS is supported as Lambda event source (AWS PLEAAASE !). DynamoDB streams or Kinesis streams cannot be used to notify Lambda as I wanted to create some kind of delay for the instances to be fully created before setting up the Swarm cluster. (maybe Simple Workflow Service ?)
  • Inject SNS before SQS. SNS can add the message to SQS and trigger the Lambda function. We won’t need CloudWatch Alarm.
  • You can improve the Skill by adding new custom intents to deploy Docker containers on the cluster or ask Alexa to deploy the cluster on a VPC

In-depth details about the skill can be found on my GitHub. Make sure to drop your comments, feedback, or suggestions below — or connect with me directly on Twitter @mlabouardy.

Immutable AMI with Packer

When dealing with Hybrid or multi-cloud environments, you would need to have an identical machine images for multiple platforms from a single source configuration. That’s were Packer comes into play.

To get started, find the appropriate package for your system and download Packer:

1
2
curl https://releases.hashicorp.com/packer/1.2.2/packer_1.2.2_darwin_amd64.zip -O /usr/local/bin/packer
chmod +x packer

With Packer installed, let’s just dive right into it and bake our AMI with a preinstalled Docker Engine in order to build a Swarm or Kubernetes cluster and avoid cold-start of node machines.

Packer is template-driven, templates are written in JSON format:

1
2
3
4
5
6
7
8
9
10
11
12
13
14
15
16
17
18
19
20
21
22
23
24
25
26
27
28
{
"variables" : {
"region" : "us-east-1"
},
"builders" : [
{
"type" : "amazon-ebs",
"profile" : "default",
"region" : "{{user `region`}}",
"instance_type" : "t2.micro",
"source_ami" : "ami-1853ac65",
"ssh_username" : "ec2-user",
"ami_name" : "docker-17.12.1-ce",
"ami_description" : "Amazon Linux Image with Docker-CE",
"run_tags" : {
"Name" : "packer-builder-docker",
"Tool" : "Packer",
"Author" : "mlabouardy"
}
}
],
"provisioners" : [
{
"type" : "shell",
"script" : "./setup.sh"
}
]
}

The template is divided into 3 sections:

  • variables: Custom variables that can be overriden during runtime by using the -var flag. In the above snippet, we’re specifying the AWS region.
  • builders: You can specify multiple builders depending on the target platforms (EC2, VMware, Google Cloud, Docker …).
  • provisioners: You can pass a shell script or use configuration managements tools like Ansible, Chef, Puppet or Salt to provision the AMI and install all required packages and softwares.

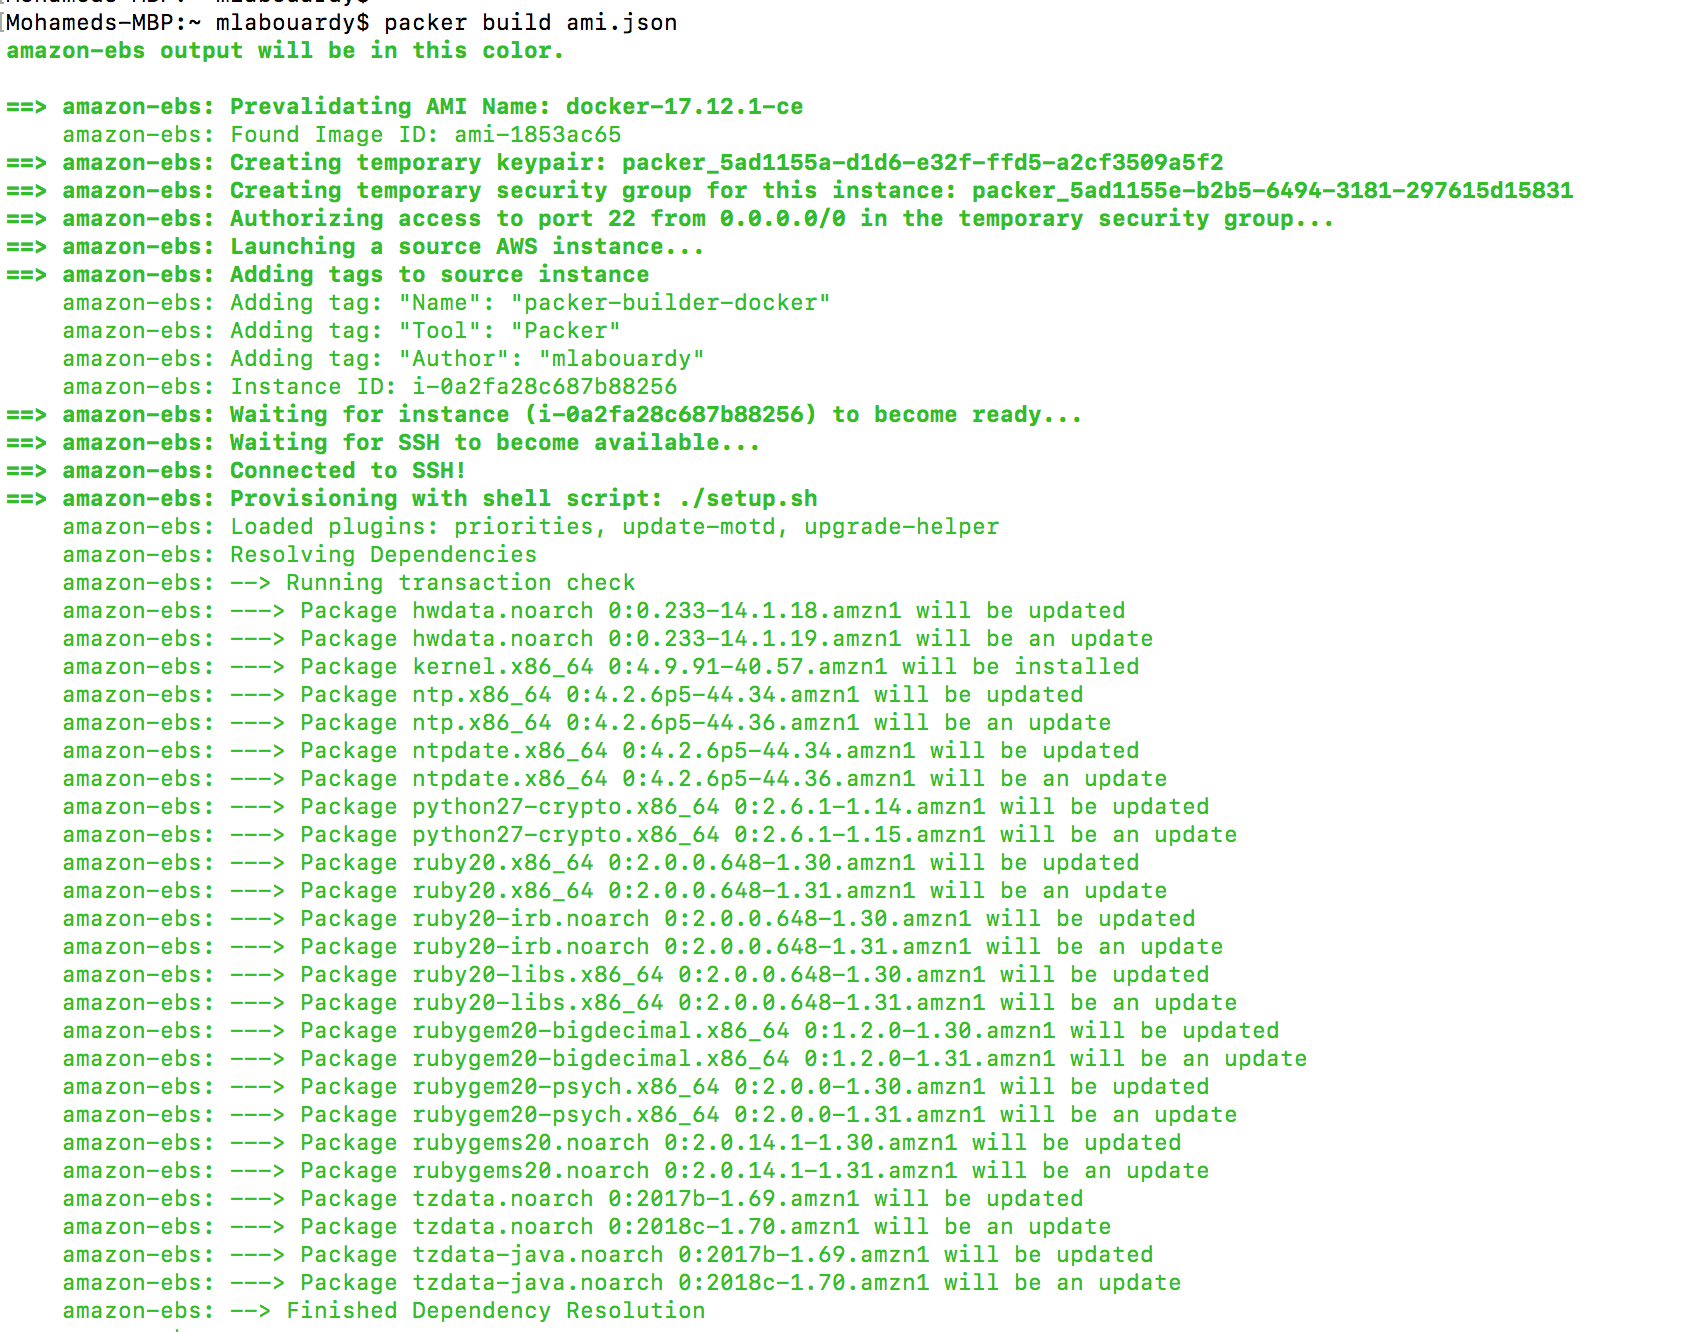
Packer will use an existing Amazon Linux Image “Gold Image” from the marketplace and install the latest Docker community edition using the following Bash script:

1
2
3
4
5
6
#/bin/sh

sudo yum update -y
sudo yum install docker -y
sudo service docker start
sudo usermod -aG docker ec2-user

Note: You can avoid hardcoding the Gold Image ID in the template by using the source_ami_filter attribute.

Before we take the template and build an image from it, let’s validate the template by running:

1
packer validate ami.json

Now that we have our template file and bash provisioning script ready to go, we can issue the following command to build our new AMI:

1
packer build ami.json


This will chew for a bit and finally output the AMI ID:


Next, create a new EC2 instance based on the AMI:

1
2
3
4
5
aws ec2 run-instances --image-id ami-3fbc1940
--count 1 --instance-type t2.micro
--key-name KEY_NAME --security-group-ids SG_ID
--region us-east-1
--tag-specifications 'ResourceType=instance,Tags=[{Key=Name,Value=demo}]'

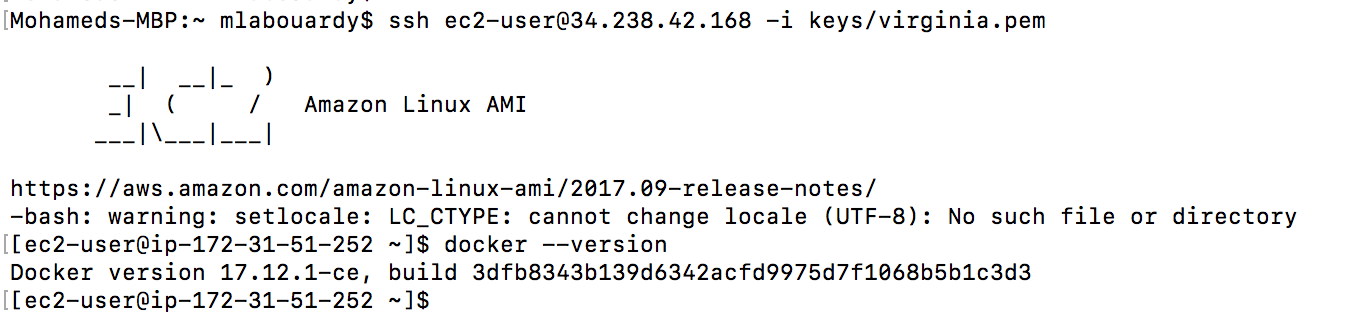
Then, connect to your instance via SSH and type the following command to verify Docker latest release is installed:


Simple right ? Well, you can go further and setup a CI/CD pipeline to build your AMIs on every push, recreate your EC2 instances with the new AMIs and rollback in case of failure.


Drop your comments, feedback, or suggestions below — or connect with me directly on Twitter @mlabouardy.

Become AWS Certified Developer with Alexa

Being an AWS Certified can boost your career (increasing your salary, finding better job or getting a promotion) and make your expertise and skills relevant. Hence, there’s no better way to prepare for your AWS Certified Developer Associate exam than getting your hands dirty and build a Serverless Quiz game with Alexa Skill and AWS Lambda.


Note: all the code is available in my GitHub.

1 – DynamoDB

To get started, create a DynamoDB Table using the AWS CLI:

1
2
3
4
5
aws dynamodb create-table --table-name Questions
--attribute-definitions AttributeName=ID,AttributeType=S
--key-schema AttributeName=ID,KeyType=HASH
--provisioned-throughput ReadCapacityUnits=5,WriteCapacityUnits=5
--region AWS_REGION

I prepared in advance a list of questions for the following AWS services:


1
2
3
4
5
6
7
8
9
10
11
12
13
14
15
16
17
18
19
20
21
22
23
24
25
[
{
"category" : "S3",
"questions" : [
{
"question": "In S3 what can be used to delete a large number of objects",
"answers" : {
"A" : "QuickDelete",
"B" : "Multi-Object Delete",
"C" : "Multi-S3 Delete",
"D" : "There is no such option available"
},
"correct" : "B"
},
{
"question": "S3 buckets can contain both encrypted and non-encrypted objects",
"answers" : {
"A" : "False",
"B" : "True"
},
"correct" : "B"
}
]
}
]

Next, import the JSON file to the DynamoDB table:

1
2
3
4
5
6
7
8
9
10
11
12
13
14
15
16
17
18
19
20
21
22
23
24
25
26
func main() {
cfg, err := external.LoadDefaultAWSConfig()
if err != nil {
log.Fatal(err)
}

raw, err := ioutil.ReadFile("questions.json")
if err != nil {
log.Fatal(err)
}

services := make([]Service, 0)
json.Unmarshal(raw, &services)

for _, service := range services {
fmt.Printf("AWS Service: %s\n", service.Category)
fmt.Printf("\tQuestions: %d\n", len(service.Questions))
for _, question := range service.Questions {
err = insertToDynamoDB(cfg, service.Category, question)
if err != nil {
log.Fatal(err)
}
}
}

}

The insertToDynamoDB function uses the AWS DynamoDB SDK and PutItemRequest method to insert an item into the table:

1
2
3
4
5
6
7
8
9
10
11
12
13
14
15
16
17
18
19
20
21
22
23
24
25
26
27
28
29
func insertToDynamoDB(cfg aws.Config, category string, question Question) error {
tableName := os.Getenv("TABLE_NAME")

item := DBItem{
ID: xid.New().String(),
Category: category,
Question: question.Question,
Answers: question.Answers,
Correct: question.Correct,
}

av, err := dynamodbattribute.MarshalMap(item)
if err != nil {
fmt.Println(err)
return err
}

svc := dynamodb.New(cfg)
req := svc.PutItemRequest(&dynamodb.PutItemInput{
TableName: &tableName,
Item: av,
})
_, err = req.Send()
if err != nil {
return err
}

return nil
}

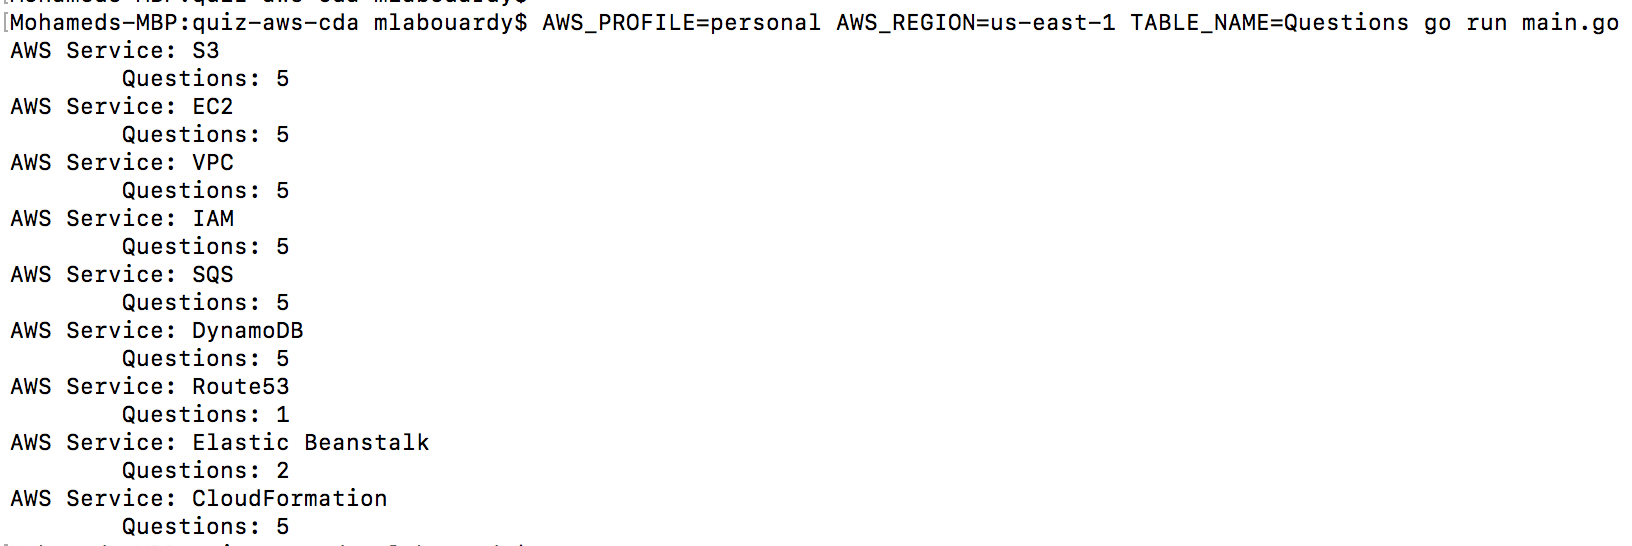
Run the main.go file by issuing the following command:


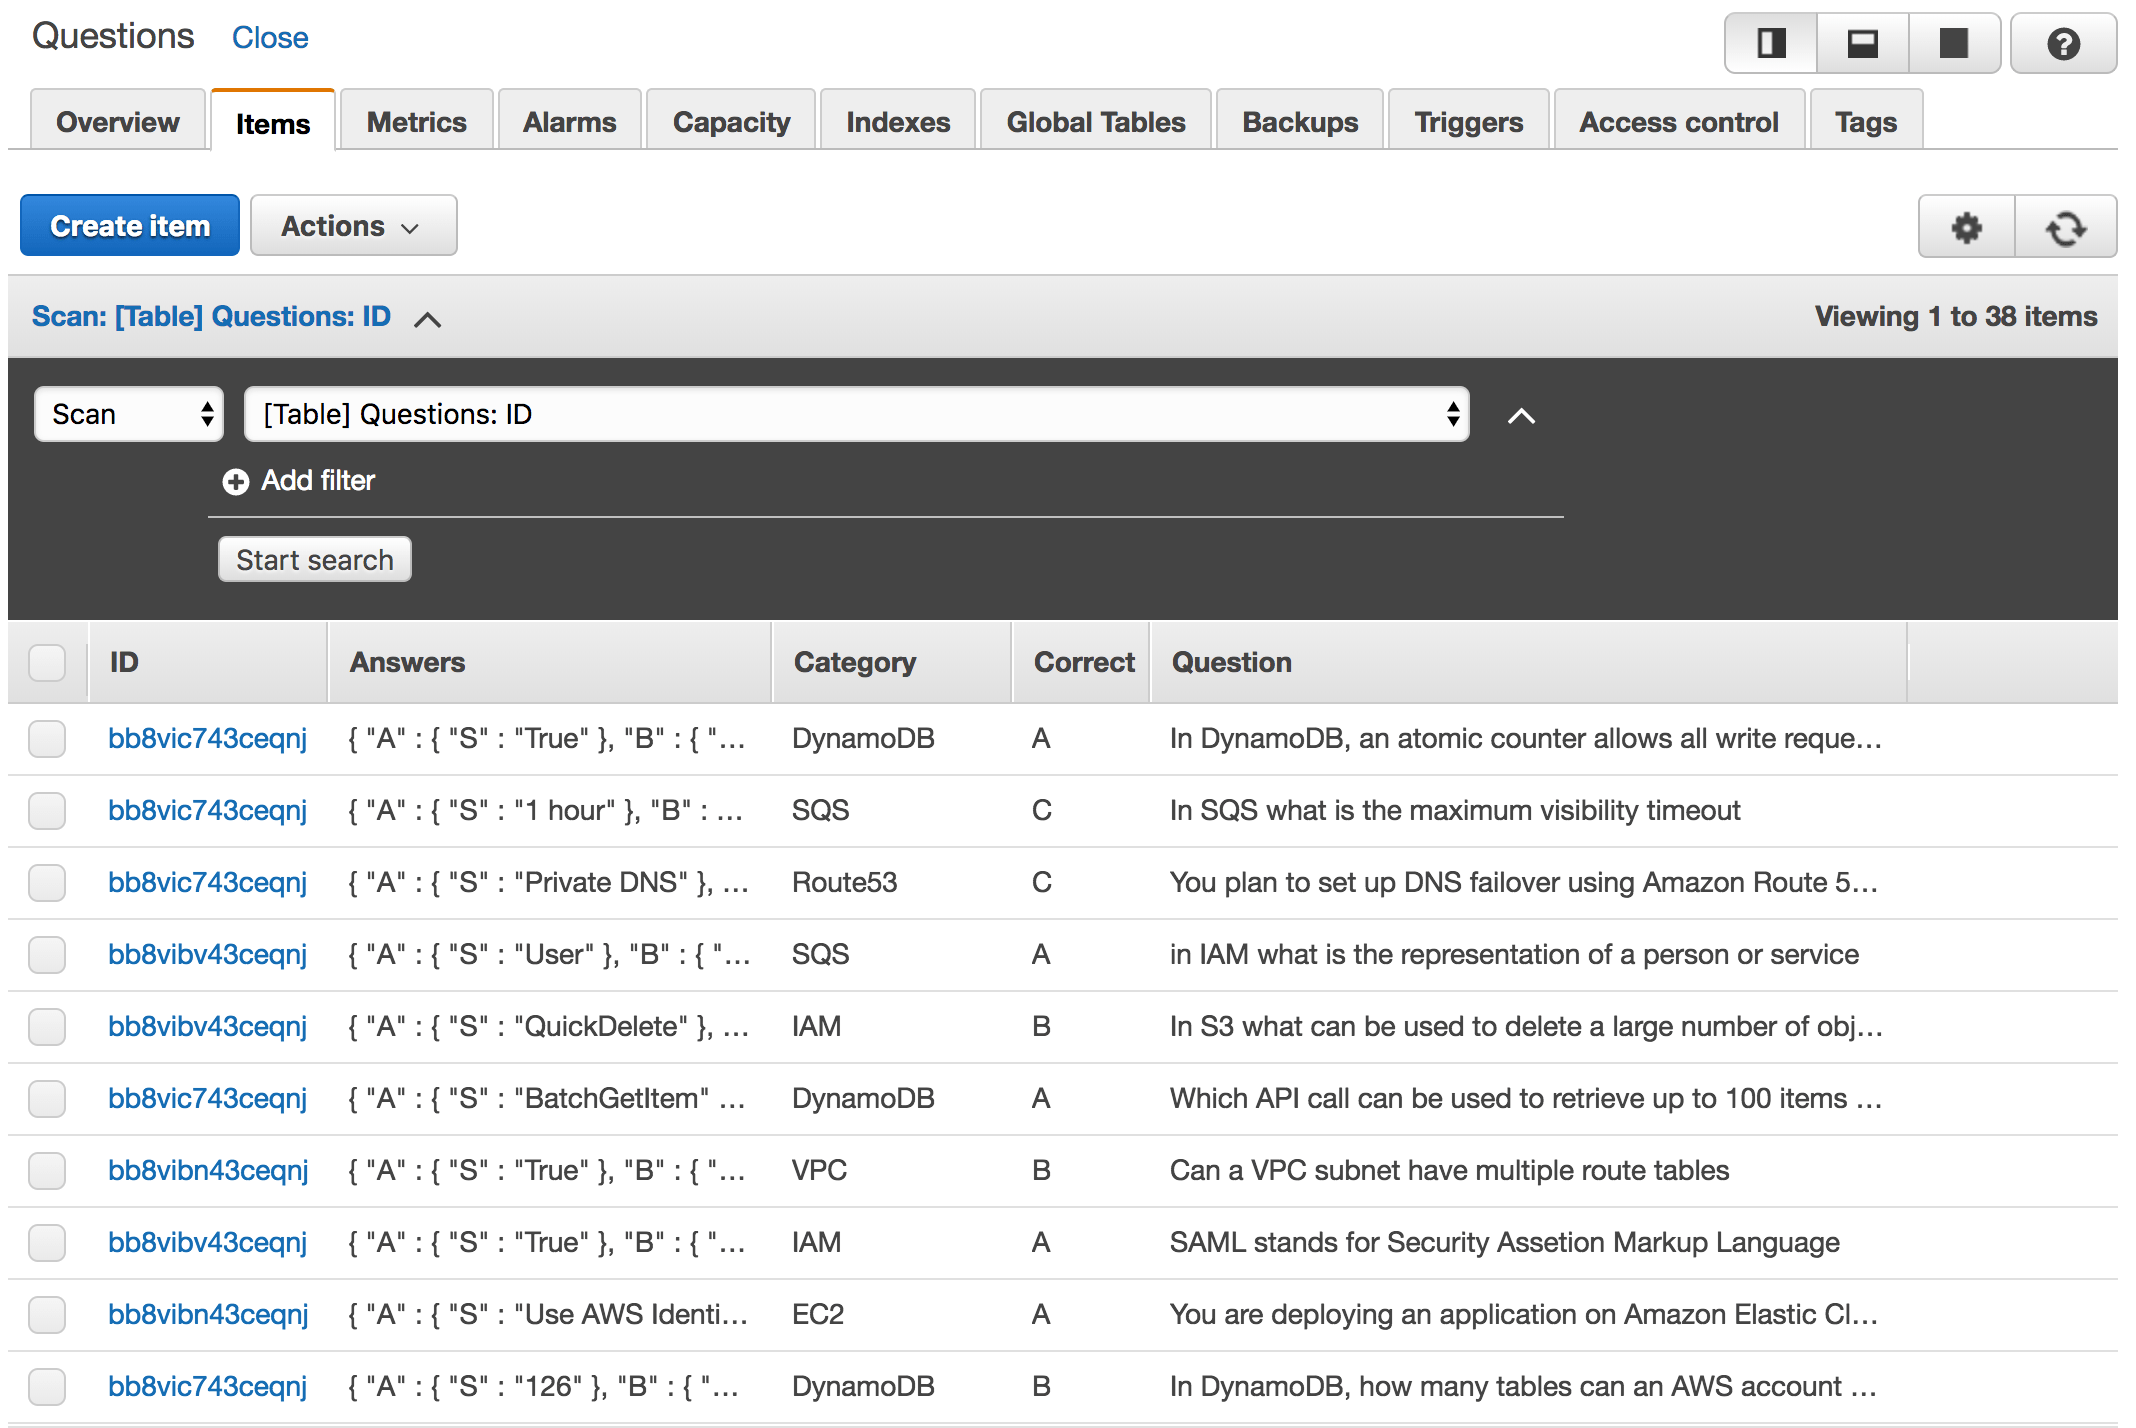
If you navigate to DynamoDB Dashboard, you should see that the list of questions has been successfully inserted:


2 – Alexa Skill

This is what ties it all together, by linking the phrases the user says to interact with the quiz to the intents.

For people who are not familiar with NLP. Alexa is based on an NLP Engine which is a system that analyses phrases (users messages) and returns an intent. Intents describe what a user want or want to do. It is the intention behind his message. Alexa can learn new intents by attributing examples of messages to an intent. Behind the scenes, the Engine will be able to predict the intent even if he had never seen it before.

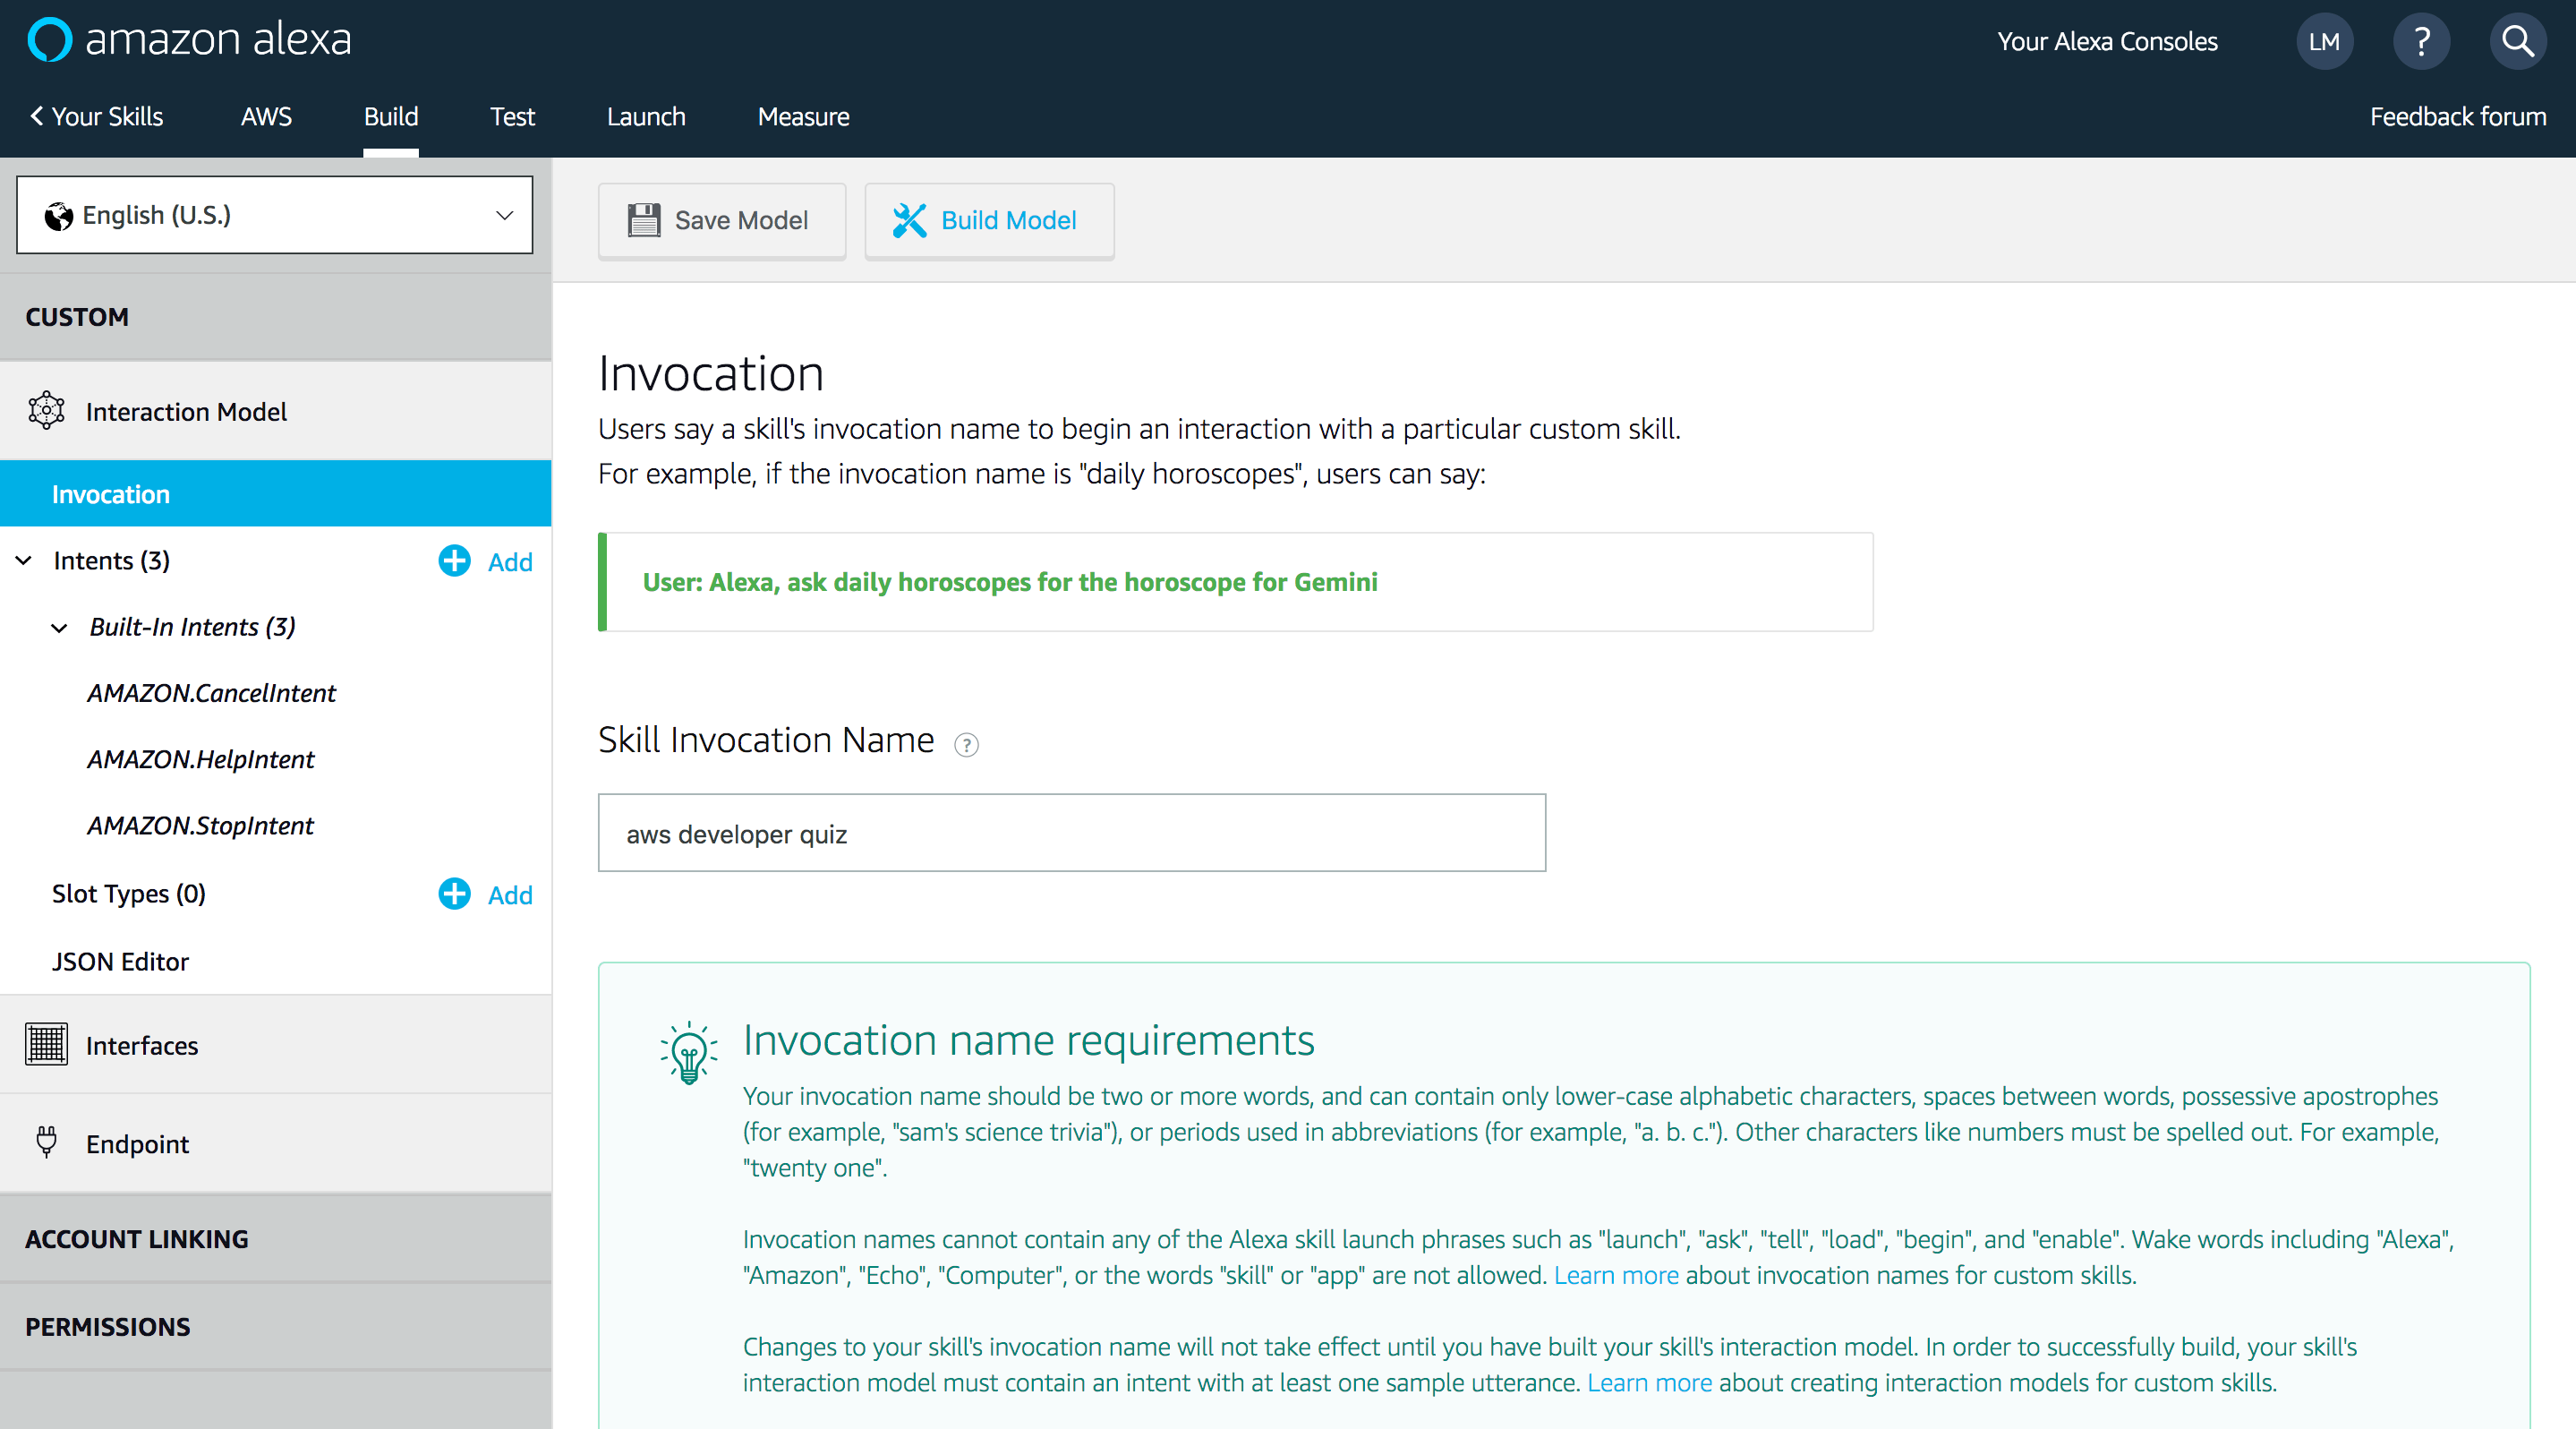
So, sign up to Amazon Developer Console, and create a new custom Alexa Skill. Set an invocation name as follows:


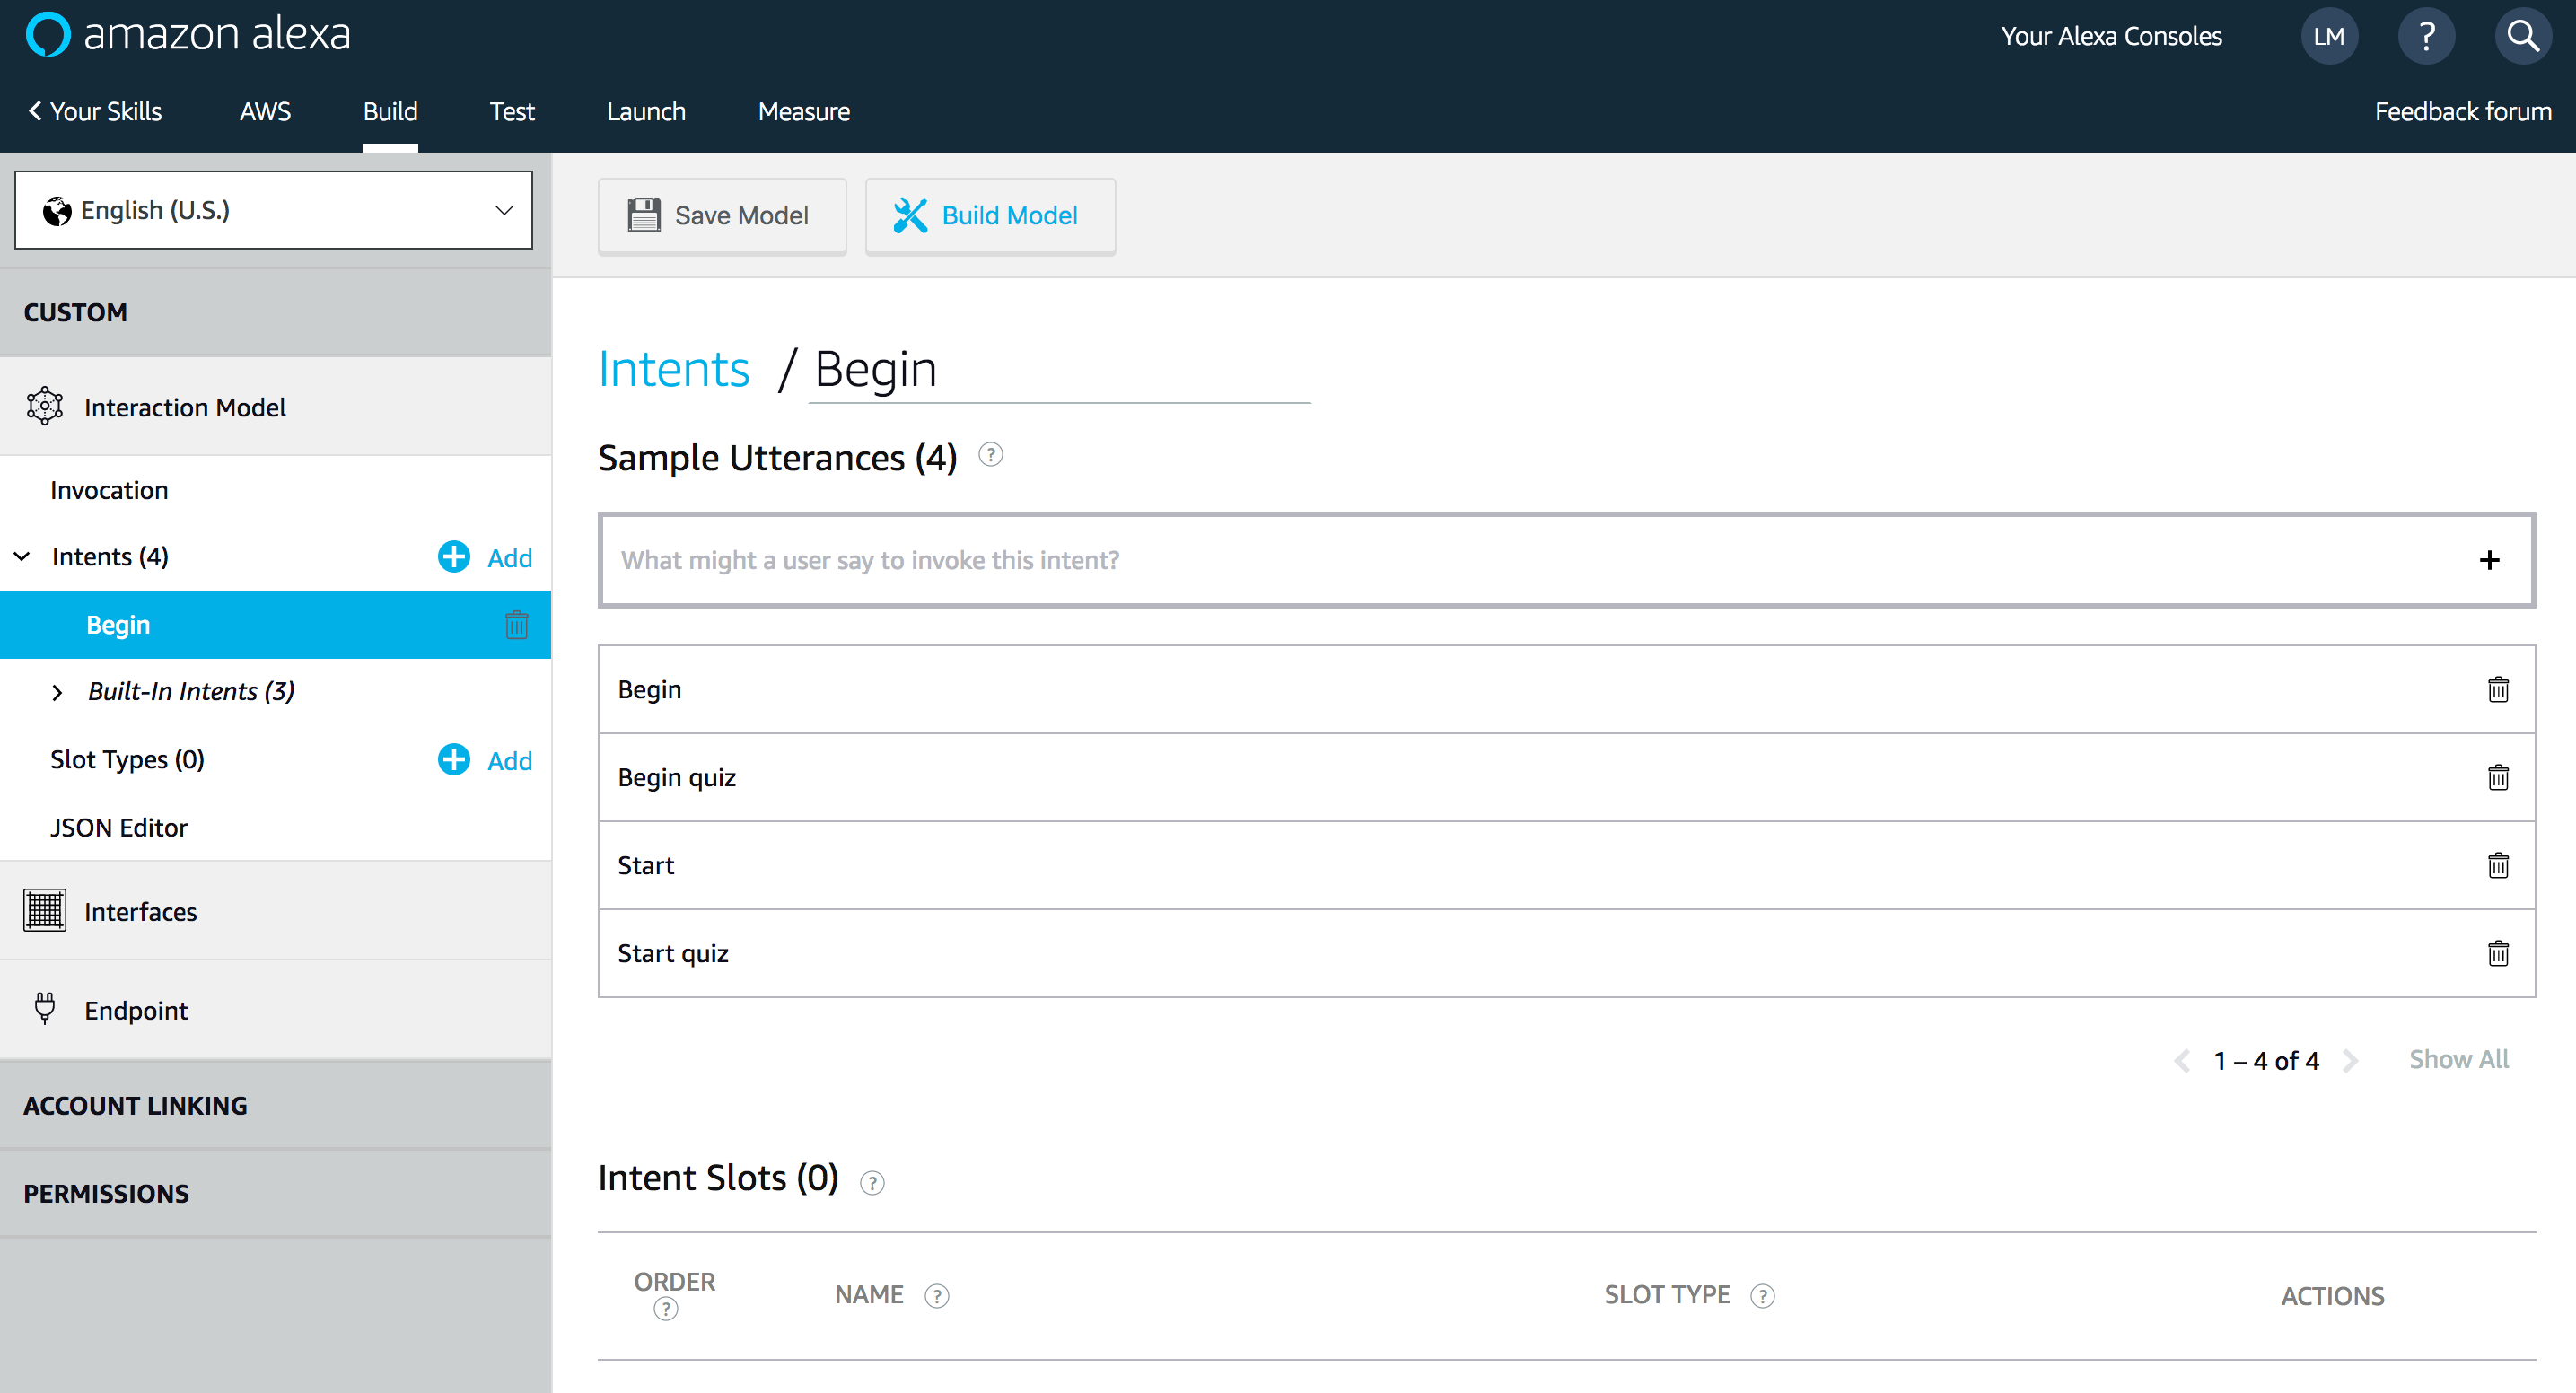
Create a new Intent for starting the Quiz:


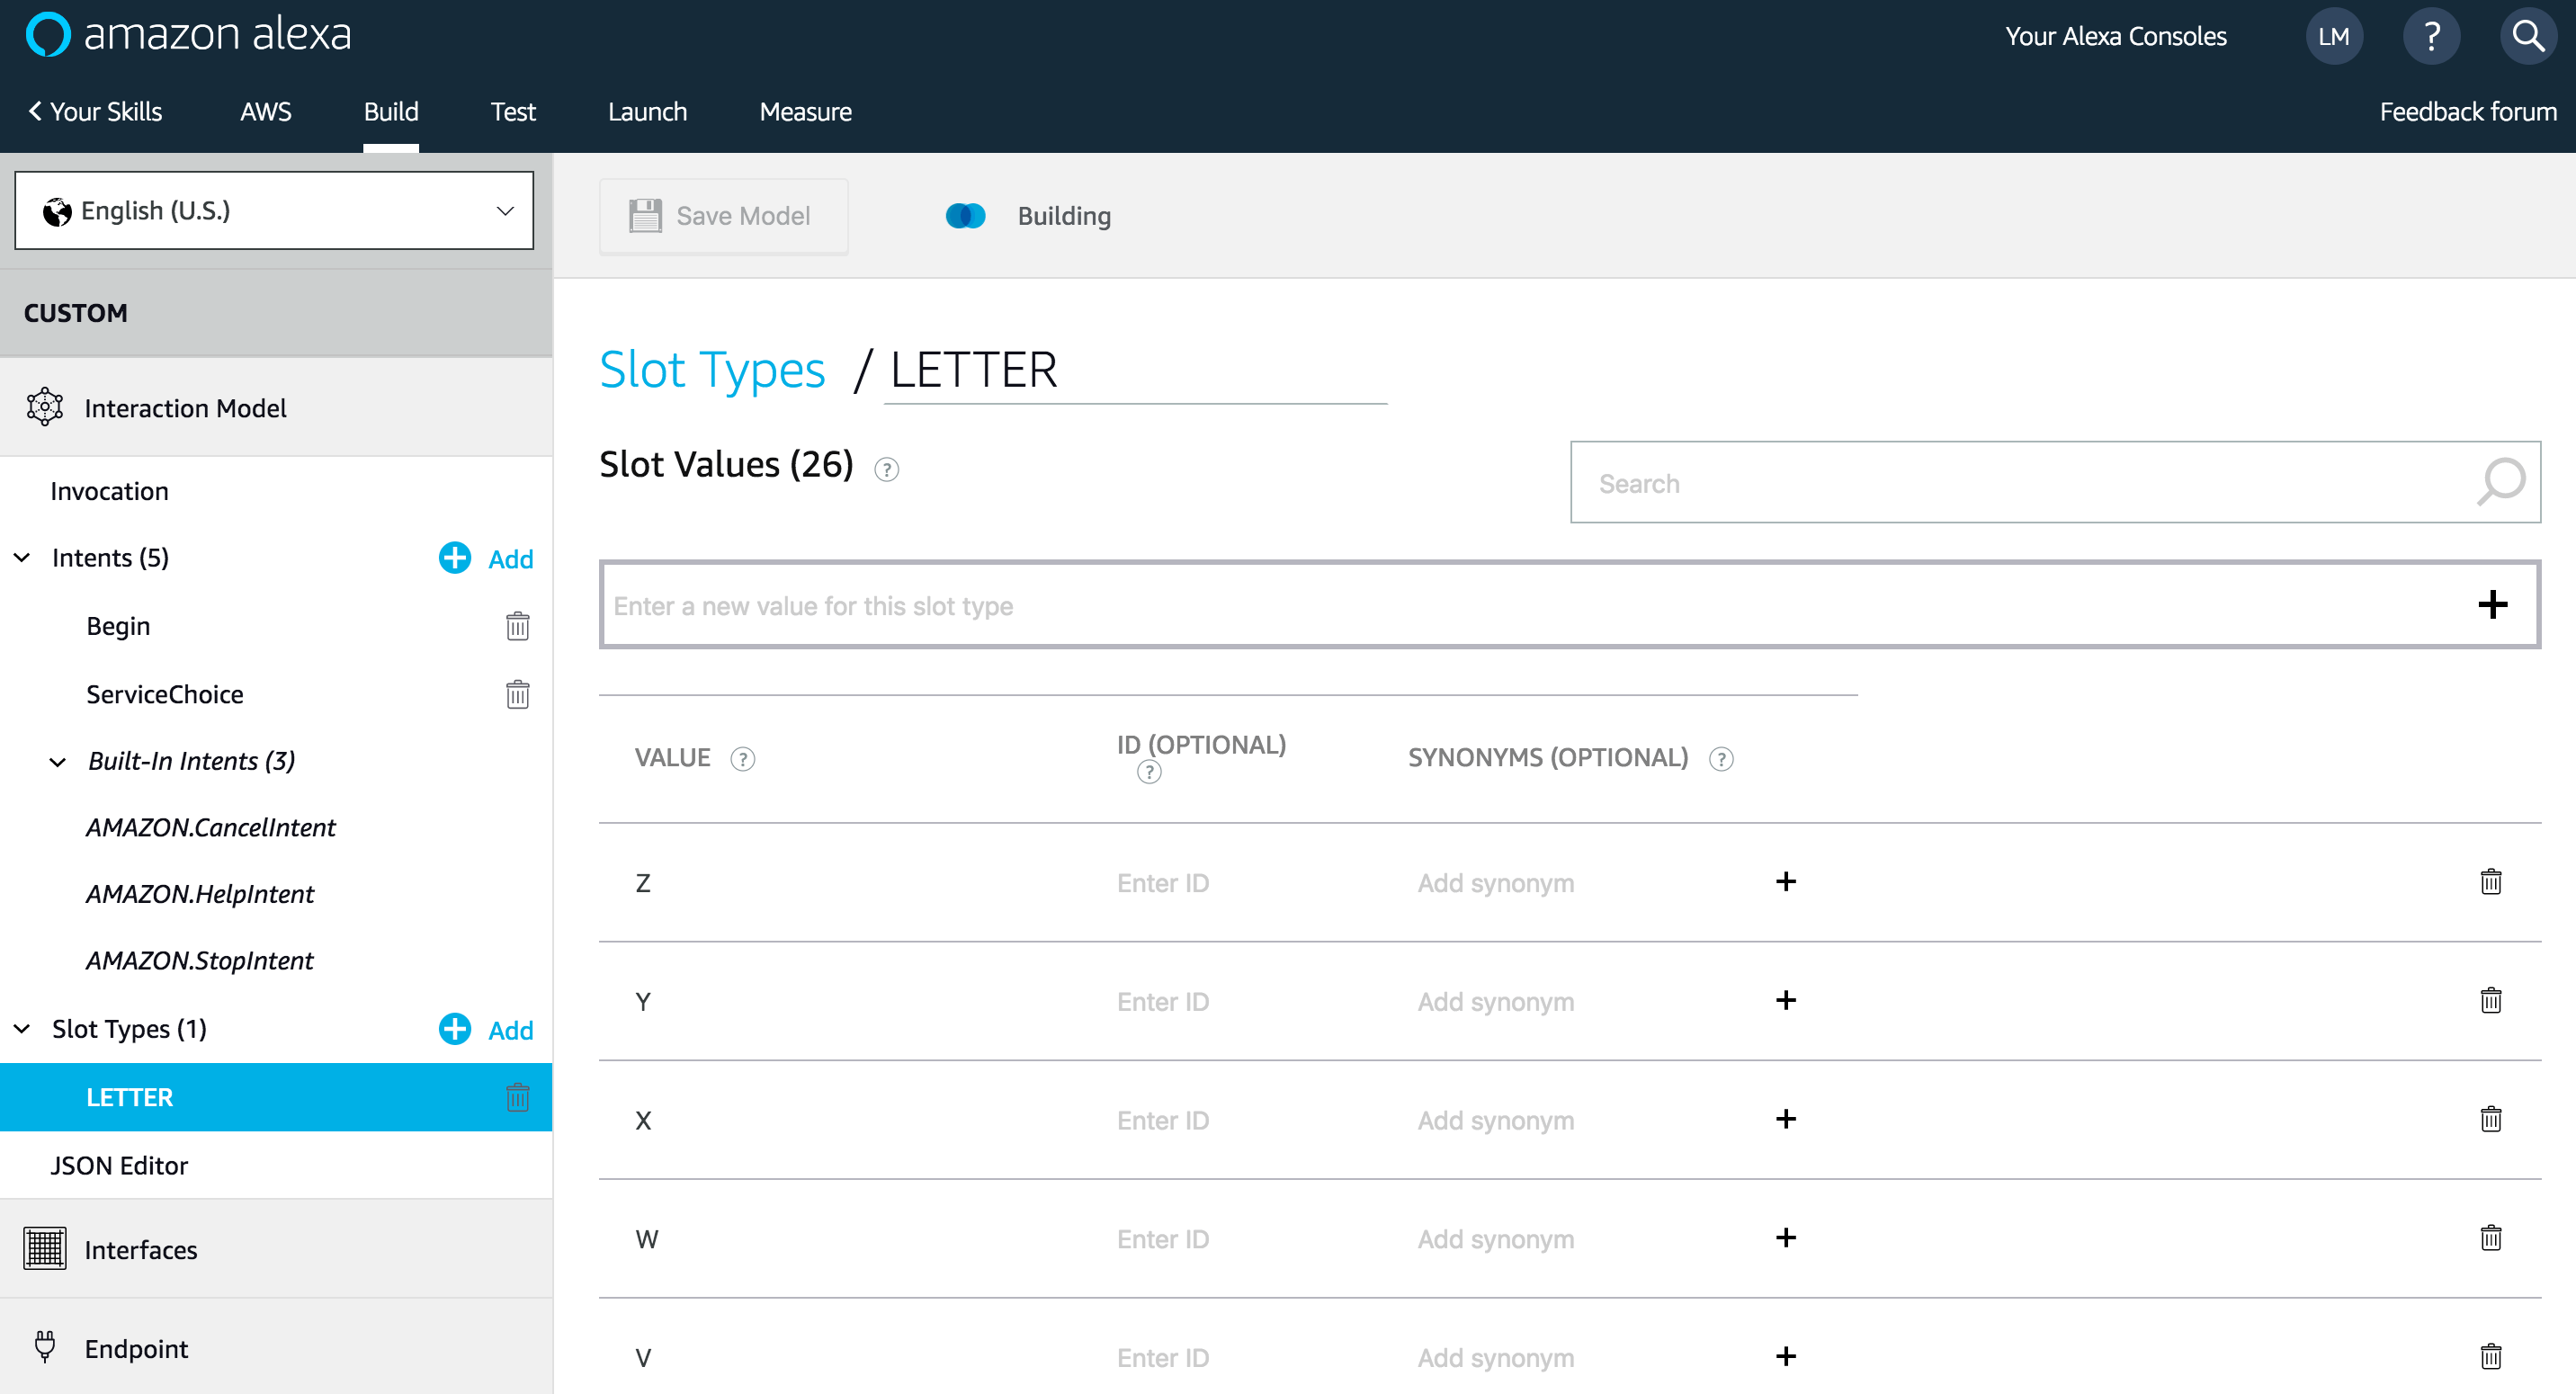
Add a new type “Slot” to store user choice:


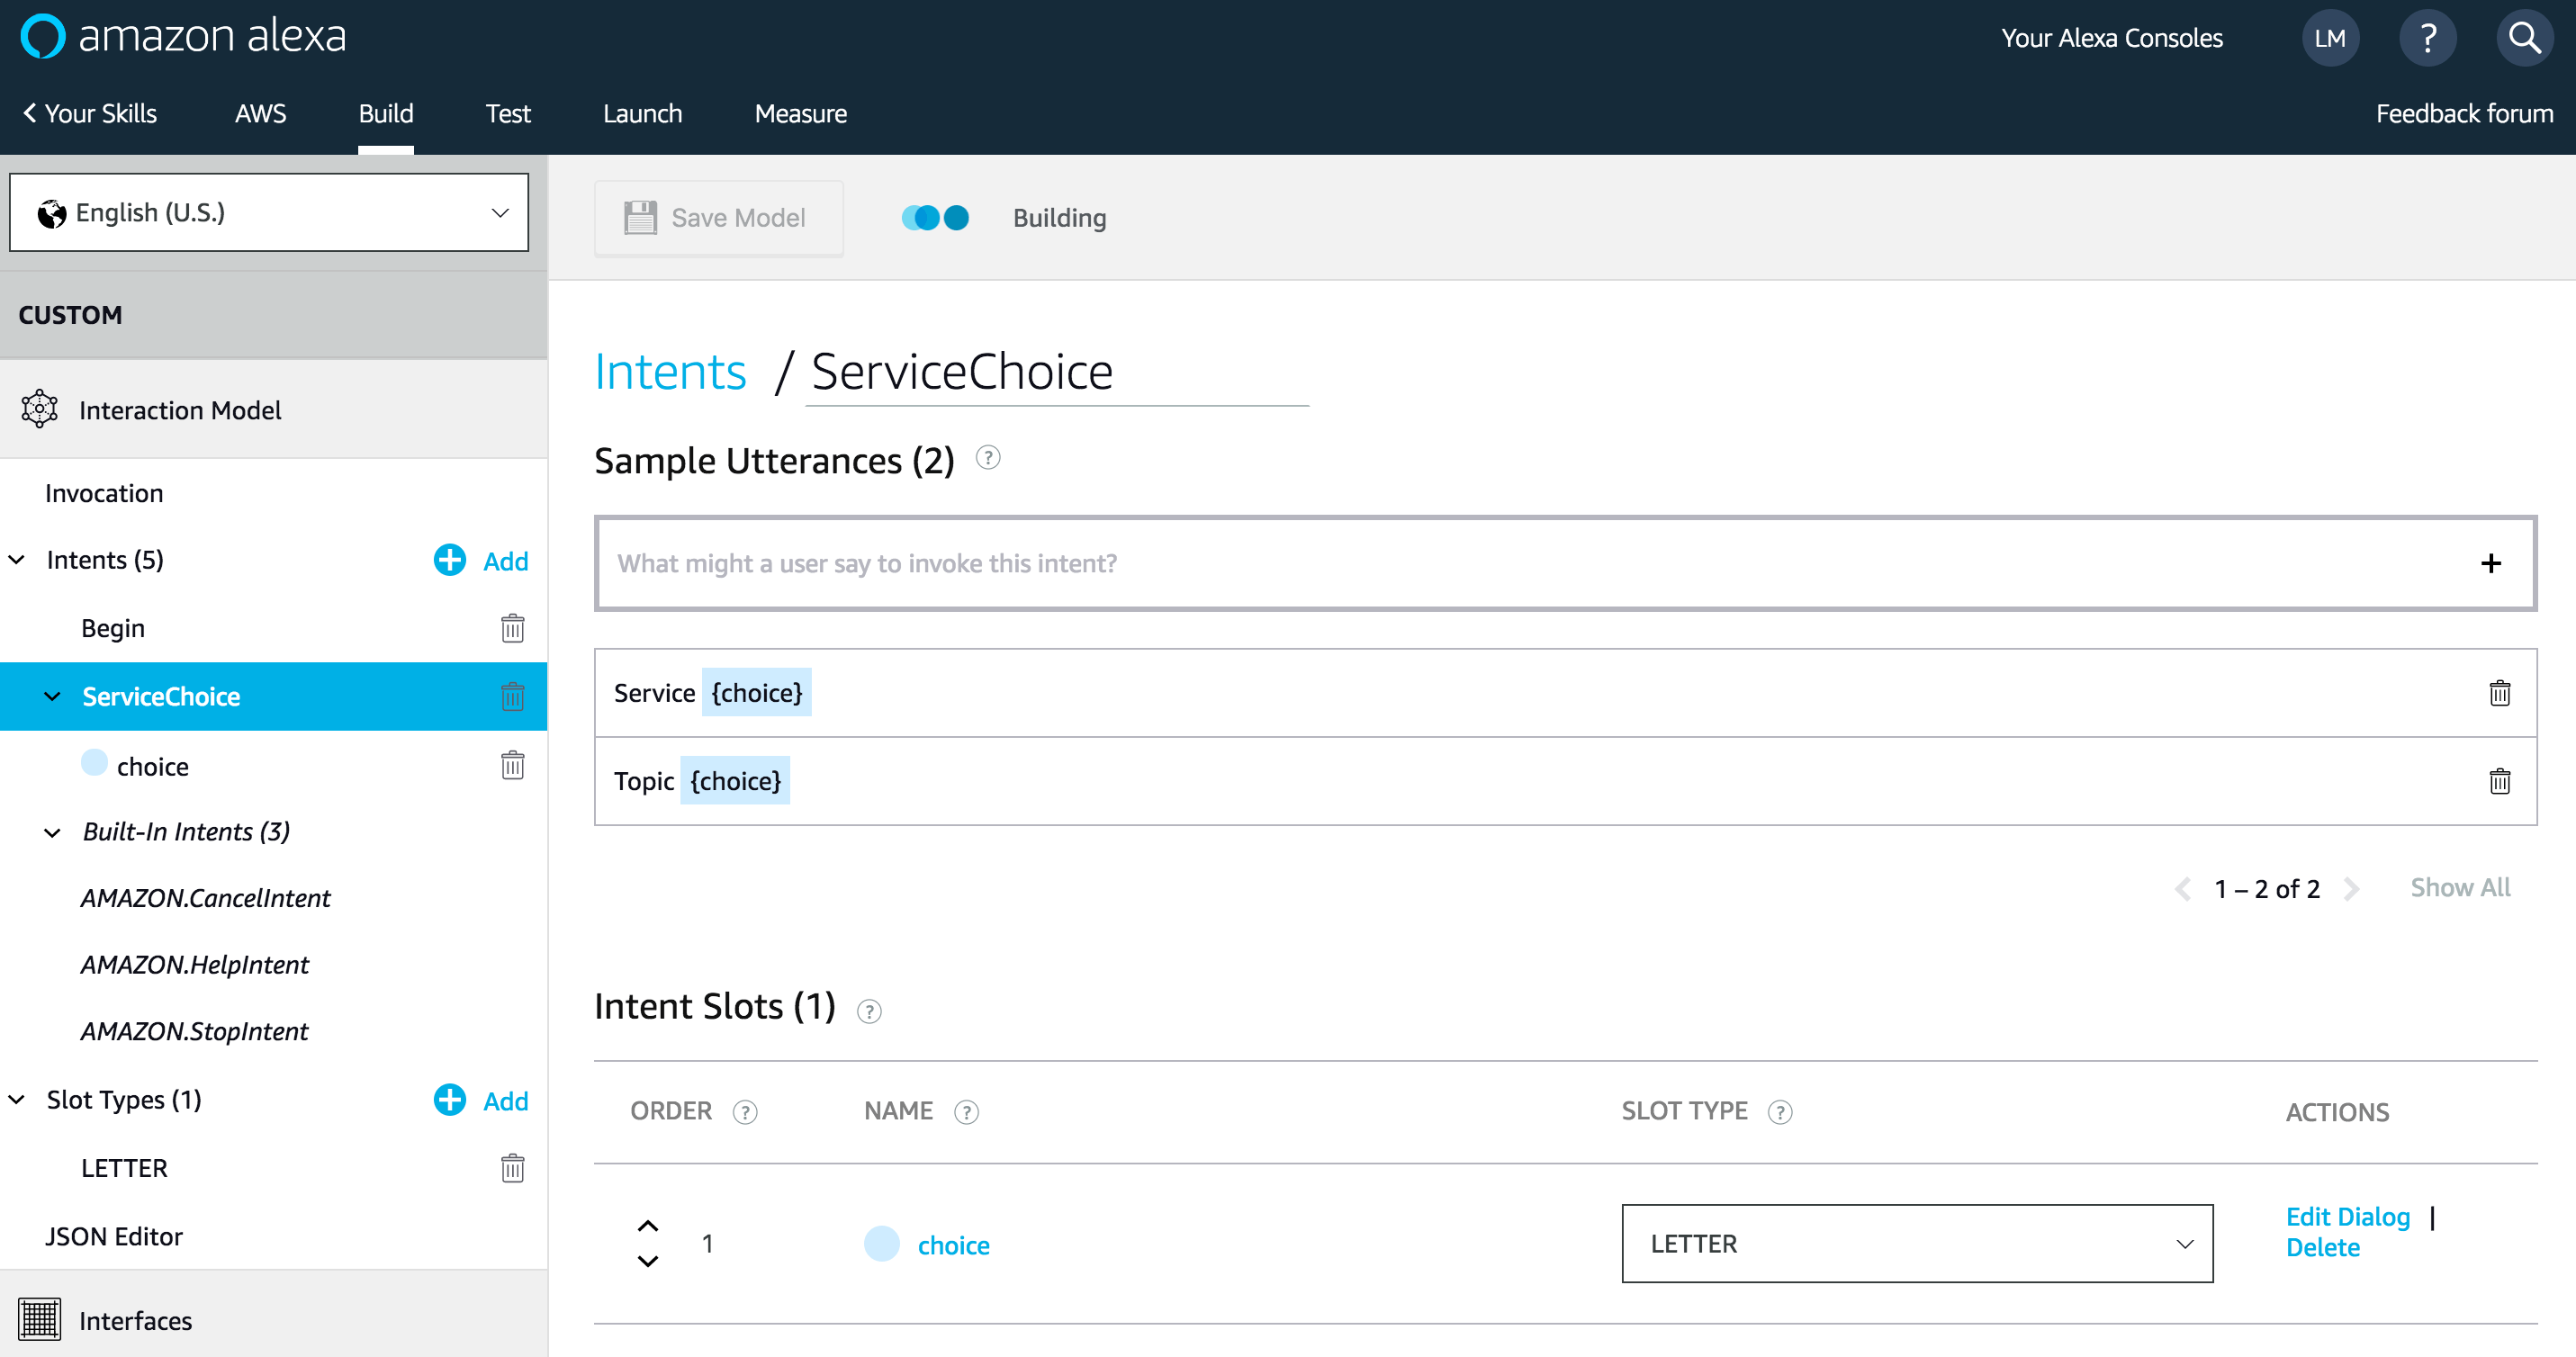
Then, create another intent for AWS service choice:


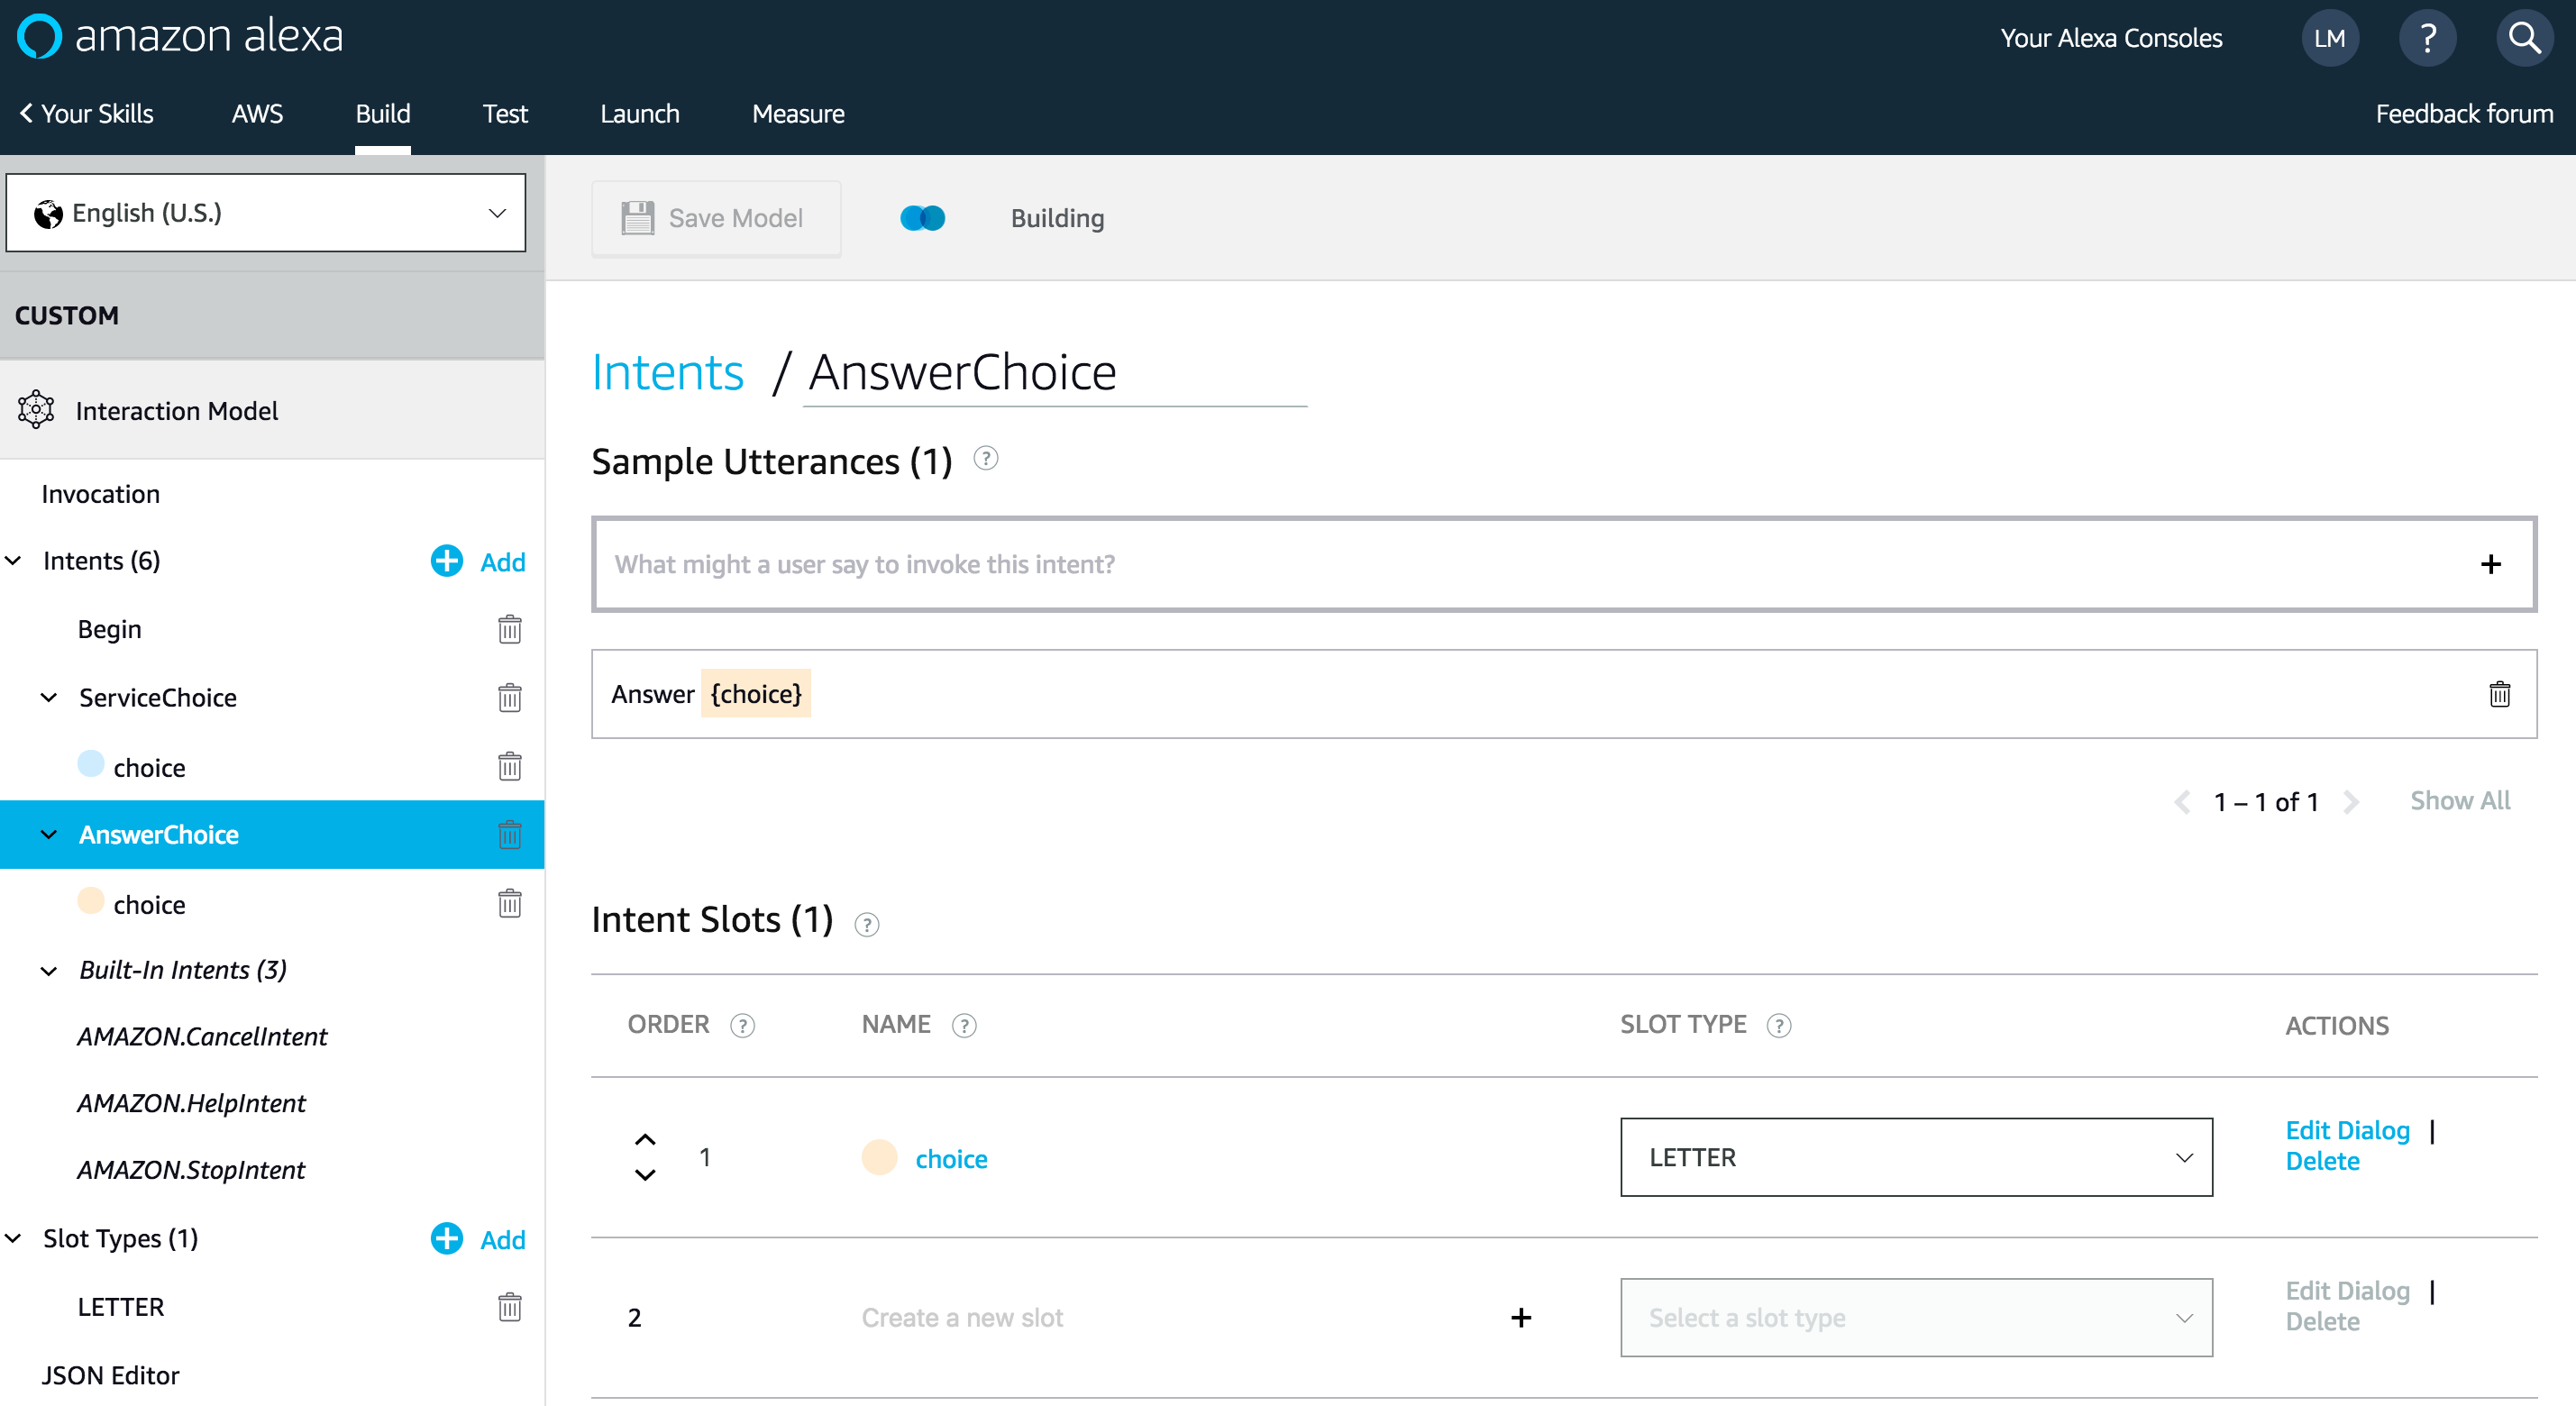
And for user’s answer choice:


Save your interaction model. Then, you’re ready to configure your Alexa Skill.

3 – Lambda Function

The Lambda handler function is self explanatory, it maps each intent to a code snippet. To keep track of the user’s score. We use Alexa sessionAttributes property of the JSON response. The session attributes will then be passed back to you with the next request JSON inside the session’s object. The list of questions is retrieved from DynamoDB using AWS SDK and SSML (Speech Synthesis Markup Language) is used to make Alexa speaks a sentence ending in a question mark as a question or add pause in the speech:

1
2
3
4
5
6
7
8
9
10
11
12
13
14
15
16
17
18
19
20
21
22
23
24
25
26
27
28
29
30
31
32
33
34
35
36
37
38
39
40
41
42
43
44
45
46
47
48
49
50
51
52
53
54
55
56
57
58
59
60
61
62
63
64
65
package main

import (
"context"
"fmt"
"log"
"strings"

"github.com/aws/aws-lambda-go/lambda"
)

func HandleRequest(ctx context.Context, r AlexaRequest) (AlexaResponse, error) {
resp := CreateResponse()

switch r.Request.Intent.Name {
case "Begin":
resp.Say(`<speak>
Choose the AWS service you want to be tested on <break time="1s"/>
A <break time="1s"/> EC2 <break time="1s"/>
B <break time="1s"/> VPC <break time="1s"/>
C <break time="1s"/> DynamoDB <break time="1s"/>
D <break time="1s"/> S3 <break time="1s"/>
E <break time="1s"/> SQS
</speak>`, false, "SSML")
case "ServiceChoice":
number := strings.TrimSuffix(r.Request.Intent.Slots["choice"].Value, ".")

questions, _ := getQuestions(services[number])

resp.SessionAttributes = make(map[string]interface{}, 1)
resp.SessionAttributes["score"] = 0
resp.SessionAttributes["correct"] = questions[0].Correct

resp.Say(text, false, "SSML")
case "AnswerChoice":
resp.SessionAttributes = make(map[string]interface{}, 1)
score := int(r.Session.Attributes["score"].(float64))
correctChoice := r.Session.Attributes["correct"]
userChoice := strings.TrimSuffix(r.Request.Intent.Slots["choice"].Value, ".")

text := "<speak>"
if correctChoice == userChoice {
text += "Correct</speak>"
score++
} else {
text += "Incorrect</speak>"
}

resp.Say(text, false, "SSML")

case "AMAZON.HelpIntent":
resp.Say(welcomeMessage, false, "PlainText")
case "AMAZON.StopIntent":
resp.Say(exitMessage, true, "PlainText")
case "AMAZON.CancelIntent":
resp.Say(exitMessage, true, "PlainText")
default:
resp.Say(welcomeMessage, false, "PlainText")
}
return *resp, nil
}

func main() {
lambda.Start(HandleRequest)
}

Note: Full code is available in my GitHub.

Sign in to AWS Management Console, and create a new Lambda function in Go from scratch:


Assign the following IAM role to the function:

1
2
3
4
5
6
7
8
9
10
11
12
13
14
15
16
17
18
19
20
21
22
23
24
{
"Version": "2012-10-17",
"Statement": [
{
"Sid": "1",
"Effect": "Allow",
"Action": [
"logs:CreateLogStream",
"logs:CreateLogGroup",
"logs:PutLogEvents"
],
"Resource": "*"
},
{
"Sid": "2",
"Effect": "Allow",
"Action": "dynamodb:Scan",
"Resource": [
"arn:aws:dynamodb:us-east-1:ACCOUNT_ID:table/Questions/index/ID",
"arn:aws:dynamodb:us-east-1:ACCOUNT_ID:table/Questions"
]
}
]
}

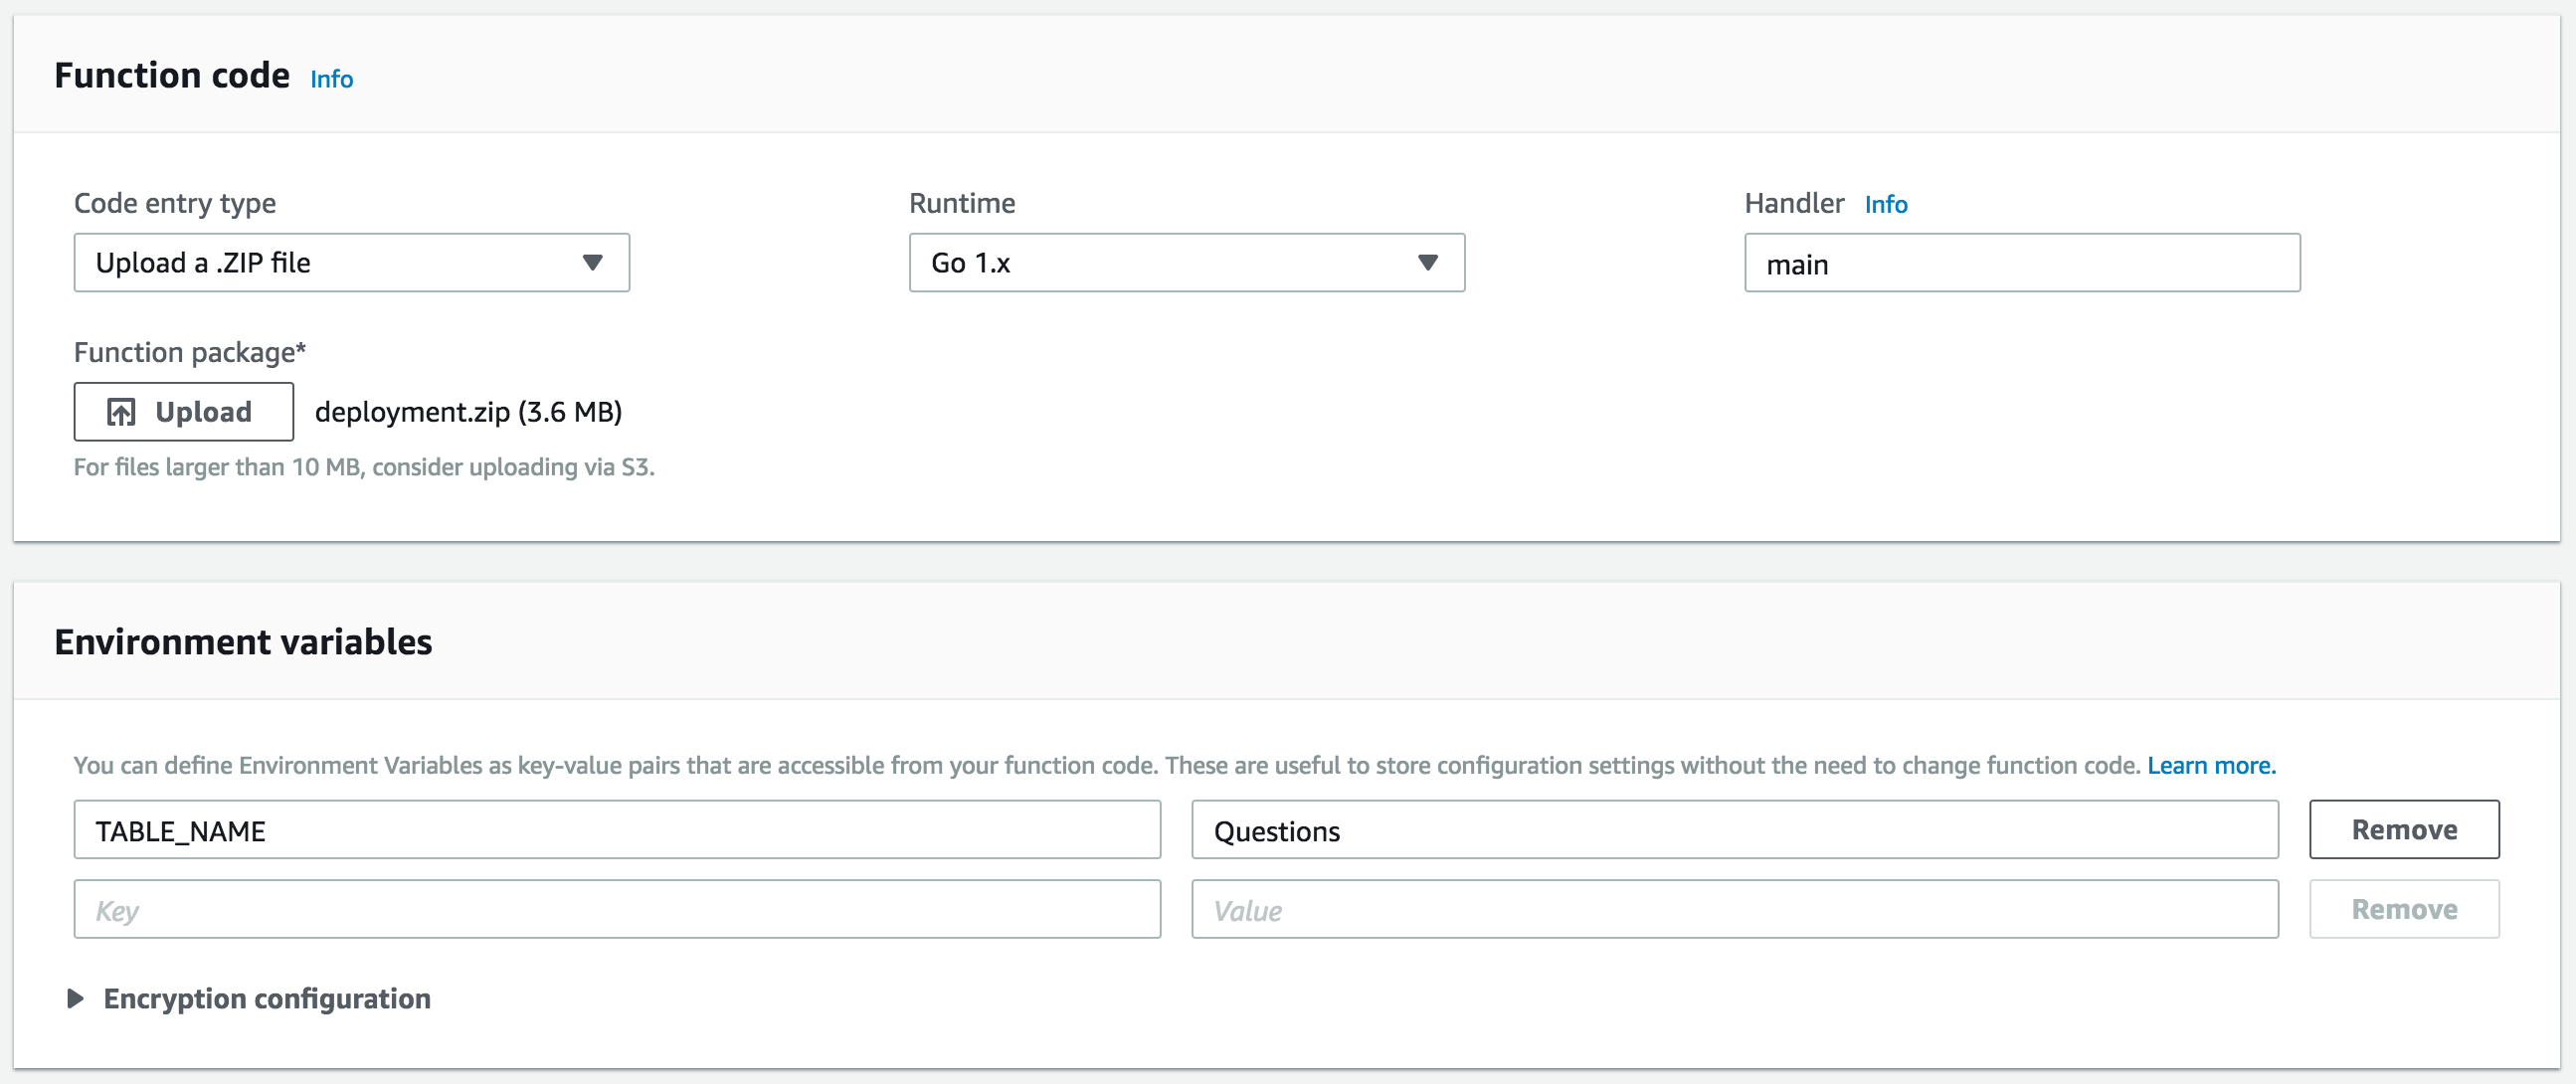
Generate the deployment package, and upload it to the Lambda Console and set the TABLE_NAME environment variable to the table name:


4 – Testing

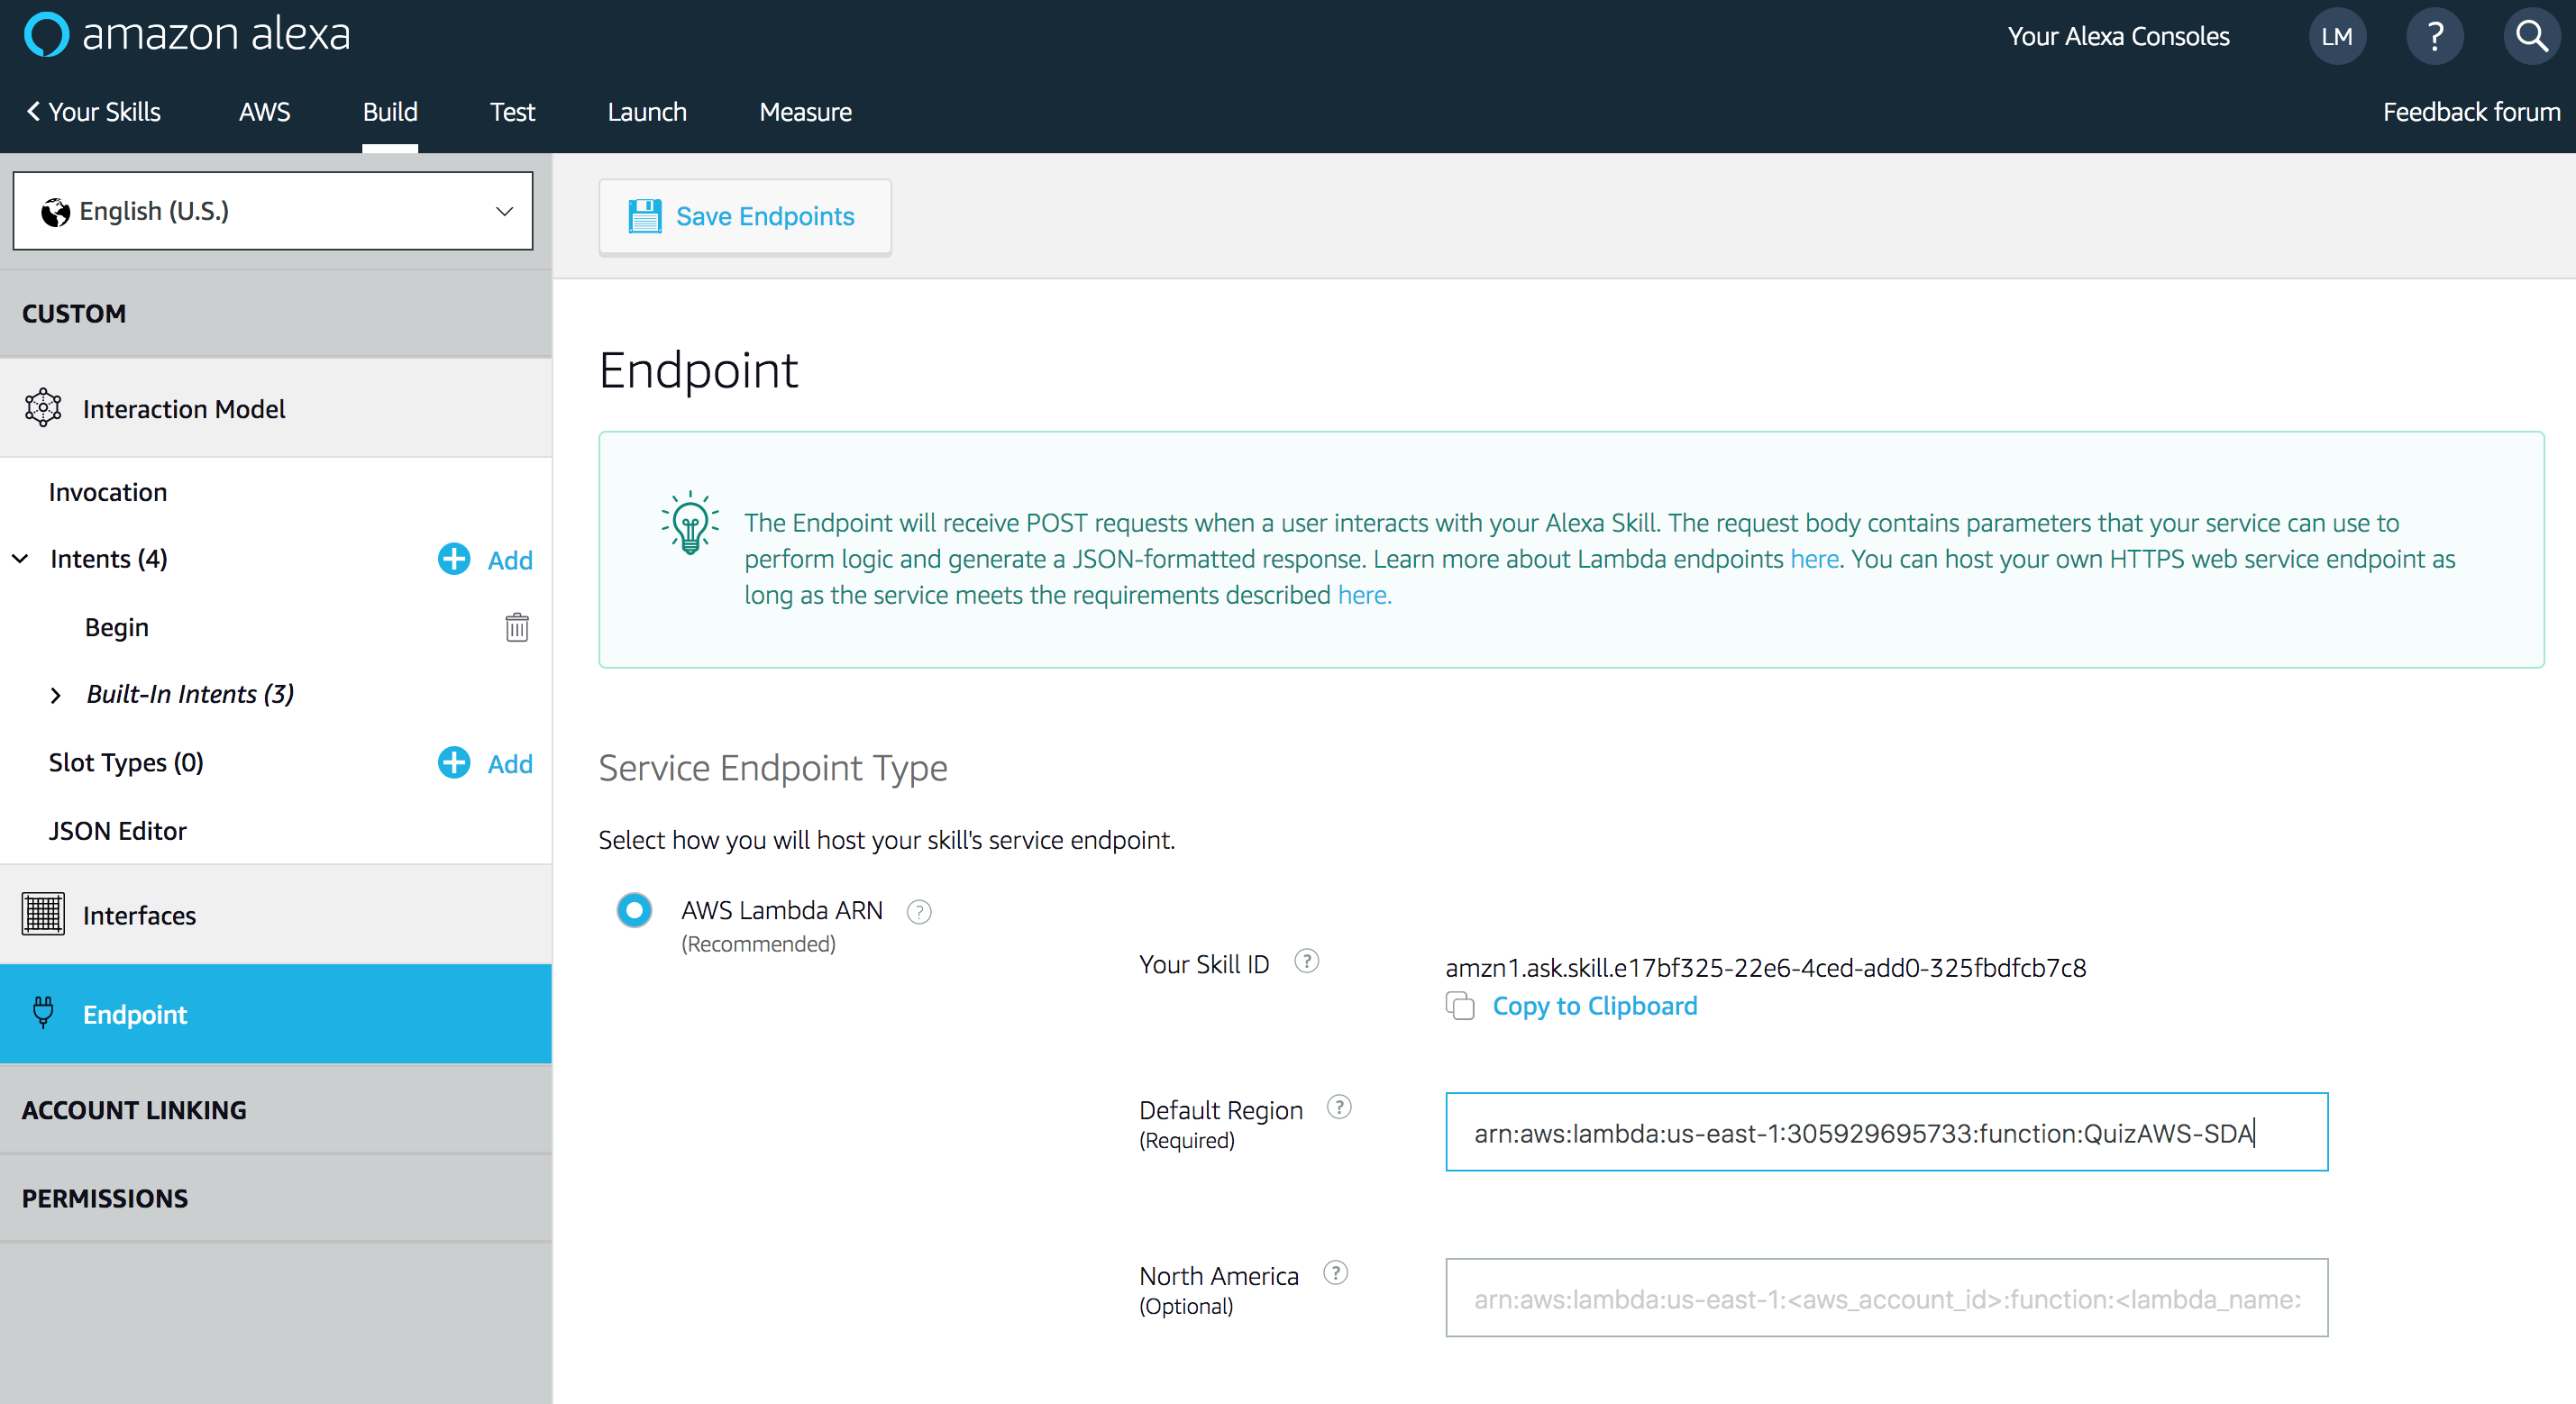
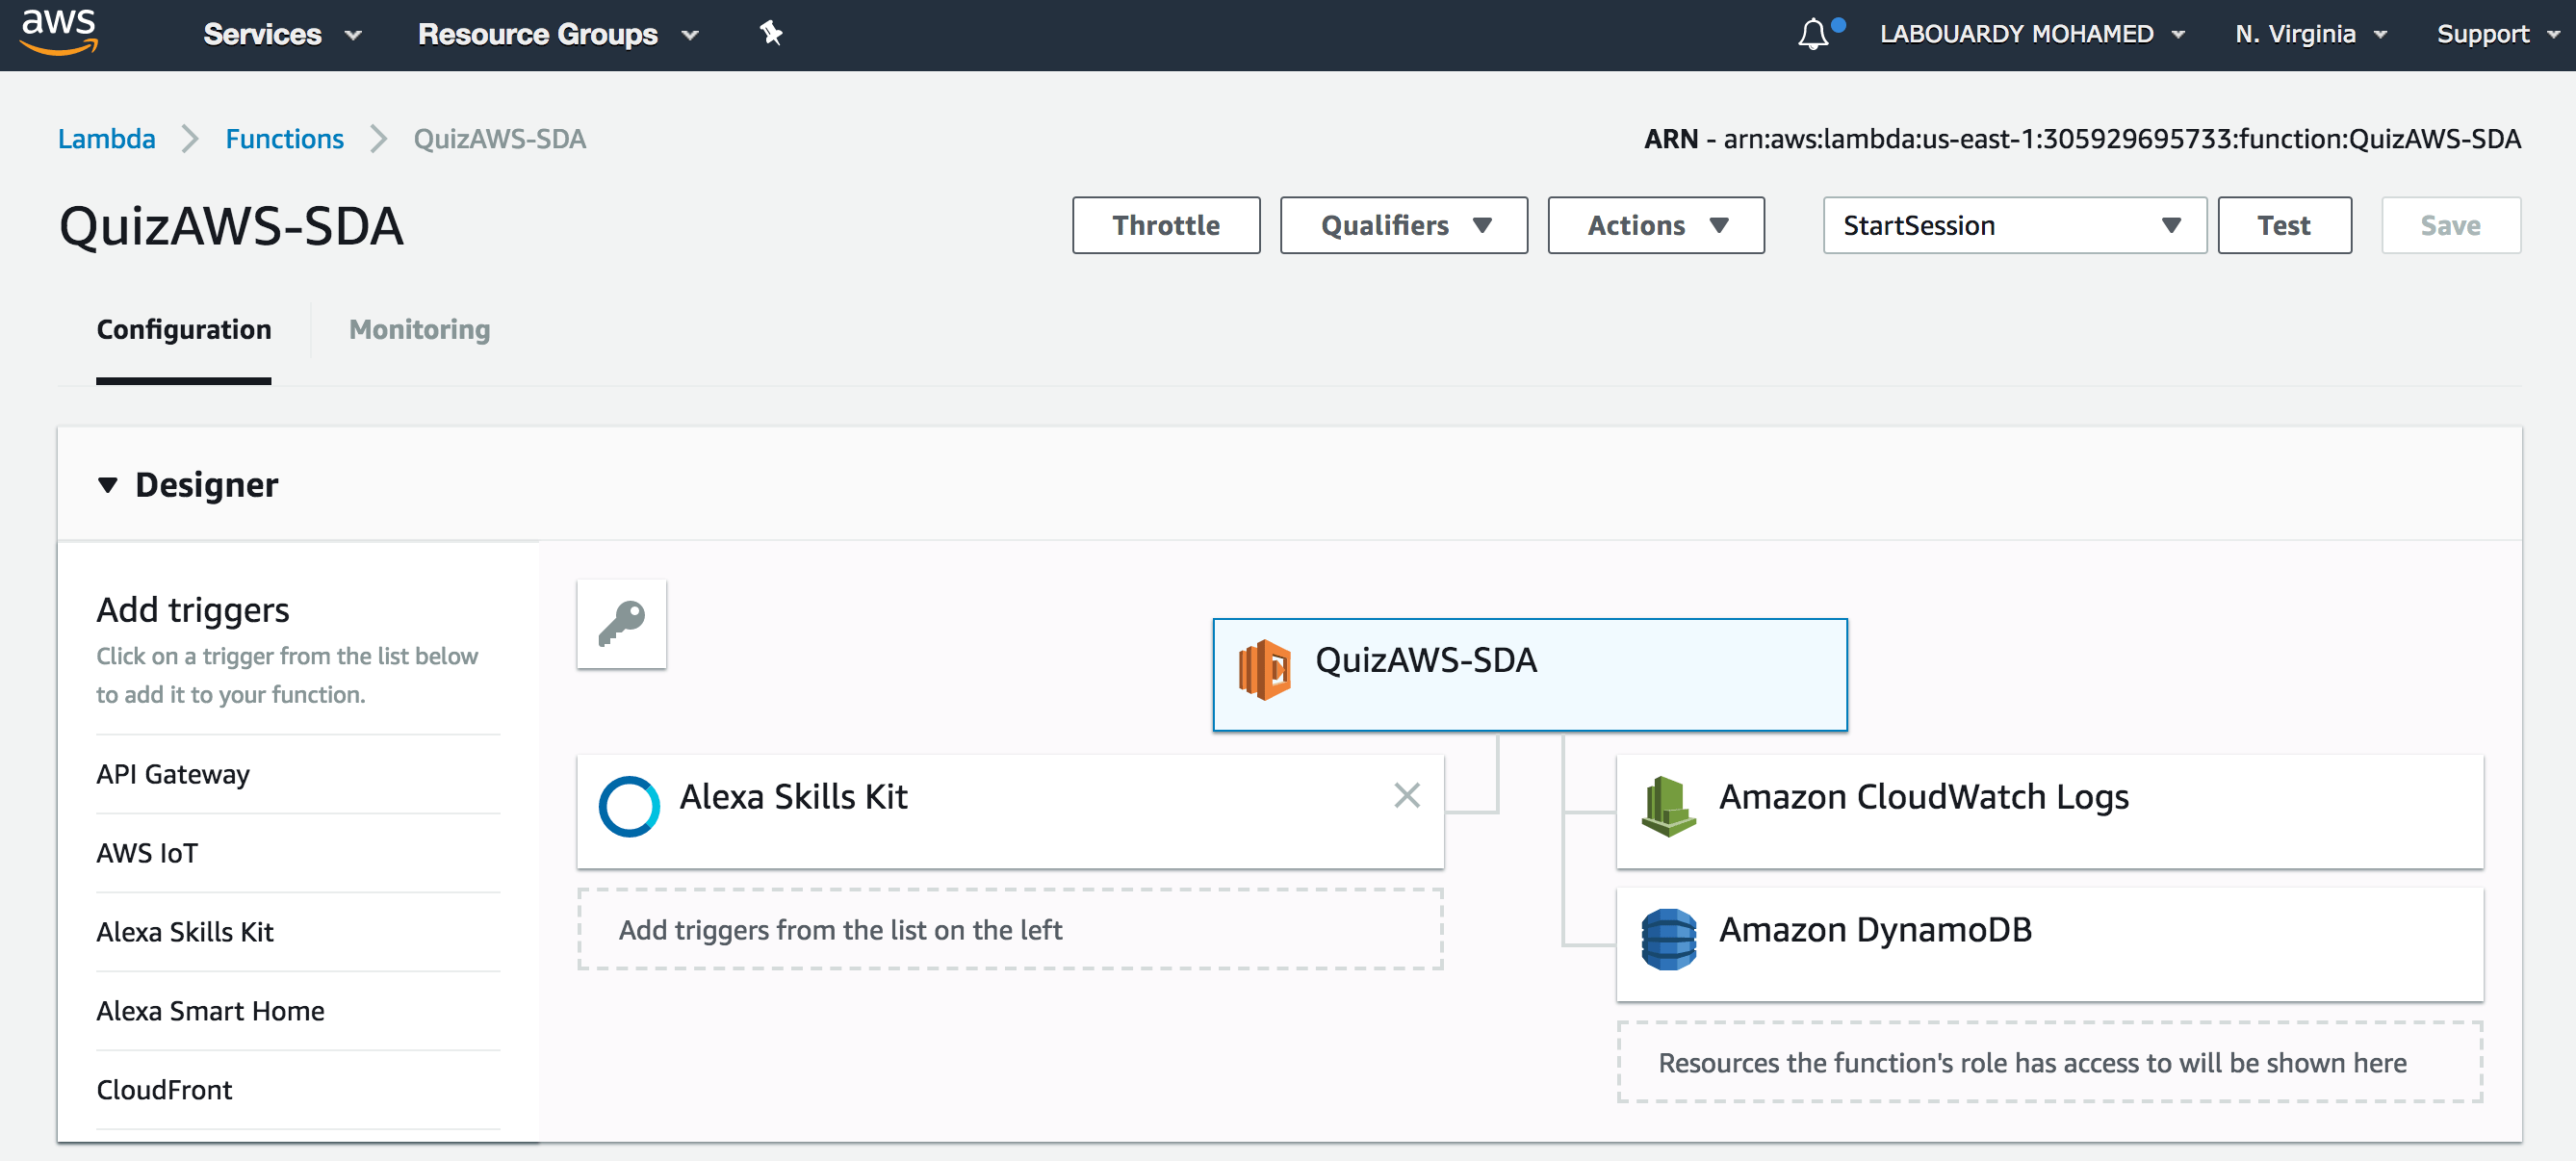
Now that you have created the function and put its code in place, it’s time to specify how it gets called. We’ll do this by linking the Lambda ARN to Alexa Skill:


Once the information is in place, click Save Endpoints. You’re ready to start testing your new Alexa Skill !


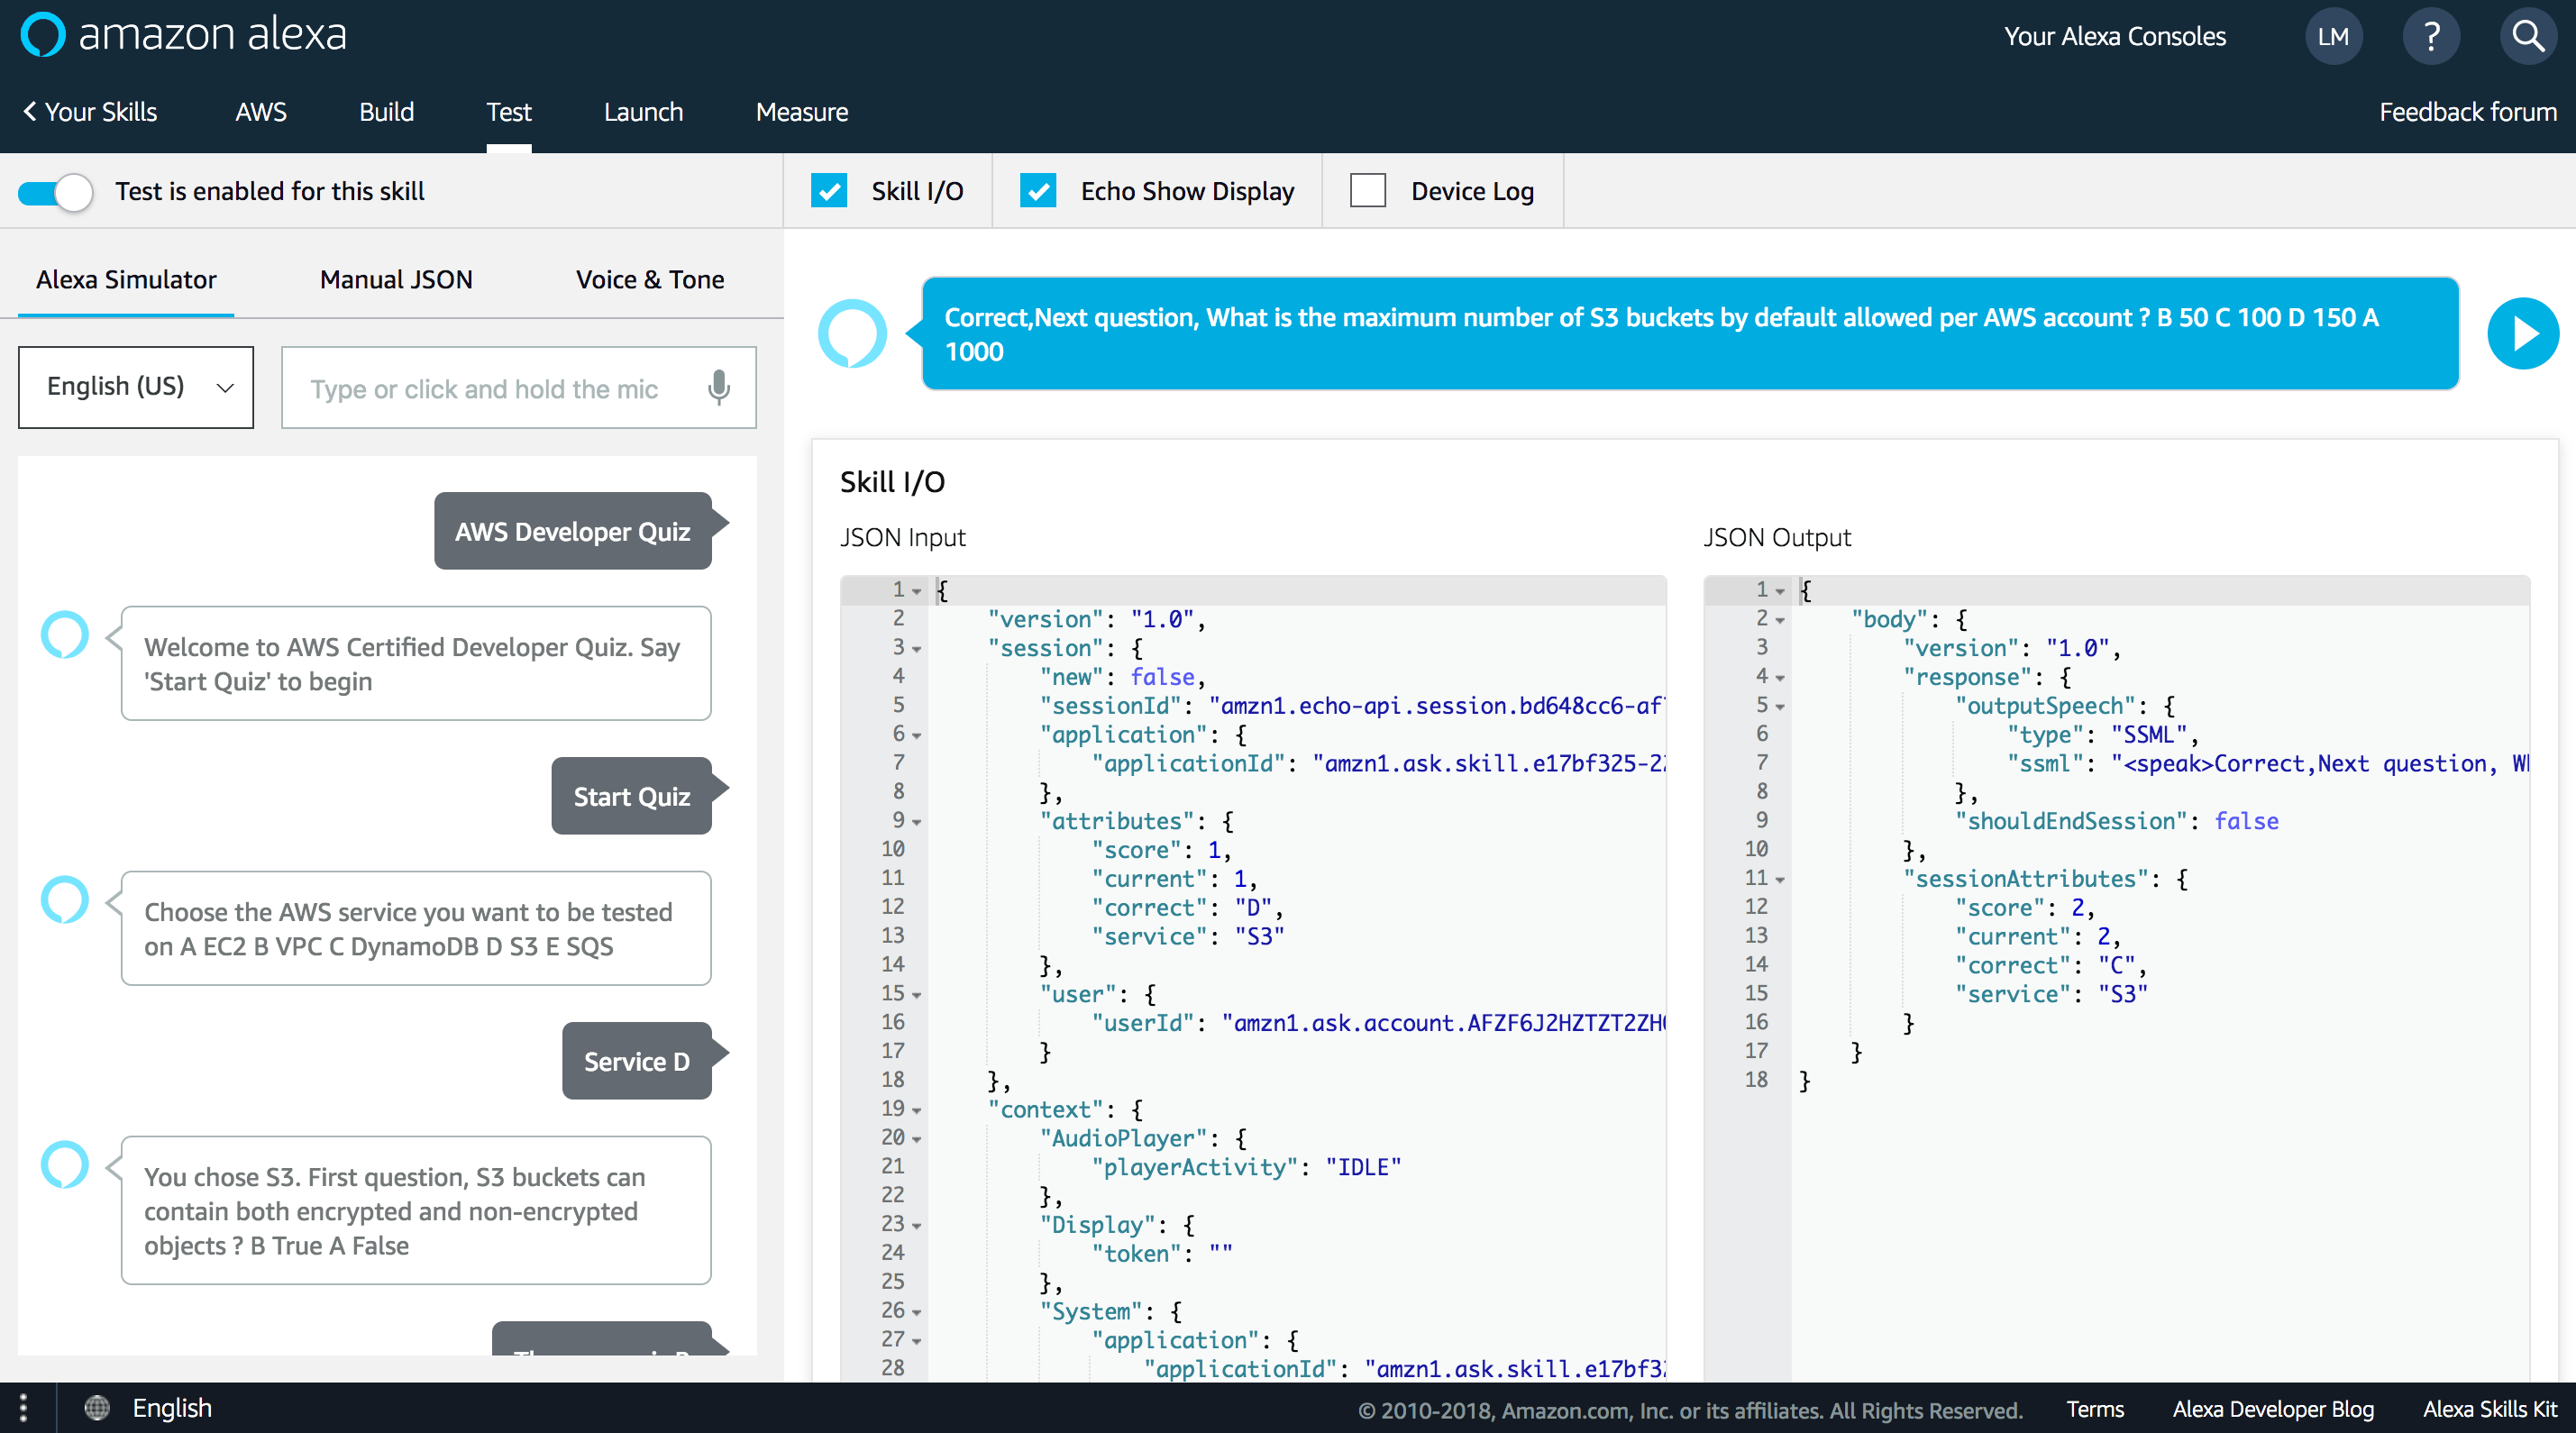
To test, you need to login to Alexa Developer Console, and enable the “Test” switch on your skill from the “Test” Tab:


Or use an Alexa enabled device like Amazon Echo, by saying “Alexa, Open AWS Developer Quiz” :


Drop your comments, feedback, or suggestions below — or connect with me directly on Twitter @mlabouardy.

Slack Notification with CloudWatch Alarms & Lambda

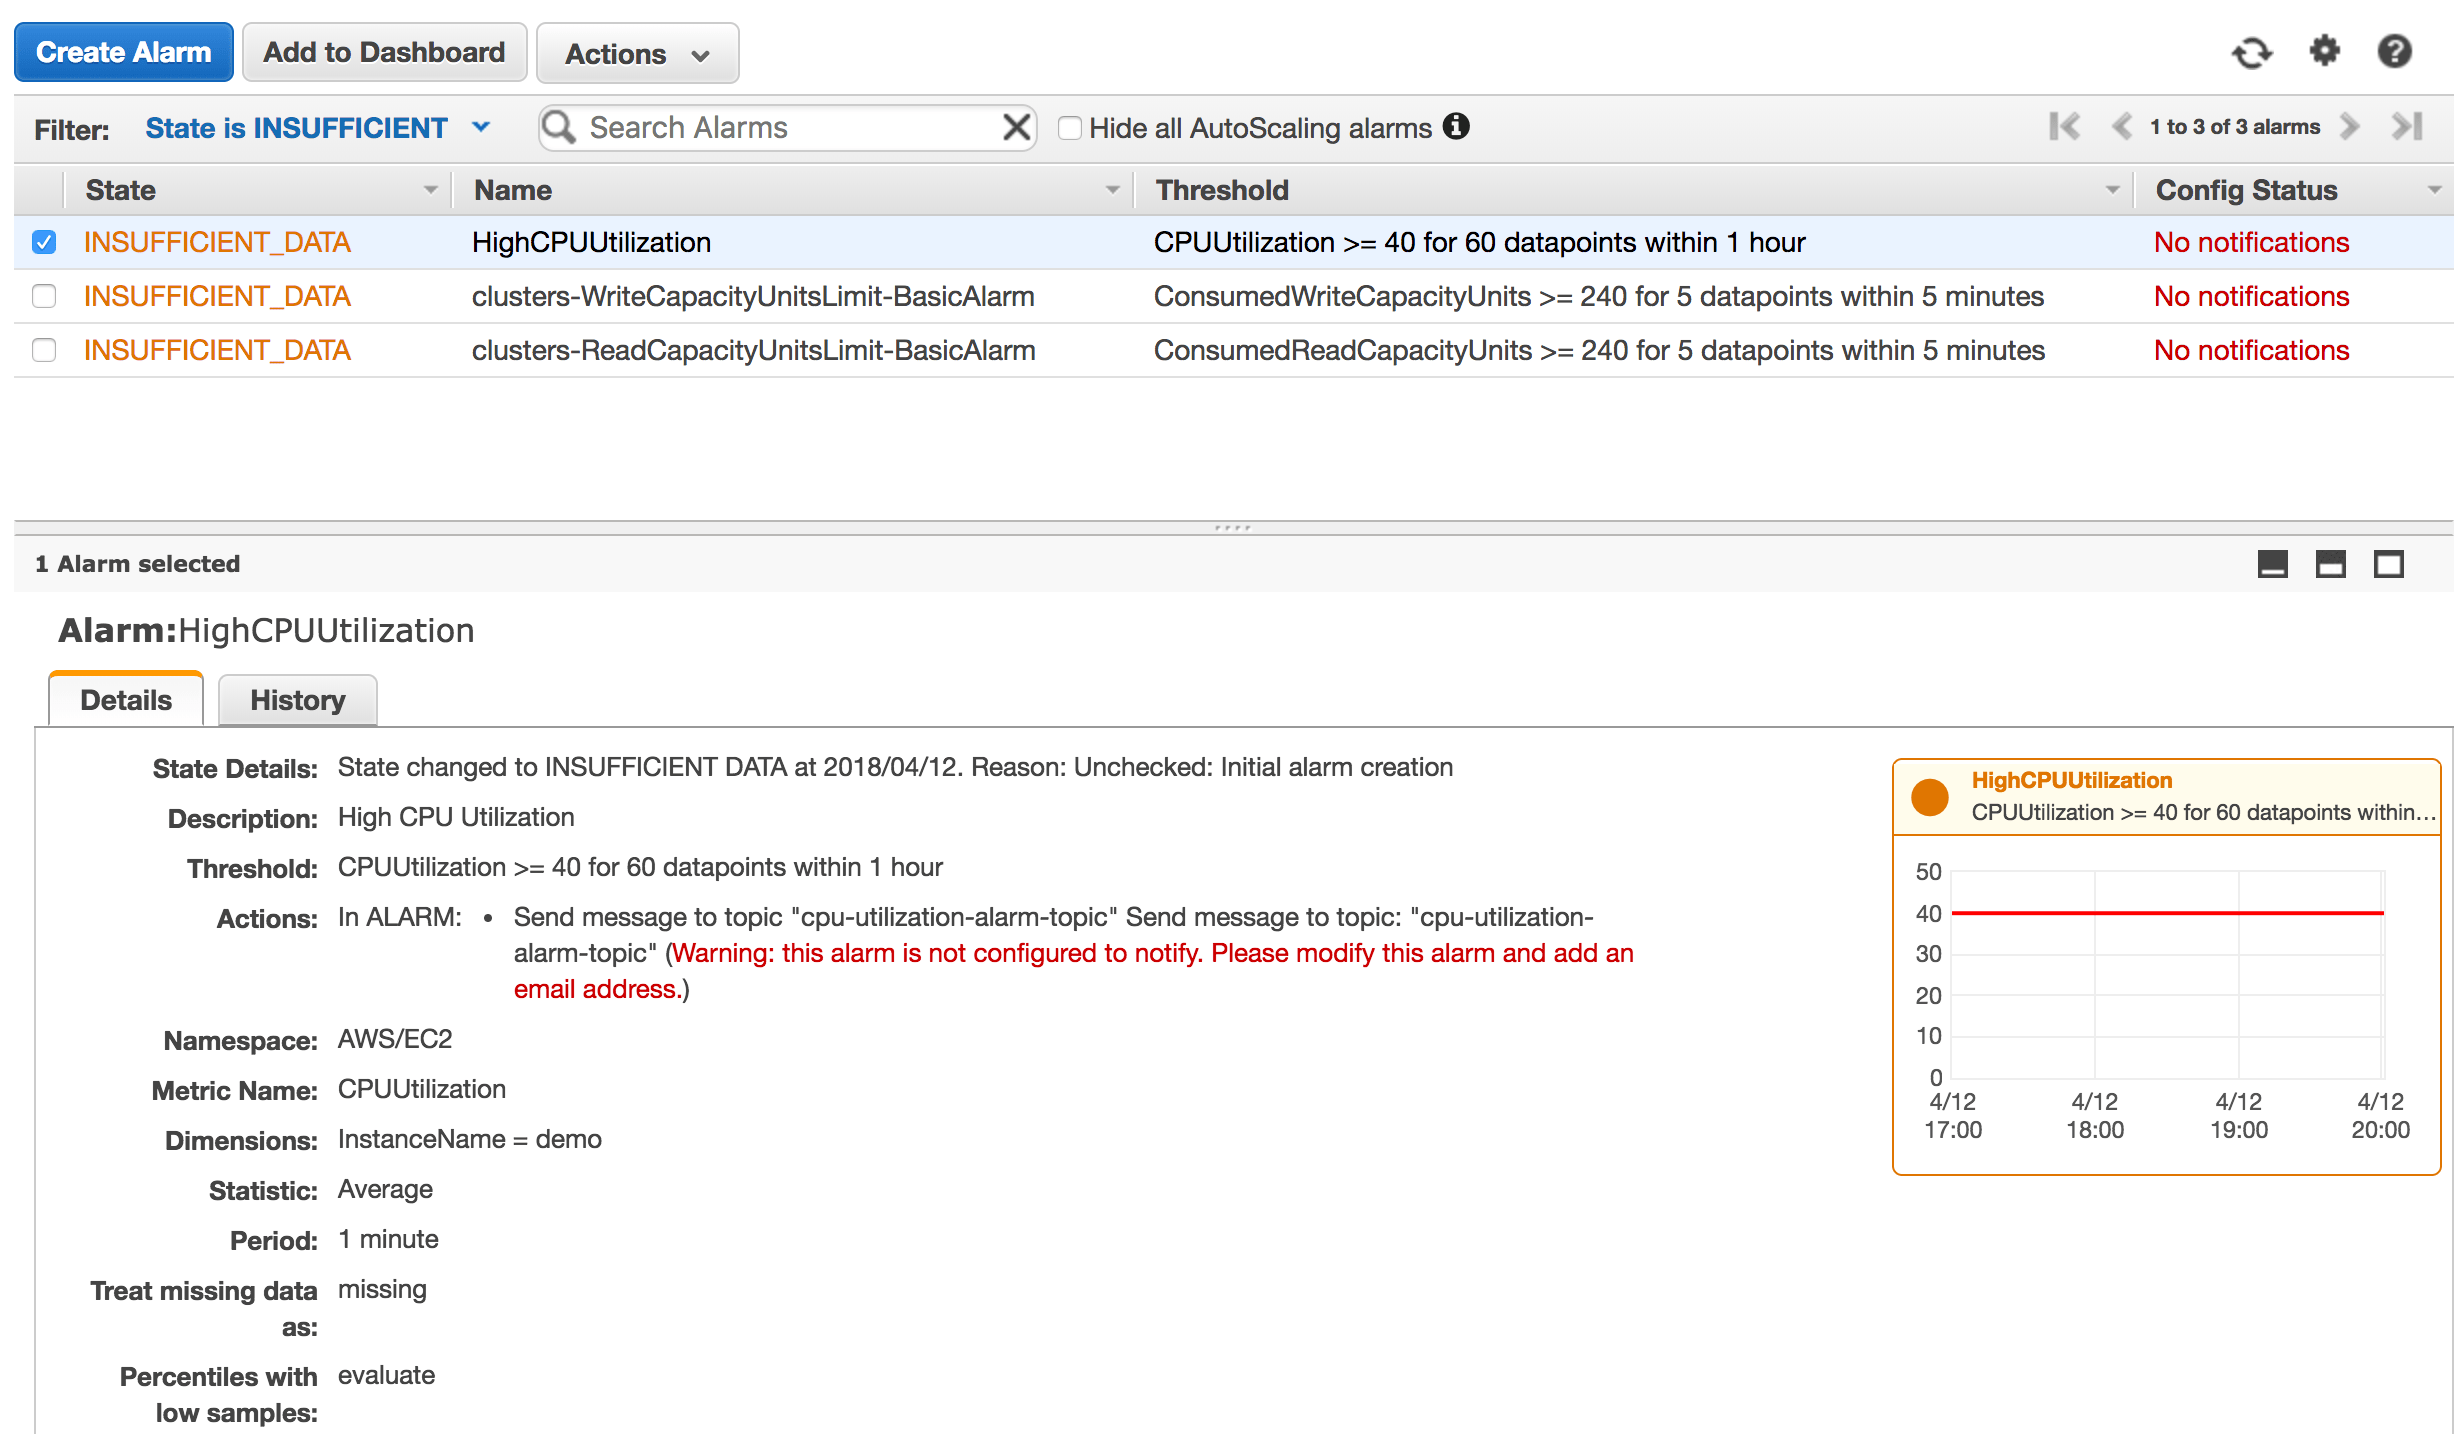
ChatOps has emerged as one of the most effective techniques to implement DevOps. Hence, it will be great to receive notifications and infrastructure alerts into collaboration messaging platforms like Slack & HipChat.

AWS CloudWatch Alarms and SNS are a great mix to build a real-time notification system as SNS supports multiple endpoints (Email, HTTP, Lambda, SQS). Unfortunately SNS doesn’t support out of the box sending notifications to tools like Slack.


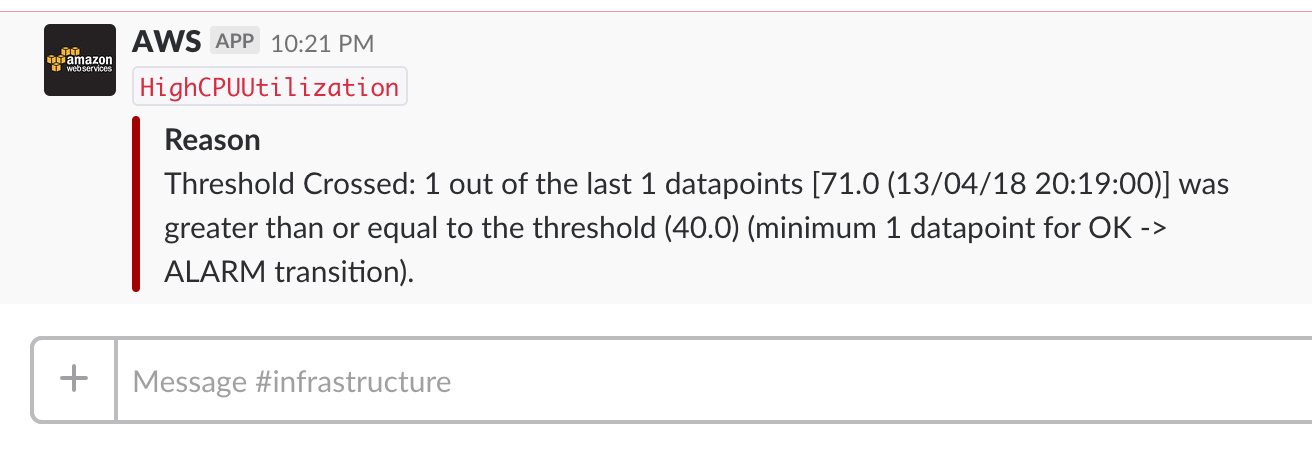
CloudWatch will trigger an alarm to send a message to an SNS topic if the monitoring data gets out of range. A Lambda function will be invoked in response of SNS receiving the message and will call the Slack API to post a message to Slack channel.


To get started, create an EC2 instance using the AWS Management Console or the AWS CLI:

1
2
3
4
5
aws ec2 run-instances --image-id ami_ID
--count 1 --instance-type t2.micro
--key-name KEY_NAME --security-group-ids SG_ID
--region us-east-1
--tag-specifications 'ResourceType=instance,Tags=[{Key=Name,Value=demo}]'

Next, create a SNS topic:

1
aws sns create-topic --name cpu-utilization-alarm-topic --region us-east-1

Then, setup a CloudWatch alarm when the instance CPU utilization is higher than 40% and send notification to the SNS topic:

1
2
3
4
5
6
7
8
9
10
11
12
aws cloudwatch put-metric-alarm --region us-east-1 
--alarm-name "HighCPUUtilization"
--alarm-description "High CPU Utilization"
--actions-enabled
--alarm-actions "TOPIC_ARN"
--metric-name "CPUUtilization"
--namespace AWS/EC2 --statistic "Average"
--dimensions "Name=InstanceName,Value=demo"
--period 60
--evaluation-periods 60
--threshold 40
--comparison-operator "GreaterThanOrEqualToThreshold"

As a result:


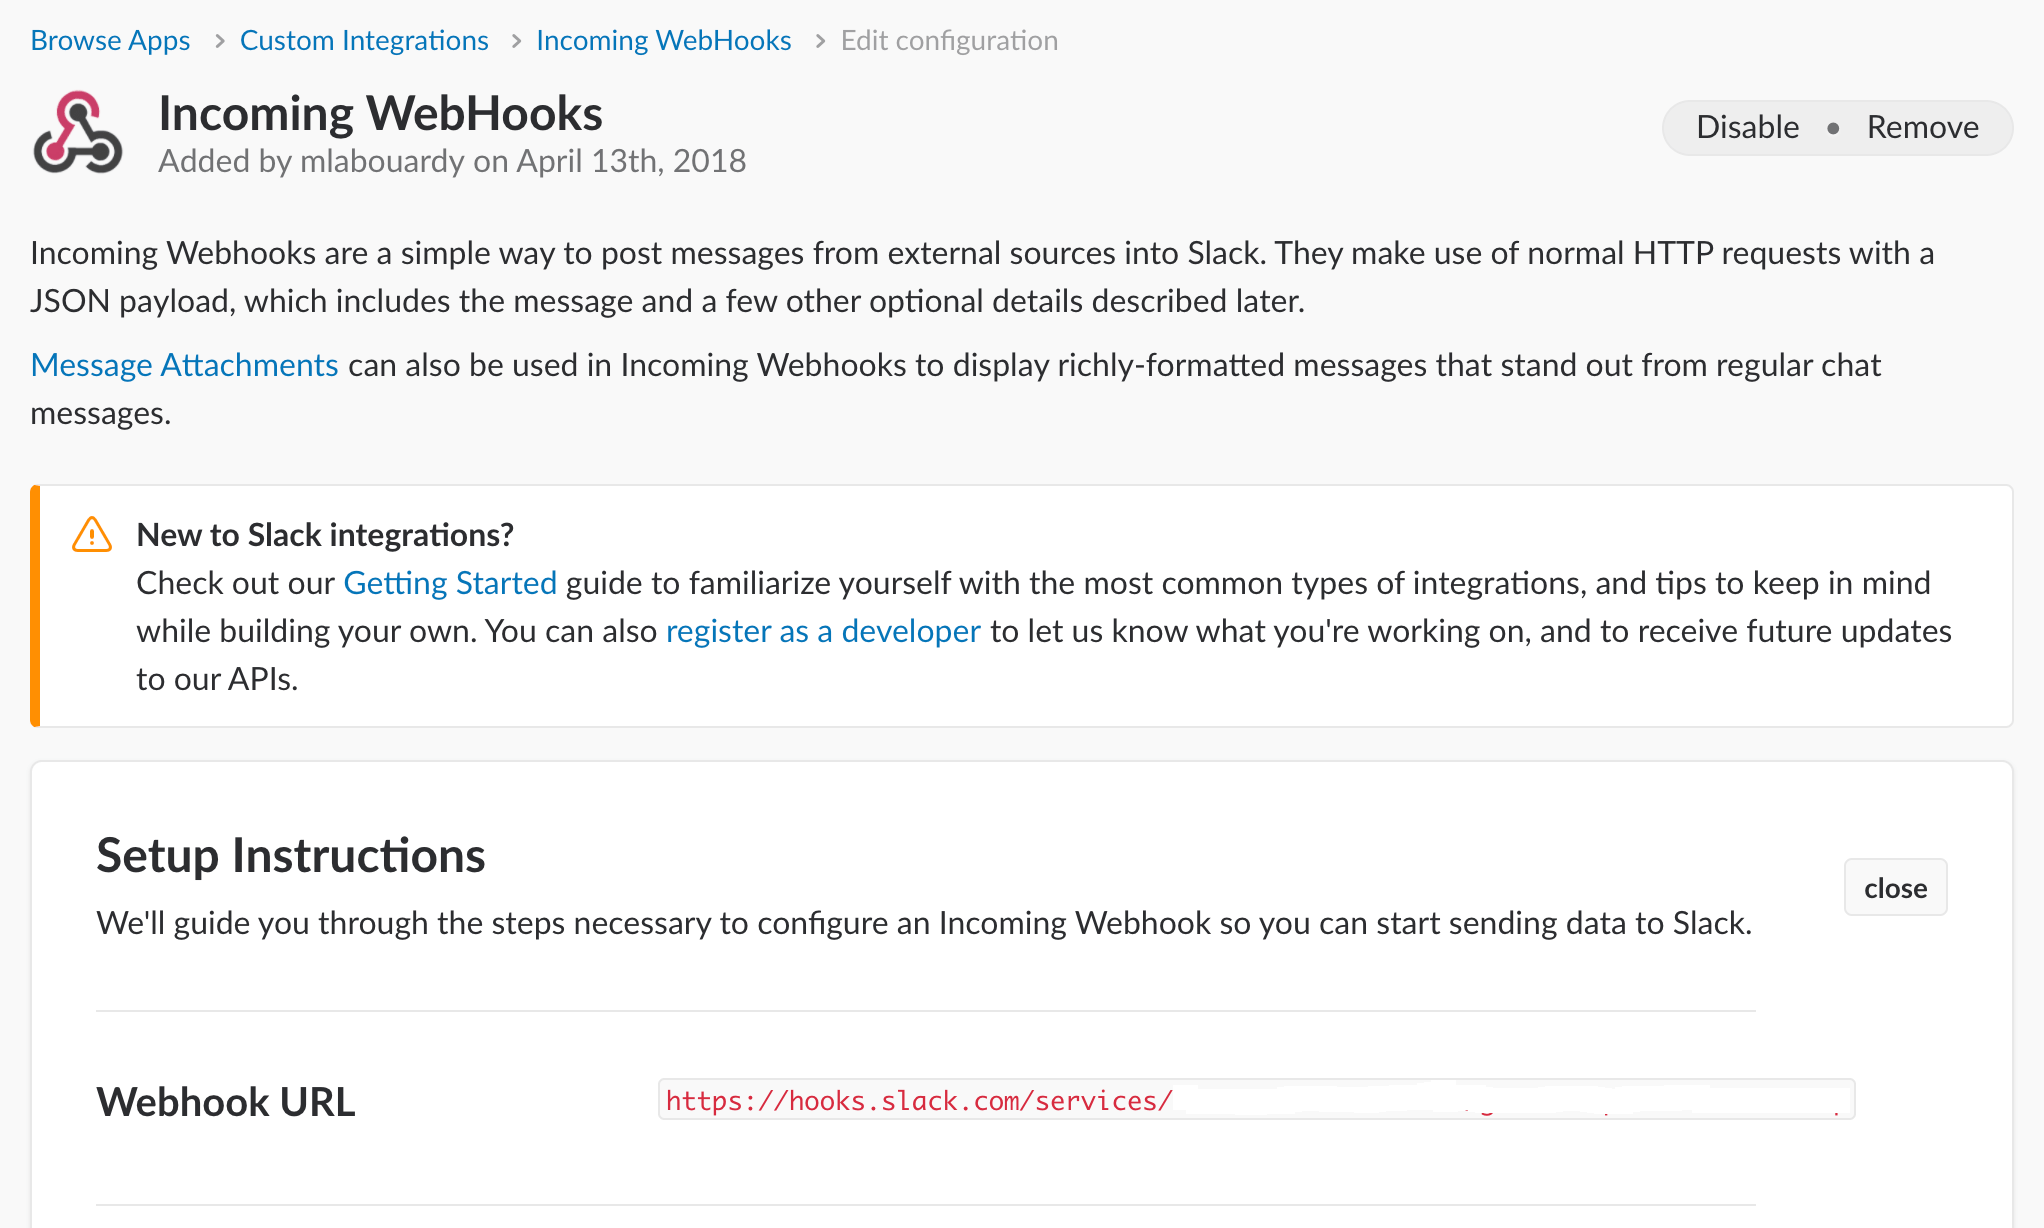
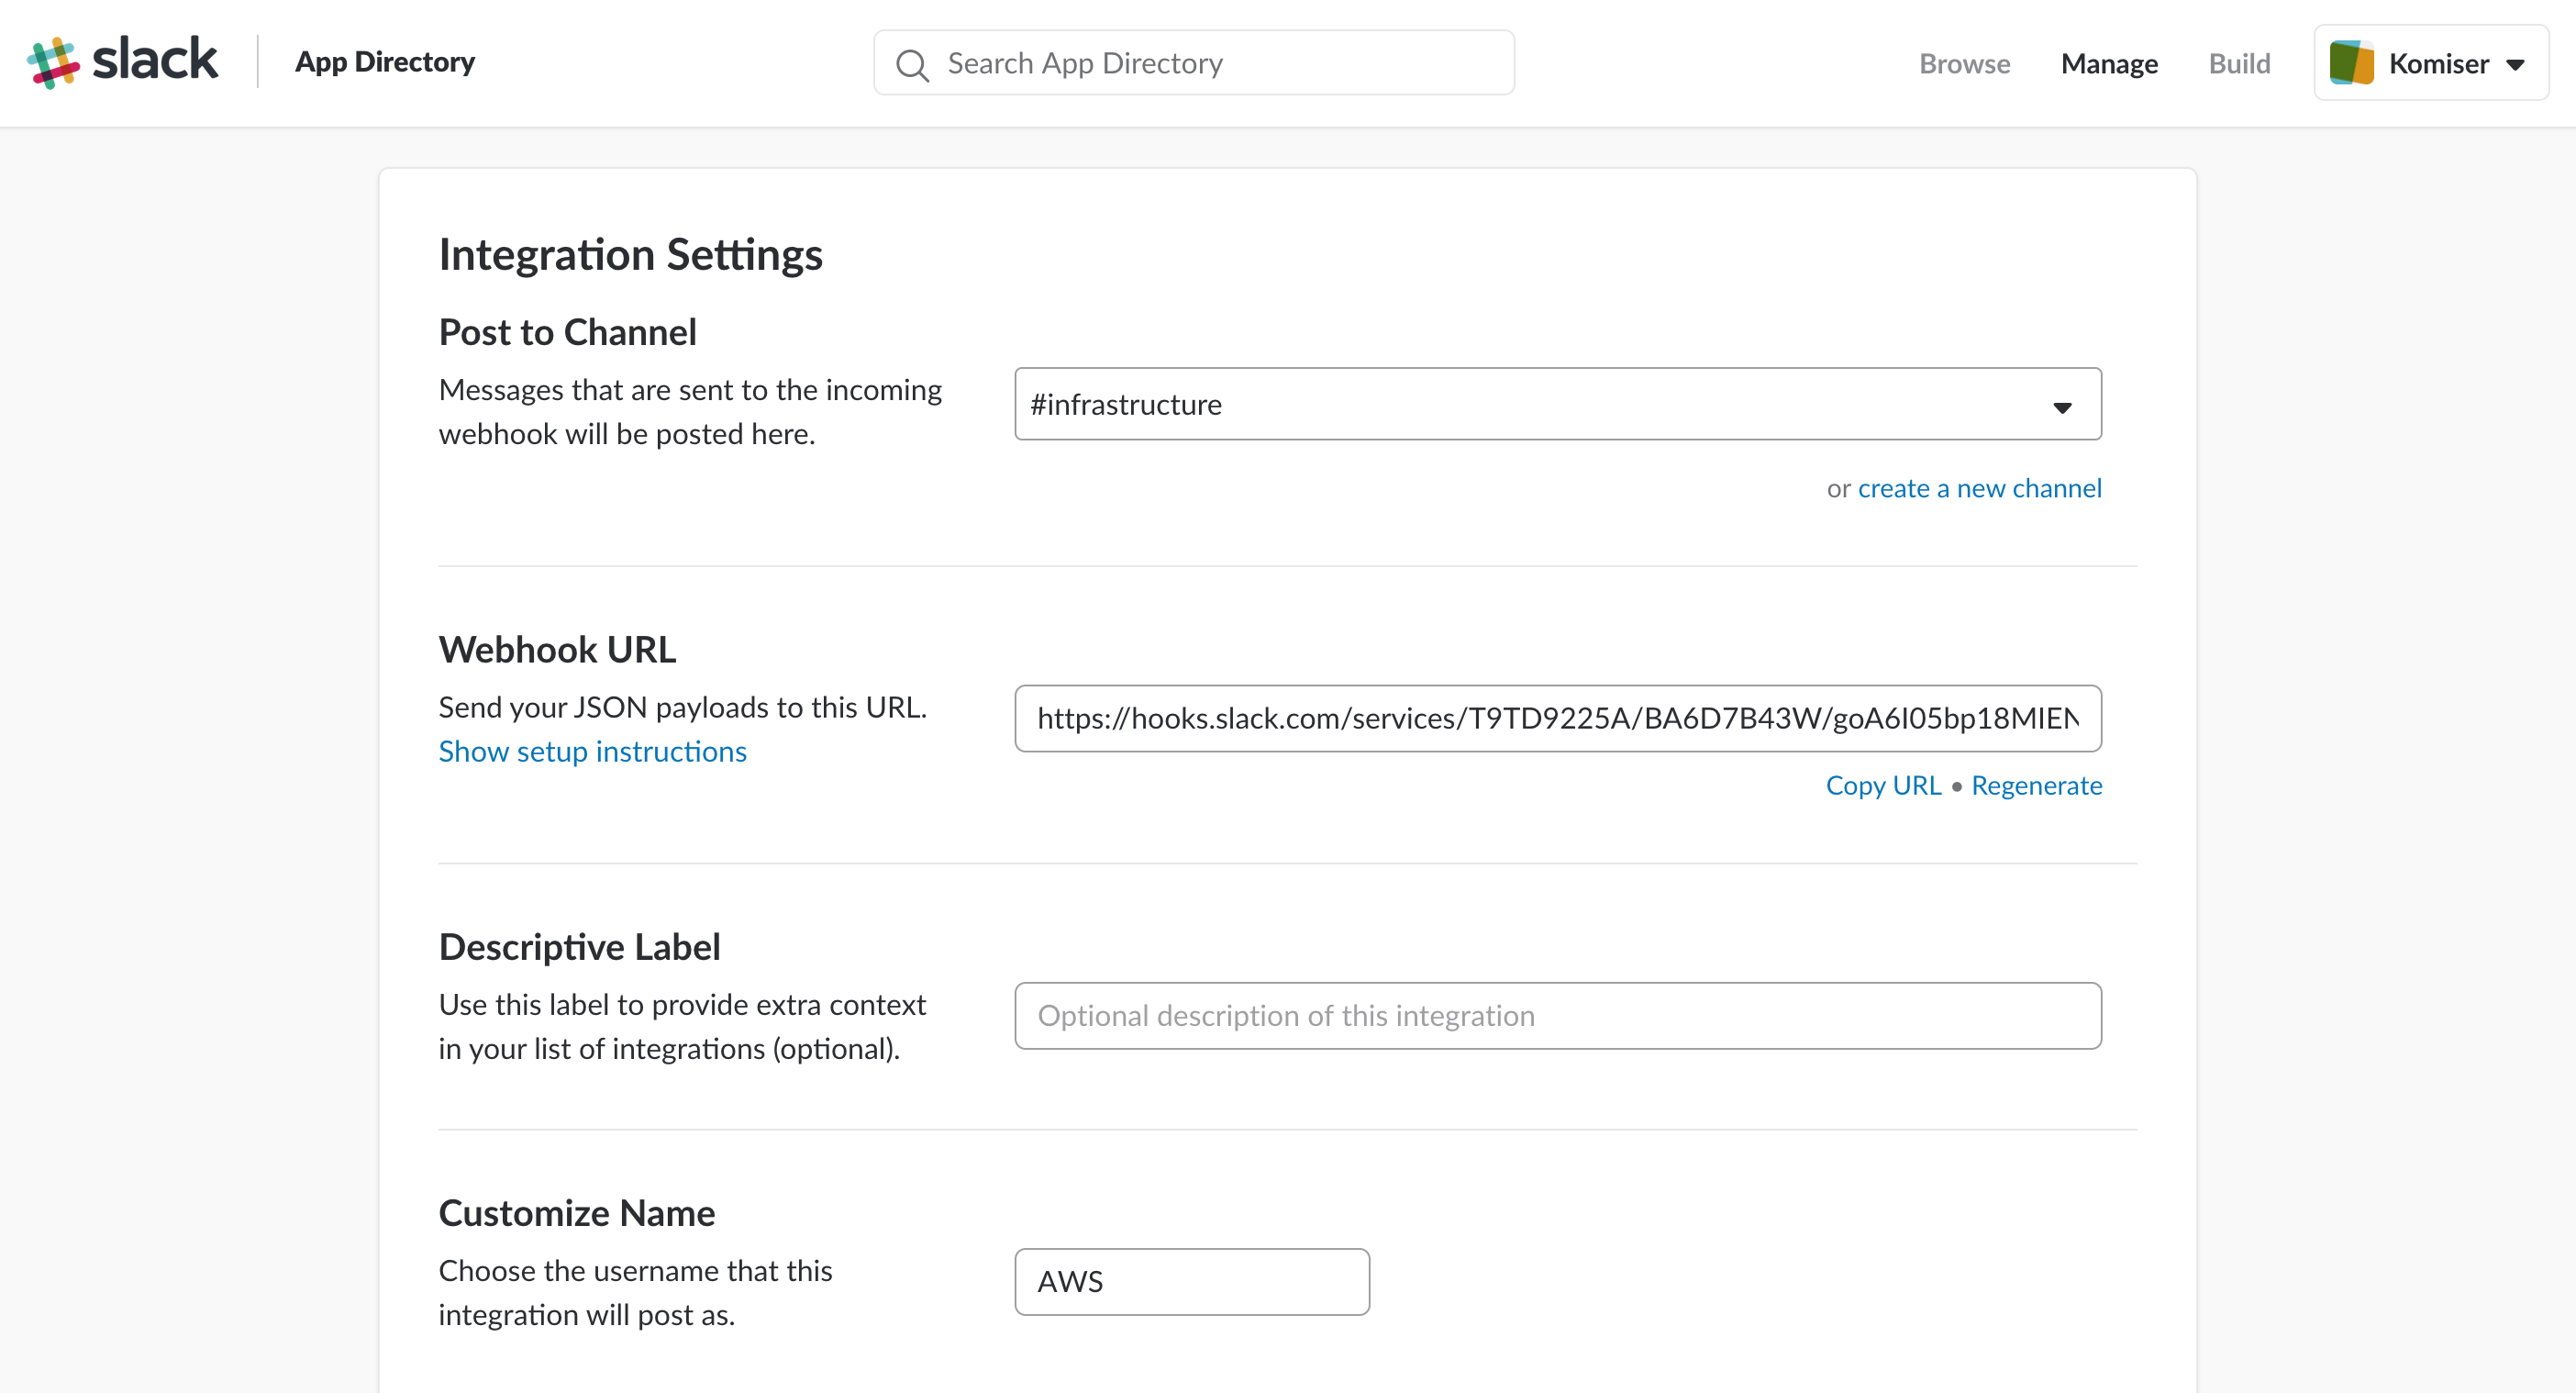
To be able to post messages to slack channel, we need to create a Slack Incoming WebHook. Start by setting up an incoming webhook integration in your Slack workspace:


Note down the returned WebHook URL for upcoming part.

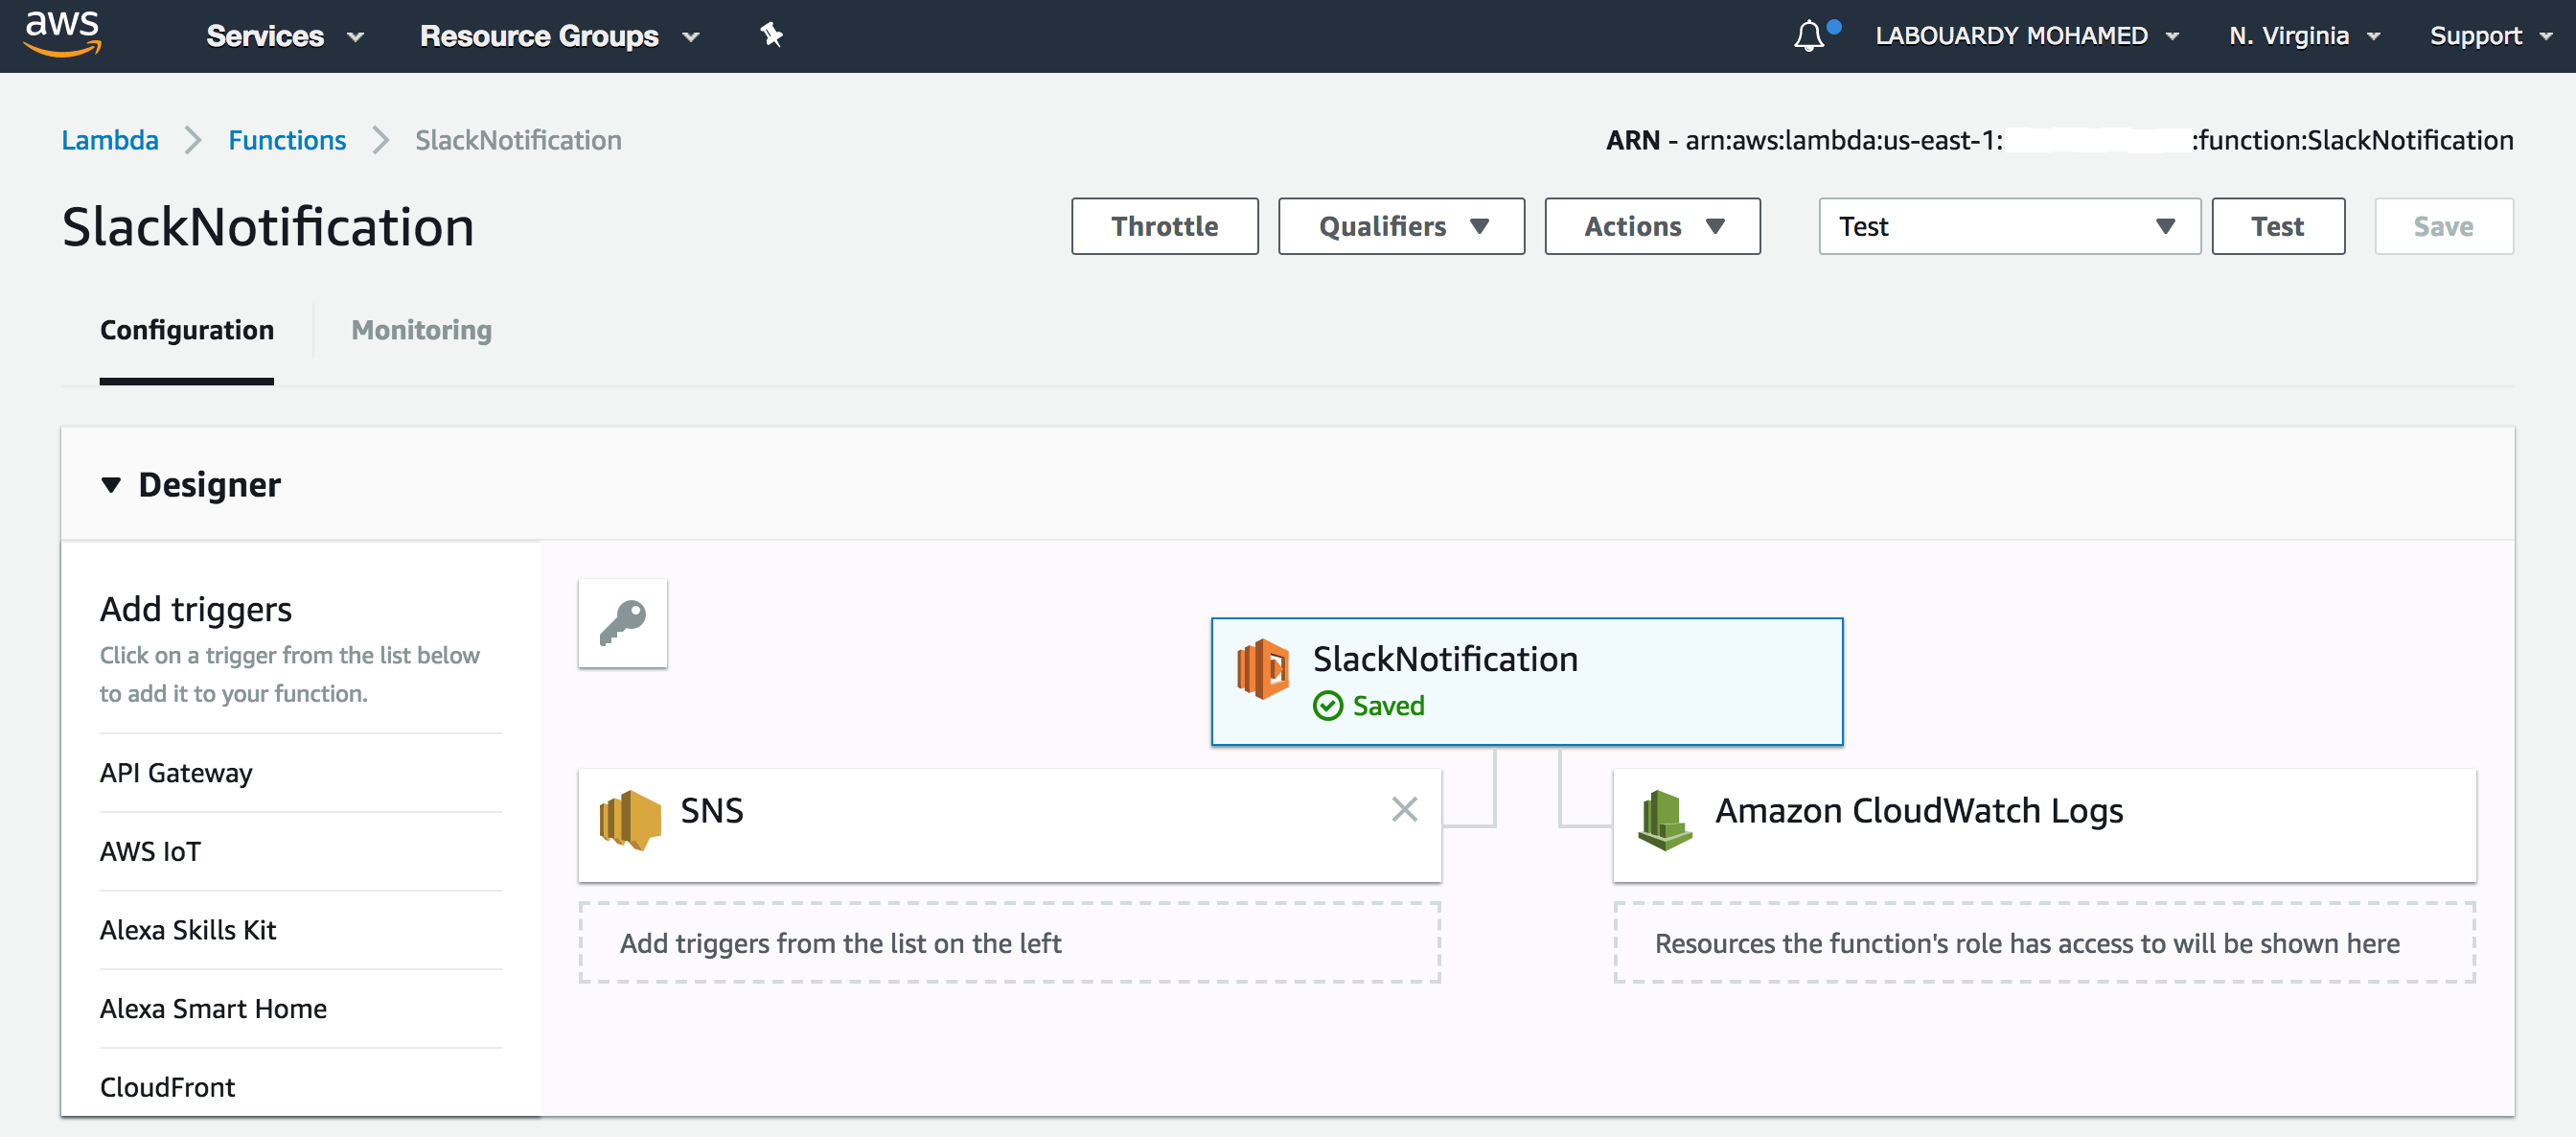
The Lambda handler function is written in Go, it takes as an argument the SNS message. Then, it parses it and queries the Slack API to post a message to the Slack channel configured in the previous section:

1
2
3
4
5
6
7
8
9
10
11
12
13
14
15
16
17
18
19
20
21
22
23
24
25
26
27
28
29
30
31
32
33
34
35
36
37
38
39
40
41
42
43
44
45
46
47
48
49
50
51
52
53
54
55
56
57
58
59
60
61
62
63
64
65
66
67
68
69
70
71
72
73
74
75
76
77
78
79
80
81
82
83
84
85
86
87
88
89
90
91
92
93
94
95
96
package main

import (
"bytes"
"encoding/json"
"fmt"
"log"
"net/http"
"os"

"github.com/aws/aws-lambda-go/lambda"
)

type Request struct {
Records []struct {
SNS struct {
Type string `json:"Type"`
Timestamp string `json:"Timestamp"`
SNSMessage string `json:"Message"`
} `json:"Sns"`
} `json:"Records"`
}

type SNSMessage struct {
AlarmName string `json:"AlarmName"`
NewStateValue string `json:"NewStateValue"`
NewStateReason string `json:"NewStateReason"`
}

type SlackMessage struct {
Text string `json:"text"`
Attachments []Attachment `json:"attachments"`
}

type Attachment struct {
Text string `json:"text"`
Color string `json:"color"`
Title string `json:"title"`
}

func handler(request Request) error {
var snsMessage SNSMessage
err := json.Unmarshal([]byte(request.Records[0].SNS.SNSMessage), &snsMessage)
if err != nil {
return err
}

log.Printf("New alarm: %s - Reason: %s", snsMessage.AlarmName, snsMessage.NewStateReason)
slackMessage := buildSlackMessage(snsMessage)
postToSlack(slackMessage)
log.Println("Notification has been sent")
return nil
}

func buildSlackMessage(message SNSMessage) SlackMessage {
return SlackMessage{
Text: fmt.Sprintf("`%s`", message.AlarmName),
Attachments: []Attachment{
Attachment{
Text: message.NewStateReason,
Color: "danger",
Title: "Reason",
},
},
}
}

func postToSlack(message SlackMessage) error {
client := &http.Client{}
data, err := json.Marshal(message)
if err != nil {
return err
}

req, err := http.NewRequest("POST", os.Getenv("SLACK_WEBHOOK"), bytes.NewBuffer(data))
if err != nil {
return err
}

resp, err := client.Do(req)
if err != nil {
return err
}
defer resp.Body.Close()

if resp.StatusCode != 200 {
fmt.Println(resp.StatusCode)
return err
}

return nil
}

func main() {
lambda.Start(handler)
}

As Go is a compiled language, build the application and create a Lambda deployment package using the bash script below:

1
2
3
4
5
6
7
8
9
10
#!/bin/bash

echo "Building binary"
GOOS=linux GOARCH=amd64 go build -o main main.go

echo "Create deployment package"
zip deployment.zip main

echo "Cleanup"
rm main

Once created, use the AWS CLI to deploy the function to Lambda. Make sure to override the Slack WebHook with your own:

1
2
3
4
5
6
aws lambda create-function --function-name SlackNotification
--zip-file fileb://./deployment.zip
--runtime go1.x --handler main
--role IAM_ROLE_ARN
--environment Variables={SLACK_WEBHOOK=https://hooks.slack.com/services/TOKEN}
--region AWS_REGION

Note: For non Gophers you can download the zip file directly from here.

From here, configure the invoking service for your function to be the SNS topic we created earlier:

1
2
3
aws sns subscribe --topic-arn TOPIC_ARN --protocol lambda
--notification-endpoint LAMBDA_ARN
--region AWS_REGION

Lambda Dashboard:


Let’s test it out, connect to your instance via SSH, then install stress which is a tool to do workload testing:

1
sudo yum install -y stress

Issue the following command to generate some workloads on the CPU:

1
stress --cpu 2 --timeout 60s

You should receive a Slack notification as below:


Note: You can go further and customize your Slack message.

Drop your comments, feedback, or suggestions below — or connect with me directly on Twitter @mlabouardy.

Build a Serverless Production-Ready Blog

Are you tired of maintaining your CMS (WordPress, Drupal, etc) ? Paying expensive hosting fees? Fixing security issues everyday ?


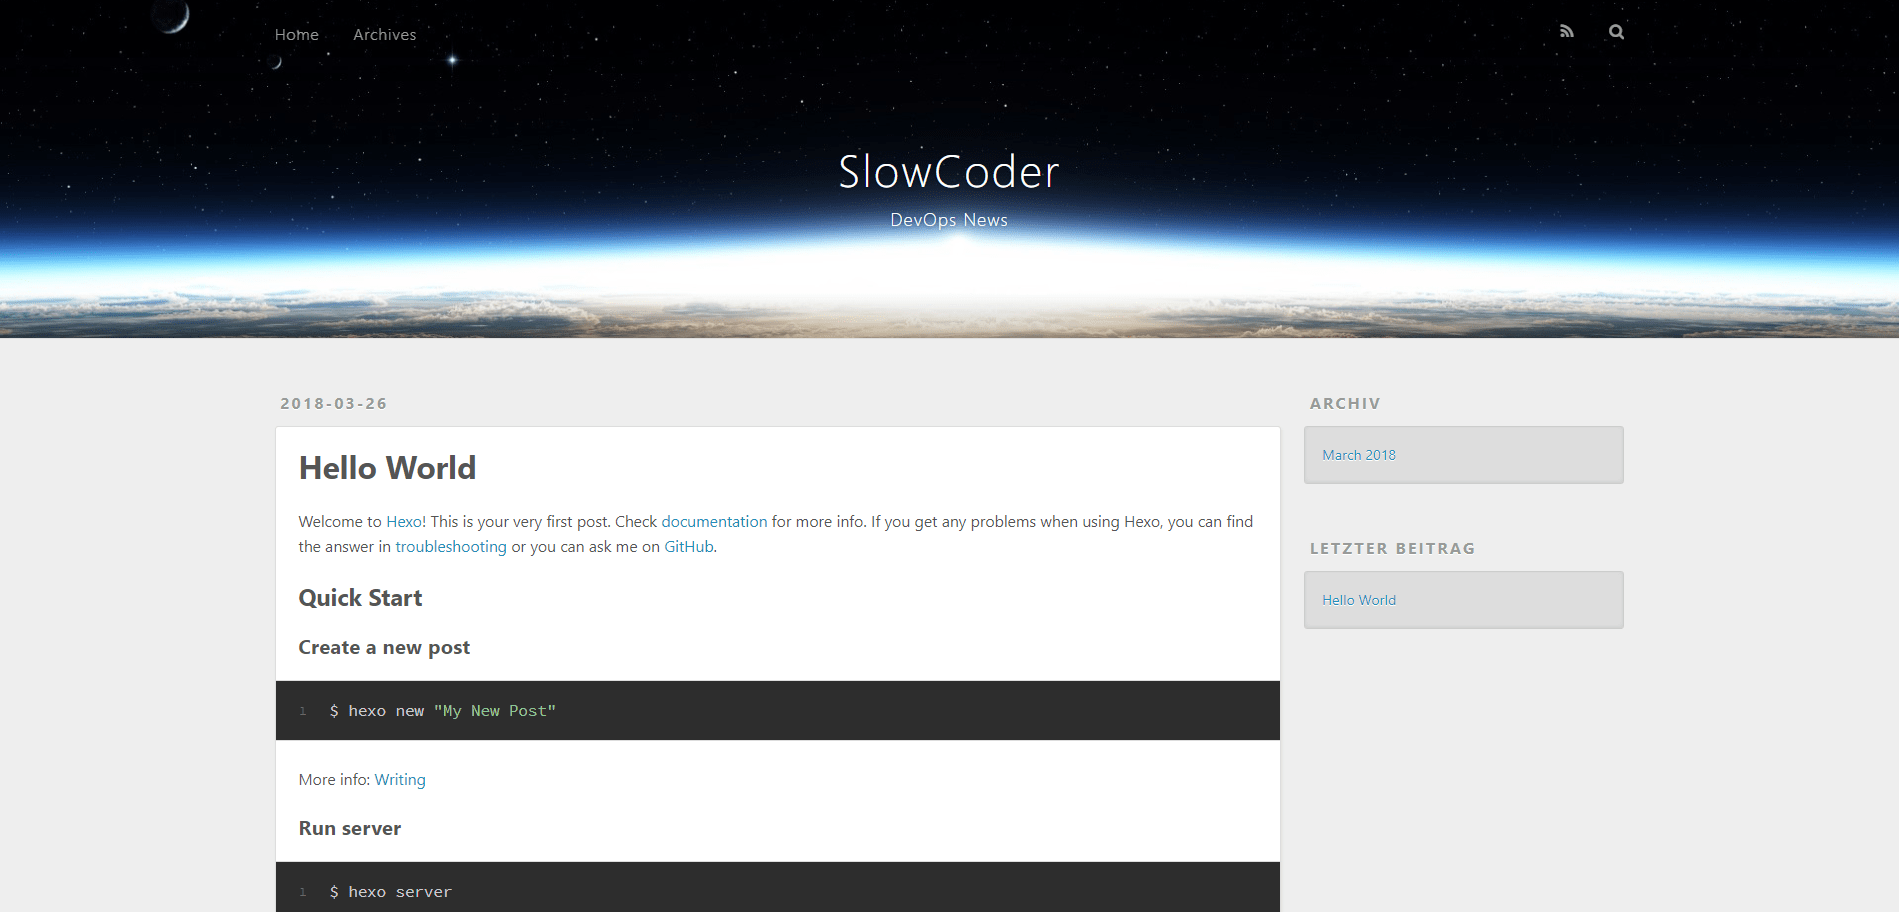
I discovered not long ago a new blogging framework called Hexo which let you publish Markdown documents in the form of blog post. So as always I got my hands dirty and wrote this post to show you how to build a production-ready blog with Hexo and use the AWS S3 to make your blog Serverless and pay only per usage. Along the way, I will show you how to automate the deployment of new posts by setting up a CI/CD pipeline

To get started, Hexo requires Node.JS & Git to be installed. Once all requirements are installed, issue the following command to install Hexo CLI:

1
npm install -g hexo-cli

Next, create a new empty project:

1
hexo init slowcoder.com

Modify blog global settings in _config.yml file:

1
2
3
4
5
6
7
8
# Site
title: SlowCoder
subtitle: DevOps News and Tutorials
description: DevOps, Cloud, Serverless, Containers news and tutorials for everyone
keywords: programming,devops,cloud,go,mobile,serverless,docker
author: Mohamed Labouardy
language: en
timezone: Europe/Paris

Start a local server with “hexo server“. By default, this is at http://localhost:4000. You’ll see Hexo’s pre-defined “Hello World” test post:


If you want to change the default theme, you just need to go here and find a new one you prefer.

I opt for Magnetic Theme as it includes many features:

  • Disqus and Facebook comments
  • Google Analytics
  • Cover image for posts and pages
  • Tags Support
  • Responsive Images
  • Image Gallery
  • Social Accounts configuration
  • Pagination

Clone the theme GitHub repository as below:

1
git clone https://github.com/klugjo/hexo-theme-magnetic themes/magnetic

Then update your blog’s main _config.yml to set the theme to magnetic. Once done, restart the server:


Now you are almost done with your blog setup. It is time to write your first article. To generate a new article file, use the following command:

1
hexo new POST_TITLE


Now, sign in to AWS Management Console, navigate to S3 Dashboard and create an S3 Bucket or use the AWS CLI to create a new one:

1
aws s3 mb s3://slowcoder.com

Add the following policy to the S3 bucket to make all objects public by default:

1
2
3
4
5
6
7
8
9
10
11
12
13
14
15
{
"Id": "Policy1522074684919",
"Version": "2012-10-17",
"Statement": [
{
"Sid": "Stmt1522074683215",
"Action": [
"s3:GetObject"
],
"Effect": "Allow",
"Resource": "arn:aws:s3:::slowcoder.com/*",
"Principal": "*"
}
]
}

Next, enable static website hosting on the S3 bucket:

1
aws s3 website s3://slowcoder.com --index-document index.html

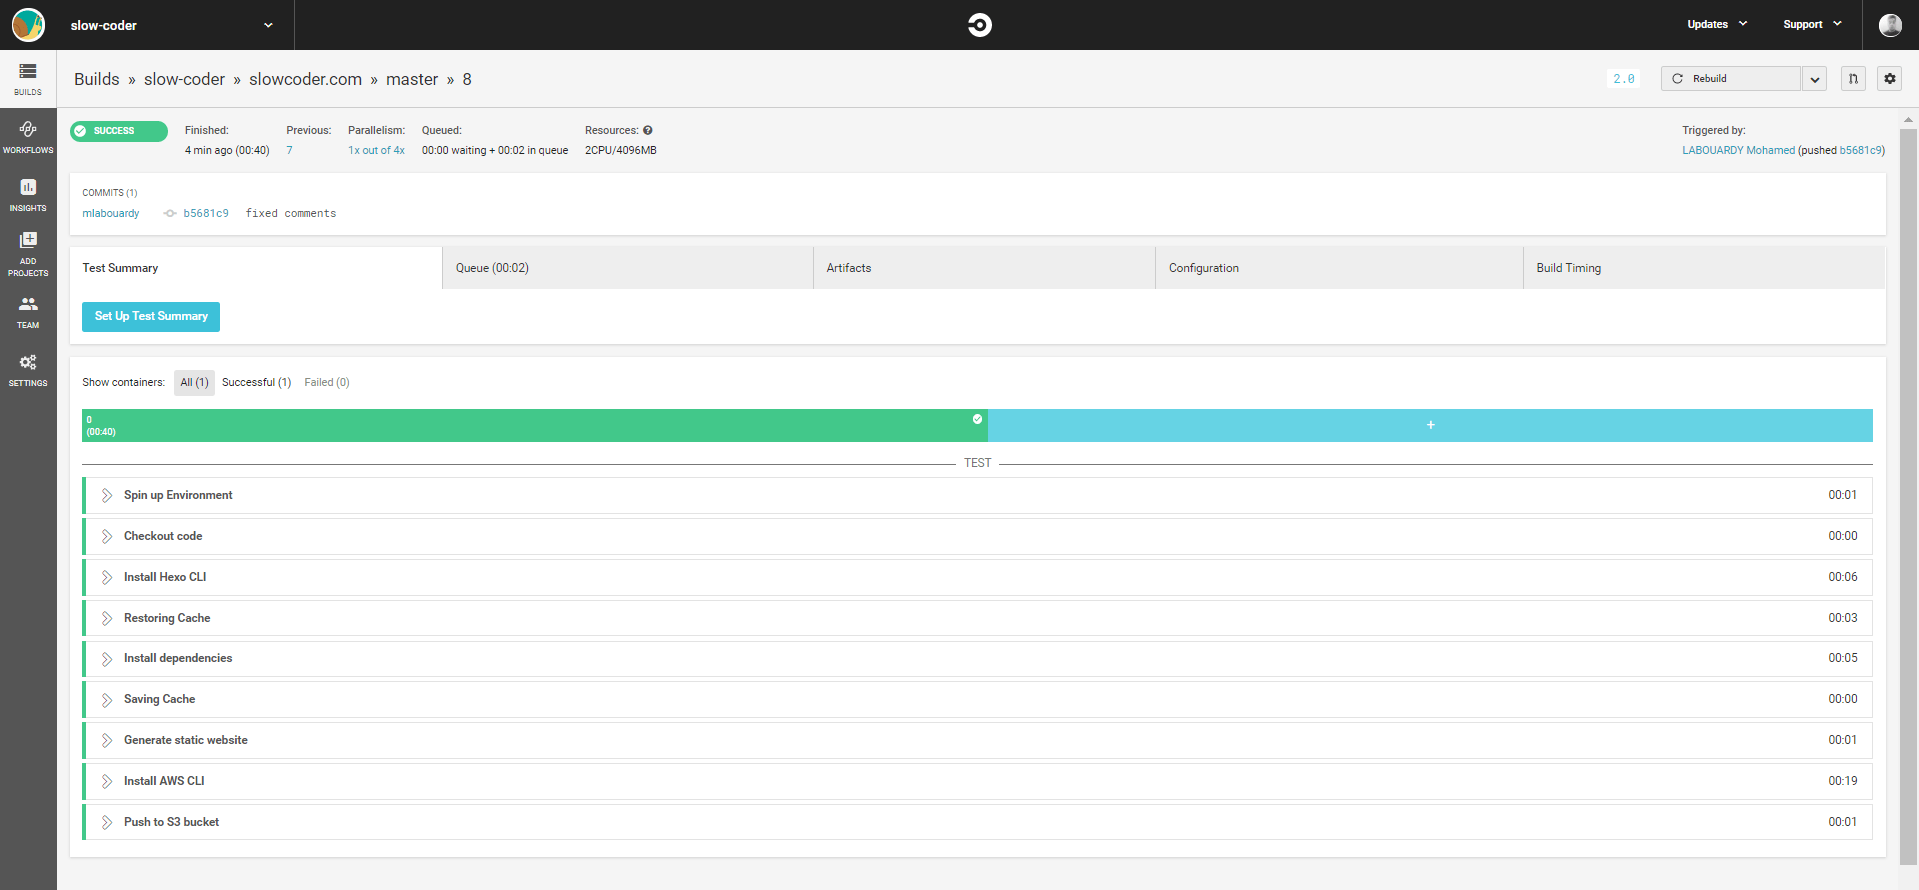
In order to automate the process of deployment of the blog to S3 each time a new article is been published. We will setup a CI/CD pipeline using CircleCI.

Sign in to CircleCI using your GitHub account, then add the circle.yml file to your project:

1
2
3
4
5
6
7
8
9
10
11
12
13
14
15
16
17
18
19
20
21
22
23
24
25
26
27
28
29
30
31
32
version: 2
jobs:
build:
docker:
- image: node:9.9.0
working_directory: ~/slowcoder.com
steps:
- checkout
- run:
name: Install Hexo CLI
command: npm install -g hexo-cli
- restore_cache:
keys:
- npm-deps-{{ checksum "package.json" }}
- run:
name: Install dependencies
command: npm install
- save_cache:
key: npm-deps-{{ checksum "package.json" }}
paths:
- node_modules
- run:
name: Generate static website
command: hexo generate
- run:
name: Install AWS CLI
command: |
apt-get update
apt-get install -y awscli
- run:
name: Push to S3 bucket
command: cd public/ && aws s3 sync . s3://slowcoder.com

Note: Make sure to set the AWS Access Key ID and Secret Access Key in your Project’s Settings page on CircleCI (s3:PutObject permission).

Now every time you push changes to your GitHub repo, CircleCI will automatically deploy the changes to S3. Here’s a passing build:


Finally, to make our blog user-friendly, we will setup a custom domain name in Route53 as below:


Note: You can go further and setup a CloudFront Distribution in front of the S3 bucket to optimize delivery of blog assets.

You can test your brand new blog now by typing the following adress: http://slowcoder.com :


Drop your comments, feedback, or suggestions below — or connect with me directly on Twitter @mlabouardy.

Publish Custom Metrics to AWS CloudWatch

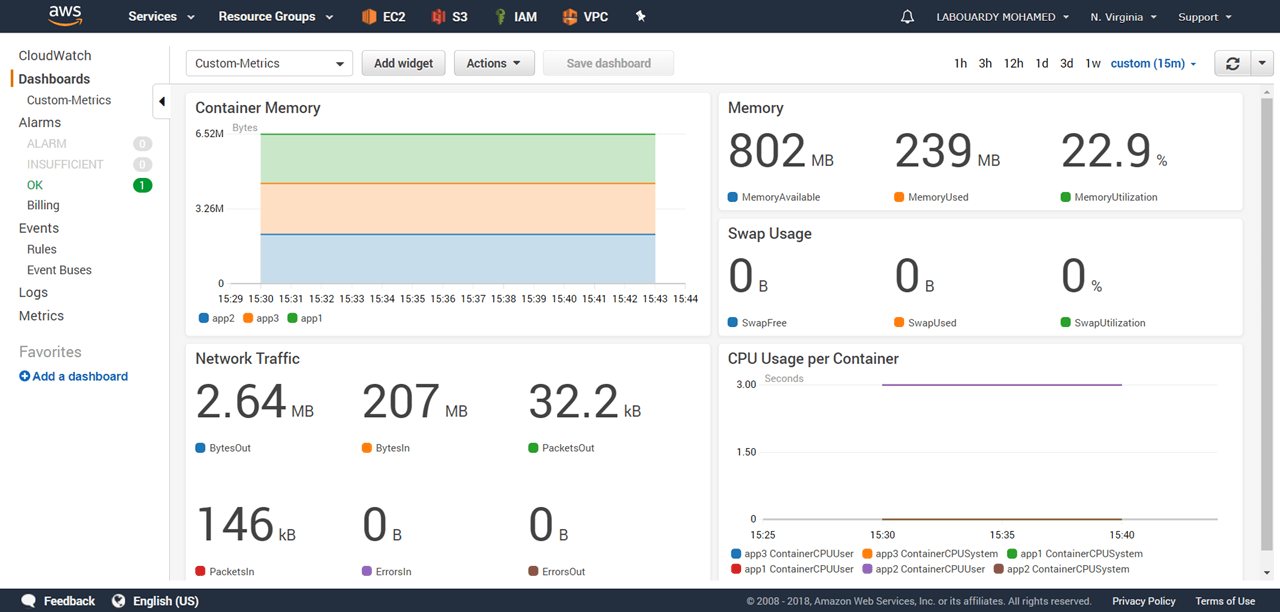
AWS Autoscaling Groups can only scale in response to metrics in CloudWatch and most of the default metrics are not sufficient for predictive scaling. That’s why you need to publish your custom metrics to CloudWatch.

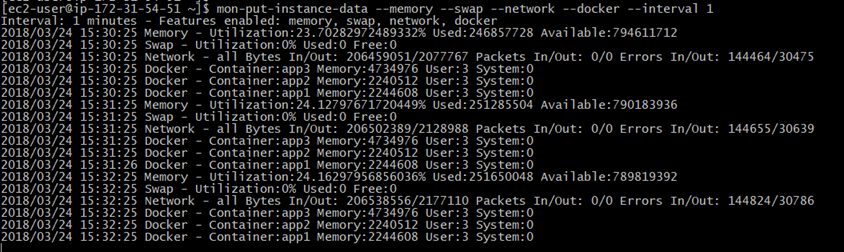
I was surfing the internet as usual, and I couldn’t find any post talking about how to publish custom metrics to AWS CloudWatch, and because I’m a Gopher, I got my hand dirty and I wrote my own script in Go.

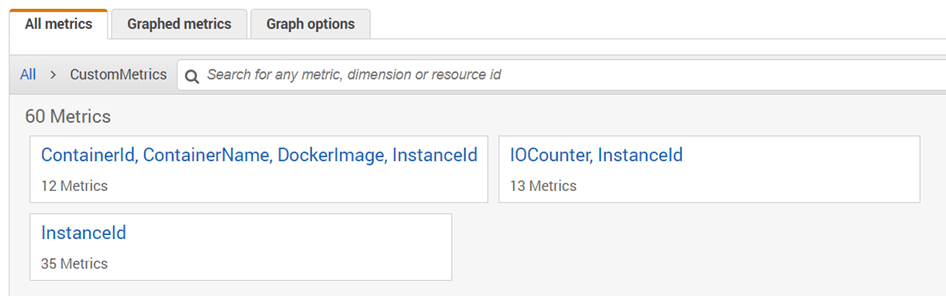
You can publish your own metrics to CloudWatch using the AWS Go SDK:

1
2
3
4
5
6
7
8
9
10
11
func Publish(metricData []cloudwatch.MetricDatum, namespace string) {
svc := cloudwatch.New(c.Config)
req := svc.PutMetricDataRequest(&cloudwatch.PutMetricDataInput{
MetricData: metricData,
Namespace: &namespace,
})
_, err := req.Send()
if err != nil {
log.Fatal(err)
}
}

To collect metrics about memory for example, you can either parse output of command ‘free -m’ or use a third-party library like gopsutil:

1
memoryMetrics, err := mem.VirtualMemory()

The memoryMetrics object expose multiple metrics:

  • Memory used
  • Memory available
  • Buffers
  • Swap cached
  • Page Tables
  • etc

Each metric will be published with an InstanceID dimension. To get the instance id, you can query the meta-data:

1
2
3
4
5
6
7
8
9
10
11
12
13
14
15
16
17
18
19
20
21
22
23
func GetInstanceID() (string, error) {
value := os.Getenv("AWS_INSTANCE_ID")
if len(value) > 0 {
return value, nil
}
client := &http.Client{}
req, err := http.NewRequest("GET", "http://169.254.169.254/latest/meta-data/instance-id", nil)
if err != nil {
return "", err
}

resp, err := client.Do(req)
if err != nil {
return "", err
}
defer resp.Body.Close()

data, err := ioutil.ReadAll(resp.Body)
if err != nil {
return "", err
}
return string(data), nil
}


What if I’m not a Gopher ? well, don’t freak out, I built a simple CLI which doesn’t require any Go knowledge or dependencies to be installed (AWS CloudWatch Monitoring Scripts requires Perl dependencies) and moreover it’s cross-platform.

The CLI collects the following metrics:

  • Memory: utilization, used, available.
  • Swap: utilization, used, free.
  • Disk: utilization, used, available.
  • Network: packets in/out, bytes in/out, errors in/out.
  • Docker: memory & cpu per container.

The CLI have been tested on instances using the following AMIs (64-bit versions):

  • Amazon Linux
  • Amazon Linux 2
  • Ubuntu 16.04
  • Microsoft Windows Server

To get started, find the appropriate package for your instance and download it. For linux:

1
2
wget https://s3.us-east-1.amazonaws.com/mon-put-instance-data/1.0.0/linux/mon-put-instance-data
chmod +x mon-put-instance-data

After you install the CLI, you may need to add the path to the executable file to your PATH variable. Then, issue the following command:

1
mon-put-instance-data --memory --swap --network --docker --interval 1

The command above will collect memory, swap, network & docker containers resource utilization on the current system.

Note: ensure an IAM role is associated with your instance, verify that it grants permission to perform cloudwatch:PutMetricData.


Now that we’ve written custom metrics to CloudWatch. You can view statistical graphs of your published metrics with the AWS Management Console:


You can create your own interactive and dynamic Dashboard based on these metrics:


Hope it helps ! The CLI is still in its early stages, so you are welcome to contribute to the project on GitHub.

Drop your comments, feedback, or suggestions below — or connect with me directly on Twitter @mlabouardy.

AWS CloudWatch Monitoring with Grafana

Hybrid cloud is the new reality. Therefore, you will need a single tool, general purpose dashboard and graph composer for your global infrastructure. That’s where Grafana comes into play. Due to it’s pluggable architecture, you have access to many widgets and plugins to create interactive & user-friendly dashboards. In this post, I will walk you through on how to create dashboards in Grafana to monitor in real-time your EC2 instances based on metrics collected in AWS CloudWatch.

To get started, create an IAM role with the following IAM policy:

1
2
3
4
5
6
7
8
9
10
11
12
13
14
15
16
{
"Version": "2012-10-17",
"Statement": [
{
"Sid": "1",
"Effect": "Allow",
"Action": [
"cloudwatch:PutMetricData",
"cloudwatch:GetMetricStatistics",
"cloudwatch:GetMetricData",
"cloudwatch:ListMetrics"
],
"Resource": "*"
}
]
}

Launch an EC2 instance with the user-data script below. Make sure to associate to the instance the role we created earlier:

1
2
3
4
#!/bin/sh
yum install -y https://s3-us-west-2.amazonaws.com/grafana-releases/release/grafana-5.0.3-1.x86_64.rpm
service grafana-server start
/sbin/chkconfig --add grafana-server

On the security group section, allow inbound traffic on port 3000 (Grafana Dashboard).

Once created, point your browser to the http://instance_dns_name:3000, you should see Grafana Login page (default credentials: admin/admin) :


Grafana ships with built in support for CloudWatch, so add a new data source:


Note: In case you are using an IAM Role (recommended), keep the other fields empty as above, otherwise, create a new file at ~/.aws/credentials with your own AWS Access Key & Secret key.

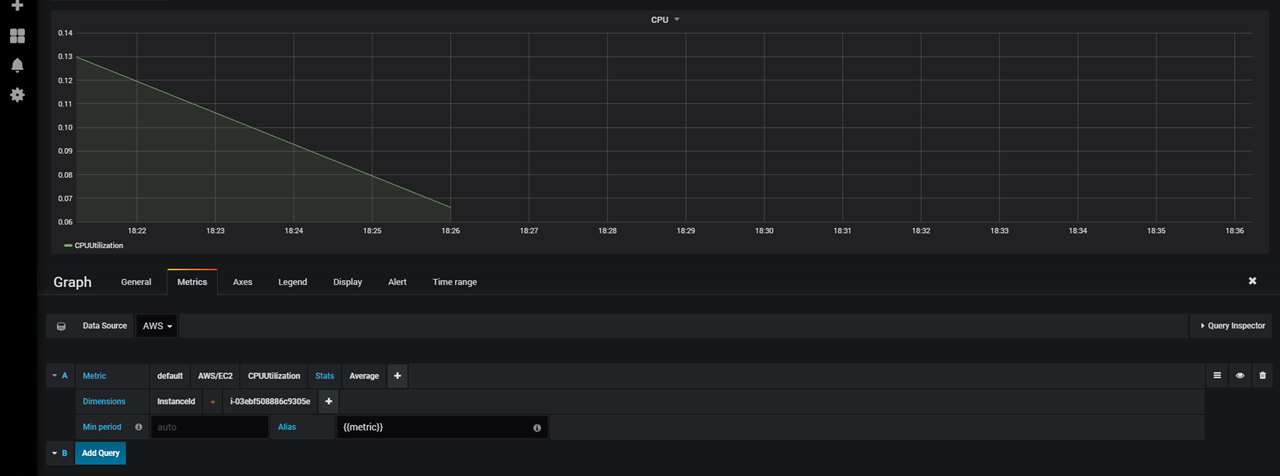
Create a new dashboard, and add new graph to the panel, select AWS/EC2 as namespace, CPUUtilization as metric, and the instance id of the instance you want to monitor in the dimension field:
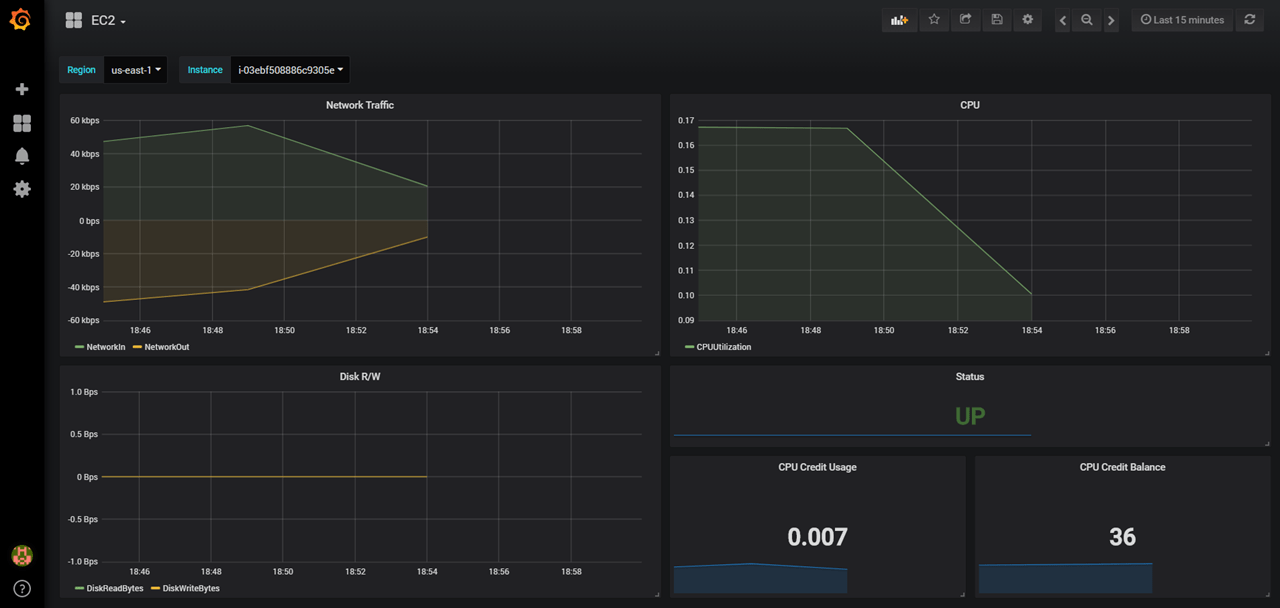


That’s great !


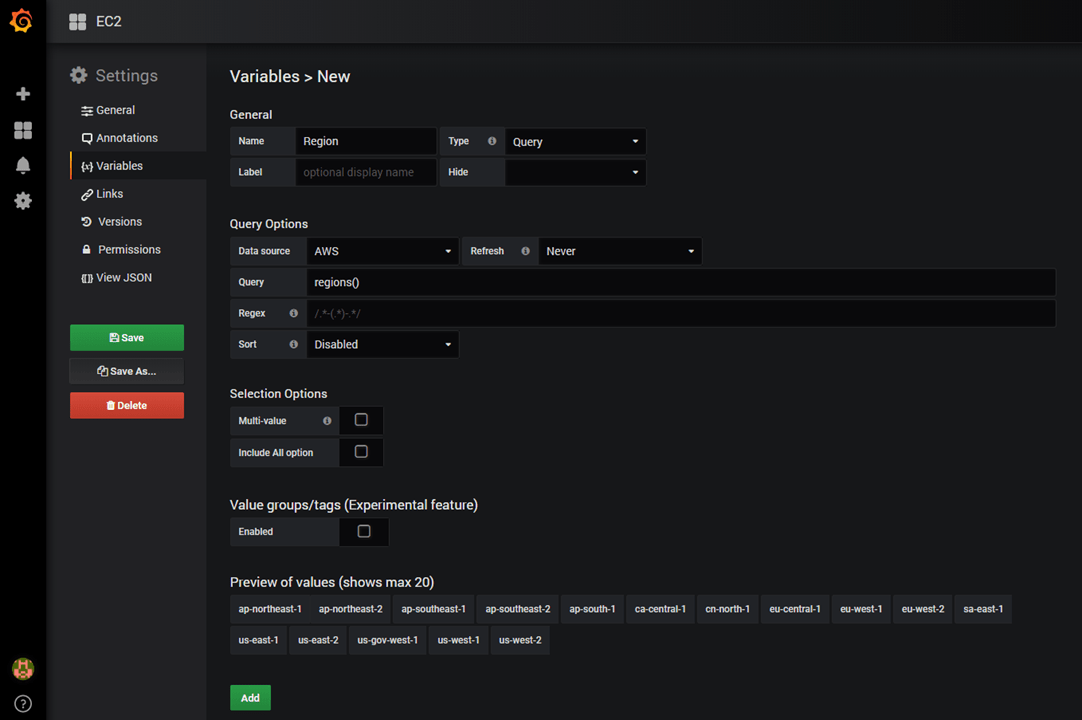
Well, instead of hard-coding the InstanceId in the query, we can use a feature in Grafana called “Query Variables“. Create a new variable to hold list of AWS supported regions :


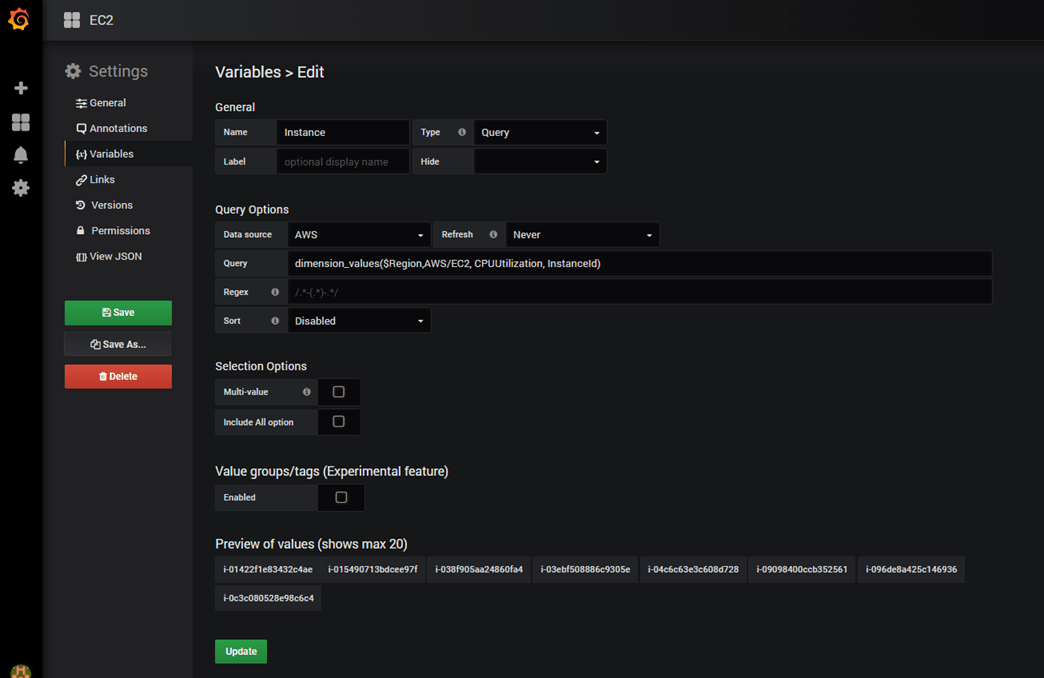
And, create a second variable to store list of instances ids per selected AWS region:


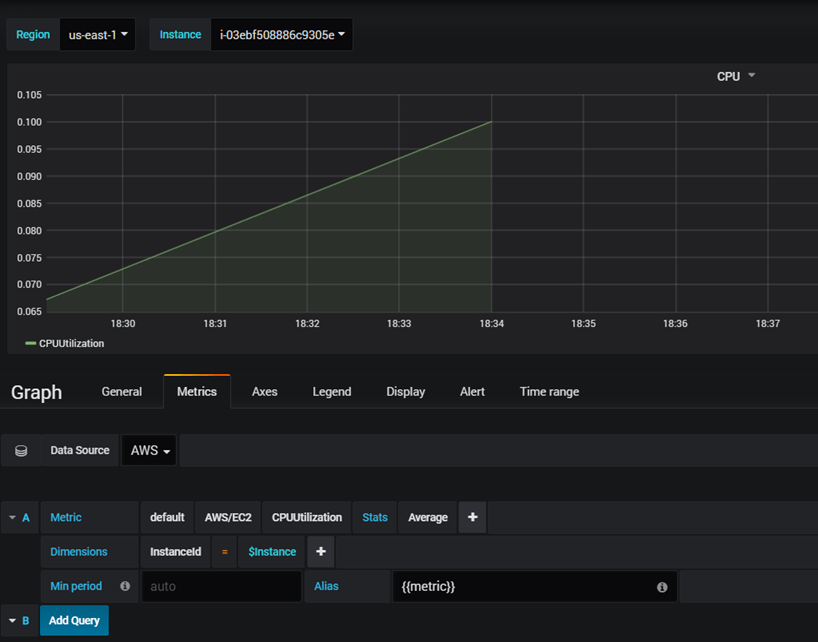
Now, go back to your graph and update the query as below:


That’s it, go ahead and create other widgets:


Note: You can download the dashboard from GitHub.

Now you’re ready to build interactive & dynamic dashboards for your CloudWatch metrics.

Drop your comments, feedback, or suggestions below — or connect with me directly on Twitter @mlabouardy.

Komiser:AWS Environment Inspector

In order to build HA & Resilient applications in AWS, you need to assume that everything will fail. Therefore, you always design and deploy your application in multiple AZ & regions. So you end up with many unused AWS resources (Snapshots, ELB, EC2, Elastic IP, etc) that could cost you a fortune.

One pillar of AWS Well-Architected Framework is Cost optimization. That’s why you need to have a global overview of your AWS Infrastructure. Fortunately, AWS offers many fully-managed services like CloudWatch, CloudTrail, Trusted Advisor & AWS Config to help you achieve that. But, they require a deep understanding of AWS Platform and they are not straighforward.


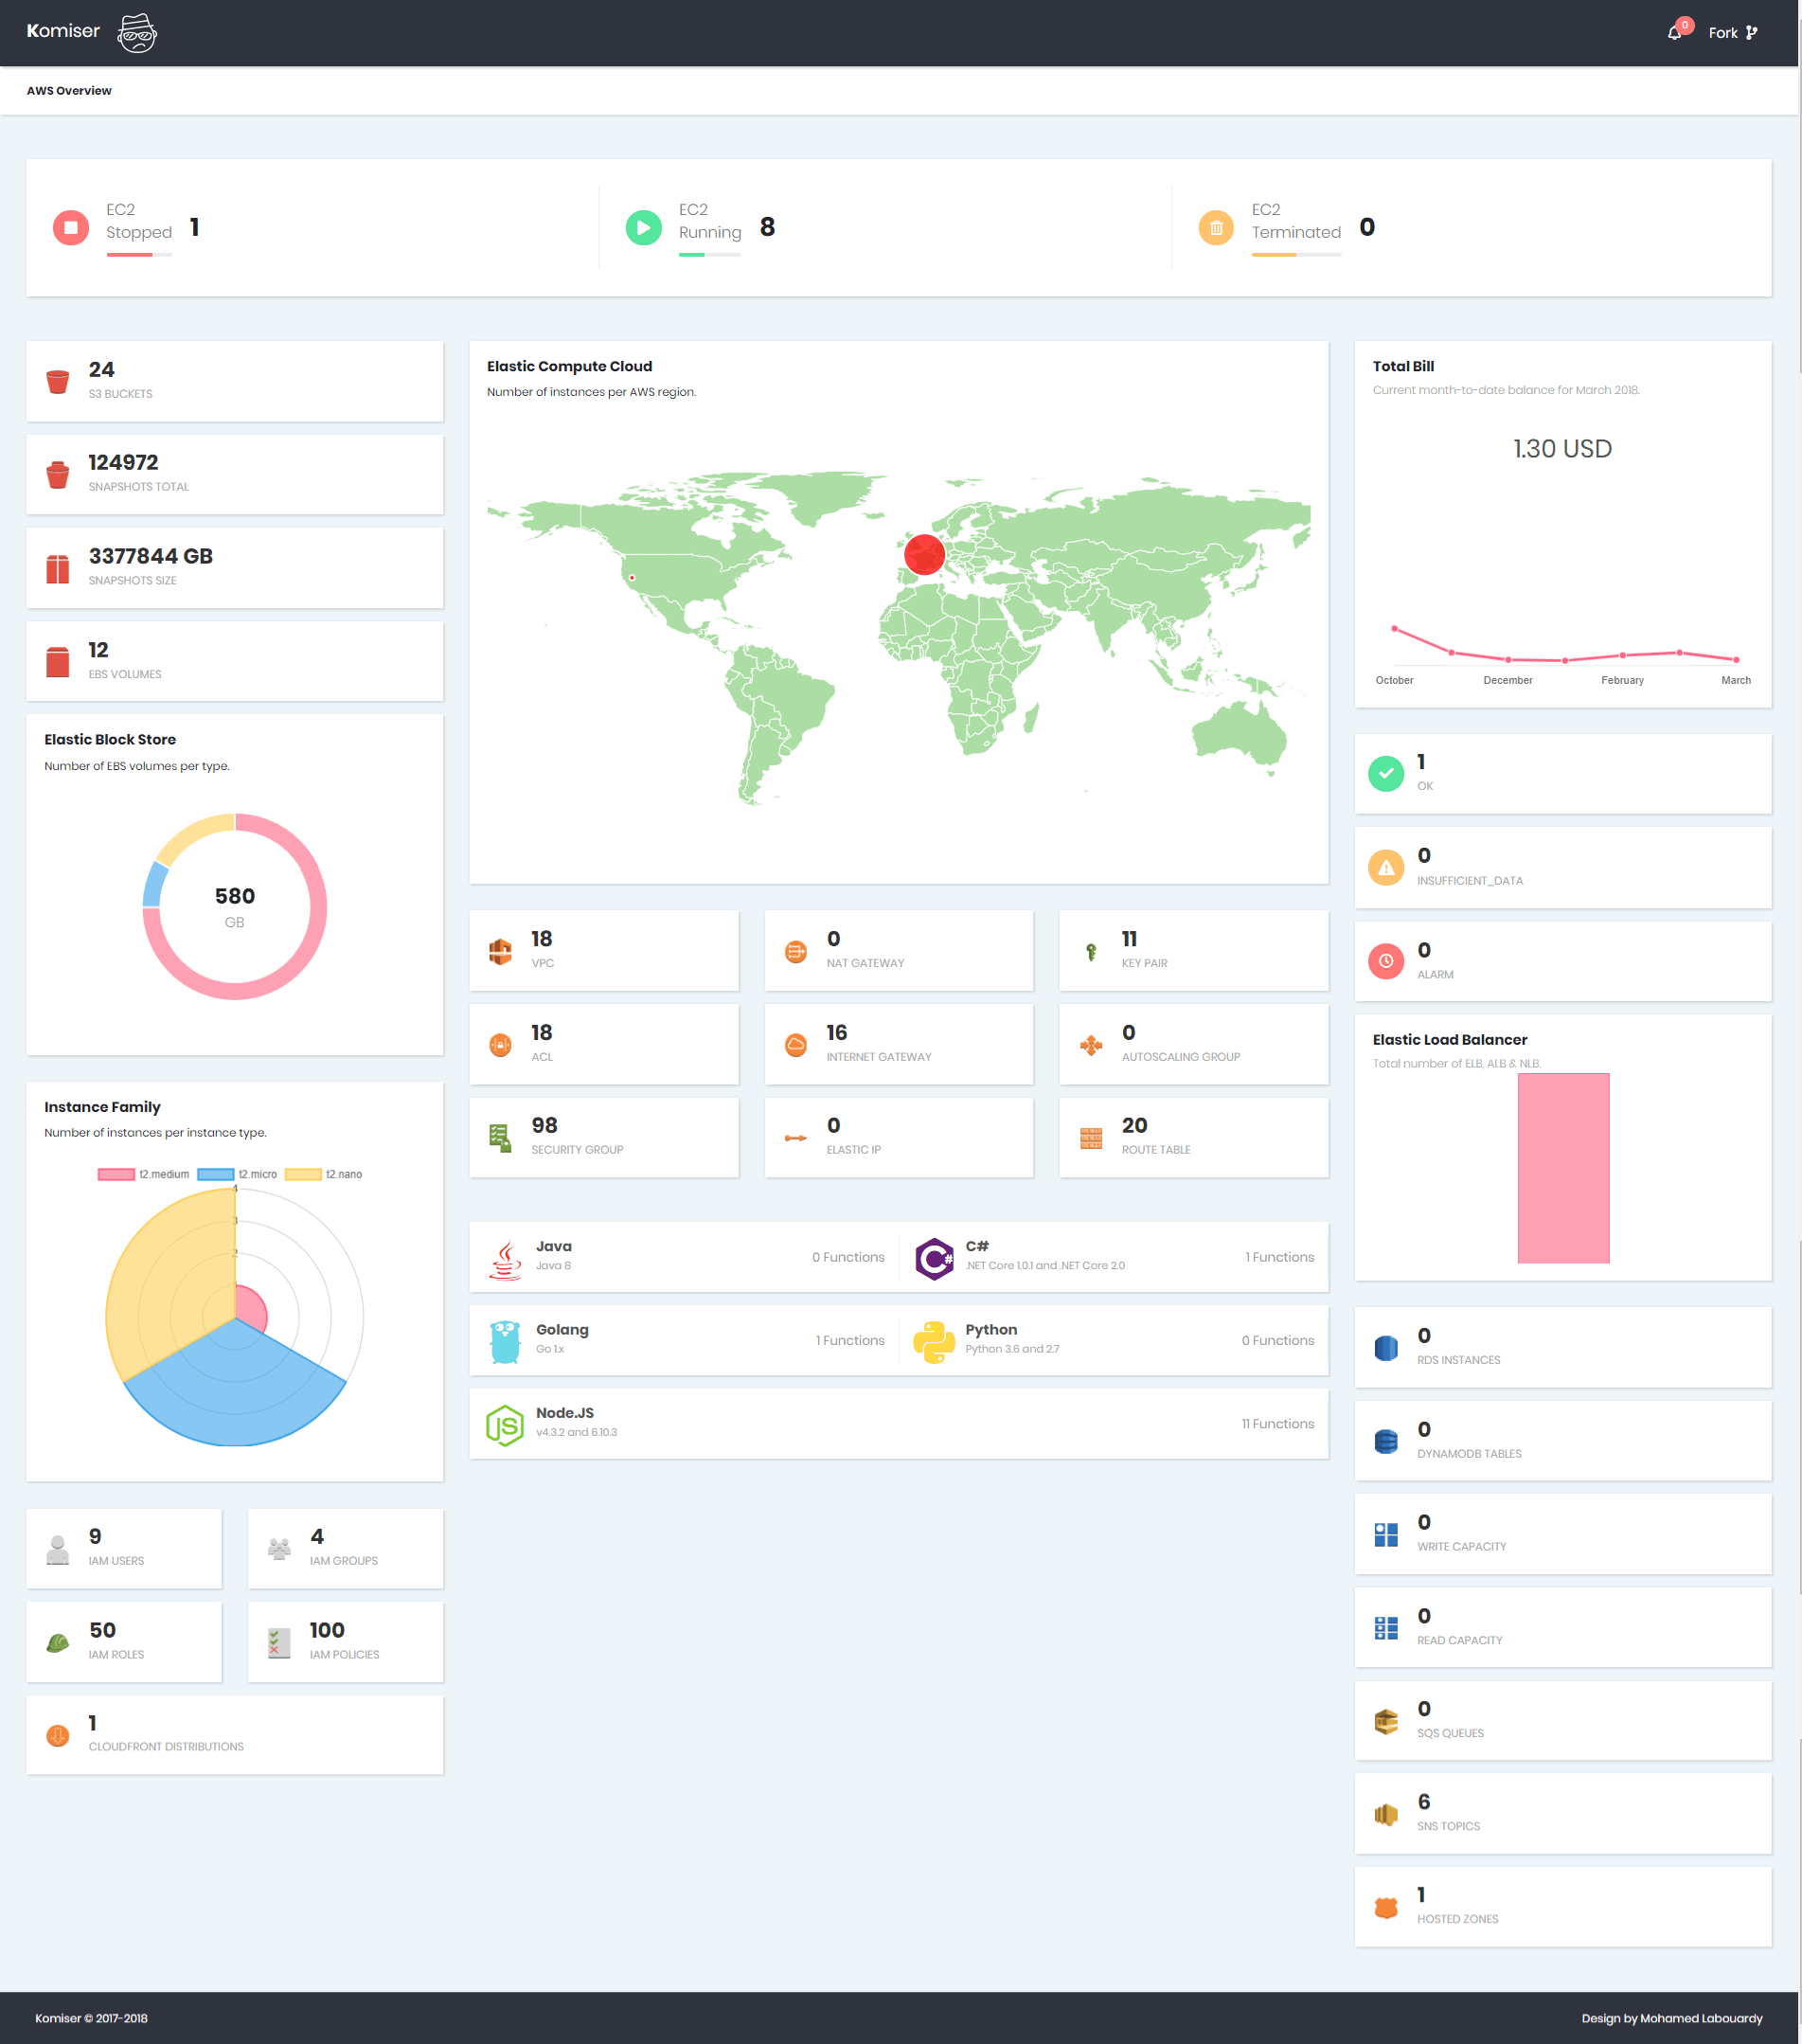
That’s why I came up with Komiser a tool that simplifies the process by querying the AWS API to fetch information about almost all critical services of AWS like EC2, RDS, ELB, S3, Lambda … in real-time in a single Dashboard.

Note: To prevent excedding AWS API rate limit for requests, the response is cached in in-memory cache by default for 30 minutes.

Komiser supported AWS Services:


  • Compute:
    • Running/Stopped/Terminated EC2 instances
    • Current EC2 instances per region
    • EC2 instances per family type
    • Lambda Functions per runtime environment
    • Disassociated Elastic IP addresses
    • Total number of Key Pairs
    • Total number of Auto Scaling Groups
  • Network & Content Delivery:
    • Total number of VPCs
    • Total number of Network Access Control Lists
    • Total number of Security Groups
    • Total number of Route Tables
    • Total number of Internet Gateways
    • Total number of Nat Gateways
    • Elastic Load Balancers per family type (ELB, ALB, NLB)
  • Management Tools:
    • CloudWatch Alarms State
    • Billing Report (Up to 6 months)
  • Database:
    • DynamoDB Tables
    • DynamoDB Provisionned Throughput
    • RDS DB instances
  • Messaging:
    • SQS Queues
    • SNS Topics
  • Storage:
    • S3 Buckets
    • EBS Volumes
    • EBS Snapshots
  • Security Identity & Compliance:
    • IAM Roles
    • IAM Policies
    • IAM Groups
    • IAM Users

1 – Configuring Credentials

Komiser needs your AWS credentials to authenticate with AWS services. The CLI supports multiple methods of supporting these credentials. By default the CLI will source credentials automatically from its default credential chain. The common items in the credentials chain are the following:

  • Environment Credentials
    • AWS_ACCESS_KEY_ID
    • AWS_SECRET_ACCESS_KEY
    • AWS_DEFAULT_REGION
  • Shared Credentials file (~/.aws/credentials)
  • EC2 Instance Role Credentials

To get started, create a new IAM user, and assign to it this following IAM policy:

1
2
3
4
5
6
7
8
9
10
11
12
13
14
15
16
17
18
19
20
21
22
23
24
25
26
27
28
29
30
31
32
33
34
35
36
37
38
39
40
41
42
43
44
45
46
47
48
49
50
51
52
53
54
55
56
57
58
59
60
61
62
63
{
"Version": "2012-10-17",
"Statement": [
{
"Sid": "1",
"Effect": "Allow",
"Action": [
"ec2:DescribeRegions",
"ec2:DescribeInstances",
"ec2:DescribeVolumes",
"ec2:DescribeVpcs",
"ec2:DescribeSecurityGroups",
"ec2:DescribeNatGateways",
"ec2:DescribeRouteTables",
"ec2:DescribeSnapshots",
"ec2:DescribeNetworkAcls",
"ec2:DescribeKeyPairs",
"ec2:DescribeInternetGateways"
],
"Resource": "*"
},
{
"Sid": "2",
"Effect": "Allow",
"Action": [
"ec2:DescribeAddresses",
"ec2:DescribeSnapshots",
"elasticloadbalancing:DescribeLoadBalancers",
"autoscaling:DescribeAutoScalingGroups",
"ce:GetCostAndUsage",
"s3:ListAllMyBuckets"
],
"Resource": "*"
},
{
"Sid": "3",
"Effect": "Allow",
"Action": [
"lambda:ListFunctions",
"dynamodb:ListTables",
"dynamodb:DescribeTable",
"rds:DescribeDBInstances",
"cloudwatch:DescribeAlarms",
"cloudfront:ListDistributions"
],
"Resource": "*"
},
{
"Sid": "4",
"Effect": "Allow",
"Action": [
"sqs:ListQueues",
"route53:ListHostedZones",
"sns:ListTopics",
"iam:ListGroups",
"iam:ListRoles",
"iam:ListPolicies",
"iam:ListUsers"
],
"Resource": "*"
}
]
}

Next, generate a new AWS Access Key & Secret Key, then update ~/.aws/credentials file as below:

1
2
3
4
[default]
aws_access_key_id = AWS ACCESS KEY ID
aws_secret_access_key = AWS SECRET ACCESS KEY
region = us-east-1

2 – Installation

2.1 – CLI

Find the appropriate package for your system and download it. For linux:

1
2
wget https://s3.us-east-1.amazonaws.com/komiser/1.0.0/linux/komiser
chmod +x komiser

Note: The Komiser CLI is updated frequently with support for new AWS services. To see if you have the latest version, see the project Github repository.

After you install the Komiser CLI, you may need to add the path to the executable file to your PATH variable.

2.2 – Docker Image

Use the official Komiser Docker Image:

1
docker run -d -p 3000:3000 -e AWS_ACCESS_KEY_ID="" -e AWS_SECRET_ACCESS_KEY="" -e AWS_DEFAULT_REGION="" --name komiser mlabouardy/komiser

3 – Overview

Once installed, start the Komiser server:

1
komiser start --port 3000 --duration 30

If you point your favorite browser to http://localhost:3000, you should see Komiser Dashboard:


Hope it helps ! The CLI is still in its early stages, so you are welcome to contribute to the project on GitHub.

Drop your comments, feedback, or suggestions below — or connect with me directly on Twitter @mlabouardy.

Serverless Application with Flutter & Lambda

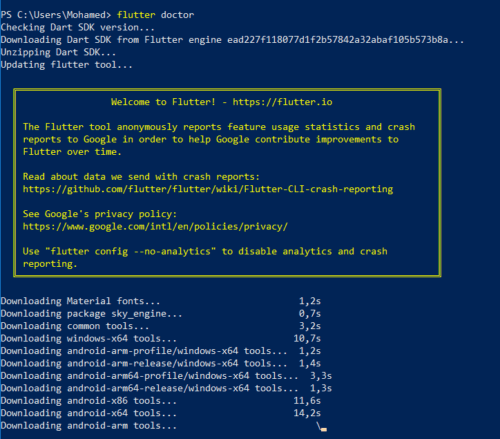
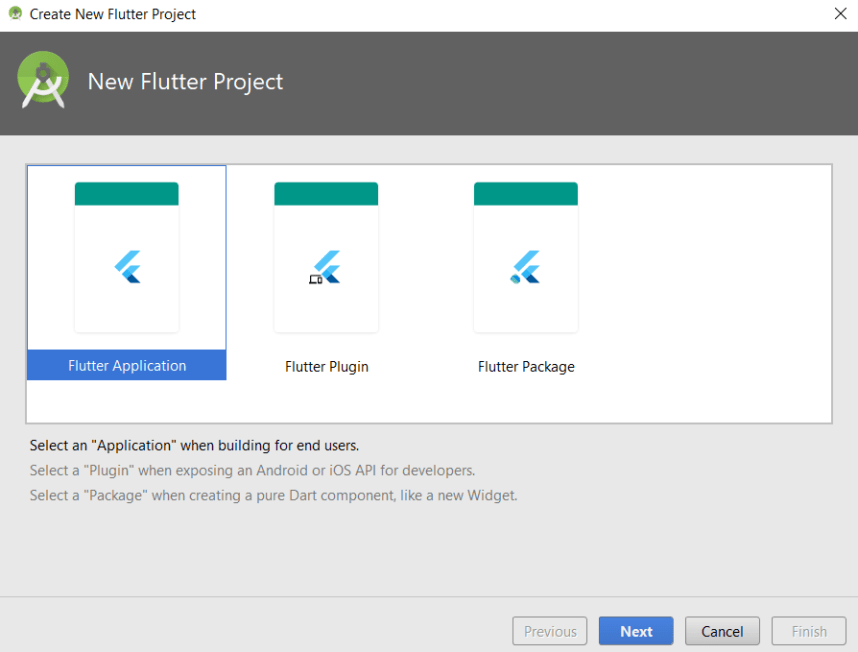
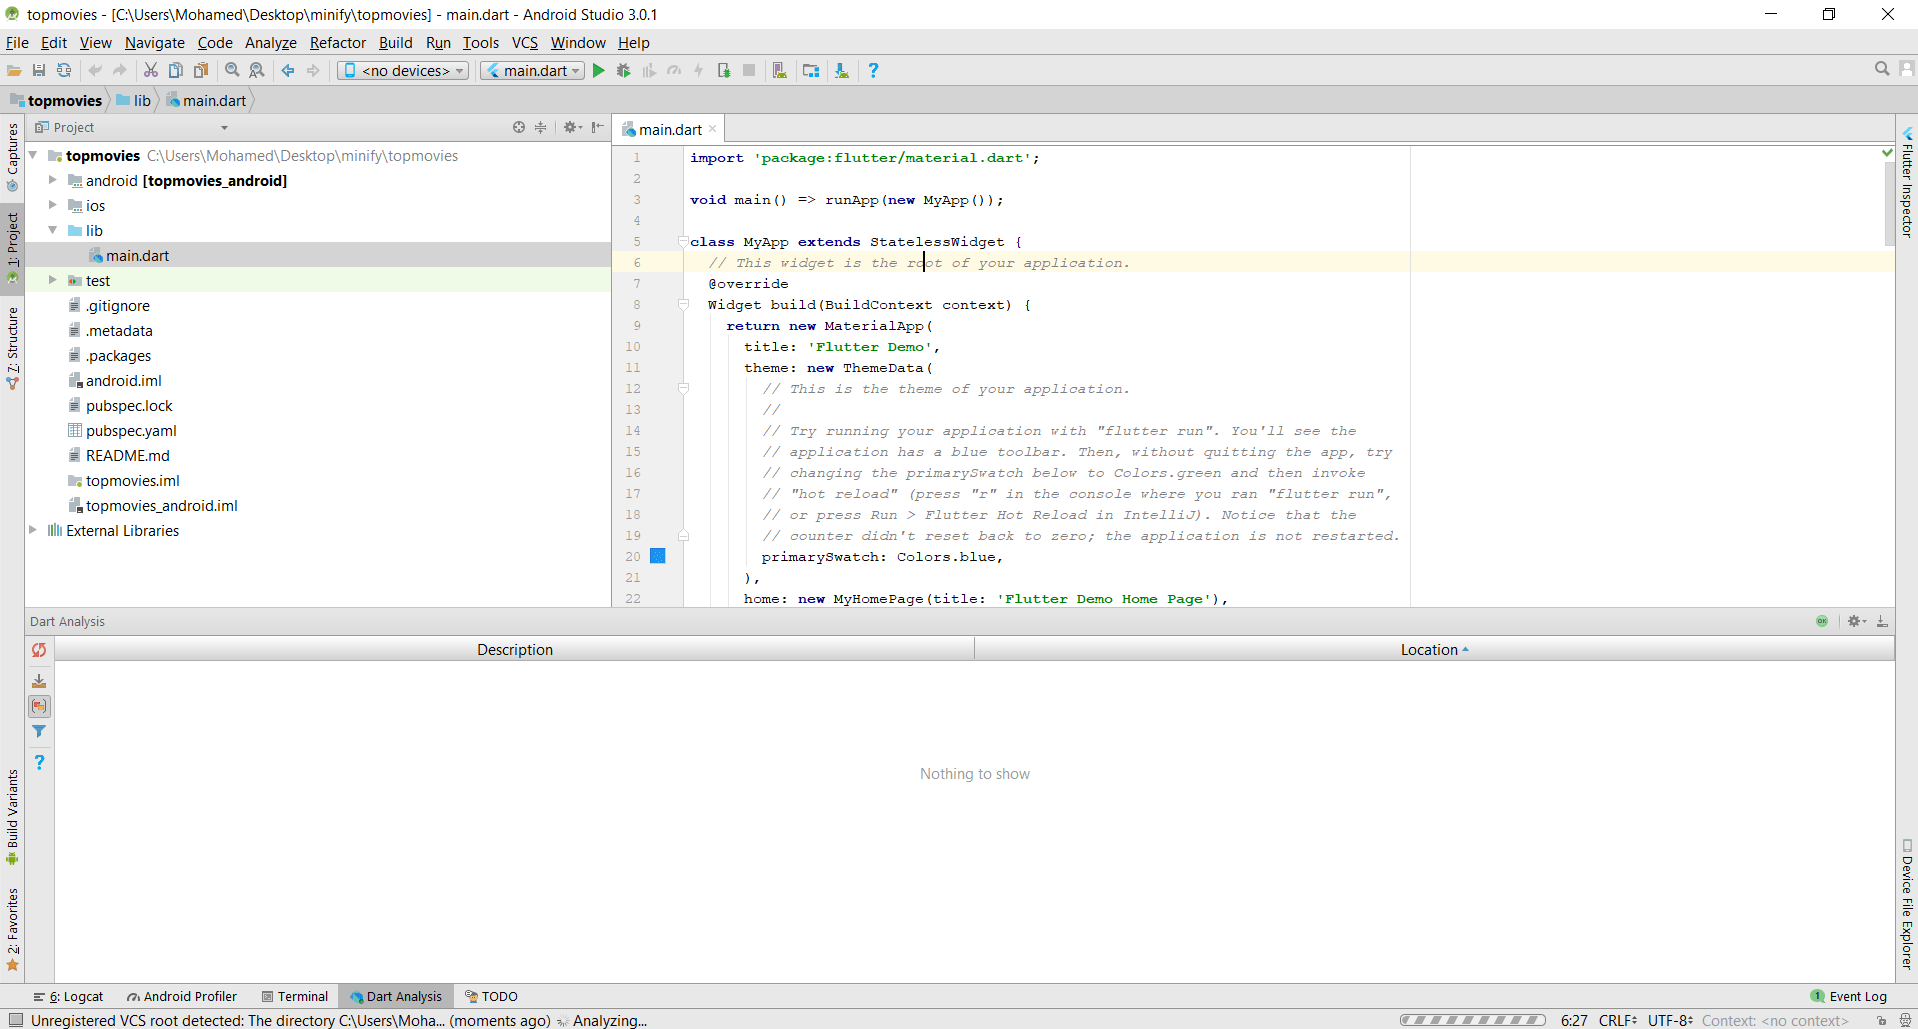
Few days ago, Google has announced the beta release of Flutter at Mobile World Congress 2018. A mobile UI framework to build native apps for both iOS and Android. It uses Dart to write application. The code is compiled using the standard Android and iOS toolchains for the specifc mobile platform, hence, better performance and startup times.

Flutter has a lot of benefits such as:

  • Open Source.
  • Hot reload for quicker development cycle.
  • Native ARM code runtime.
  • Rich widget set & growing community of plugins backed by Google.
  • Excellent editor integretation: Android Studio & Visual Studio Code.
  • Single codebase for iOS and Android, full native performance (does not use JavaScript as a bridge or WebViews) .
  • React Native competitor.
  • Dart feels more Java, easy for Java developers to jump on it.
  • It use Widgets, so for people coming from web developement background everything should seem very familiar.
  • It might end the Google vs Oracle Java wars.

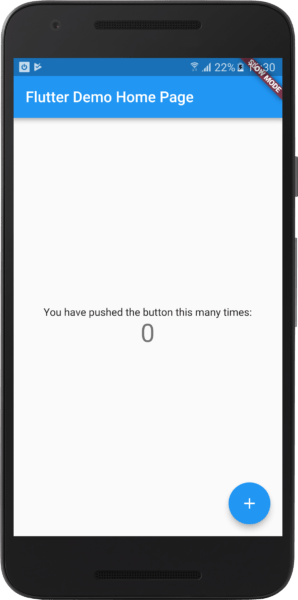
So it was a great opportunity to get my hands dirty and create a Flutter application based on Serverless Golang API I built in my previous post “Serverless Golang API with AWS Lambda


The Flutter application will call API Gateway which will invoke a Lambda Function that will use TMDB API to get a list of movies airing this week in theatres in real-time. The application will consume the JSON response and display results in a ListView.

Note: All code can be found on my GitHub.

To get started, follow my previous tutorial on how to create a Serverless API, once deployed, copy to clipboard the API Gateway Invoke URL.

Next, get the Flutter SDK by cloning the following GitHub repository:

1
git clone -b beta https://github.com/flutter/flutter.git

Note: Make sure to add flutter/bin folder to your PATH environment variable.

Next, install the missing dependencies and SDK files:


Start Android Studio, and install Flutter plugin from File>Settings>Plugins :


Create a new Flutter project:


Note: Flutter comes with a CLI that you can use to create a new project “flutter create PROJECT_NAME

Android Studio will generate the files for a basic Flutter sample app, we will work in lib/main.dart file:


Run the app. You should see the following screen:


Create a simple POJO class Movie with a set of attributes and getters:

1
2
3
4
5
6
7
8
9
10
11
12
13
14
15
16
17
18
19
20
21
22
23
24
class Movie {
String poster;
String title;
String overview;
String releaseDate;

Movie({this.poster, this.title, this.overview, this.releaseDate});

getTitle(){
return this.title;
}

getPoster(){
return this.poster;
}

getOverview(){
return this.overview;
}

getReleaseDate(){
return this.releaseDate;
}
}

Create a widget, TopMovies, which creates it’s State, TopMoviesState. The state class will maintain a list of movies.

Add the stateful TopMovies widget to main.dart:

1
2
3
4
class TopMovies extends StatefulWidget {
@override
createState() => new TopMoviesState();
}

Add the TopMoviesState class. Most of the app’s logic will resides in this class.

1
2
3
4
class TopMoviesState extends State<TopMovies> {
List<Movie> _movies = new List();
final _apiGatewayURL = "https://gfioehu47k.execute-api.us-west-1.amazonaws.com/staging/main";
}

Let’s initialize our _movies variable with a list of movies by invoking API Gateway, we will iterate through the JSON response, and add the movies using the _addMovie function:

1
2
3
4
5
6
7
8
9
10
@override
void initState() {
super.initState();
http.get(this._apiGatewayURL)
.then((response) => response.body)
.then(JSON.decode)
.then((movies) {
movies.forEach(_addMovie);
});
}

The _addMovie() function will simply add the movie passed as an argument to list of _movies:

1
2
3
4
5
6
7
8
void _addMovie(dynamic movie){
this._movies.add(new Movie(
title: movie["title"],
overview: movie["overview"],
poster: movie["poster_path"],
releaseDate: movie["release_date"]
));
}

Now we just need to display movies in a scrolling ListView. Flutter comes with a suit of powerful basic widgets. In the code below I used the Text, Row, Image widgets. In addition to Padding & Align components to display properly a Movie item:

1
2
3
4
5
6
7
8
9
10
11
12
13
14
15
16
17
18
19
20
21
22
23
24
25
26
27
28
29
30
31
32
33
34
35
36
37
38
39
40
41
42
43
44
45
46
47
48
49
50
51
52
53
54
55
56
57
58
Widget _fetchMovies() {
return new ListView.builder(
padding: const EdgeInsets.all(16.0),
itemBuilder: (context, i){
return new Card(
child: new Container(
height: 250.0,
child: new Padding(
padding: new EdgeInsets.all(2.0),
child: new Row(
children: <Widget>[
new Align(
child: new Hero(
child: new Image.network("https://image.tmdb.org/t/p/w500"+this._movies[i].getPoster()),
tag: this._movies[i].getTitle()
),
alignment: Alignment.center,
),
new Expanded(
child: new Stack(
children: <Widget>[
new Align(
child: new Text(
this._movies[i].getTitle(),
style: new TextStyle(fontSize: 11.0, fontWeight: FontWeight.bold),
),
alignment: Alignment.topCenter,
),
new Align(
child: new Padding(
padding: new EdgeInsets.all(4.0),
child: new Text(
this._movies[i].getOverview(),
maxLines: 8,
overflow: TextOverflow.ellipsis,
style: new TextStyle(fontSize: 12.0, fontStyle: FontStyle.italic)
)
),
alignment: Alignment.centerRight,
),
new Align(
child: new Text(
this._movies[i].getReleaseDate(),
style: new TextStyle(fontSize: 11.0, fontWeight: FontWeight.bold),
),
alignment: Alignment.bottomRight,
),
]
)
)
]
)
)
)
);
}
);
}

Finally, update the build method for MyApp to call the TopMovies widget instead:

1
2
3
4
5
6
7
8
9
10
11
12
13
14
15
16
class MyApp extends StatelessWidget {
@override
Widget build(BuildContext context) {
return new MaterialApp(
title: 'WatchNow',
home: new Scaffold(
appBar: new AppBar(
title: new Text('WatchNow'),
),
body: new Center(
child: new TopMovies(),
),
),
);
}
}

Restart the app. You should see a list of movies airing today in cinema !


That’s it ! we have successfully created a Serverless application in just 143 lines of code and it works like a charm on both Android and iOS.

Flutter is still in womb so of course it has some cons:

  • Steep learning curve compared to React Native which uses JavaScript.
  • Unpopular comparing to Kotlin or Java.
  • Does not support 32-bit iOS devices.
  • Due to autogenerated code, the build artifact is huge (APK for Android is almost 25 Mb, While I built the same app in Java for 3 Mb).

But for a beta release it look very stable and well designed. I can’t wait to see what you can build with it !

Drop your comments, feedback, or suggestions below — or connect with me directly on Twitter @mlabouardy.

Your browser is out-of-date!

Update your browser to view this website correctly. Update my browser now

×