Preventing race conditions in Docker

It’s easy to get race conditions with Compose & Docker. Take for example, if you have a common pattern when you have the application server depends on the database, but since the database server didn’t have time to configure itself and application has already started it would just failed connecting for it.

A race condition example with NodeJS app & MySQL:

1
2
3
4
5
6
7
8
9
10
11
12
13
14
15
16
17
18
19
20
21
22
23
24
25
var MySQL = require('mysql'),
express = require('express'),
app = express();

var connection = MySQL.createConnection({
host : process.env.MYSQL_HOST || 'localhost',
user : process.env.MYSQL_USER || '',
password : process.env.MYSQL_PASSWORD || ''
});

connection.connect(function(err){
if(err){
console.log('error connecting:', err.stack);
process.exit(1);
}
console.log('connected as id:', connection.threadId);
})

app.get('/', function(req, res){
res.send('Hello world :)');
})

app.listen(3000, function(){
console.log('Server started ....');
})

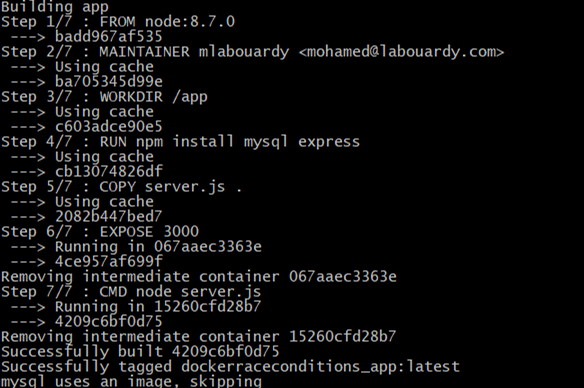
To build the application container, I used the following Dockerfile:

1
2
3
4
5
6
7
8
9
10
11
12
FROM node:8.7.0
MAINTAINER mlabouardy <mohamed@labouardy.com>

WORKDIR /app

RUN npm install mysql express

COPY server.js .

EXPOSE 3000

CMD node server.js

To deploy the stack, I used docker-compose:

1
2
3
4
5
6
7
8
9
10
11
12
13
14
15
16
17
18
19
20
21
22
23
24
version: "3.0"

services:
mysql:
image: mysql:5.6
environment:
- MYSQL_ROOT_PASSWORD=root
networks:
- db-net

app:
build: .
ports:
- 3000:3000
environment:
- MYSQL_HOST=mysql
- MYSQL_USER=root
- MYSQL_PASSWORD=root
networks:
- db-net

networks:
db-net:
driver: bridge

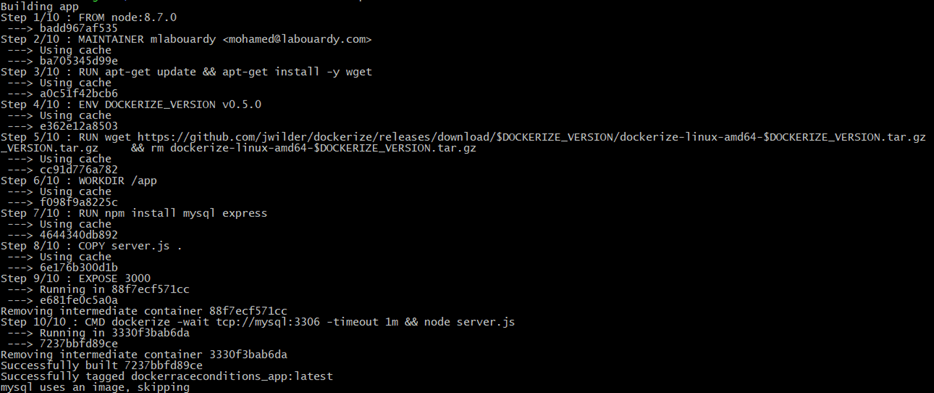
Let’s build the image:

1
docker-compose build


Then, create the containers:

1
docker-compose up -d 


Let’s see the status:

1
docker-compose ps


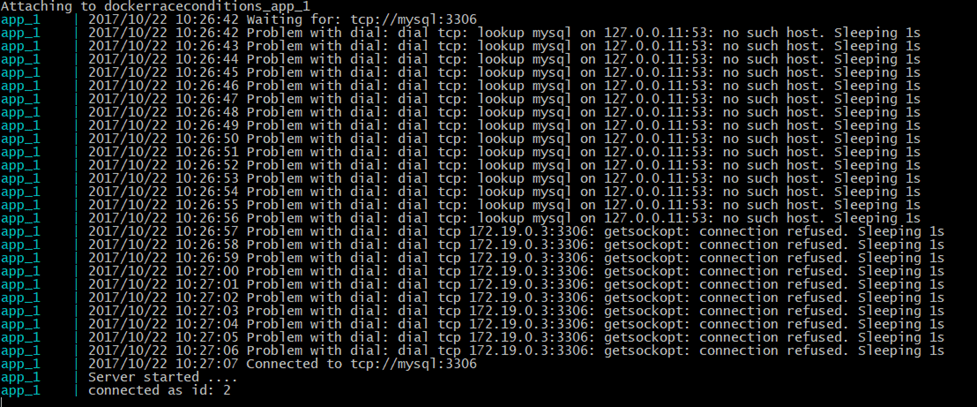
The application failed to start, lets see why ?

1
docker-compose logs -f app


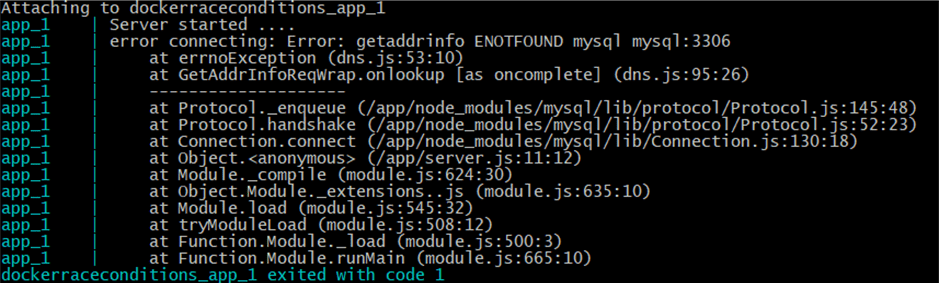
RACE CONDITION ! The application container come up before the DB and tried to connect to MySQL database and fail with a database connection error. To avoid that, There are many solutions:

  • Adding a mechanism in the code to wait for DB to be up and setup before starting to connect to it
  • Using restart policy – Docker Docs
  • Holding the container until the database is up and running

I will go with the 3rd solution, an open source tool called Dockerize, the advantage of this tool is that’s its pretty fast to just look over the opening the socket until it’s getting open and then launch the web app.

Note: Dockerize gives you the ability to wait for services on a specified protocol (file, tcp, tcp4, tcp6, http, https and unix)

So just update the Dockerfile to install Dockerize:

1
2
3
4
5
6
7
8
9
10
11
12
13
14
15
16
17
18
19
FROM node:8.7.0
MAINTAINER mlabouardy <mohamed@labouardy.com>

RUN apt-get update && apt-get install -y wget

ENV DOCKERIZE_VERSION v0.5.0
RUN wget https://github.com/jwilder/dockerize/releases/download/$DOCKERIZE_VERSION/dockerize-linux-amd64-$DOCKERIZE_VERSION.tar.gz \
&& tar -C /usr/local/bin -xzvf dockerize-linux-amd64-$DOCKERIZE_VERSION.tar.gz \
&& rm dockerize-linux-amd64-$DOCKERIZE_VERSION.tar.gz

WORKDIR /app

RUN npm install mysql express

COPY server.js .

EXPOSE 3000

CMD dockerize -wait tcp://mysql:3306 -timeout 1m && node server.js

Then, build the new image:


1
2
docker-compose up -d
docker-compose ps


1
docker-compose logs -f app


Its working !

Drop your comments, feedback, or suggestions below — or connect with me directly on Twitter @mlabouardy.

Setup Docker Swarm on AWS using Ansible & Terraform

This post is part of “IaC” series explaining how to use Infrastracture as Code concepts with Terraform. In this part, I will show you how to setup a Swarm cluster on AWS using Ansible & Terraform as shown in the diagram below (1 Master and 2 Workers) in less than 1 min ⏱:


All the templates and playbooks used in this tutorial, can be found on my GitHub](https://github.com/mlabouardy/terraform-aws-labs/tree/master/docker-swarm-cluster). 😎

Note: I did some tutorials about how to get started with Terraform on AWS, so make sure you read it before you go through this post.

1 – Setup EC2 Cluster using Terraform

1.1 – Global Variables

This file contains environment specific configuration like region name, instance type …

1
2
3
4
5
6
7
8
9
10
11
12
13
14
15
16
17
18
19
20
21
22
23
24
variable "aws_region" {
description = "AWS region on which we will setup the swarm cluster"
default = "us-east-1"
}

variable "ami" {
description = "Amazon Linux AMI"
default = "ami-4fffc834"
}

variable "instance_type" {
description = "Instance type"
default = "t2.micro"
}

variable "key_path" {
description = "SSH Public Key path"
default = "/home/core/.ssh/id_rsa.pub"
}

variable "bootstrap_path" {
description = "Script to install Docker Engine"
default = "install-docker.sh"
}

1.2 – Config AWS as Provider

1
2
3
provider "aws" {
region = "${var.aws_region}"
}

1.3 – Security Group

This SG allows all the inbound/outbound traffic:

1
2
3
4
5
6
7
8
9
10
11
12
13
14
15
16
17
18
19
20
21
22
23
24
25
26
resource "aws_security_group" "default" {
name = "sgswarmcluster"

# Allow all inbound
ingress {
from_port = 0
to_port = 65535
protocol = "tcp"
cidr_blocks = ["0.0.0.0/0"]
}

egress {
from_port = 0
to_port = 65535
protocol = "tcp"
cidr_blocks = ["0.0.0.0/0"]
}

# Enable ICMP
ingress {
from_port = -1
to_port = -1
protocol = "icmp"
cidr_blocks = ["0.0.0.0/0"]
}
}

1.4 – EC2 Instances

1
2
3
4
5
6
7
8
9
10
11
12
13
14
15
16
17
18
19
20
21
22
23
24
25
26
27
28
29
30
31
32
33
34
35
36
37
38
39
40
resource "aws_key_pair" "default"{
key_name = "clusterkp"
public_key = "${file("${var.key_path}")}"
}

resource "aws_instance" "master" {
ami = "${var.ami}"
instance_type = "${var.instance_type}"
key_name = "${aws_key_pair.default.id}"
user_data = "${file("${var.bootstrap_path}")}"
vpc_security_group_ids = ["${aws_security_group.default.id}"]

tags {
Name = "master"
}
}

resource "aws_instance" "worker1" {
ami = "${var.ami}"
instance_type = "${var.instance_type}"
key_name = "${aws_key_pair.default.id}"
user_data = "${file("${var.bootstrap_path}")}"
vpc_security_group_ids = ["${aws_security_group.default.id}"]

tags {
Name = "worker 1"
}
}

resource "aws_instance" "worker2" {
ami = "${var.ami}"
instance_type = "${var.instance_type}"
key_name = "${aws_key_pair.default.id}"
user_data = "${file("${var.bootstrap_path}")}"
vpc_security_group_ids = ["${aws_security_group.default.id}"]

tags {
Name = "worker 2"
}
}

Bootstrap script to install latest version of Docker:

1
2
3
4
5
#!/bin/sh
yum update
yum install -y docker
service docker start
usermod -aG docker ec2-user

2 – Transform to Swarm Cluster with Ansible

The playbook is self explanatory:

1
2
3
4
5
6
7
8
9
10
11
12
13
14
15
16
17
18
19
20
21
22
23
24
25
26
27
28
29
30
31
32
33
34
35
36
37
38
39
40
---
- name: Init Swarm Master
hosts: masters
gather_facts: False
remote_user: ec2-user
tasks:
- name: Swarm Init
command: docker swarm init --advertise-addr {{ inventory_hostname }}

- name: Get Worker Token
command: docker swarm join-token worker -q
register: worker_token

- name: Show Worker Token
debug: var=worker_token.stdout

- name: Master Token
command: docker swarm join-token manager -q
register: master_token

- name: Show Master Token
debug: var=master_token.stdout

- name: Join Swarm Cluster
hosts: workers
remote_user: ec2-user
gather_facts: False
vars:
token: "{{ hostvars[groups['masters'][0]]['worker_token']['stdout'] }}"
master: "{{ hostvars[groups['masters'][0]]['inventory_hostname'] }}"
tasks:
- name: Join Swarm Cluster as a Worker
command: docker swarm join --token {{ token }} {{ master }}:2377
register: worker

- name: Show Results
debug: var=worker.stdout

- name: Show Errors
debug: var=worker.stderr

Now we defined all the required templates and playbook, we only need to type 2 commands to bring up the swarm cluster:

1
2
terraform apply
ansible -i hosts playbook.yml

Note: Make sure to update the hosts file with the public ip of each EC2 instance.

Setting up the Swarm cluster in action is show below 😃 :

Drop your comments, feedback, or suggestions below — or connect with me directly on Twitter @mlabouardy.

Your browser is out-of-date!

Update your browser to view this website correctly. Update my browser now

×