How We Reduced Lambda Functions Costs by Thousands of Dollars

Serverless Computing or FaaS is the best way to consume cloud computing. In this model, the responsibility for provisioning, maintaining, and patching servers is shifted from the customer to cloud providers. Which allows developers to focus on building new features and innovating, and pay only for the compute time that they consume.

In the last 7 months, we started using Lambda based functions heavily in production. It allowed us to scale quickly and brought agility to our development activities.


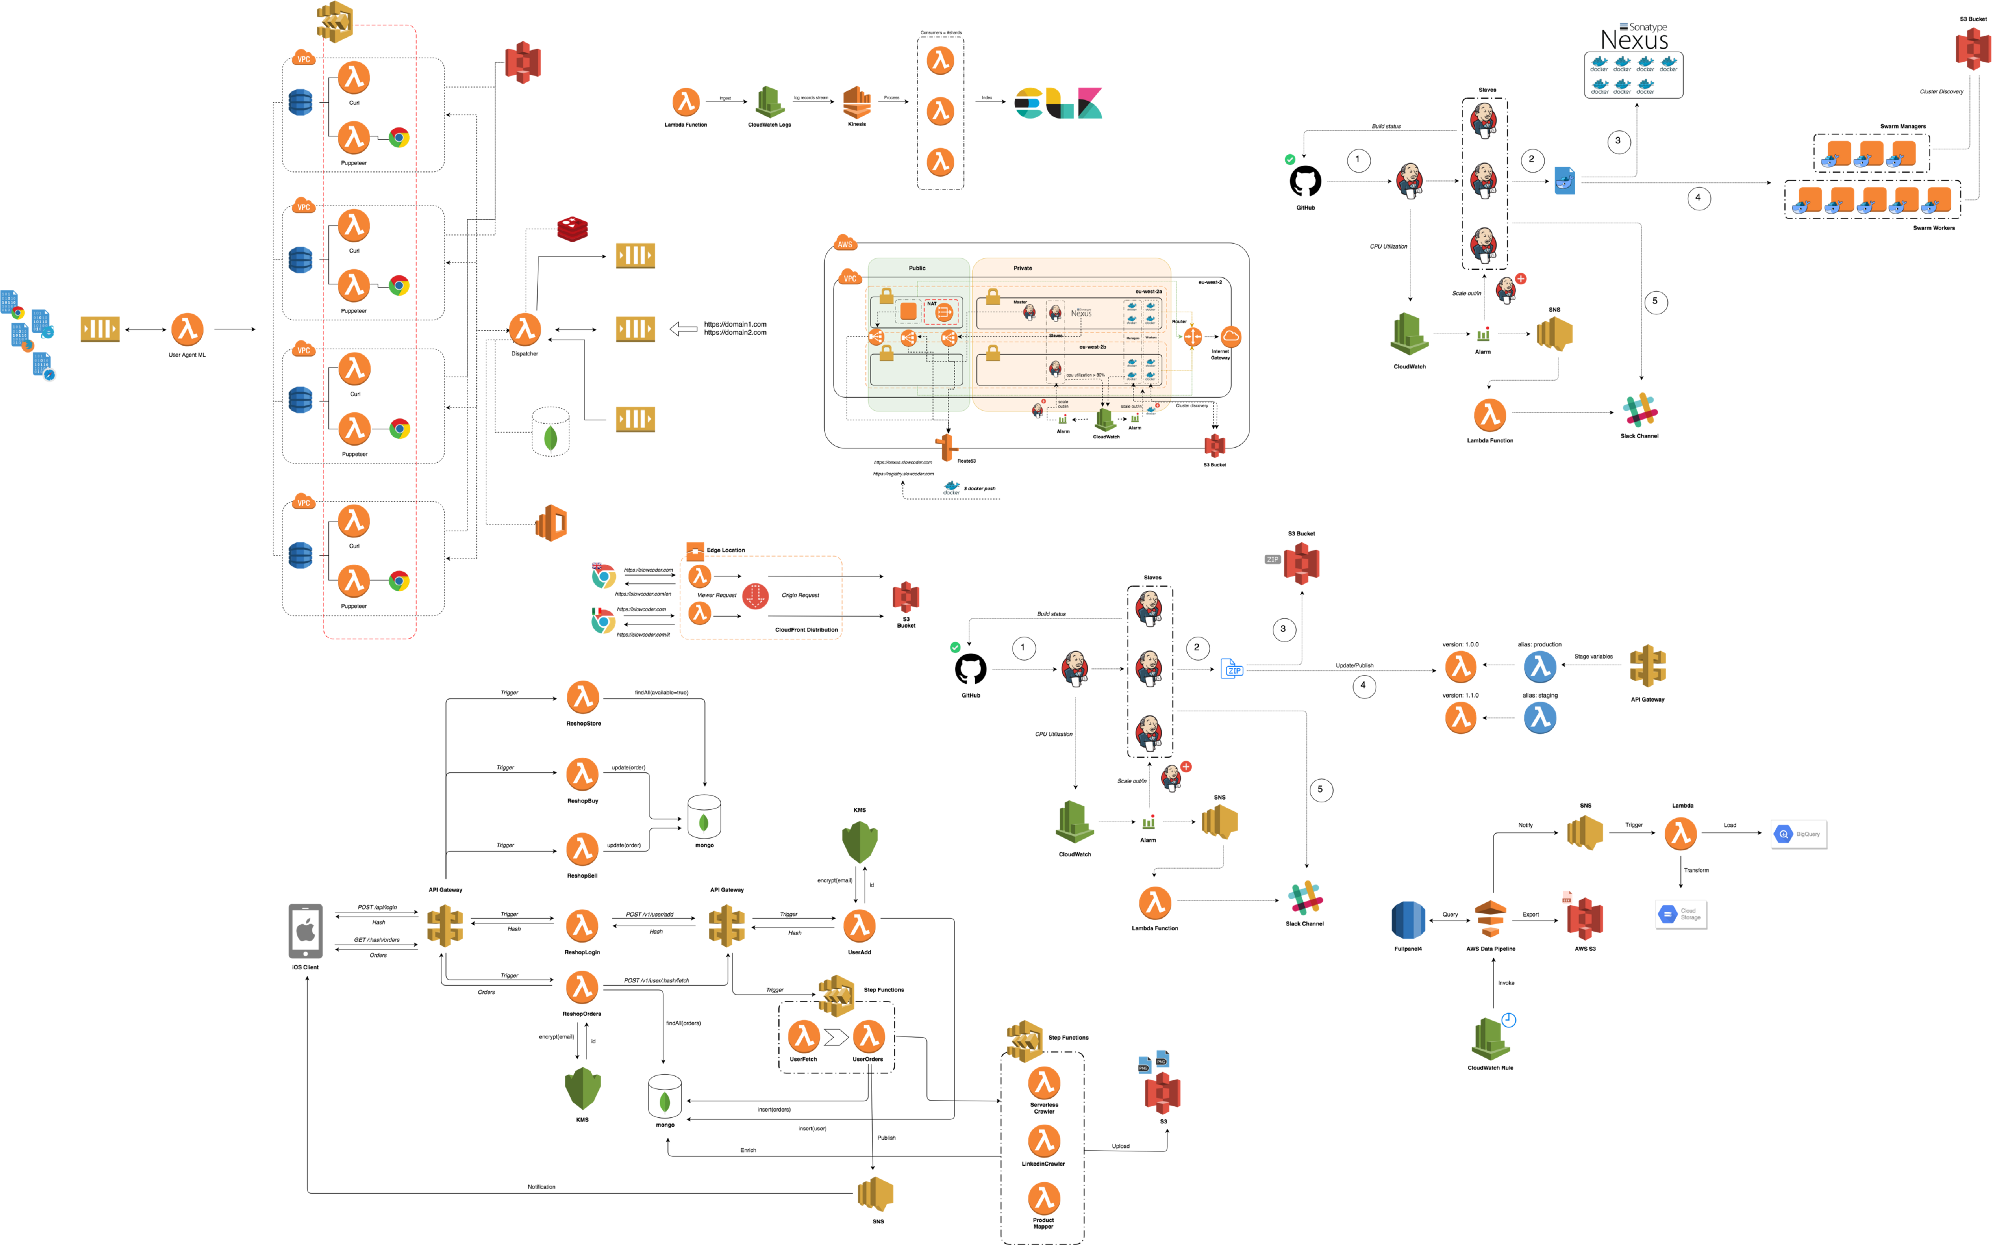
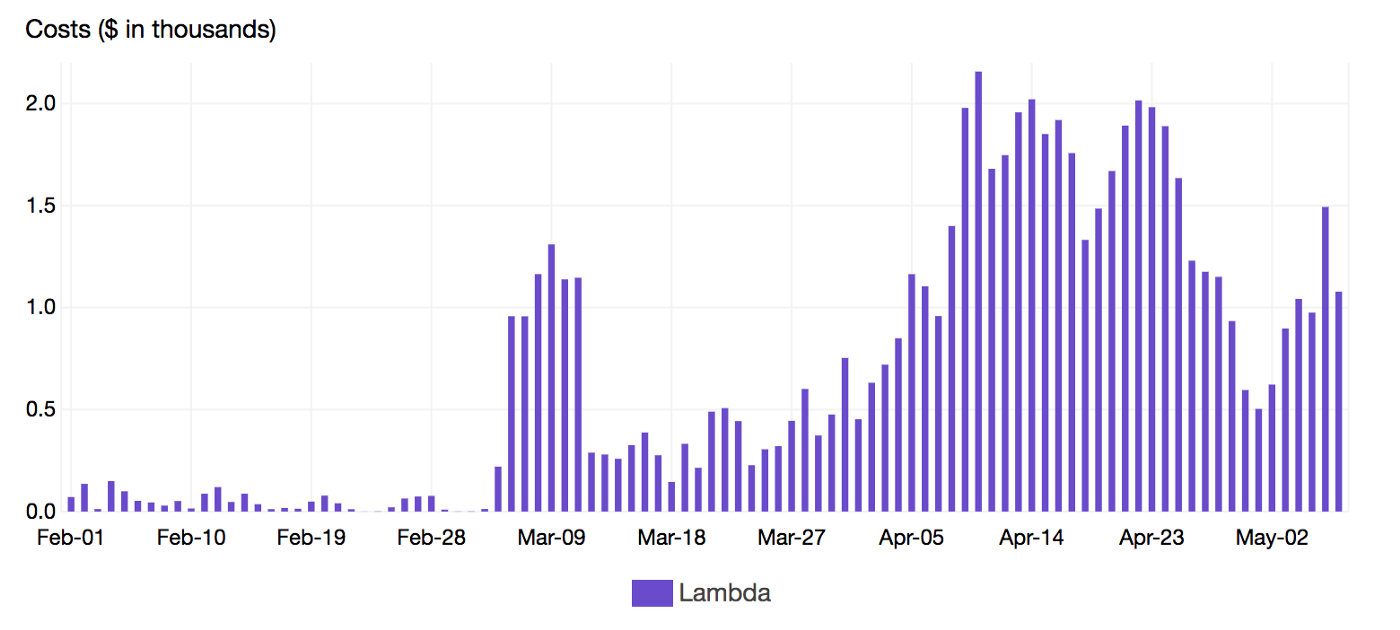
We were serving +80M Lambda invocations per day across multiple AWS regions with an unpleasant surprise in the form of a significant bill.


It was very easy and cheap to build a Lambda based applications that we forgot to estimate and optimize the Lambda costs earlier during development phase, so once we start running heavy workloads in production, the cost become significant and we spent thousands of dollars daily


To keep Lambda cost under control, understanding its behavior was critical. Lambda pricing model is based on the following factors:

  • Number of executions.
  • Duration, rounded to the nearest 100ms.
  • Memory allocated to the function.
  • Data transfer (out to the internet, inter-region and intra-region).

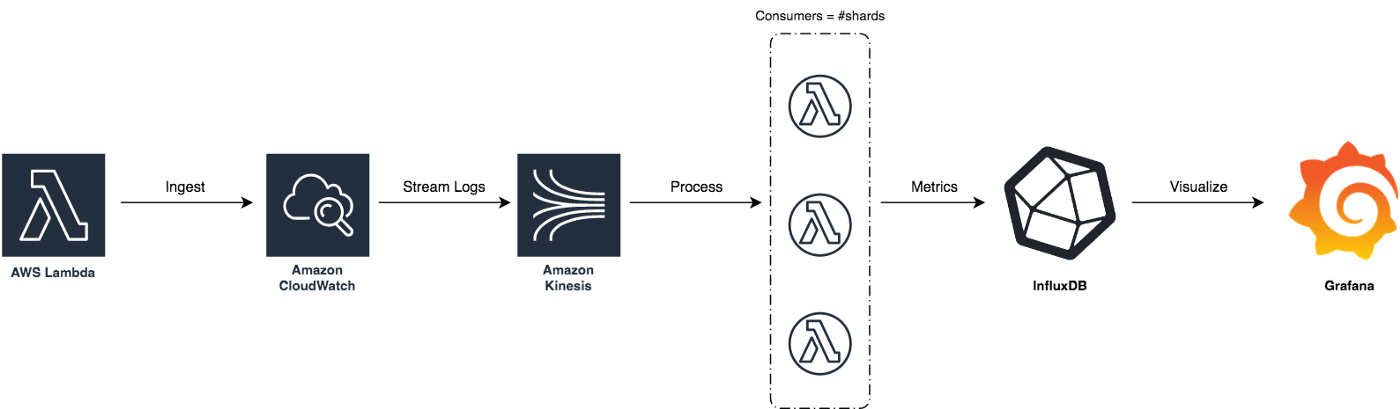
In order to reduce AWS Lambda costs, we monitored Lambda memory usage and execution time based on logs stored in CloudWatch.


We’ve updated our previous centralized logging platform to extract relevant metrics (Duration, Billed Duration and Memory Size) from “REPORT” log entry reported through CloudWatch and store them into InfluxDB. You can check out the following link for a step-by-step guide on how to setup the following workflow:


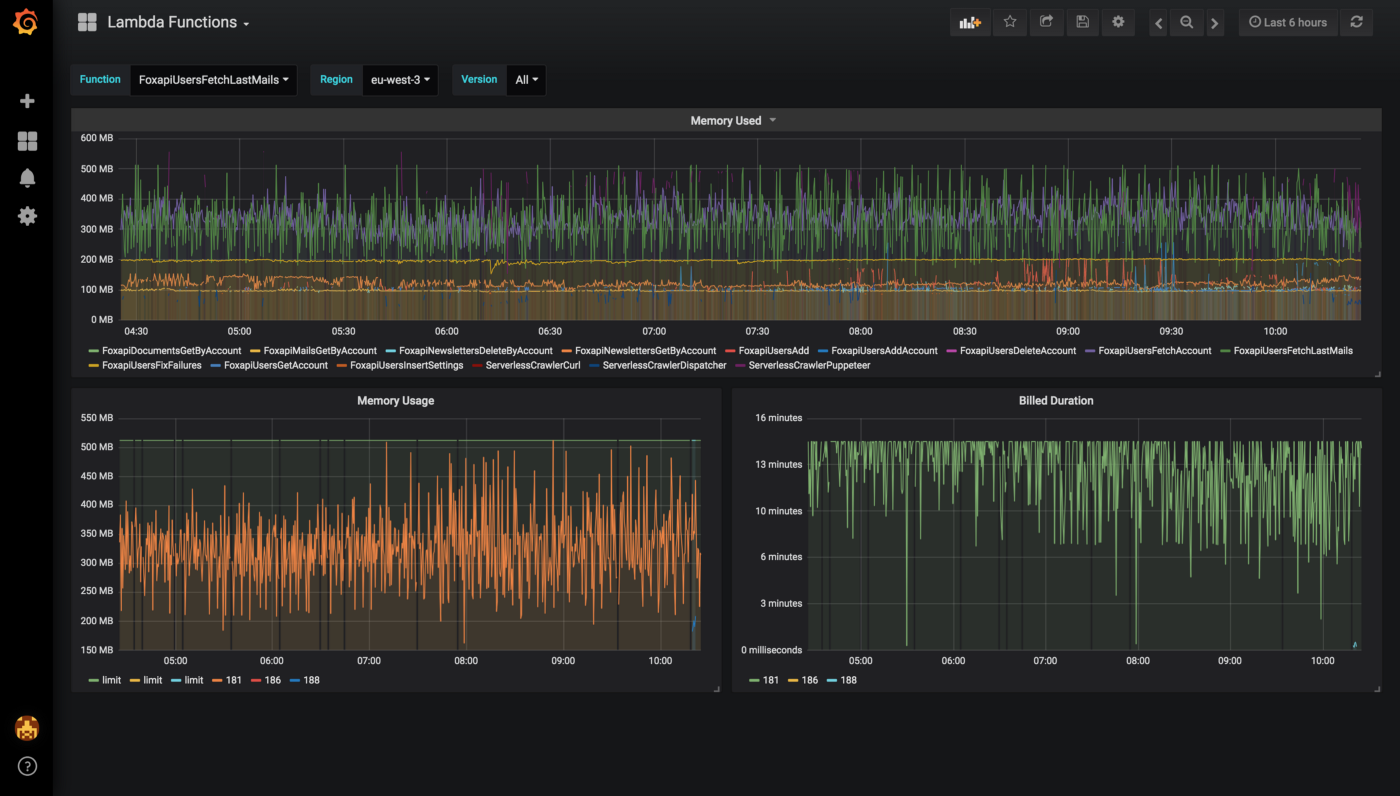
Next, we created dynamic visualizations on Grafana based on metrics available in the timeseries database and we were able to monitor in near real-time Lambda runtime usage. A graphical representation of the metrics for Lambda functions is shown below:


You can also use CloudWatch Logs Insights to issue ad-hoc queries to analyse statistics from recents invocations of your Lambda functions:


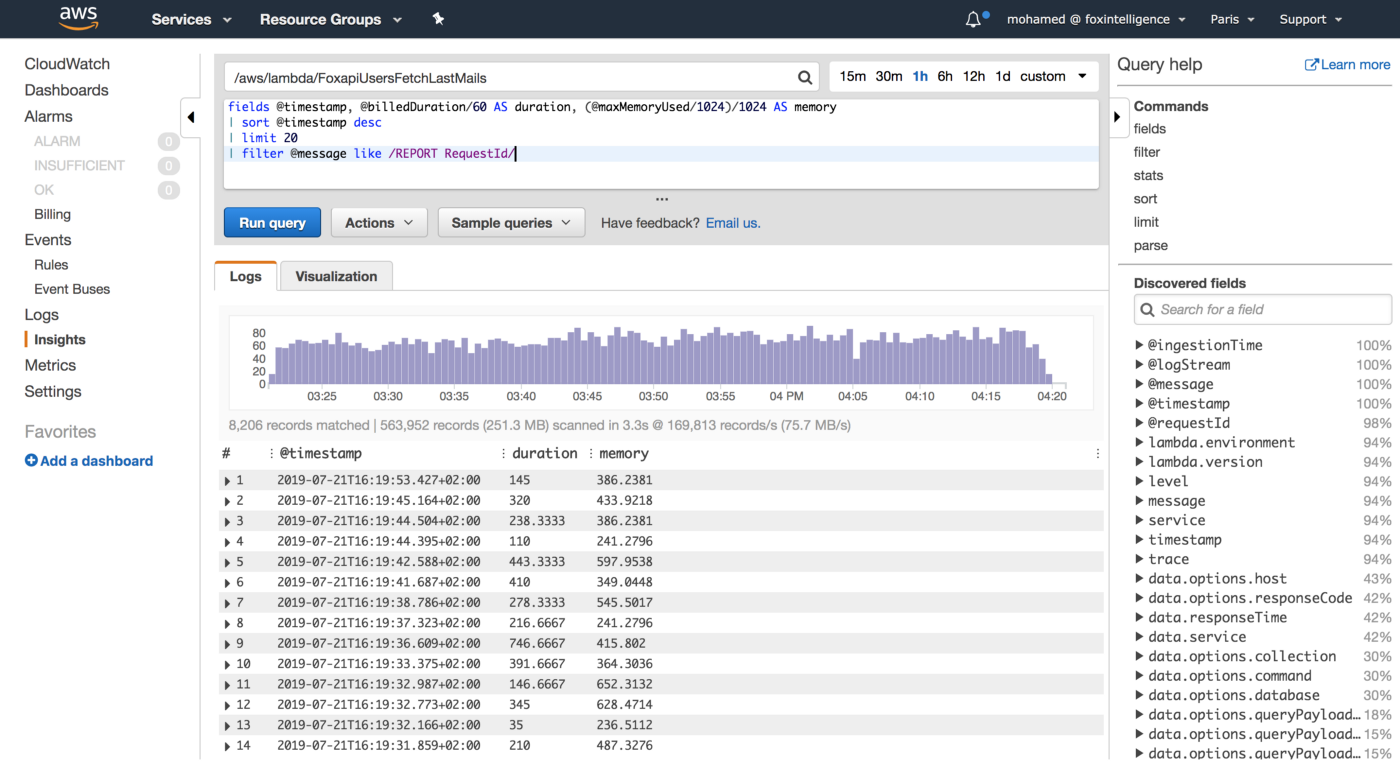
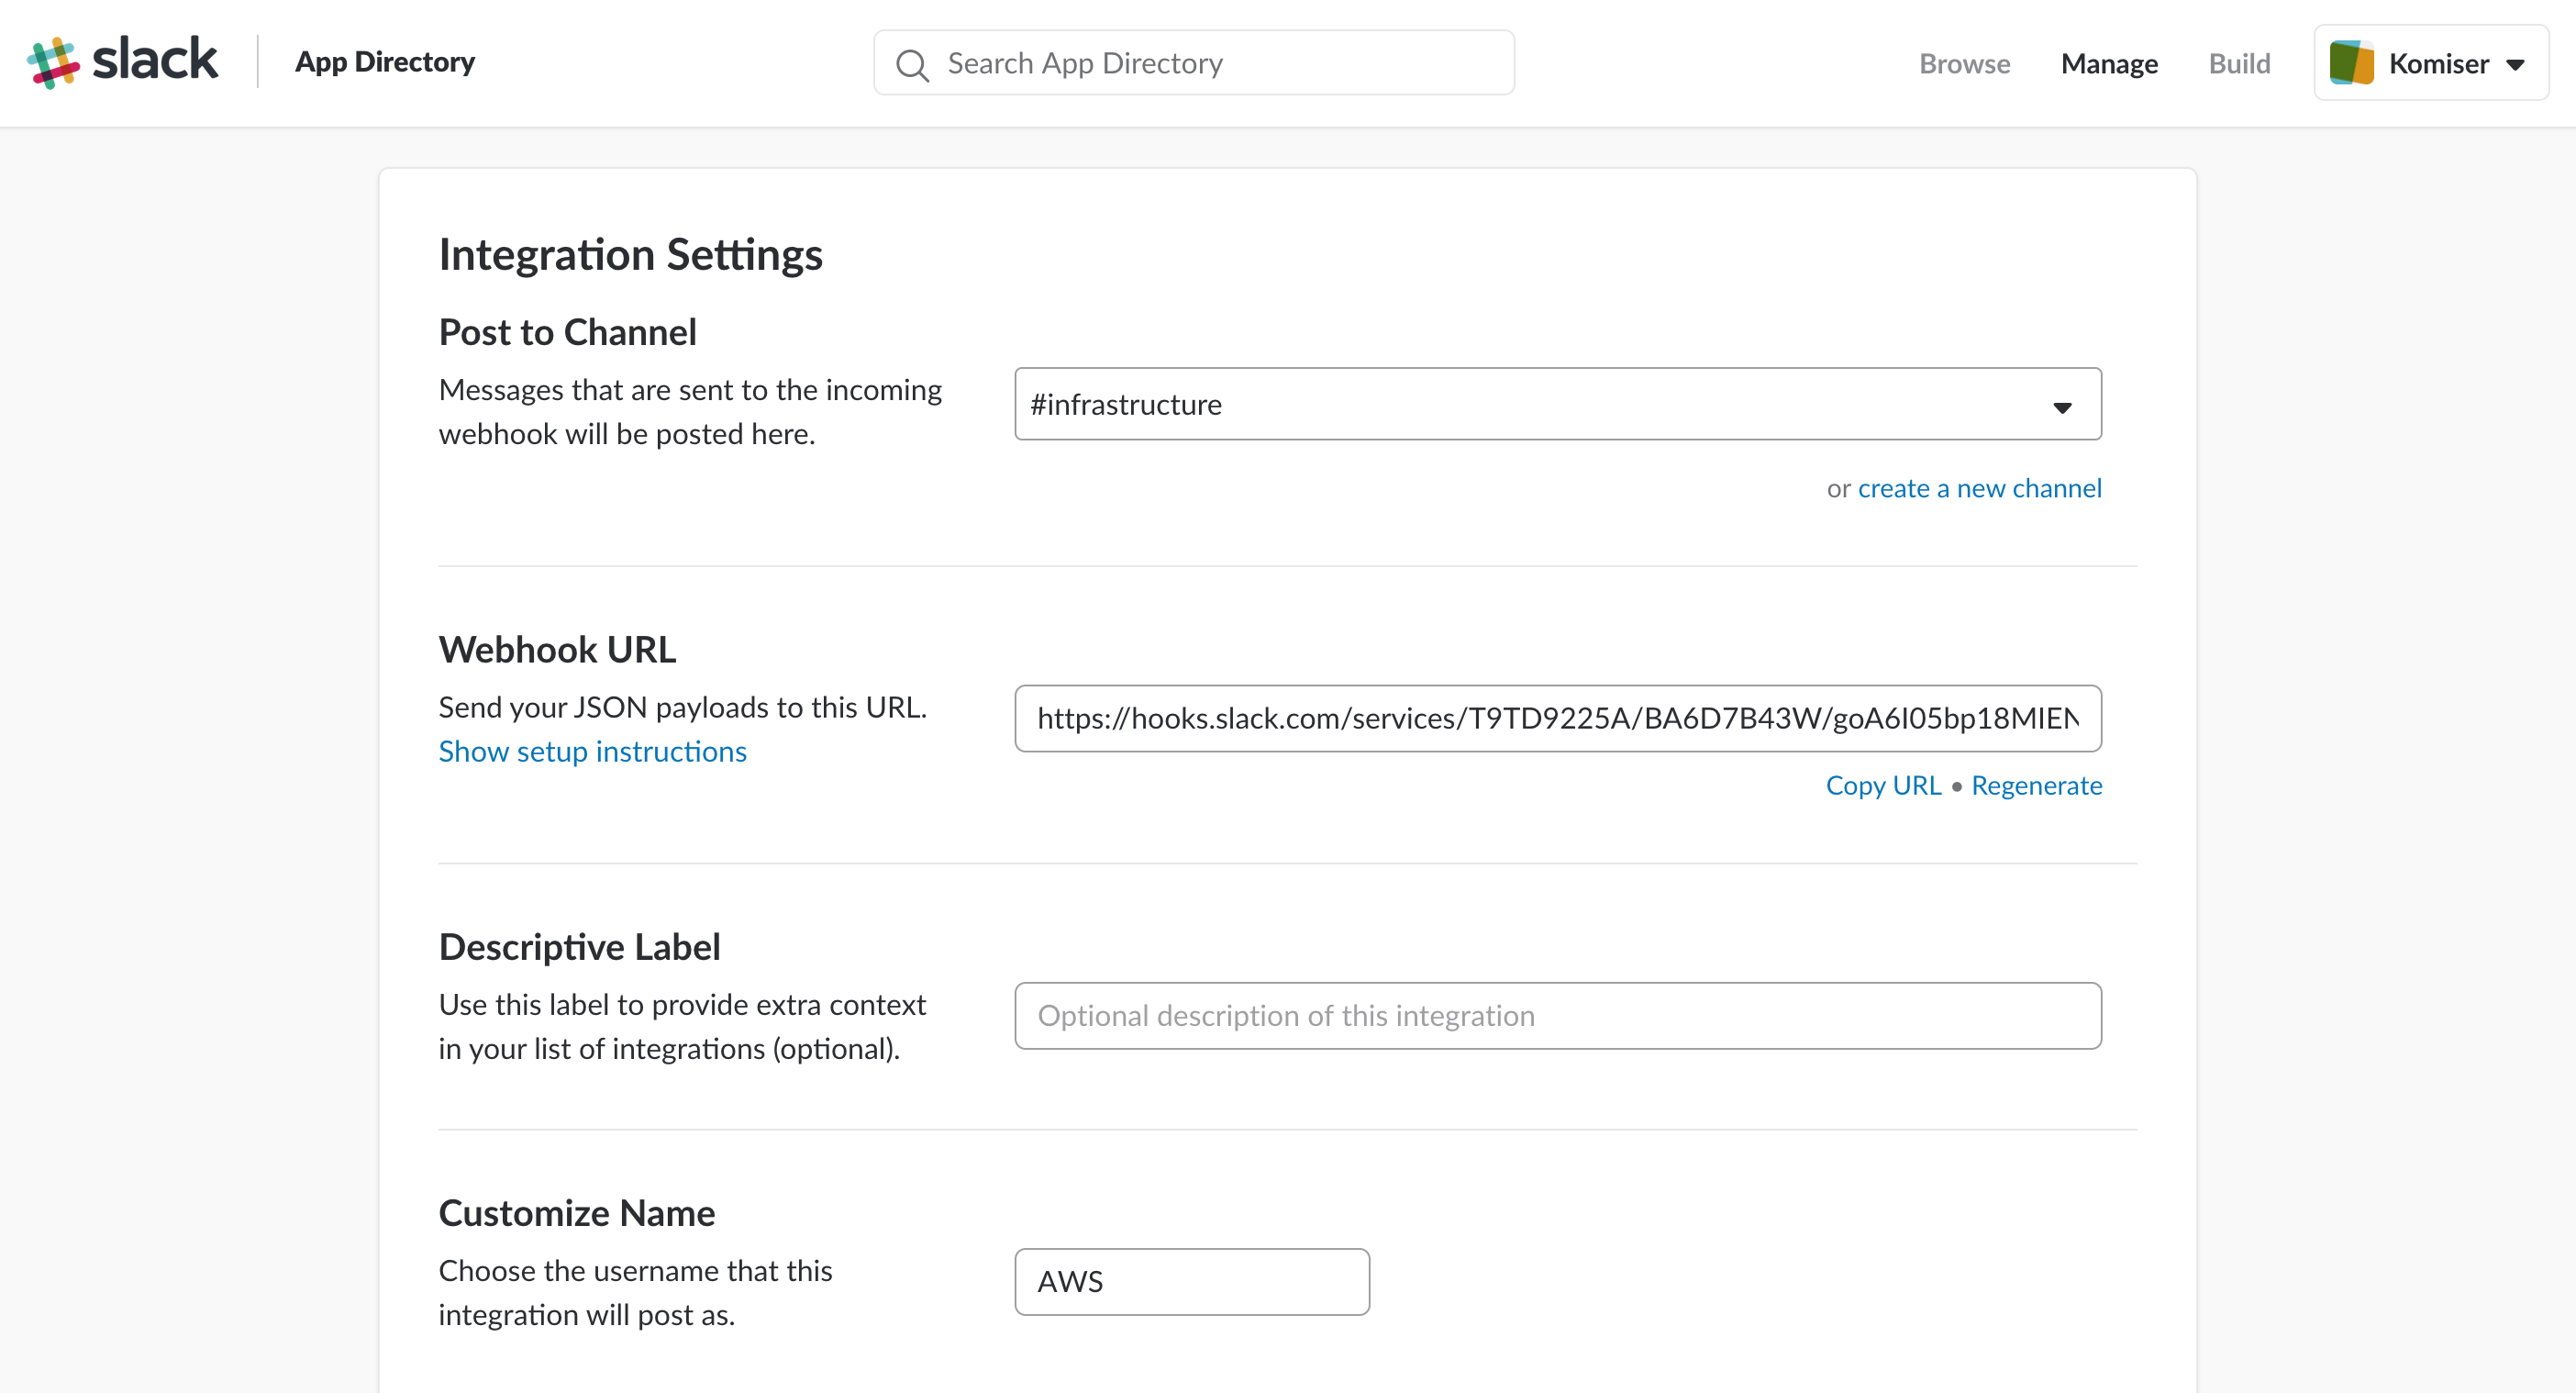
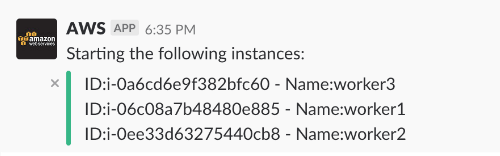
We leveraged these metrics to set Slack notifications when memory allocation is either too low (risk of failure) or too high (risk of over-paying) and to identify the billed duration, memory usage for the ten most expensive Lambda functions. When performing heuristic analysis of Lambda logs, we gain insights into the right sizing of each Lambda function deployed in our AWS account and we avoided excessive over-allocation of memory. Hence, significantly reduced the Lambda’s cost.

Memory allocation can make a big difference in your Lambda function cost. Too much allocated memory and you’ll overpay. Too little and your function will be at risk of failing. Therefore, you want to keep a healthy balance when it comes to memory allocation.

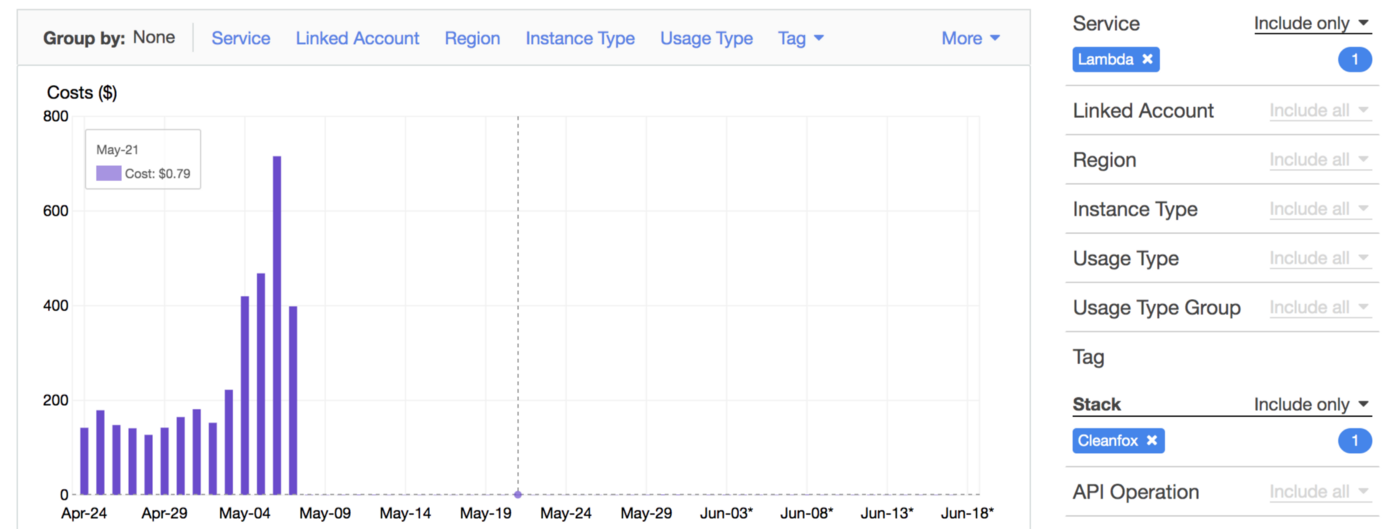
To gather more insights and uncover hidden costs, we had to identify the most expensive functions. Thats where Lambda Tags comes into the play. We leveraged those metadata to breakdown the cost per Stack (project):


By reducing the invocation frequency (control concurrency with SQS), we reduced the cost up to 99% and CO2 emissions footprint of our B2C app Cleanfox 🚀💰


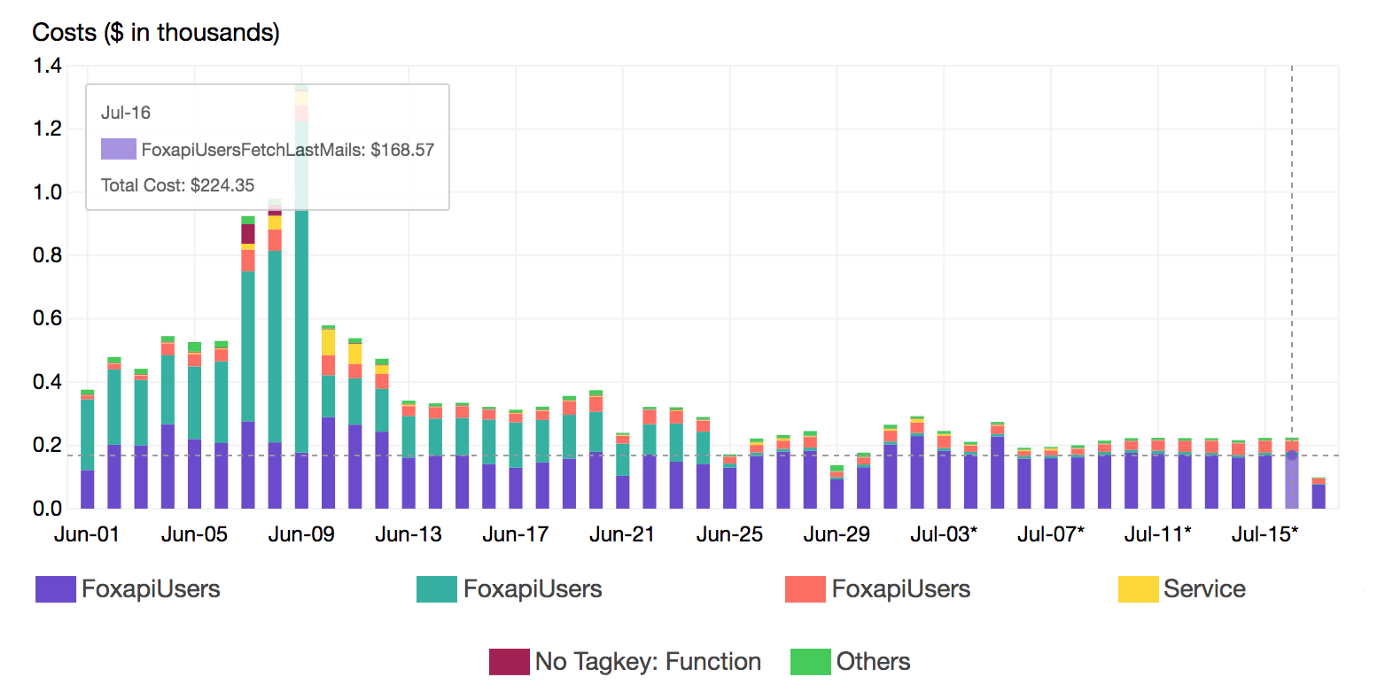
At a deeper level, we also breakdown the cost by Lambda function name using a secondary tag which is Function tag:


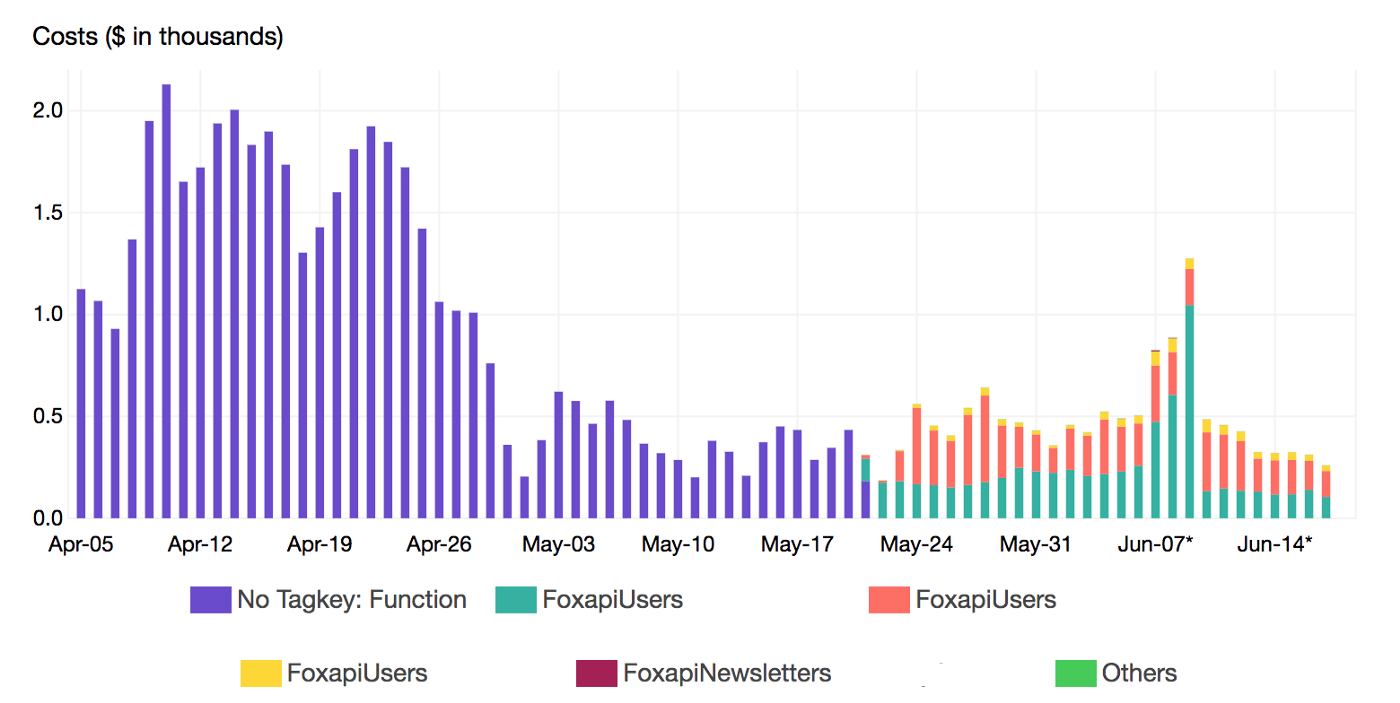
Once the target functions were identified, we reviewed the execution flow and applied some optimisation in our code to shorten the running time and resources needed (Memory and CPU)


By continuously monitoring increases in spend, we end up building scalable, secure and resilient Lambda based solutions while maintaining maximum cost-effectiveness. Also, we are now configuring Lambda runtime parameters appropriately at the sandbox stage and we’re evaluating alternative services like Spot Instances & Batch Jobs to run heavy non-critical workloads considering the hidden costs of Serverless.

Drop your comments, feedback, or suggestions below — or connect with me directly on Twitter @mlabouardy.

Infrastructure Cost Optimization with Lambda

Having multiple environments is important to build a continuous integration/deployment pipeline and be able to reproduce bugs in production with ease but this comes at price. In order to reduce cost of AWS infrastructure, instances which are running 24/7 unnecessarily (sandbox & staging environments) must be shut down outside of regular business hours.

The figure below describes an automated process to schedule, stop and start instances to help cutting costs. The solution is a perfect example of using Serverless computing.


Note: full code is available on my GitHub.

2 Lambda functions will be created, they will scan all environments looking for a specific tag. The tag we use is named ‘Environment’. Instances without an Environment tag will not be affected:

1
2
3
4
5
6
7
8
9
10
11
12
13
14
15
16
17
18
19
20
21
22
23
24
25
26
27
28
29
30
31
32
func getInstances(cfg aws.Config) ([]Instance, error) {
instances := make([]Instance, 0)

svc := ec2.New(cfg)
req := svc.DescribeInstancesRequest(&ec2.DescribeInstancesInput{
Filters: []ec2.Filter{
ec2.Filter{
Name: aws.String("tag:Environment"),
Values: []string{os.Getenv("ENVIRONMENT")},
},
},
})
res, err := req.Send()
if err != nil {
return instances, err
}

for _, reservation := range res.Reservations {
for _, instance := range reservation.Instances {
for _, tag := range instance.Tags {
if *tag.Key == "Name" {
instances = append(instances, Instance{
ID: *instance.InstanceId,
Name: *tag.Value,
})
}
}
}
}

return instances, nil
}

The StartEnvironment function will query the StartInstances method with the list of instance ids returned by the previous function:

1
2
3
4
5
6
7
8
9
10
11
12
13
14
15
16
func startInstances(cfg aws.Config, instances []Instance) error {
instanceIds := make([]string, 0, len(instances))
for _, instance := range instances {
instanceIds = append(instanceIds, instance.ID)
}

svc := ec2.New(cfg)
req := svc.StartInstancesRequest(&ec2.StartInstancesInput{
InstanceIds: instanceIds,
})
_, err := req.Send()
if err != nil {
return err
}
return nil
}

Similarly, the StopEnvironment function will query the StopInstances method:

1
2
3
4
5
6
7
8
9
10
11
12
13
14
15
16
func stopInstances(cfg aws.Config, instances []Instance) error {
instanceIds := make([]string, 0, len(instances))
for _, instance := range instances {
instanceIds = append(instanceIds, instance.ID)
}

svc := ec2.New(cfg)
req := svc.StopInstancesRequest(&ec2.StopInstancesInput{
InstanceIds: instanceIds,
})
_, err := req.Send()
if err != nil {
return err
}
return nil
}

Finally, both functions will post a message to Slack channel for real-time notification:

1
2
3
4
5
6
7
8
9
10
11
12
13
14
15
16
17
18
19
20
21
22
23
24
25
26
27
28
29
func postToSlack(color string, title string, instances string) error {
message := SlackMessage{
Text: title,
Attachments: []Attachment{
Attachment{
Text: instances,
Color: color,
},
},
}

client := &http.Client{}
data, err := json.Marshal(message)
if err != nil {
return err
}

req, err := http.NewRequest("POST", os.Getenv("SLACK_WEBHOOK"), bytes.NewBuffer(data))
if err != nil {
return err
}

resp, err := client.Do(req)
if err != nil {
return err
}

return nil
}

Now our functions are defined, let’s build the deployment packages (zip files) using the following Bash script:

1
2
3
4
5
6
7
8
9
10
11
12
13
14
15
#!/bin/bash

echo "Building StartEnvironment binary"
GOOS=linux GOARCH=amd64 go build -o main start/*.go

echo "Creating deployment package"
zip start-environment.zip main
rm main

echo "Building StopEnvironment binary"
GOOS=linux GOARCH=amd64 go build -o main stop/*.go

echo "Creating deployment package"
zip stop-environment.zip main
rm main

The functions require an IAM role to be able to interact with EC2. The StartEnvironment function has to be able to describe and start EC2 instances:

1
2
3
4
5
6
7
8
9
10
11
12
13
14
15
16
17
18
{
"Version": "2012-10-17",
"Statement": [
{
"Effect": "Allow",
"Action": [
"logs:CreateLogStream",
"logs:PutLogEvents",
"logs:CreateLogGroup",
"ec2:DescribeInstances",
"ec2:StartInstances"
],
"Resource": [
"*"
]
}
]
}

The StopEnvironment function has to be able to describe and stop EC2 instances:

1
2
3
4
5
6
7
8
9
10
11
12
13
14
15
16
17
18
{
"Version": "2012-10-17",
"Statement": [
{
"Effect": "Allow",
"Action": [
"logs:CreateLogStream",
"logs:PutLogEvents",
"logs:CreateLogGroup",
"ec2:DescribeInstances",
"ec2:StopInstances"
],
"Resource": [
"*"
]
}
]
}

Finally, create an IAM role for each function and attach the above policies:

1
2
3
4
5
6
7
8
9
10
11
12
13
#!/bin/bash

echo "IAM role for StartEnvironment"
arn=$(aws iam create-policy --policy-name StartEnvironment --policy-document file://start/policy.json | jq -r '.Policy.Arn')
result=$(aws iam create-role --role-name StartEnvironmentRole --assume-role-policy-document file://role.json | jq -r '.Role.Arn')
aws iam attach-role-policy --role-name StartEnvironmentRole --policy-arn $arn
echo "ARN: $result"

echo "IAM role for StopEnvironment"
arn=$(aws iam create-policy --policy-name StopEnvironment --policy-document file://stop/policy.json | jq -r '.Policy.Arn')
result=$(aws iam create-role --role-name StopEnvironmentRole --assume-role-policy-document file://role.json | jq -r '.Role.Arn')
aws iam attach-role-policy --role-name StopEnvironmentRole --policy-arn $arn
echo "ARN: $result"

The script will output the ARN for each IAM role:


Before jumping to deployment part, we need to create a Slack WebHook to be able to post messages to Slack channel:


Next, use the following script to deploy your functions to AWS Lambda (make sure to replace the IAM roles, Slack WebHook token & the target environment):

1
2
3
4
5
6
7
8
9
10
11
12
13
14
15
16
17
18
19
20
21
22
23
24
25
26
27
#!/bin/bash

START_IAM_ROLE="arn:aws:iam::ACCOUNT_ID:role/StartEnvironmentRole"
STOP_IAM_ROLE="arn:aws:iam::ACCOUNT_ID:role/StopEnvironmentRole"
AWS_REGION="us-east-1"
SLACK_WEBHOOK="https://hooks.slack.com/services/TOKEN"
ENVIRONMENT="sandbox"

echo "Deploying StartEnvironment to Lambda"
aws lambda create-function --function-name StartEnvironment \
--zip-file fileb://./start-environment.zip \
--runtime go1.x --handler main \
--role $START_IAM_ROLE \
--environment Variables="{SLACK_WEBHOOK=$SLACK_WEBHOOK,ENVIRONMENT=$ENVIRONMENT}" \
--region $AWS_REGION


echo "Deploying StopEnvironment to Lambda"
aws lambda create-function --function-name StopEnvironment \
--zip-file fileb://./stop-environment.zip \
--runtime go1.x --handler main \
--role $STOP_IAM_ROLE \
--environment Variables="{SLACK_WEBHOOK=$SLACK_WEBHOOK,ENVIRONMENT=$ENVIRONMENT}" \
--region $AWS_REGION \


rm *-environment.zip

Once deployed, if you sign in to AWS Management Console, navigate to Lambda Console, you should see both functions has been deployed successfully:

StartEnvironment:


StopEnvironment:


To further automate the process of invoking the Lambda function at the right time. AWS CloudWatch Scheduled Events will be used.

Create a new CloudWatch rule with the below cron expression (It will be invoked everyday at 9 AM):


And another rule to stop the environment at 6 PM:


Note: All times are GMT time.

Testing:

a – Stop Environment


Result:


b – Start Environment


Result:


The solution is easy to deploy and can help reduce operational costs.

Full code can be found on my GitHub. Make sure to drop your comments, feedback, or suggestions below — or connect with me directly on Twitter @mlabouardy.

Your browser is out-of-date!

Update your browser to view this website correctly. Update my browser now

×