Building a CI/CD on GCP with Kubernetes

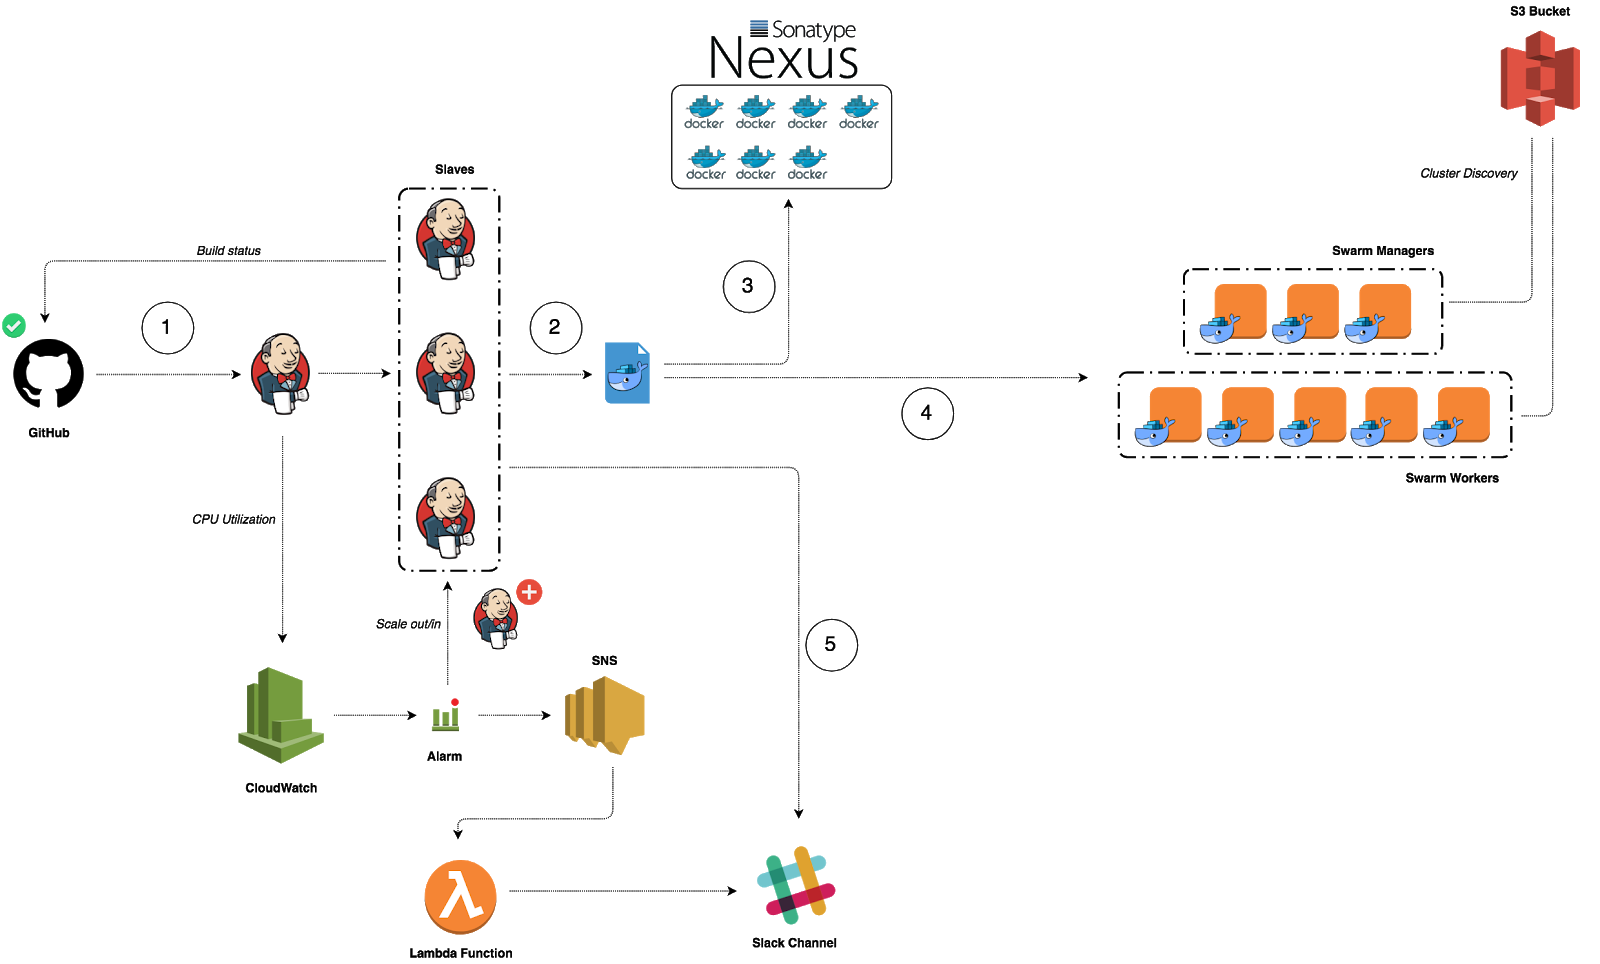
Last year I have given a talk at Nexus User Conference 2018 on how to build a CI/CD pipeline from scratch on AWS to deploy Dockerized Microservices and Serverless Functions. You can read my previous Medium post for step by step guide:


In 2019 edition of Nexus User Conference, I have presented how to build a CI/CD workflow on GCP with GKE, Cloud Build and Infrastructure as Code tools such us Terraform & Packer. This post will walk you through how to create an automated end-to-end process to package a Go based web application in a Docker container image, and deploy that container image on a Google Kubernetes Engine cluster.


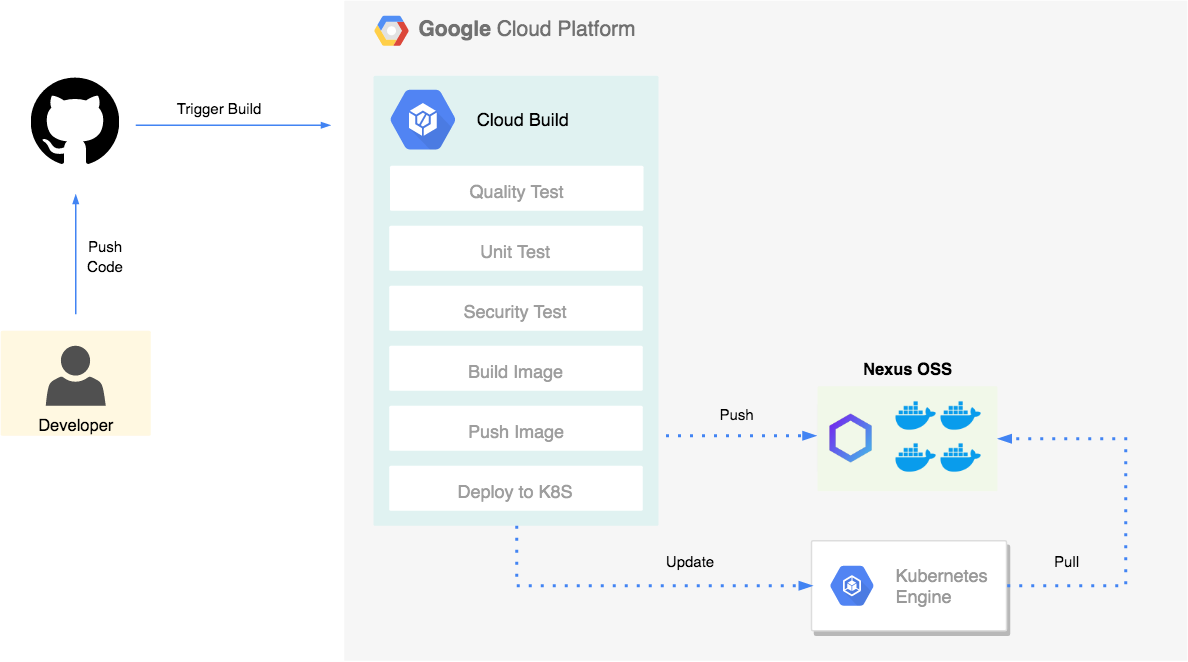
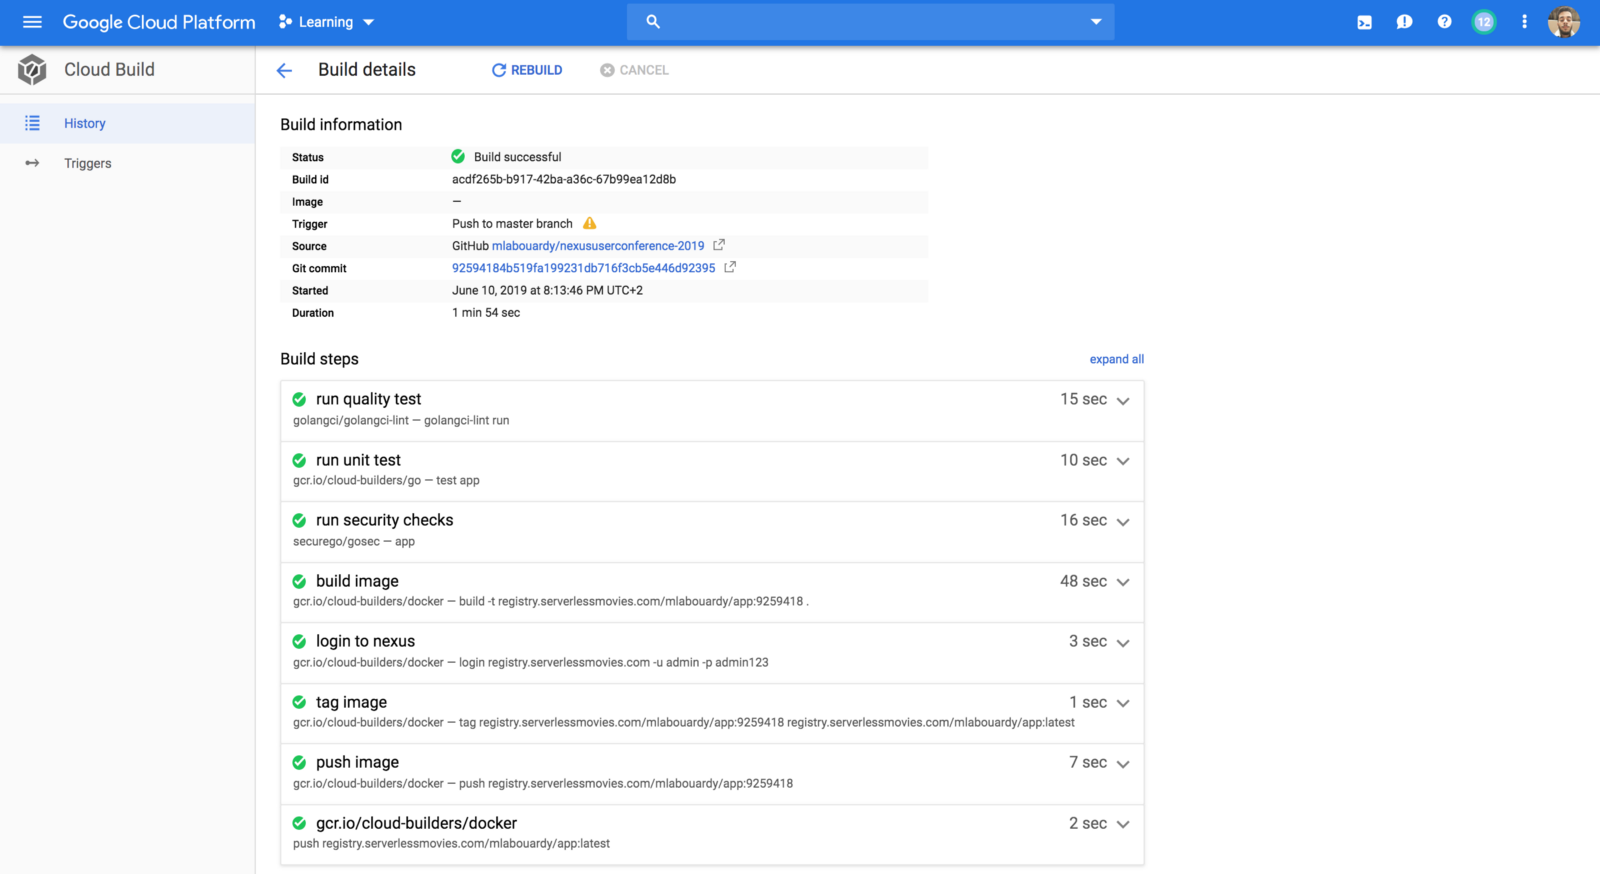
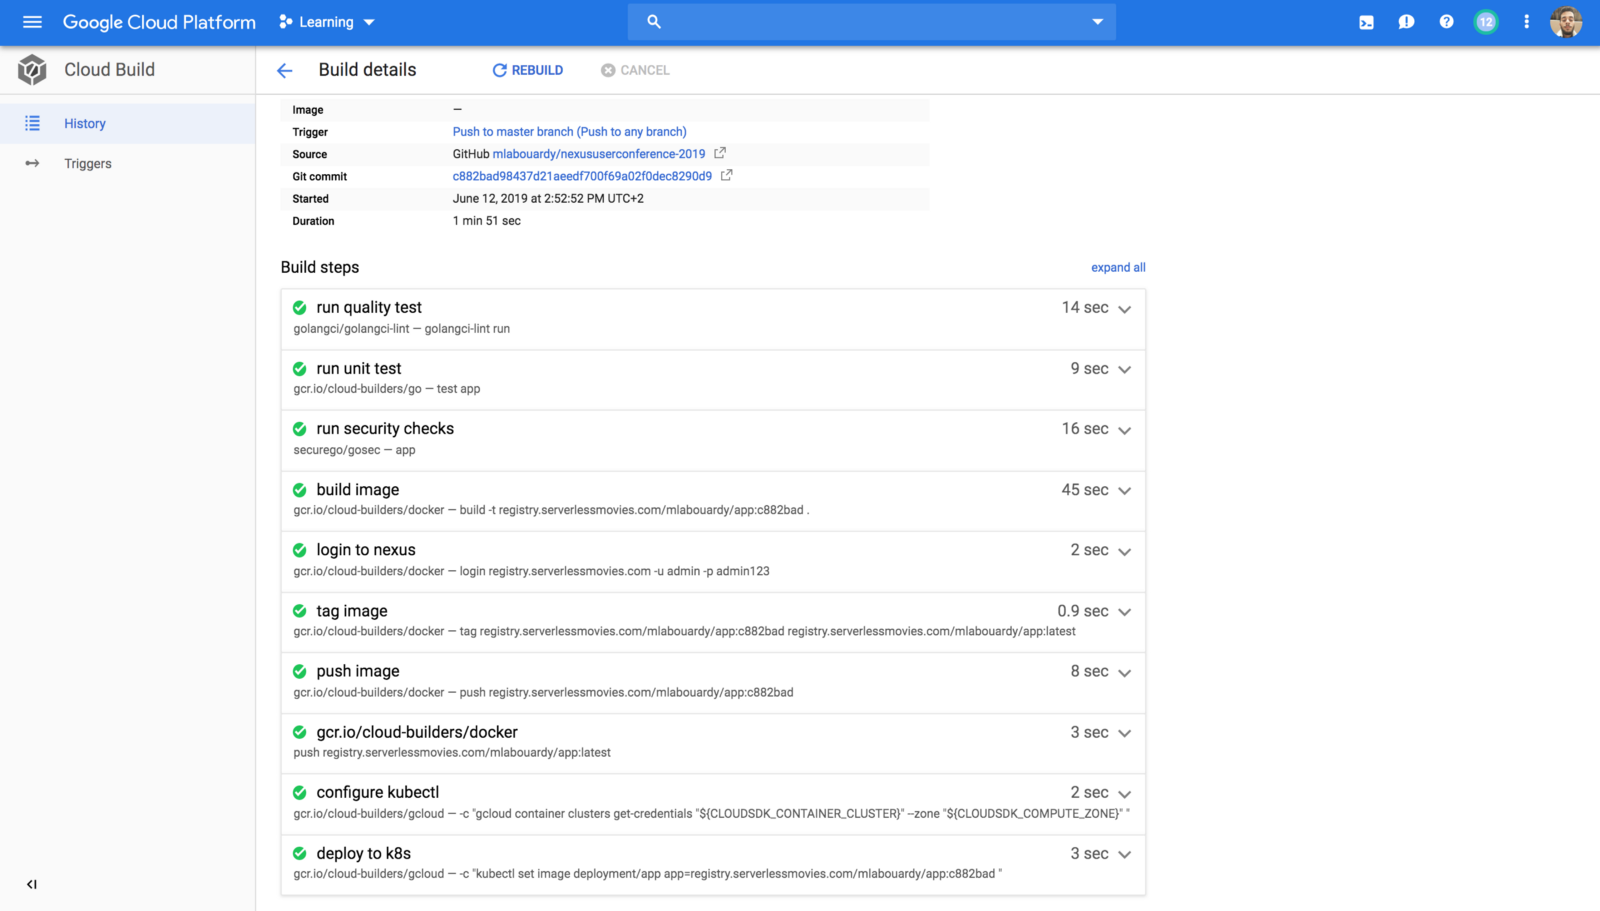
Google Cloud Build allows you to define your pipeline as code in a template file called cloudbuild.yaml (This definition file must be committed to the application’s code repository). The continuous integration pipeline is divided to multiple stages or steps:

  • Quality Test: check whether our code is well formatted and follows Go best practices.
  • Unit Test: launch unit tests. You could also output your coverage and validate that you’re meeting your code coverage requirements.
  • Security Test: inspects source code for common security vulnerabilities.
  • Build: build a Docker image based on Docker multi-stage feature.
  • Push: tag and store the artifact (Docker image) to a Docker private registry.
1
2
3
4
5
6
7
8
9
10
11
12
13
14
15
16
17
18
19
20
21
22
23
24
25
26
27
28
29
30
31
32
33
steps:
- id: 'run quality test'
name: "golangci/golangci-lint"
args: ["golangci-lint","run"]

- id: 'run unit test'
name: 'gcr.io/cloud-builders/go'
args: ['test', 'app']
env: ['GOPATH=.']

- id: 'run security checks'
name: "securego/gosec"
args: ['app']
env: ['GOPATH=.']

- id: 'build image'
name: 'gcr.io/cloud-builders/docker'
args: ['build', '-t', 'registry.serverlessmovies.com/mlabouardy/app:$SHORT_SHA', '.']

- id: 'login to nexus'
name: 'gcr.io/cloud-builders/docker'
args: ['login', 'registry.serverlessmovies.com', '-u', '${_NEXUS_USERNAME}', '-p', '${_NEXUS_PASSWORD}']

- id: 'tag image'
name: 'gcr.io/cloud-builders/docker'
args: ['tag', 'registry.serverlessmovies.com/mlabouardy/app:$SHORT_SHA', 'registry.serverlessmovies.com/mlabouardy/app:latest']

- id: 'push image'
name: 'gcr.io/cloud-builders/docker'
args: ['push', 'registry.serverlessmovies.com/mlabouardy/app:$SHORT_SHA']

- name: 'gcr.io/cloud-builders/docker'
args: ['push', 'registry.serverlessmovies.com/mlabouardy/app:latest']

Now we have to connect the dots. We are going to add a build trigger to initiate our pipeline. To do this, you have to navigate to Cloud Build console and create a new Trigger. Fill the details as shown in the screenshot below and create the trigger.


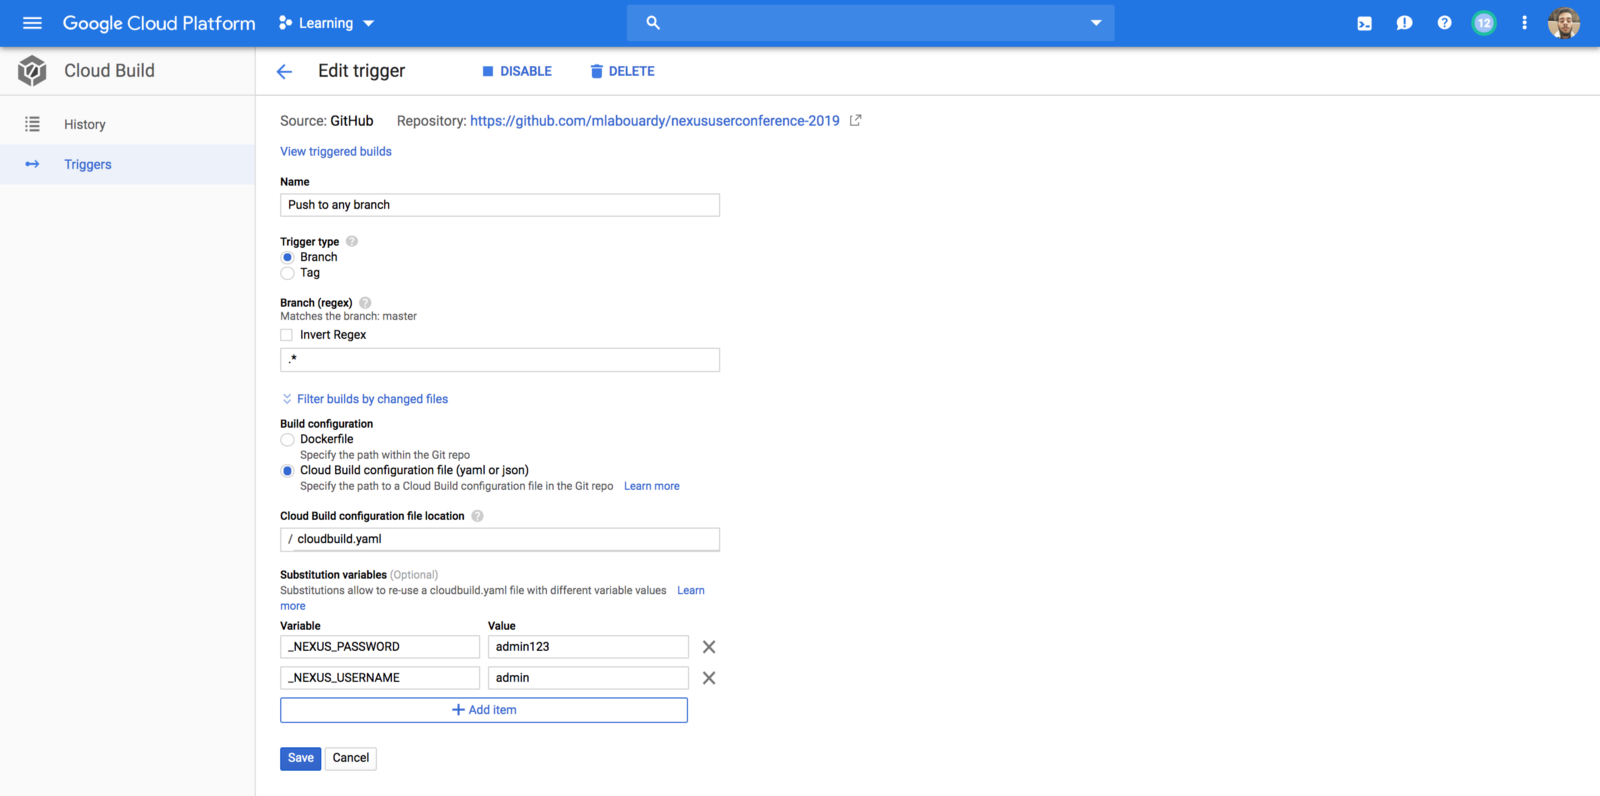
Notice the usage of variables instead of hardcoding Nexus Registry credentials for security purposes.

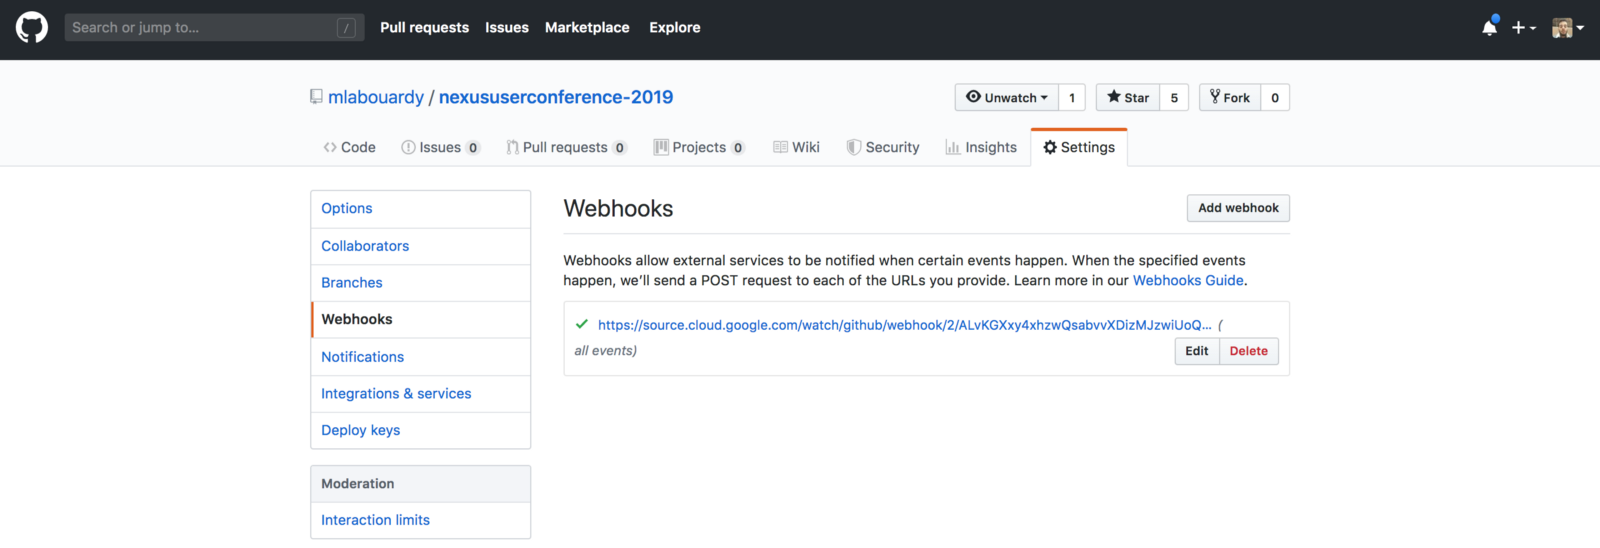
A new Webhook will be created automatically in your GitHub repository to watch for changes:


All good! now everything is configured and you can push your features in your repository and the pipeline will jump to action.


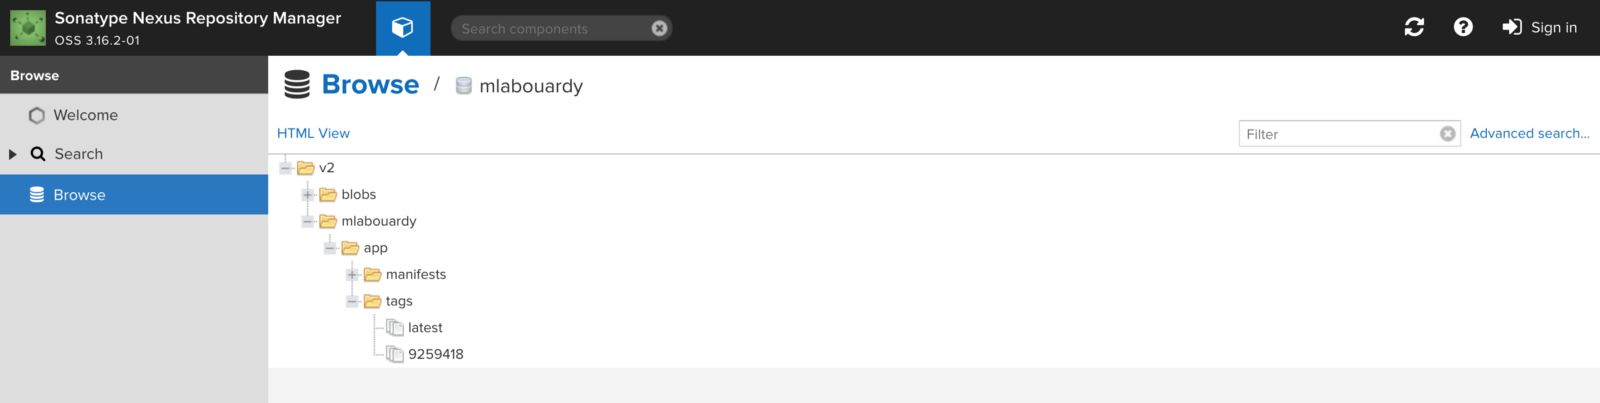
One the CI finishes the Docker image will be pushed into the hosted Docker registry, if we jump back to Nexus Repository Manager, the image should be available:


Now the docker image is stored in a registry, we will deploy it to a Kubernetes cluster, so similarly we will create a Kubernetes cluster based on GKE using Terraform:

1
2
3
4
5
6
7
8
9
10
11
12
13
14
15
16
17
18
19
20
21
22
23
24
25
26
27
28
29
30
31
32
33
34
35
36
37
38
resource "google_container_cluster" "cluster" {
name = "${var.environment}"
location = "${var.zone}"

remove_default_node_pool = true

initial_node_count = "${var.k8s_nodes}"

master_auth {
username = ""
password = ""

client_certificate_config {
issue_client_certificate = false
}
}
}

resource "google_container_node_pool" "pool" {
name = "k8s-node-pool-${var.environment}"
location = "${var.zone}"
cluster = "${google_container_cluster.cluster.name}"
node_count = "${var.k8s_nodes}"

node_config {
preemptible = true
machine_type = "${var.instance_type}"

metadata {
disable-legacy-endpoints = "true"
}

oauth_scopes = [
"https://www.googleapis.com/auth/logging.write",
"https://www.googleapis.com/auth/monitoring",
]
}
}

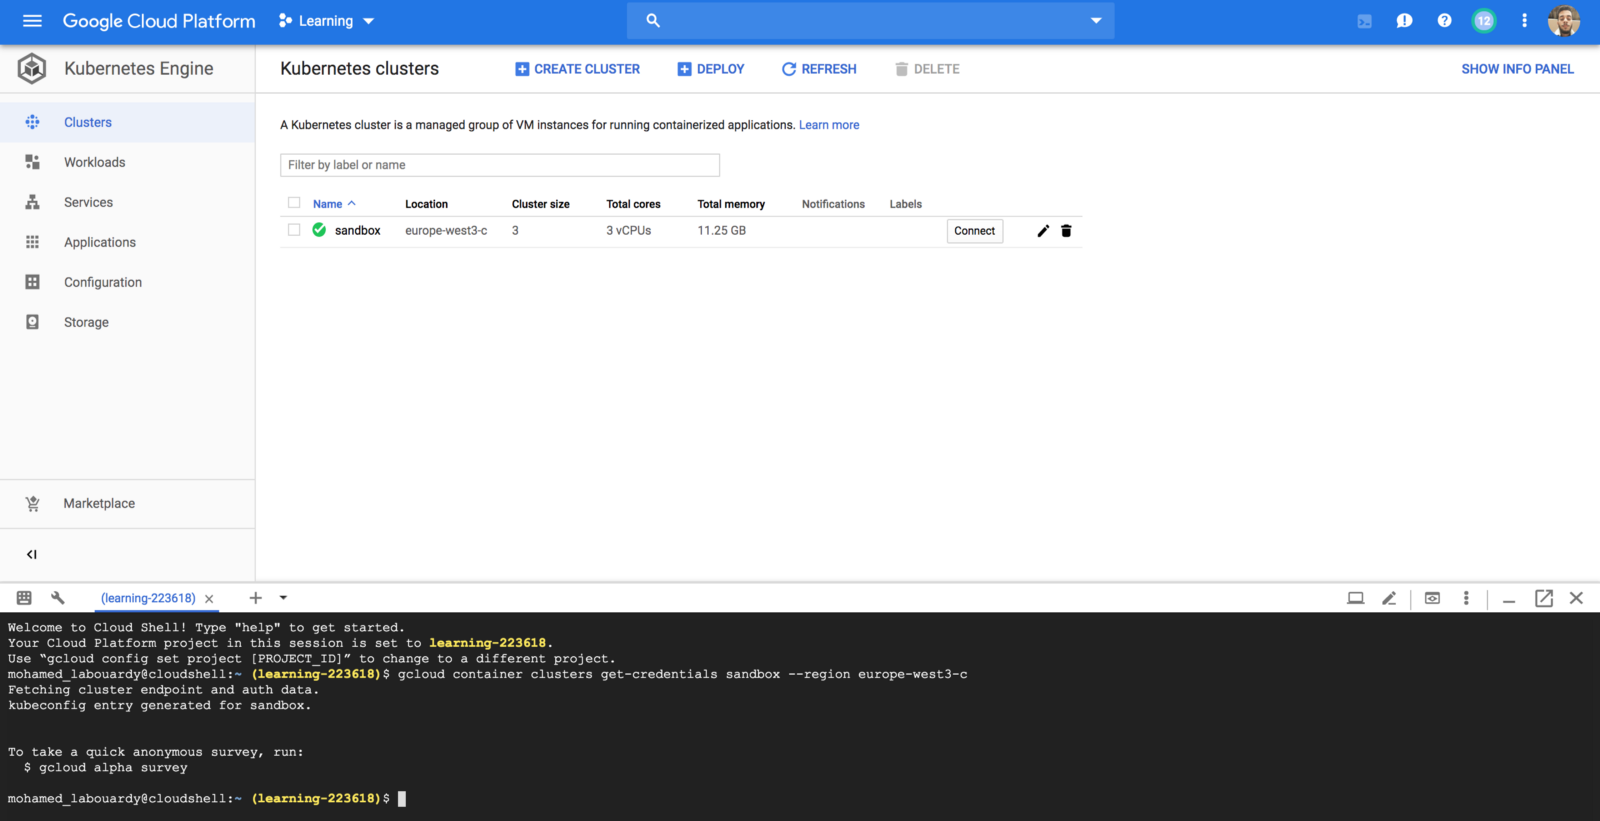
Once the cluster is created, we will provision a new shell machine, and issue the below command to configure kubectl command-line tool to communicate with the cluster:

1
gcloud container clusters get-credentials CLUSTER_NAME --region REGION


Our image is stored in a private Docker repository. Hence, we need to generate credentials for K8s nodes to be able to pull the image from the private registry. Authenticate with the registry using docker login command. Then, create a Secret based on Docker credentials stored in config.json file (This file hold the authorization token)

1
2
3
4
5
docker login REGISTRY_URL -u USER -p PASSWORD

kubectl create secret generic nexus \
--from-file=.dockerconfigjson=/home/$USER/.docker/config.json \
--type=kubernetes.io/dockerconfigjson

Now we are ready to deploy our container:

1
2
3
4
5
6
7
8
9
10
11
12
13
14
15
16
17
18
19
20
21
22
apiVersion: apps/v1
kind: Deployment
metadata:
name: app
spec:
replicas: 1
selector:
matchLabels:
app: app
template:
metadata:
labels:
app: app
spec:
containers:
- name: app
image: registry.serverlessmovies.com/mlabouardy/app:latest
ports:
- containerPort: 3000
imagePullPolicy: Always
imagePullSecrets:
- name: nexus

To pull the image from the private registry, Kubernetes needs credentials. The imagePullSecrets field in the configuration file specifies that Kubernetes should get the credentials from a Secret named nexus.

Run the following command to deploy your application, listening on port 3000:

1
kubectl apply -f deployment.yml

By default, the containers you run on GKE are not accessible from the Internet, because they do not have external IP addresses. You must explicitly expose your application to traffic from the Internet. I’m going to use the LoadBalancer type service for this demo. But you are free to use whatever you like.

1
2
3
4
5
6
7
8
9
10
11
apiVersion: v1
kind: Service
metadata:
name: app
spec:
ports:
- port: 80
targetPort: 3000
selector:
app: app
type: LoadBalancer

Once you’ve determined the external IP address for your application, copy the IP address.


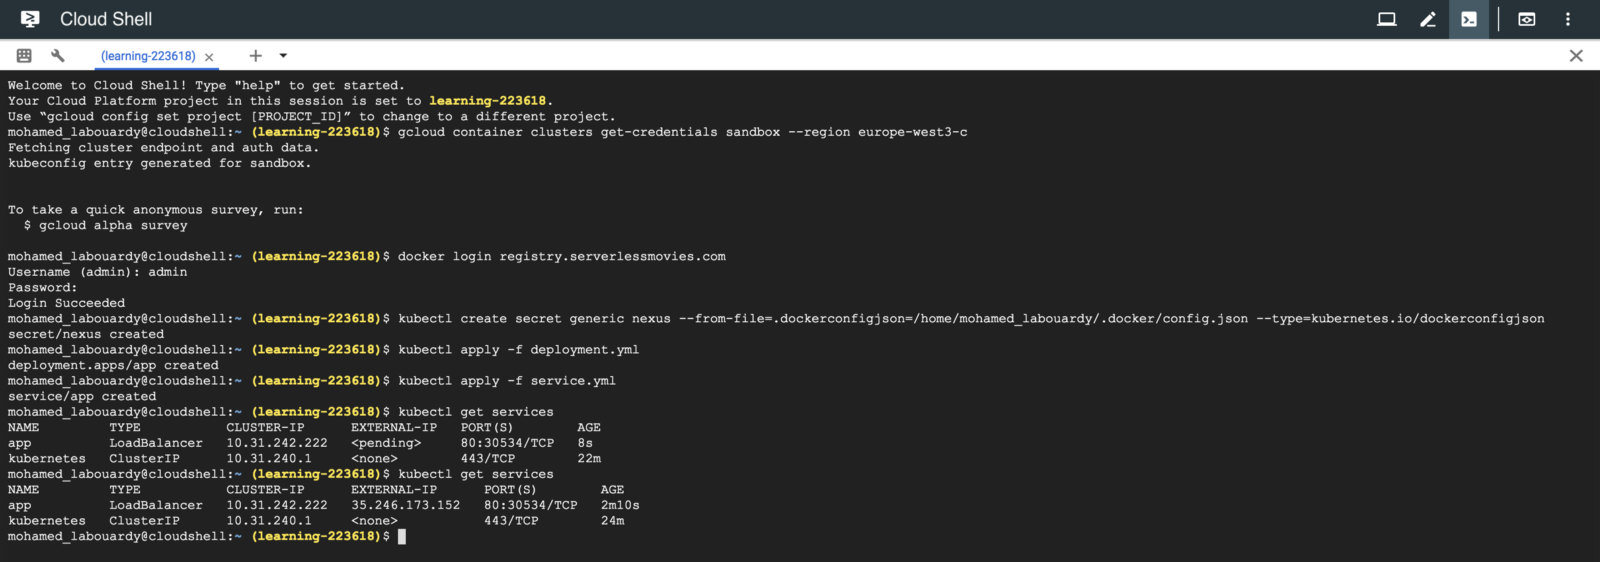
Point your browser to that URL to check if your application is accessible:


Finally, to automatically deploy our changes to K8s cluster, we need to update the cloudbuild.yaml file to add continuous deployment steps. We will apply a rolling update to the existing deployment with an image update:

1
2
3
4
5
6
7
8
9
10
11
12
13
14
15
16
17
18
19
20
21
22
23
24
25
26
27
- id: 'configure kubectl'
name: 'gcr.io/cloud-builders/gcloud'
env:
- 'CLOUDSDK_COMPUTE_ZONE=${_CLOUDSDK_COMPUTE_ZONE}'
- 'CLOUDSDK_CONTAINER_CLUSTER=${_CLOUDSDK_CONTAINER_CLUSTER}'
- 'KUBECONFIG=/kube/config'
entrypoint: 'sh'
args:
- '-c'
- |
gcloud container clusters get-credentials "$${CLOUDSDK_CONTAINER_CLUSTER}" --zone "$${CLOUDSDK_COMPUTE_ZONE}"
volumes:
- name: 'kube'
path: /kube

- id: 'deploy to k8s'
name: 'gcr.io/cloud-builders/gcloud'
env:
- 'KUBECONFIG=/kube/config'
entrypoint: 'sh'
args:
- '-c'
- |
kubectl set image deployment/app app=registry.serverlessmovies.com/mlabouardy/app:$SHORT_SHA
volumes:
- name: 'kube'
path: /kube

Test it out by pushing some changes to your repository, within a minute or two, it should get pushed to your live infrastructure.


That’s it! You’ve just managed to build a solid CI/CD pipeline in GCP for whatever your application code may be.

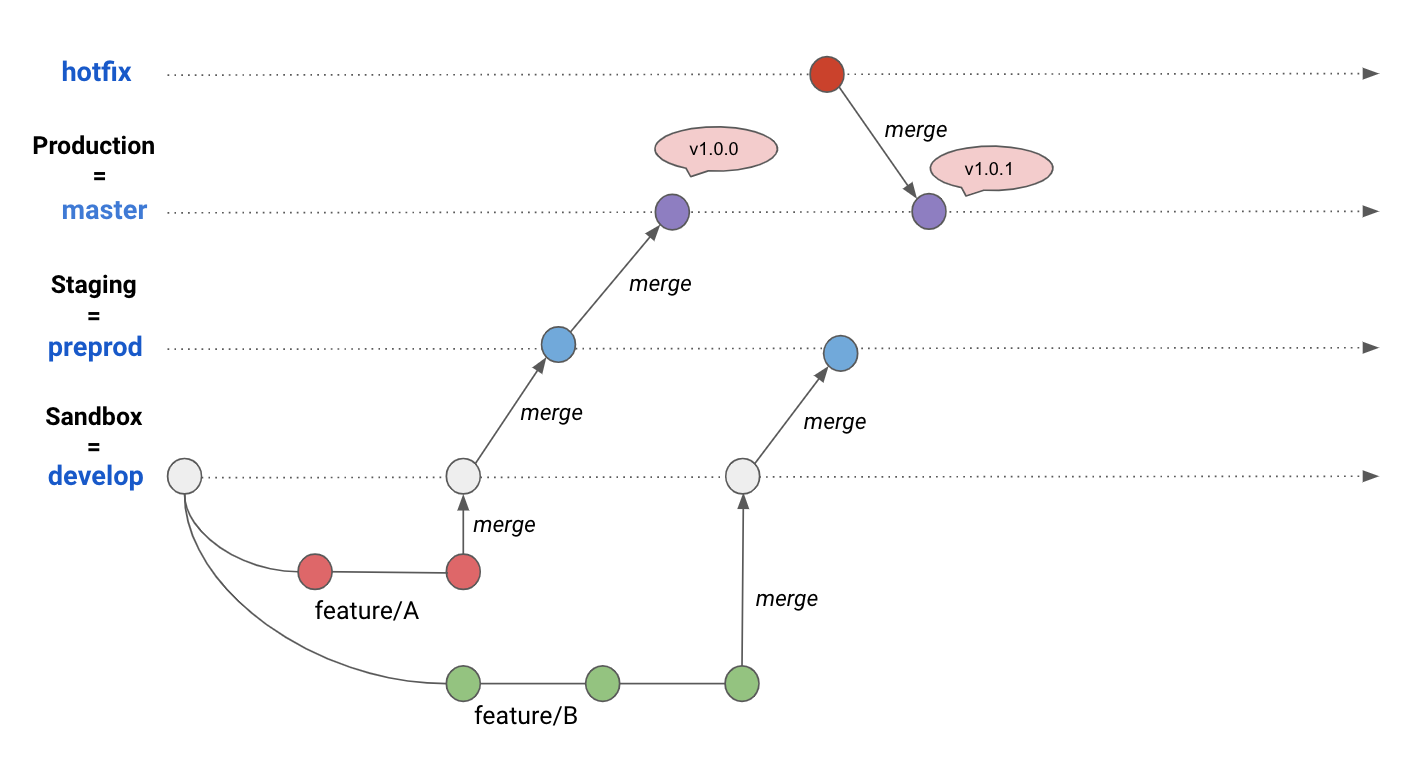
You can take this workflow further and use GitFlow branching model to separate your deployment environments to test new changes and features without breaking your production:


Drop your comments, feedback, or suggestions below — or connect with me directly on Twitter @mlabouardy.

Komiser:Detect potential cost savings on GCP

I’m super excited to annonce the release of Komiser:2.1.0 with beta support of Google Cloud Platform. You can now use one single open source tool to detect both AWS and GCP overspending.

Highlights


With the GDPR becoming real in EU, logging and storage of (potentially) personally identifiable information now need to be reduced in many organizations. Komiser allows you to analyze and manage cloud cost, usage, security, and governance in one place. Hence, detecting potential vulnerabilities that could put your cloud environment at risk.

It allows you also to control your usage and create visibility across all used services to achieve maximum cost-effectiveness and get a deep understanding of how you spend on the AWS, GCP and Azure.


Usage

Below are the available downloads for the latest version of Komiser (2.1.0). Please download the proper package for your operating system and architecture.

Linux:

1
wget https://cli.komiser.io/2.1.0/linux/komiser

Windows:

1
wget https://cli.komiser.io/2.1.0/windows/komiser

Mac OS X:

1
wget https://cli.komiser.io/2.1.0/osx/komiser

Note: make sure to add the execution permission to Komiser chmod +x komiser and update the user’s $PATH variable.

Komiser is also available as a Docker image:

Docker:

1
docker run -d -p 3000:3000 --name komiser mlabouardy/komiser:2.1.0

Note that we need to provide the three environment variables AWS_DEFAULT_REGION, AWS_ACCESS_KEY_ID and AWS_SECRET_ACCESS_KEY set in the container such as that the CLI can automatically authenticate with AWS.

Create a service account with Viewer permission, see Creating and managing service accounts docs.

Enable the below APIs for your project through GCP Console, gcloud or using the Service Usage API. You can find out more about these options in Enabling an API in your GCP project docs.

1
2
3
4
5
6
7
8
9
10
11
12
13
14
15
16
17
appengine.googleapis.com
bigquery-json.googleapis.com
compute.googleapis.com
cloudfunctions.googleapis.com
container.googleapis.com
cloudresourcemanager.googleapis.com
cloudkms.googleapis.com
dns.googleapis.com
dataflow.googleapis.com
dataproc.googleapis.com
iam.googleapis.com
monitoring.googleapis.com
pubsub.googleapis.com
redis.googleapis.com
serviceusage.googleapis.com
storage-api.googleapis.com
sqladmin.googleapis.com

To analyze and optimize the infrastructure cost, you need to export your daily cost to BigQuery, see Export Billing to BigQuery docs.

Provide authentication credentials to your application code by setting the environment variable GOOGLE_APPLICATION_CREDENTIALS:

1
export GOOGLE_APPLICATION_CREDENTIALS="[PATH]"

That should be it. Try out the following from your command prompt to start the server:

1
komiser start --port 3000 --dataset project-id.dataset-name.table-name

If you point your favorite browser to http://localhost:3000, you should see Komiser awesome dashboard:


The versioned documentation can be found on https://docs.komiser.io.

Komiser is written in Golang and is MIT licensed — contributions are welcomed whether that means providing feedback or testing existing and new features.


https://komiser.io

Drop your comments, feedback, or suggestions below — or connect with me directly on Twitter @mlabouardy.

Your browser is out-of-date!

Update your browser to view this website correctly. Update my browser now

×