At AWS re:Invent 2018, it was announced that Ruby is now a supported language for AWS Lambda. In this post, I walk you through how to write your very first Ruby-based Lambda function from scratch, followed by how to configure, deploy, and test a Lambda function.
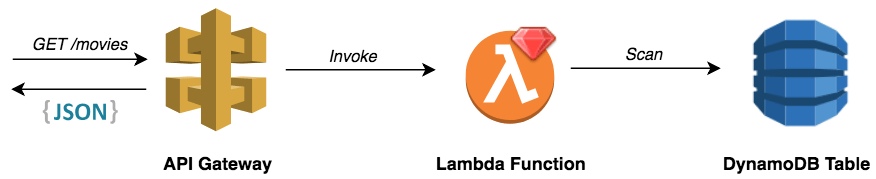
API Gateway will forward incoming requests to the target Ruby based Lambda function, which will call the corresponding DynamoDB operation on the movies table.
To get started, create a Lambda execution role with permission to invoke the Scan operation on the DynamoDB table:
The function entry-point below is is self explanatory, it uses the AWS SDK (the package is pre-installed in Lambda) to instantiate a DynamoDB client in the appropriate region and issues the Scan operation on the DynamoDB table (defined in an environment variable):
The AWS SDK for Ruby is included in the Lambda execution environment by default.
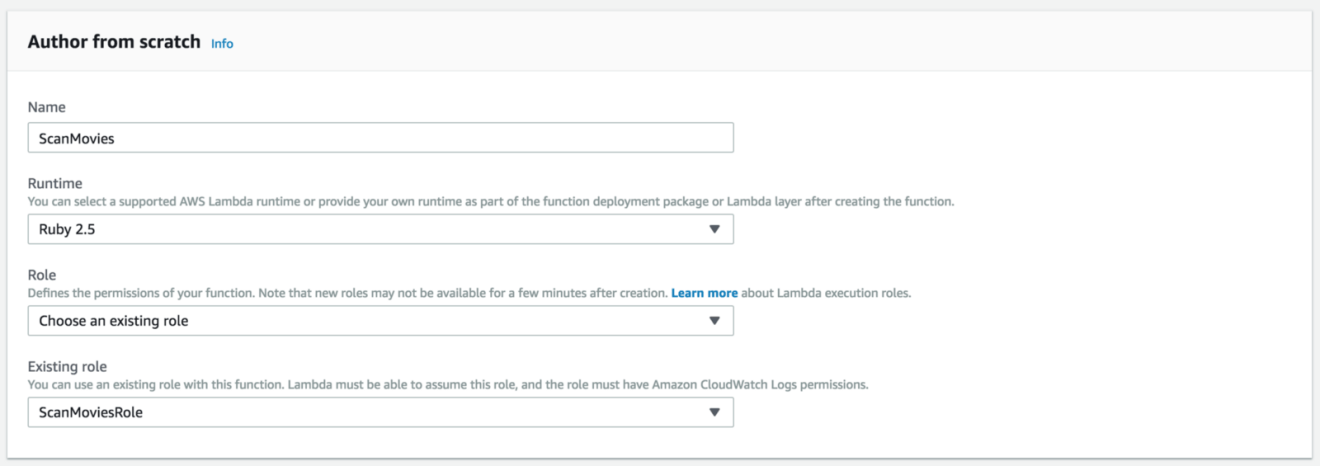
Now that our handler is defined, head to the Lambda form creation and select the IAM role (you might need to refresh the page for the changes to take effect) from the Existing role drop-down list. Then, click the Create function button:
Set the table name as an environment variable:
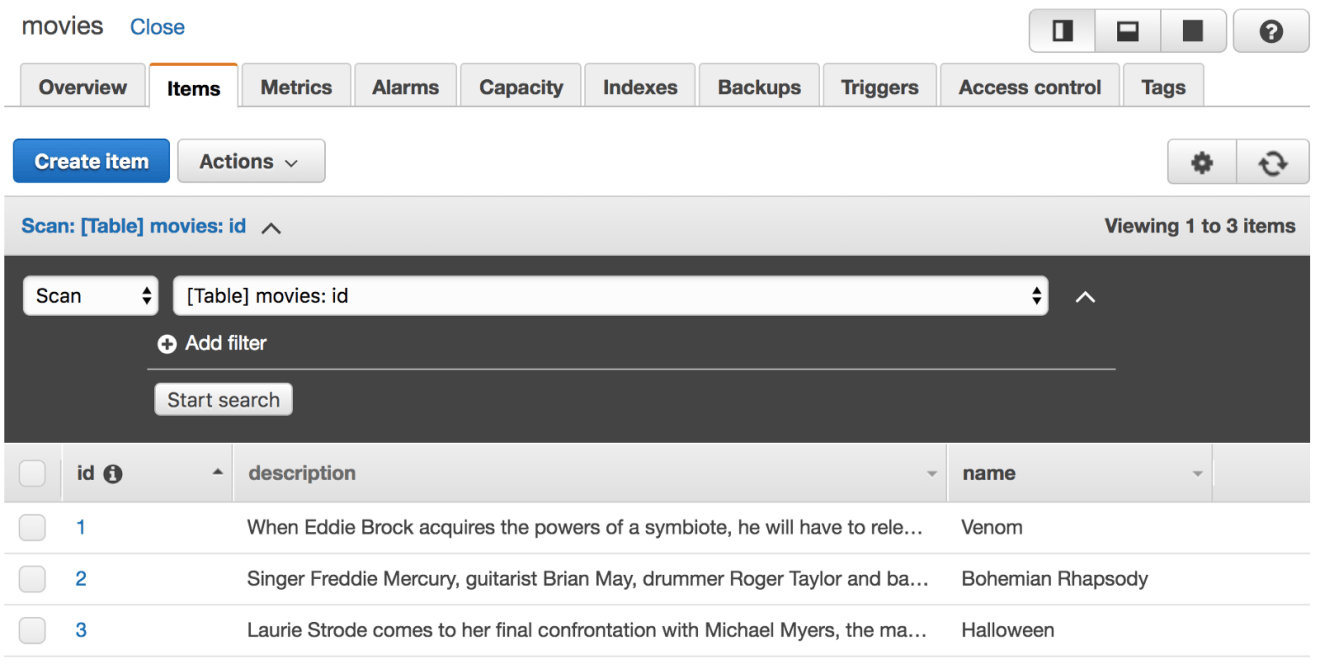
The movies table contains a set of movies:
Create a deployment package (zip file) and update the function’s code using the AWS CLI command:
Make sure to set the Lambda function handler to handler.lambda_handler
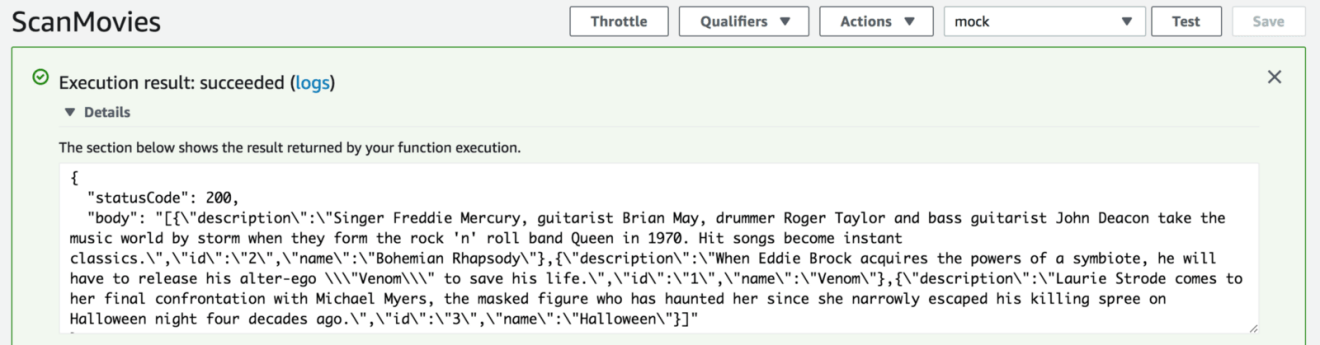
Once the function has been deployed, invoke it manually using the sample event data by clicking on the “Test” button in the top right of the console.
So far, we learned how to build our first Lambda function with Ruby. We also learned how to invoke it manually from the console. To leverage the power of Lambda, we are going to learn how to trigger this Lambda function in response to incoming HTTP requests (event-driven architecture) using the AWS API Gateway service:
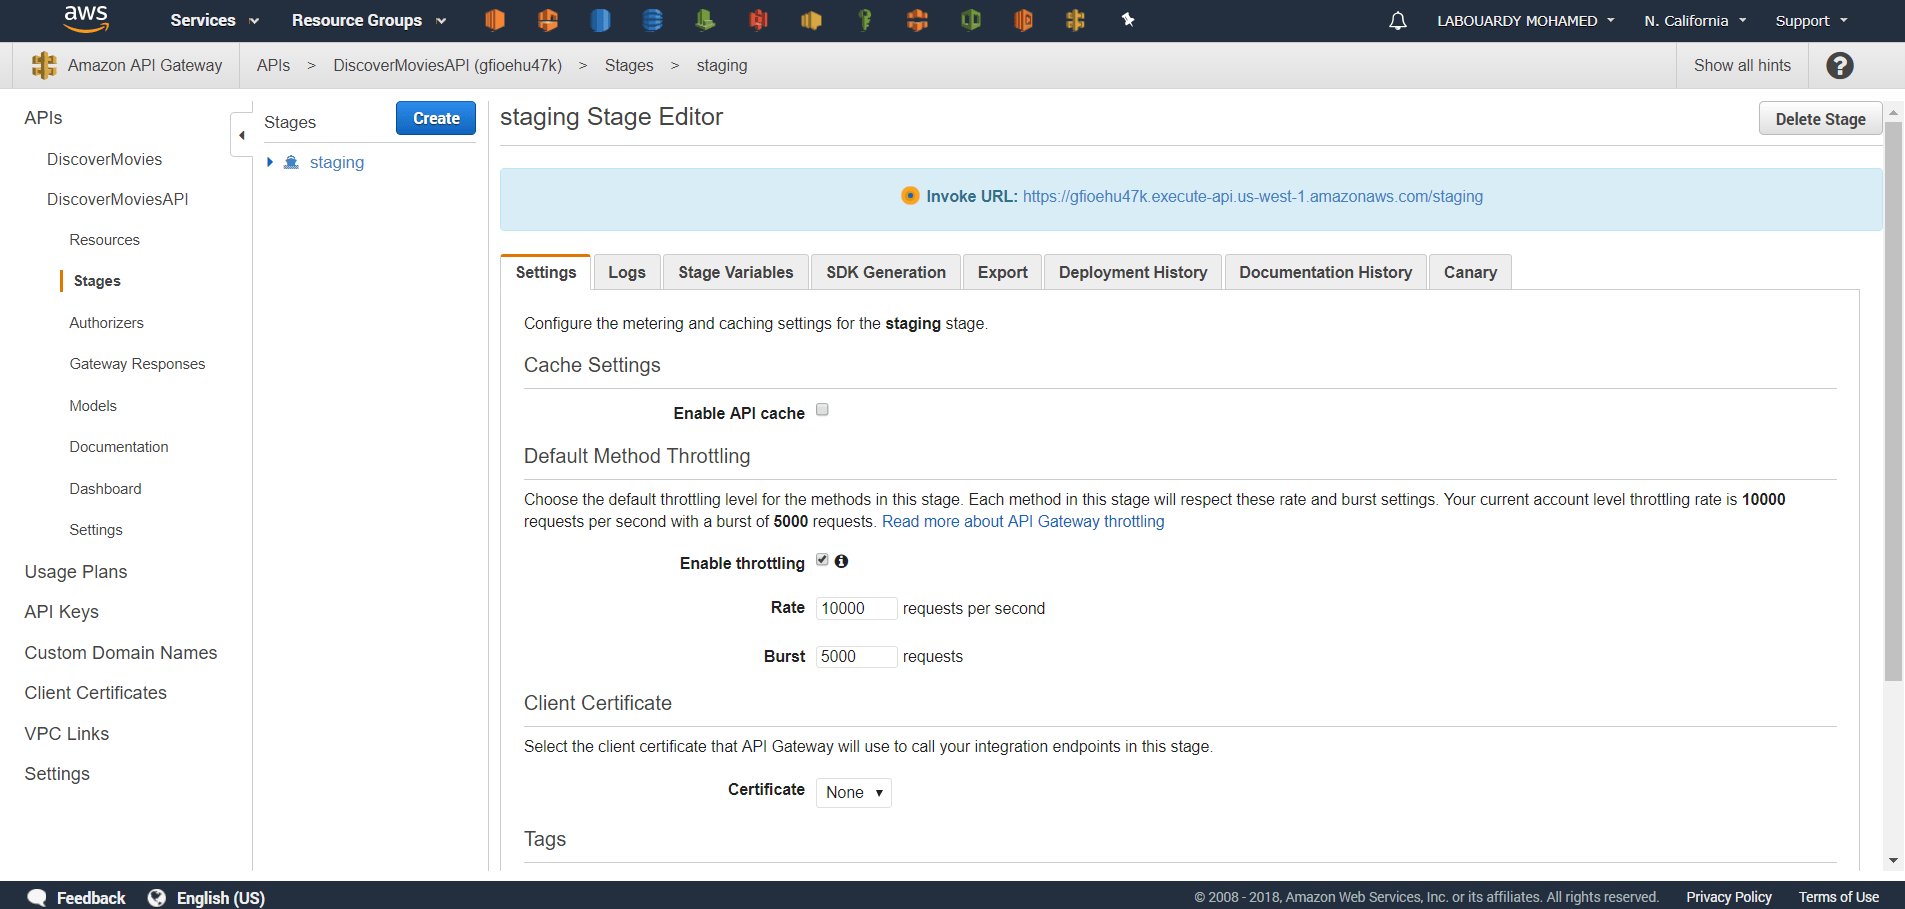
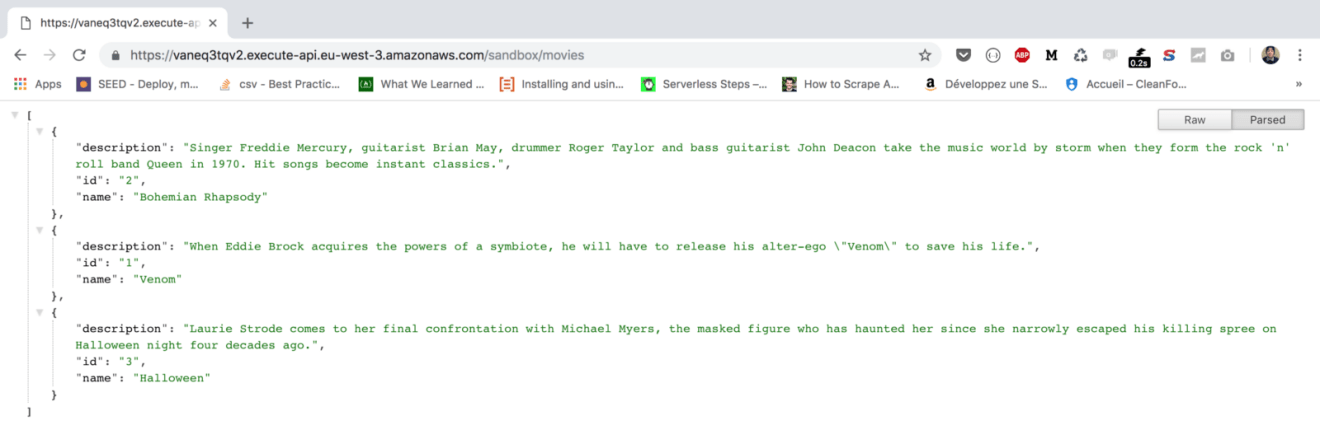
Create a deployment stage and open your favorite browser with the API Invoke URL; you should see a message like the one shown in the following screenshot:
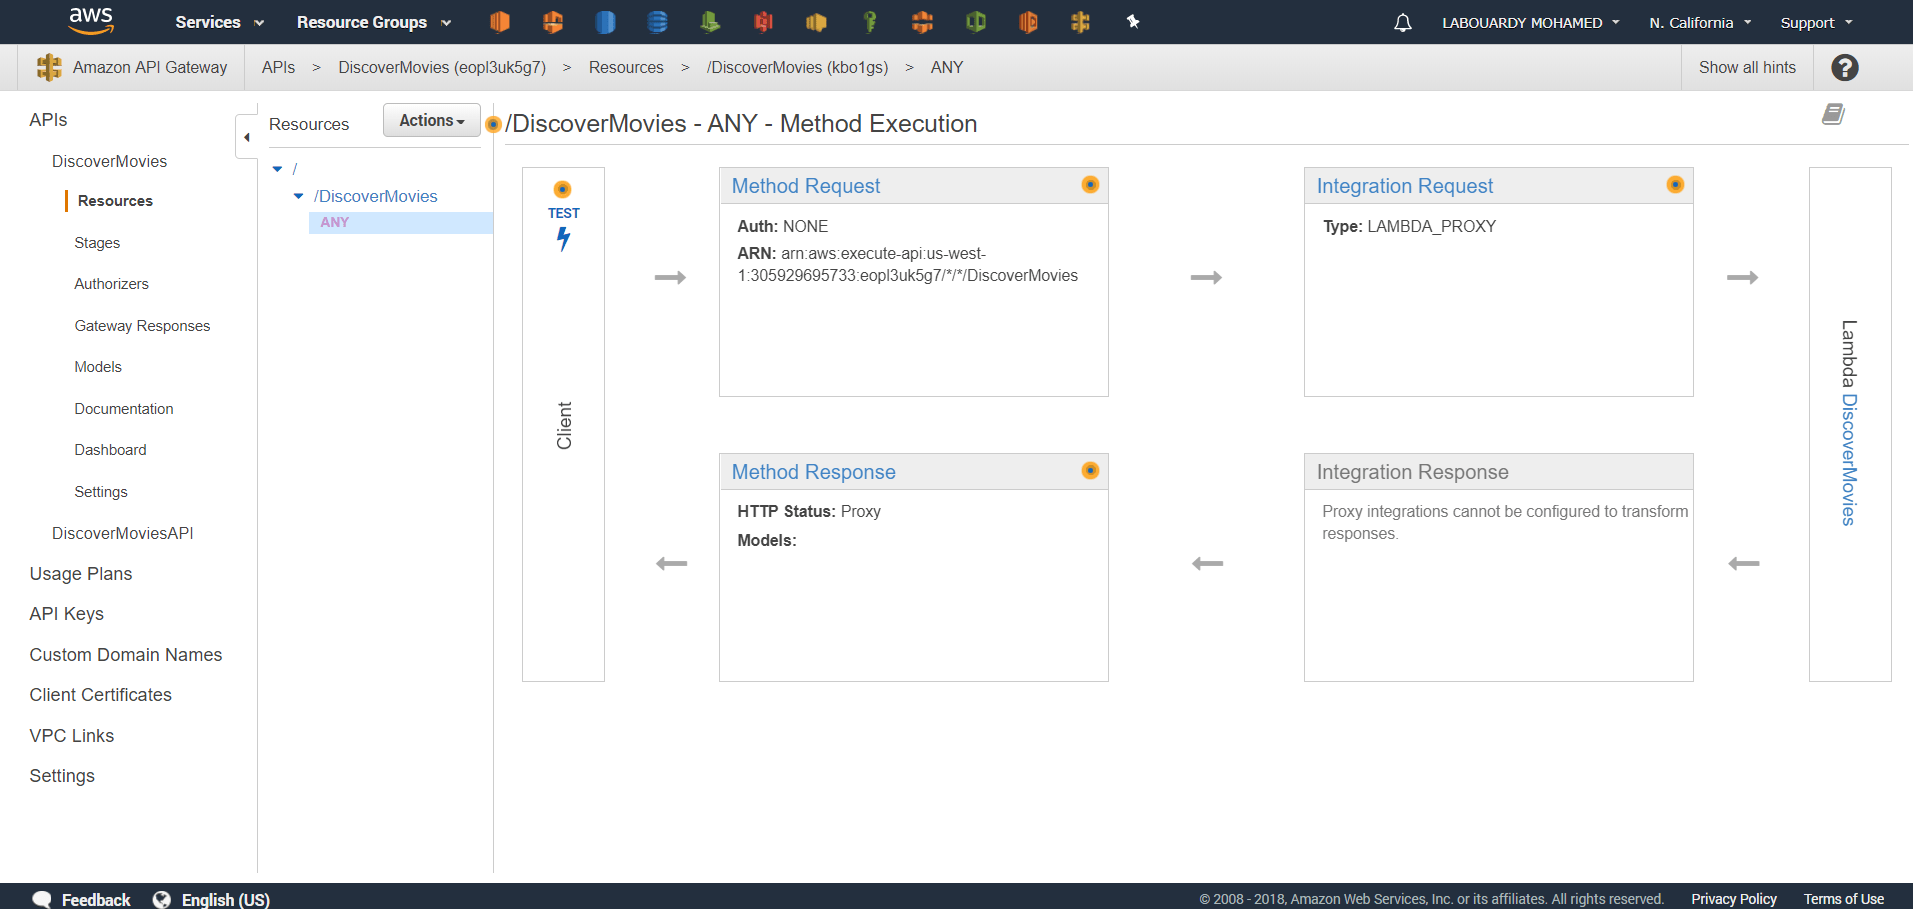
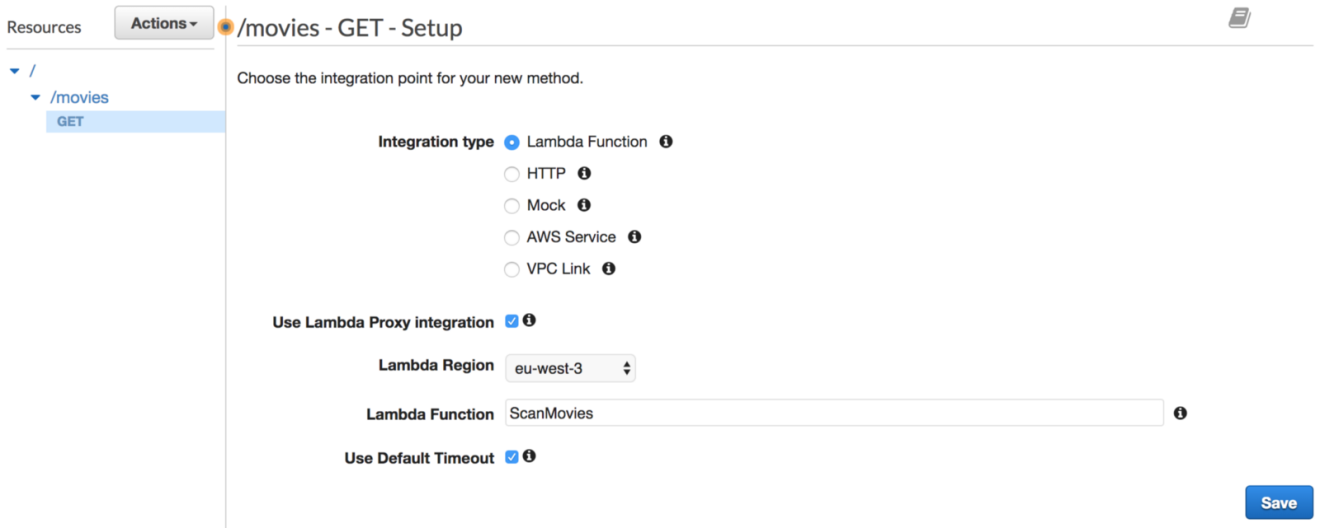
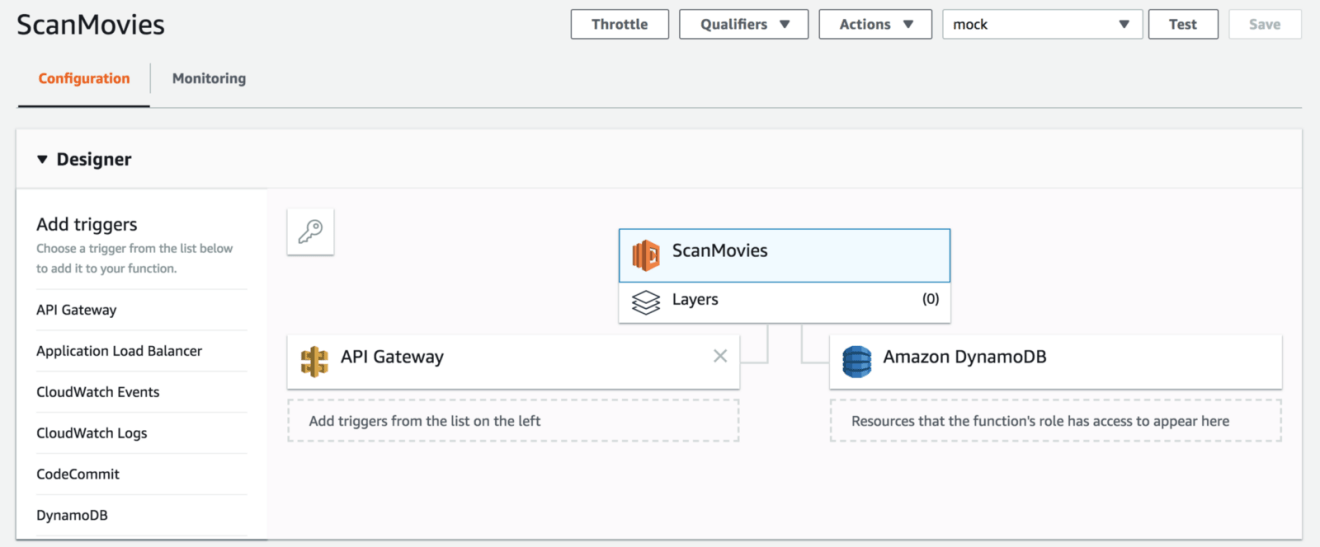
The following screenshot shows a properly configured Ruby based Lambda function with IAM access to DynamoDB:
Like what you’re reading? Check out my book and learn how to build, secure, deploy and manage production-ready Serverless applications in Golang with AWS Lambda.
Drop your comments, feedback, or suggestions below — or connect with me directly on Twitter @mlabouardy.
A common use case of API Gateway is building API endpoints in top of Lambda functions. It can also be used as an API proxy to connect to AWS services. In this guide, I will walk you through how to create your own API using API Gateway and DynamoDB only and go through advanced features to enhance your API endpoints such as:
Mapping templates, Integration Request and Integration Response.
Error handling and request validation.
Authentication with AWS Cognito and Lambda Authorizer.
API Throttling with Plan usage and API keys.
API documentation generation.
API Gateway custom domain.
Setting up DynamoDB
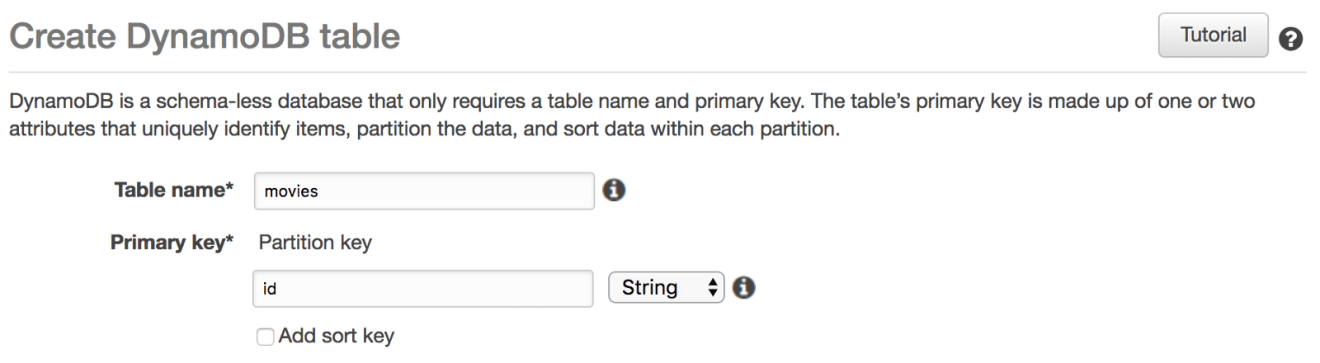
To get started, create a DynamoDB table called movies with an id as a partition key (leave the read/write capacity to default values):
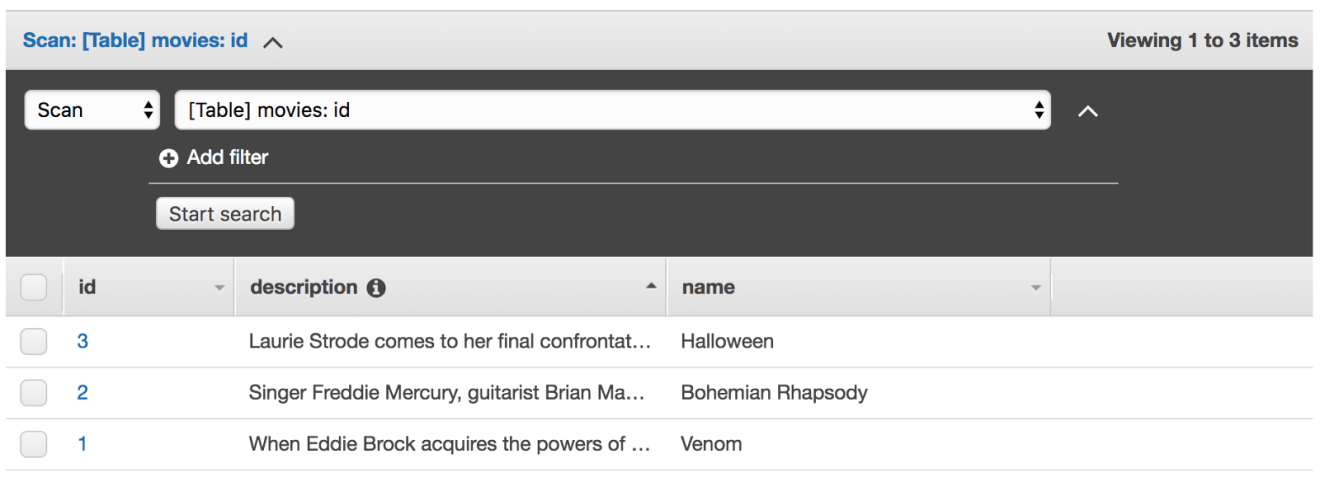
Next, insert few items into the table, it should look something like this:
Next, we need to grant the API Gateway access to DynamoDB table. Therefore we need to create an IAM role assumable by API Gateway:
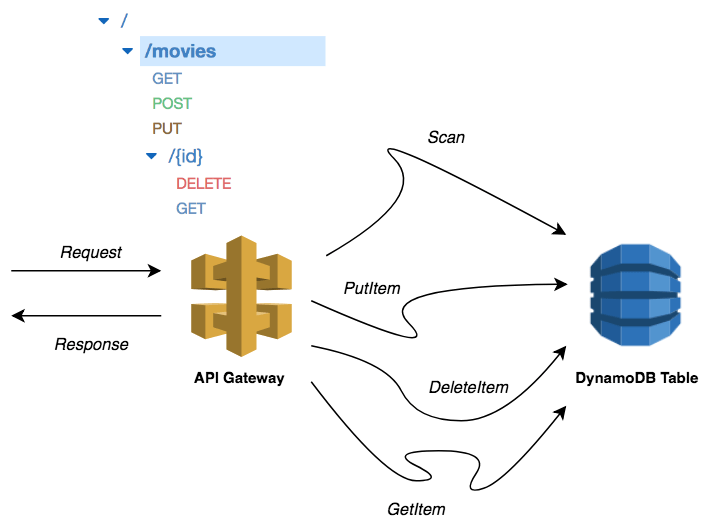
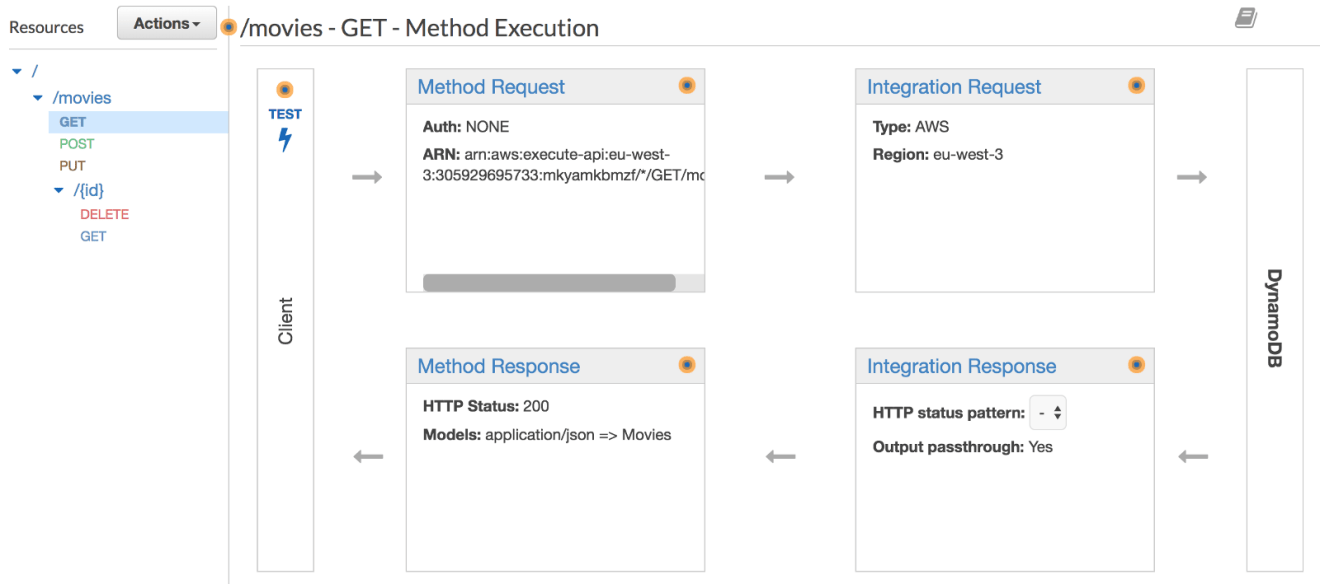
Before going into further detail about the architecture, the following diagram shows how API Gateway and DynamoDB will fit into the API architecture:
When calling the API endpoints, the request will go through the API Gateway, which will invoke the appropriate DynamoDB operation. This returns a response which is proxied by the API Gateway to the client in a JSON format.
GET /MOVIES
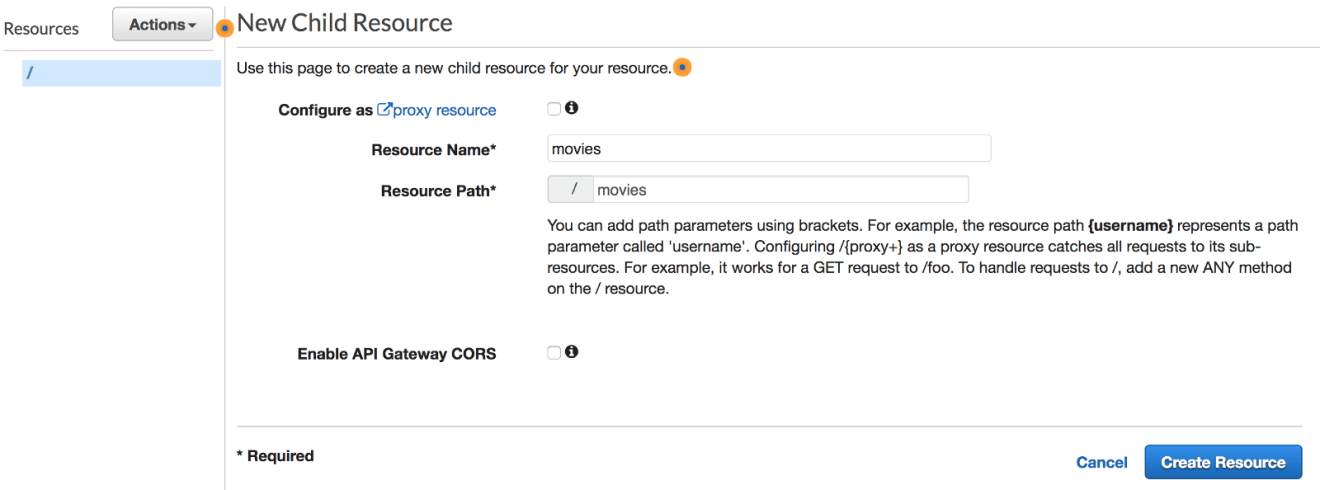
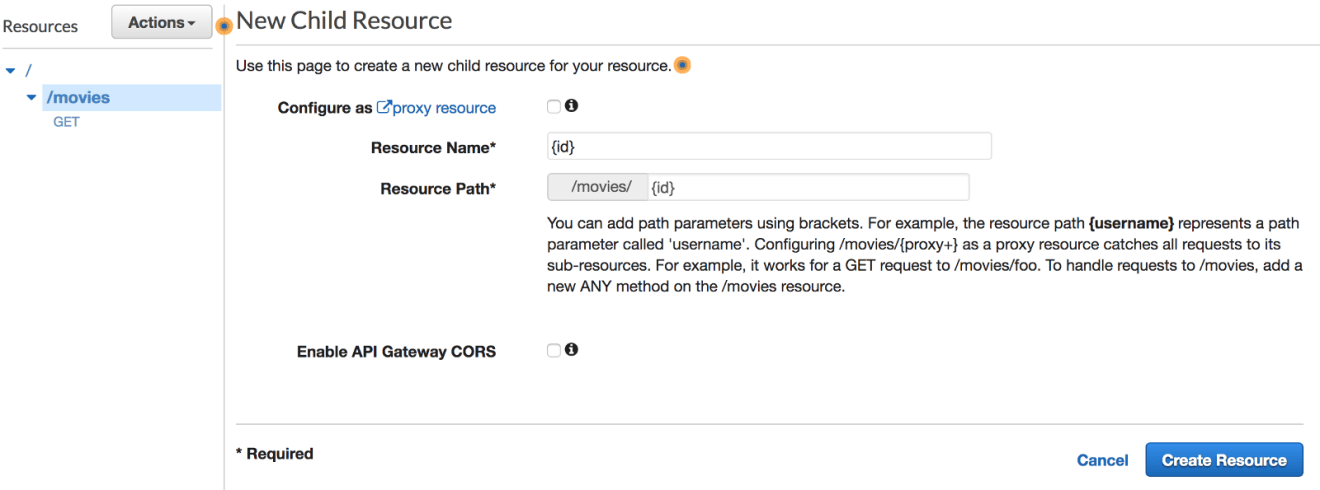
Create new API called MoviesAPI from API Gateway Console, and create a new resource, let’s call it movies:
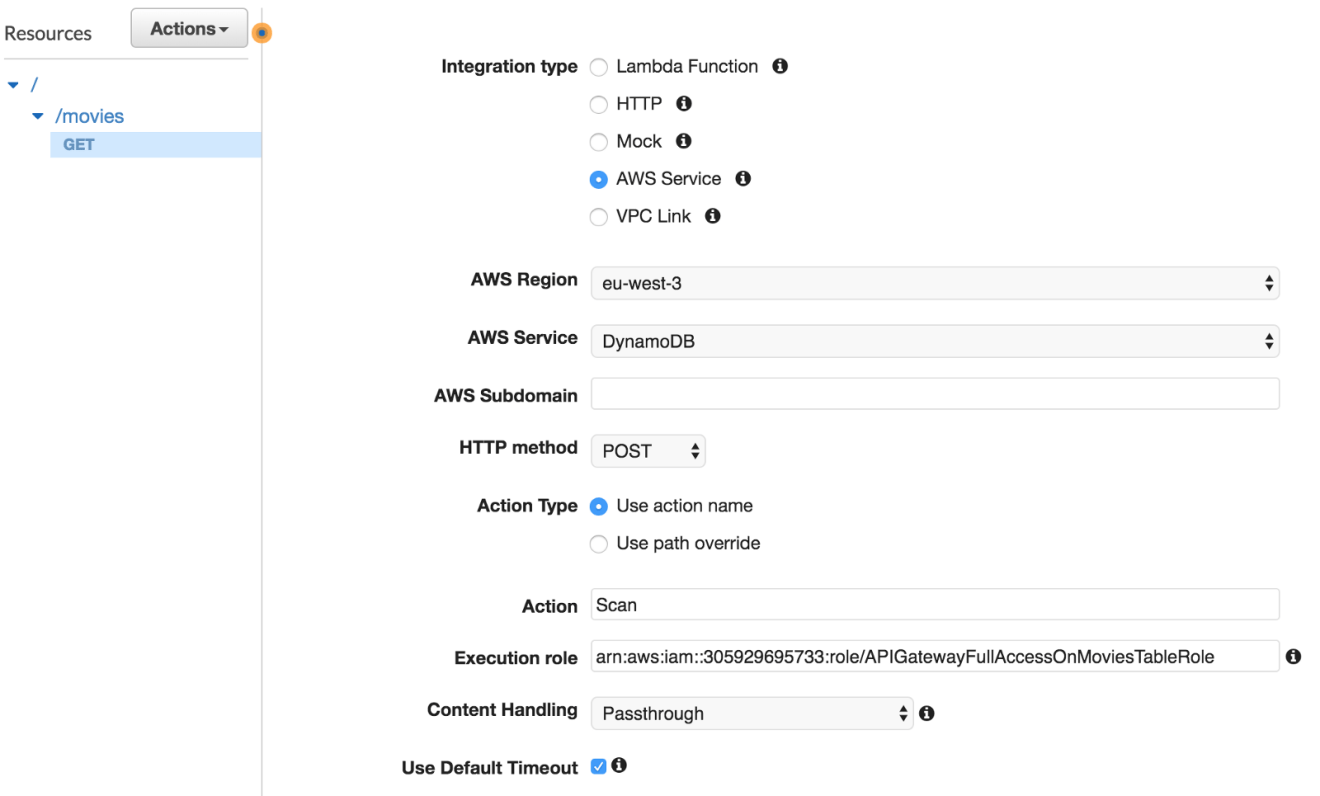
Expose a GET method on /movies resource by clicking on “Create Method”. Select AWS Service under the “Integration type” section, choose the DynamoDB service, set the HTTP method to be POST and action type to be a Scan operation.
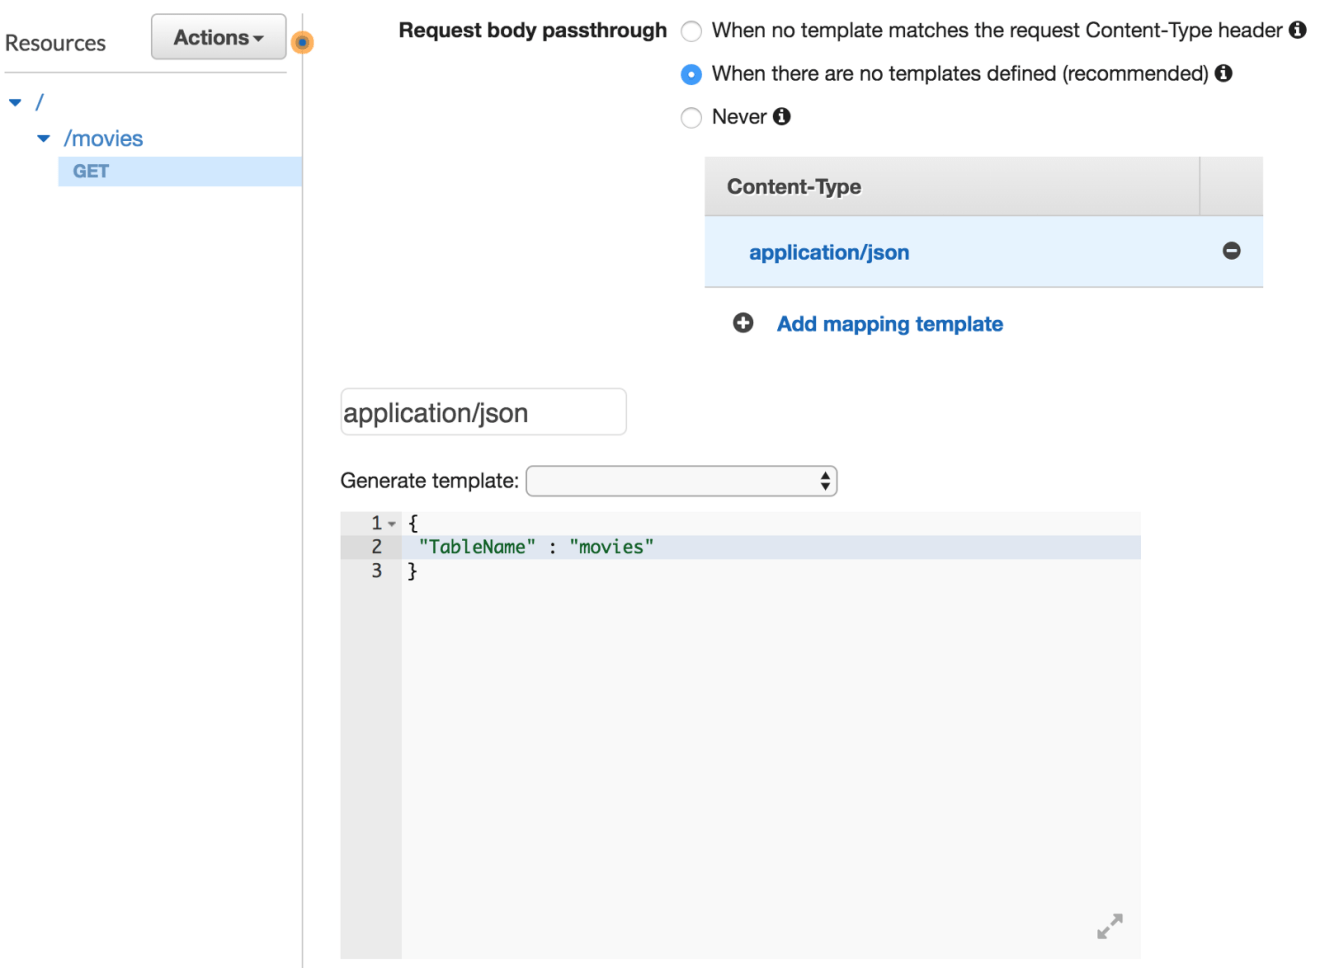
Next, we need to transform the HTTP request coming into API Gateway to a proper Scan request for DynamoDB. In the API Gateway console, select the “Integration Request”. All the way at the bottom we can select the Body Mapping Templates. Here, create a new application/json mapping template with the following configuration:
Deploy the API from “Actions” and create a new deployment stage, an invocation URL will be displayed:
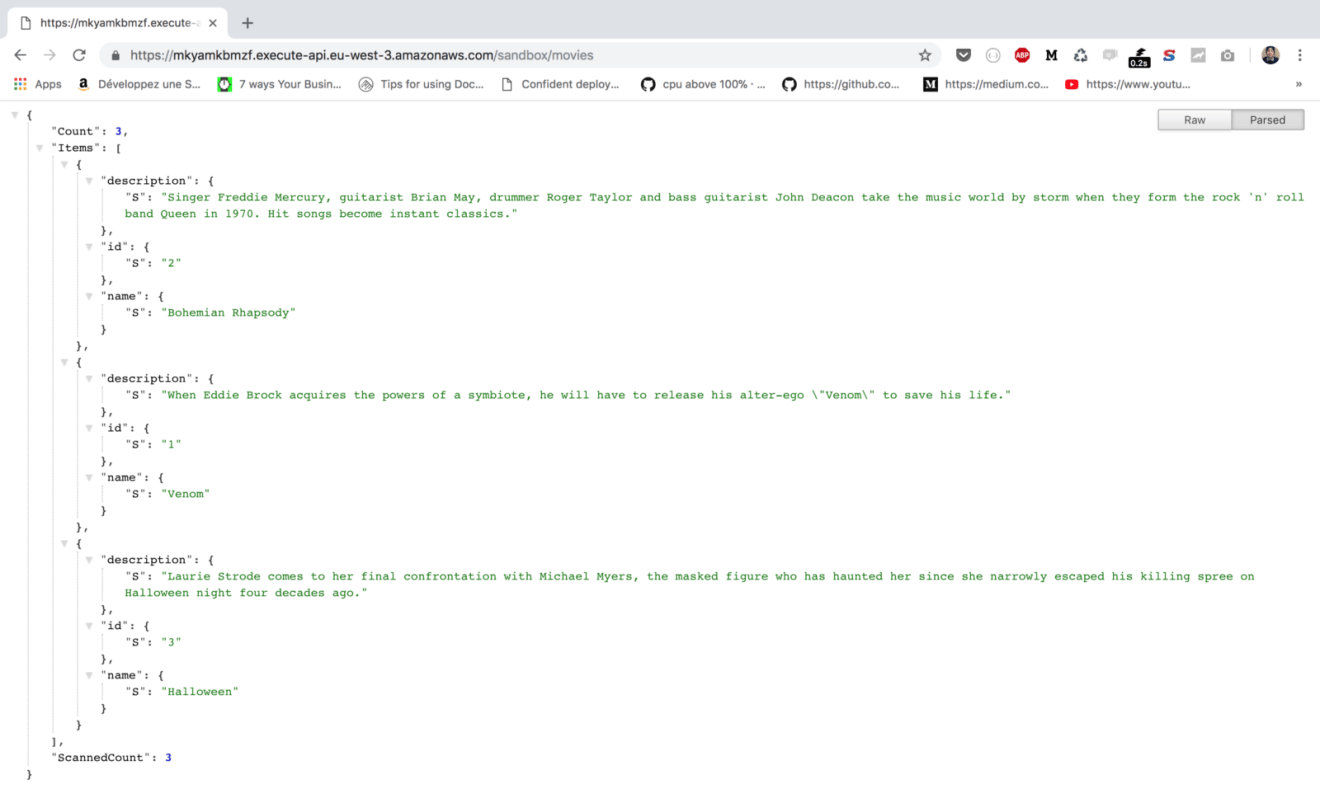
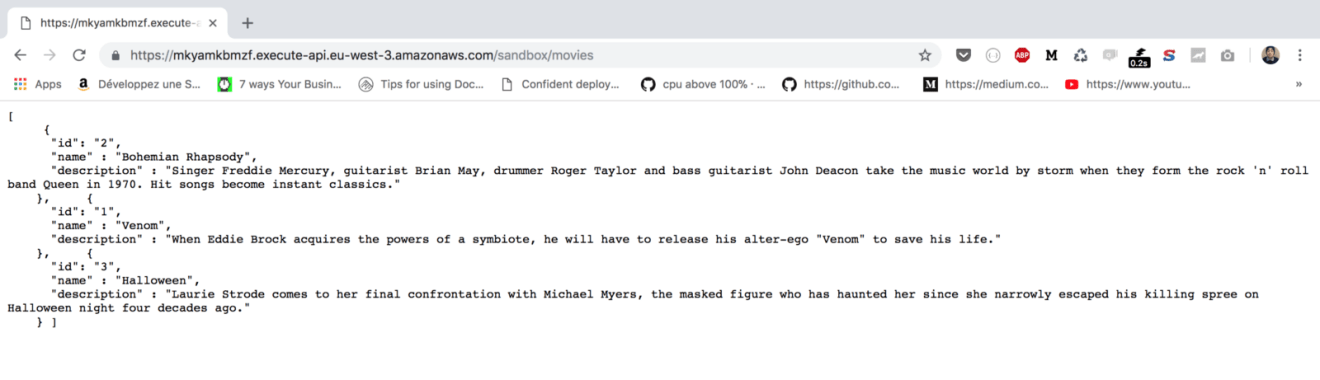
Point your browser to the URL given or use a modern REST client like Postman. The endpoint will return a list of movies in a JSON format:
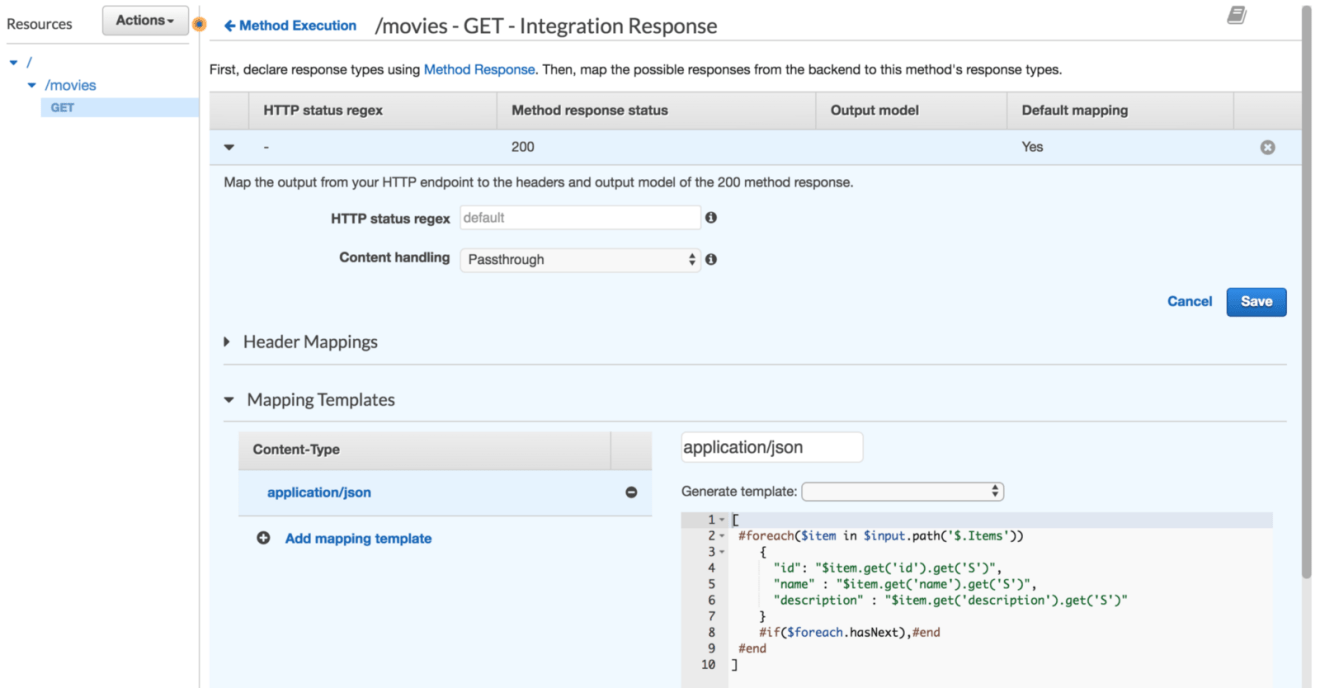
The output is returned in DynamoDB response format, in order to map the raw response to traditional JSON object structure, we will use Integration Response feature.
Click on “GET” method and navigate to “Integration Response”, expand the 200 response code. Expand the “Mapping Templates” section. In Content-Type choose application/json and create a mapping template that loop through each item from the Items array, extracts the relevant attributes of the movie’s item and places them into a response structure:
As a result, you should now see a formatted response.
GET /MOVIES/:ID
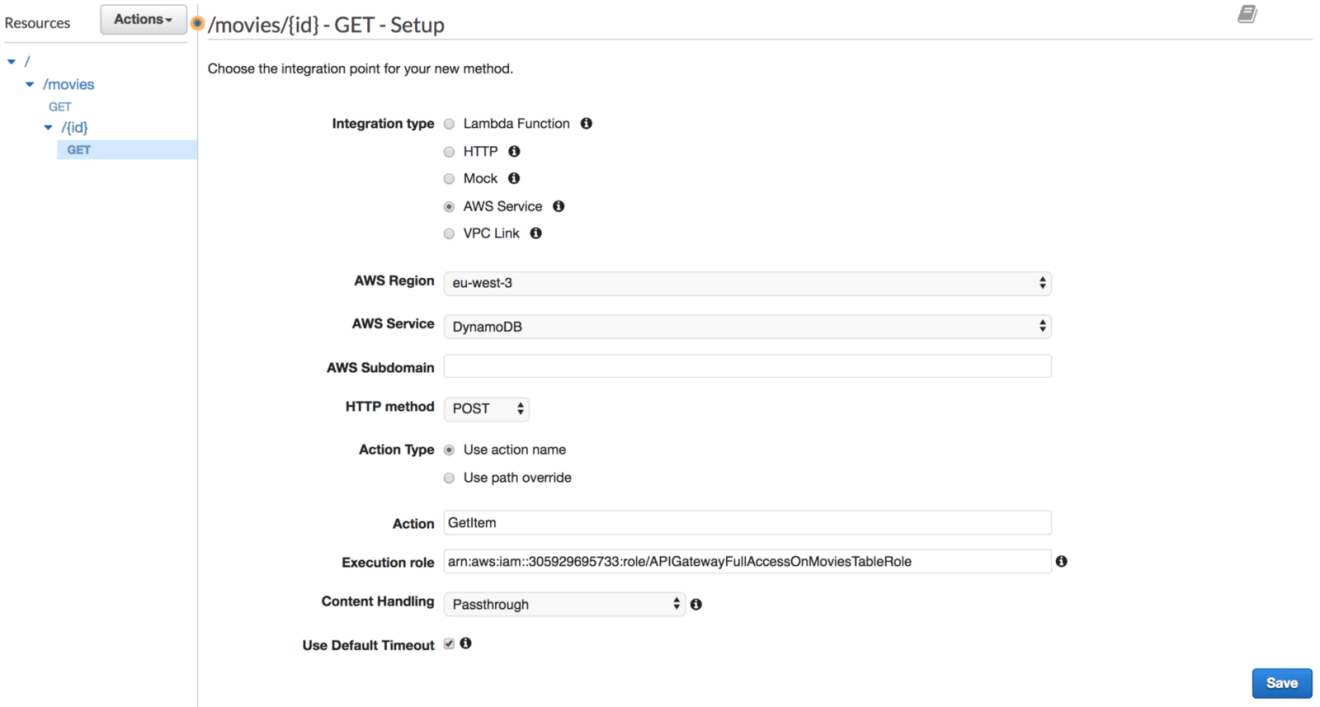
The second endpoint will be responsible of fetching a movie based on an ID provided by the client. Hence, a new resource with a path parameter should be created. The value of ID will be made available via the $input.params(‘id’) method:
Expose a GET method, and then link the resource to the DynamoDB service. The action will be GetItem operation:
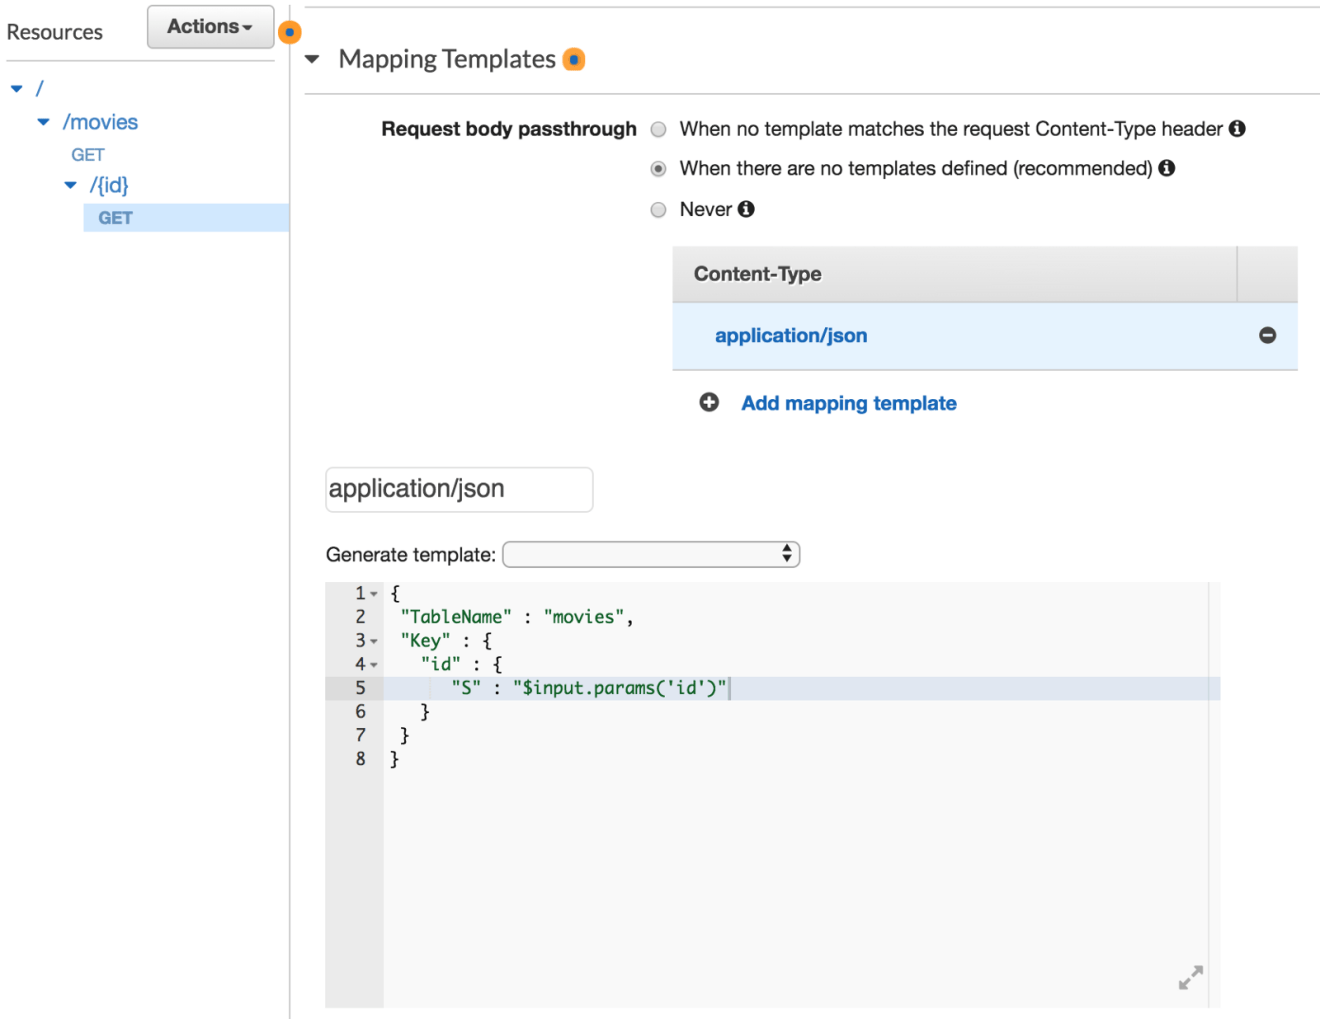
Again, specify a body mapping template for the integration request, now with the following template:
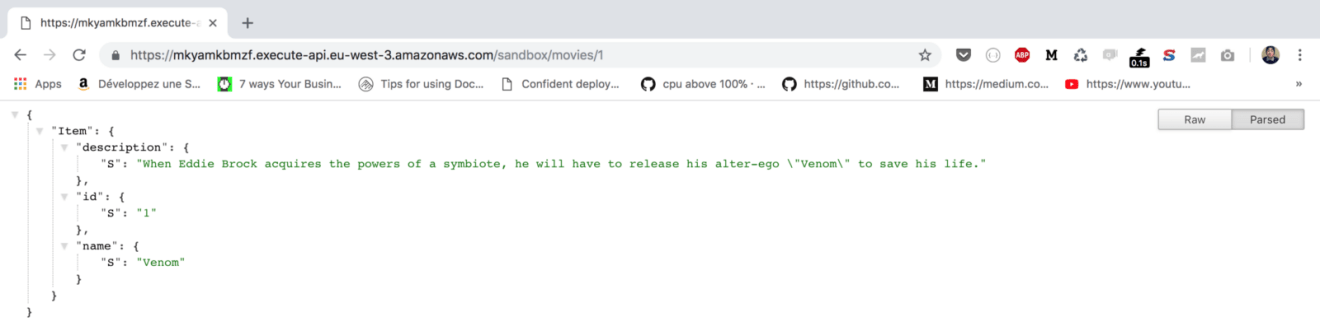
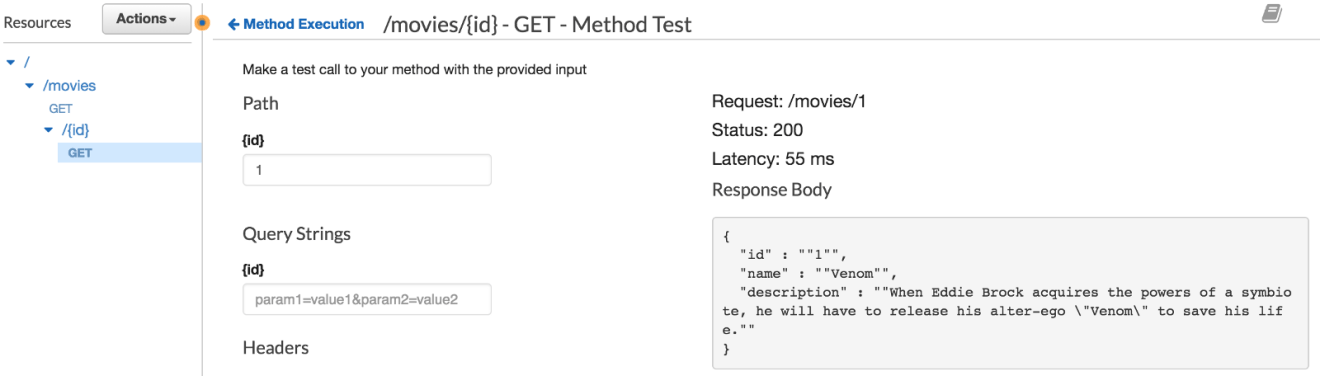
When the API URL is invoked with an ID, the movie corresponding to the ID is returned if it exists.
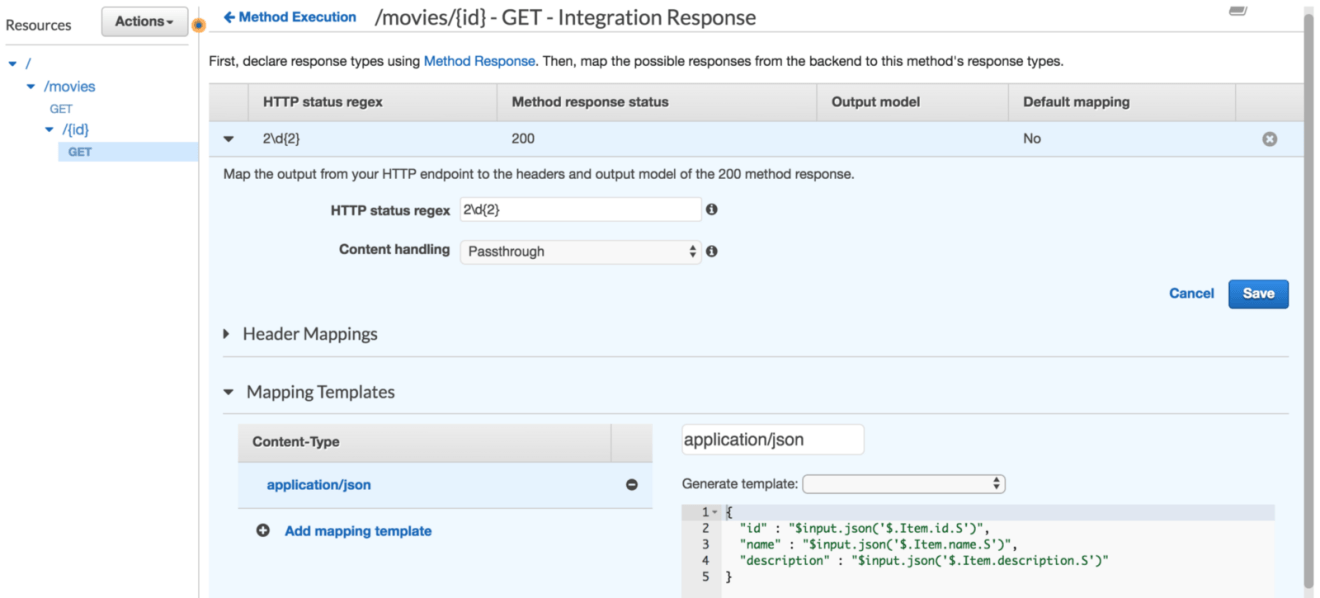
Similarly we will use integration response to map the raw DynamoDB response to the similar JSON object structure we defined earlier:
If you test it out once again, the following JSON will be returned:
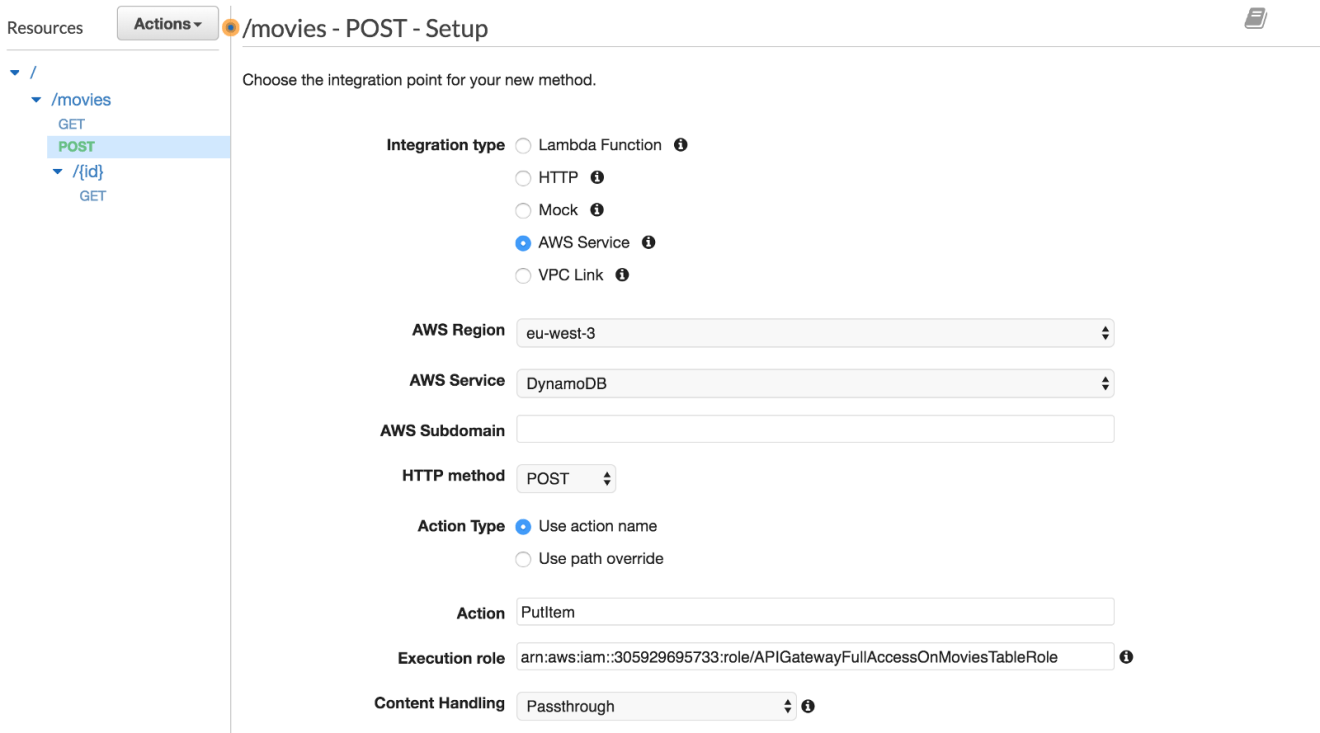
POST /MOVIES
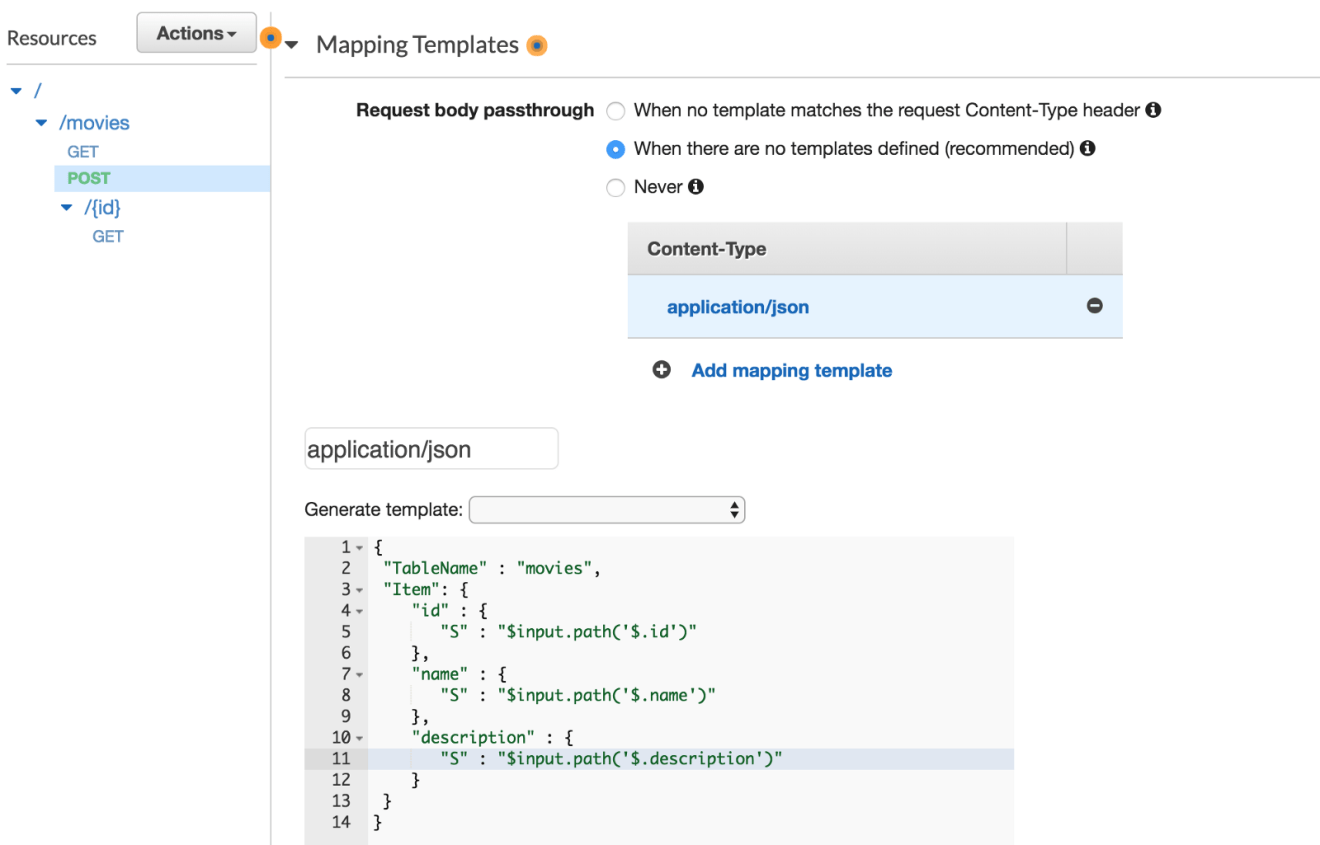
Now we know how the GET method works with and without path parameters. The next step will be to insert a new item to the table. Create a POST method with PutItem as an action:
We will create a mapping template to transform the client request into the structure that the DynamoDB API PutItem requires. The below mapping template creates the JSON structure required by the DynamoDB PutItem API. The three input variables are referenced from the request JSON using the $input variable:
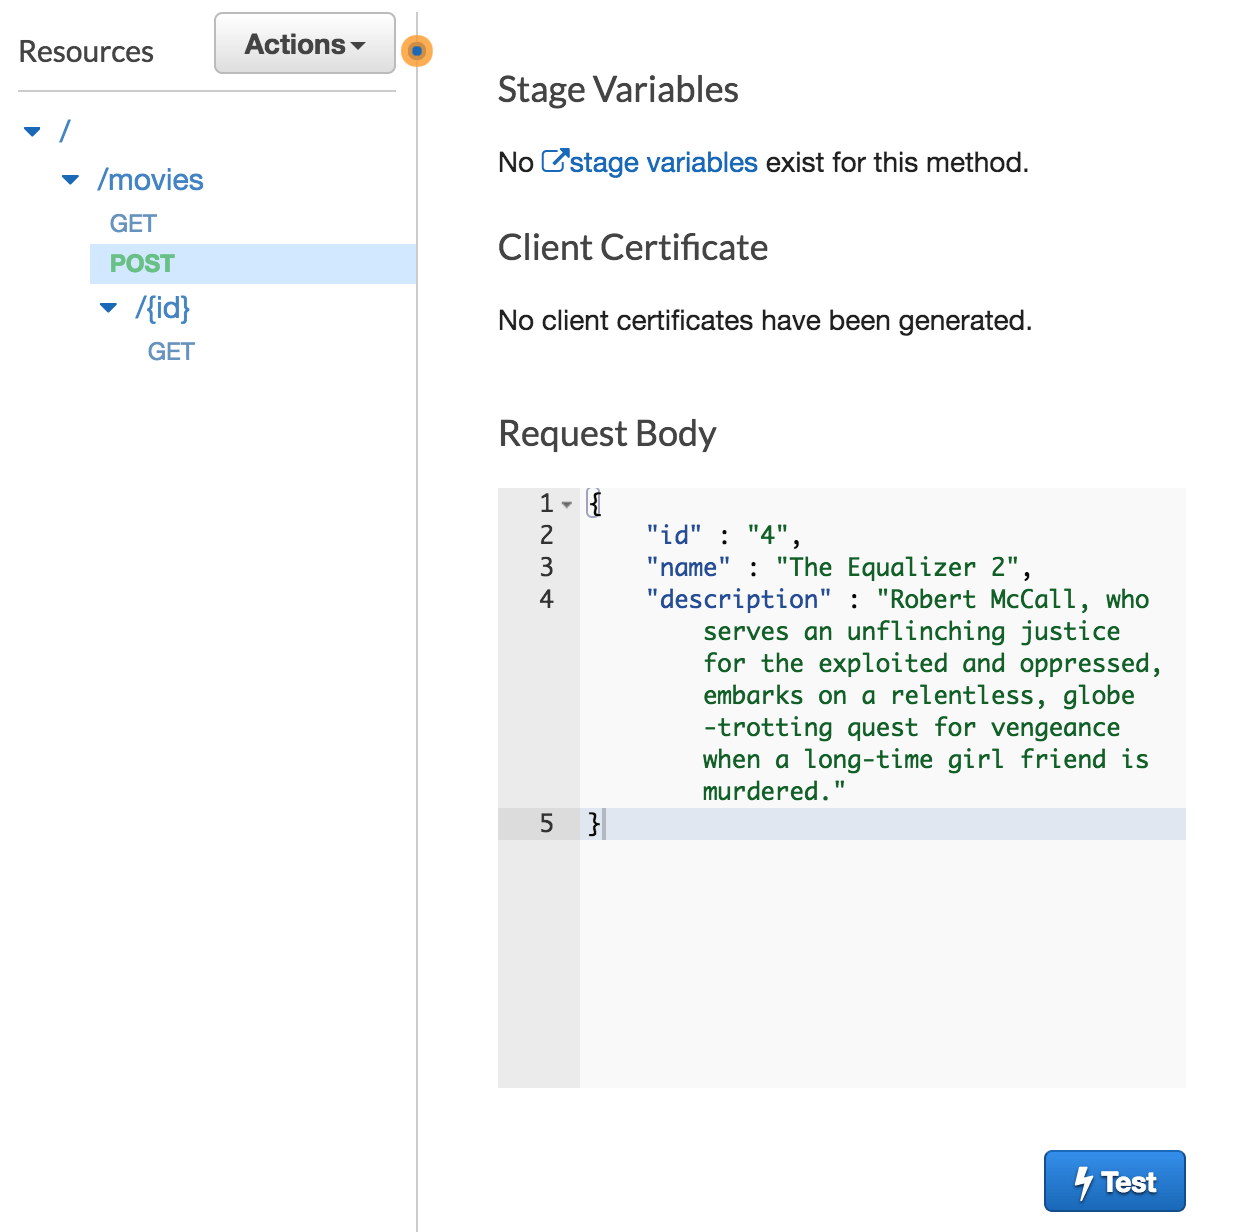
Back in the “Method Execution” pane click “TEST”. Create an example request body that matches the API definition documented above and then choose “Test”. For example, your request body could be:
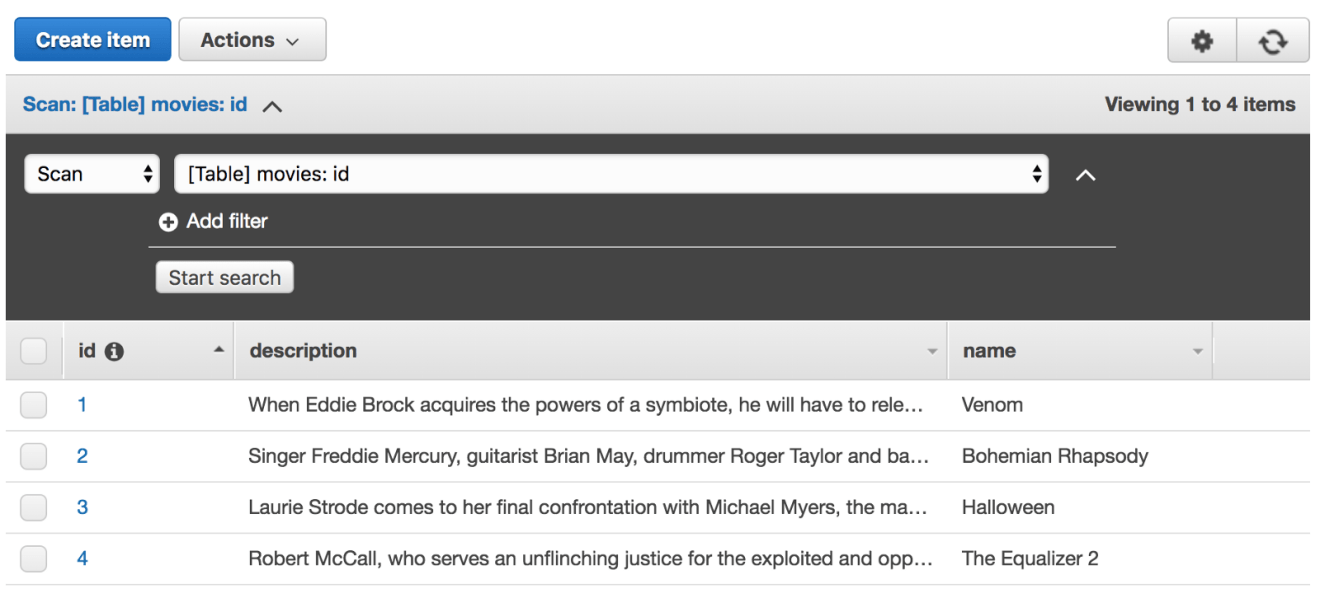
Navigate to the DynamoDB console and view the movies table to show that the request really was successfully processed:
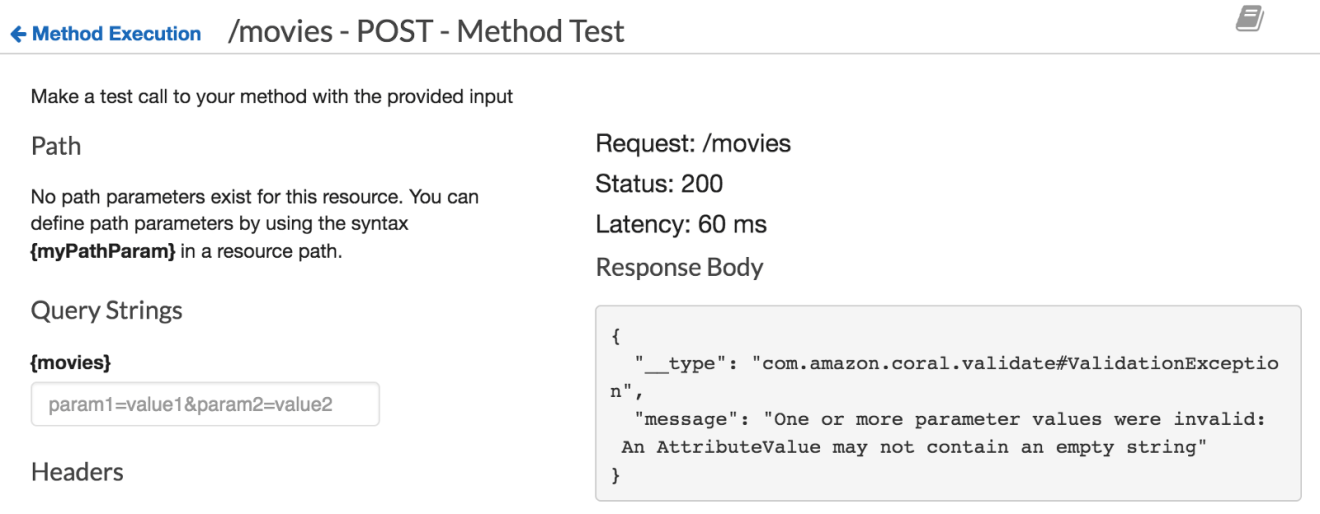
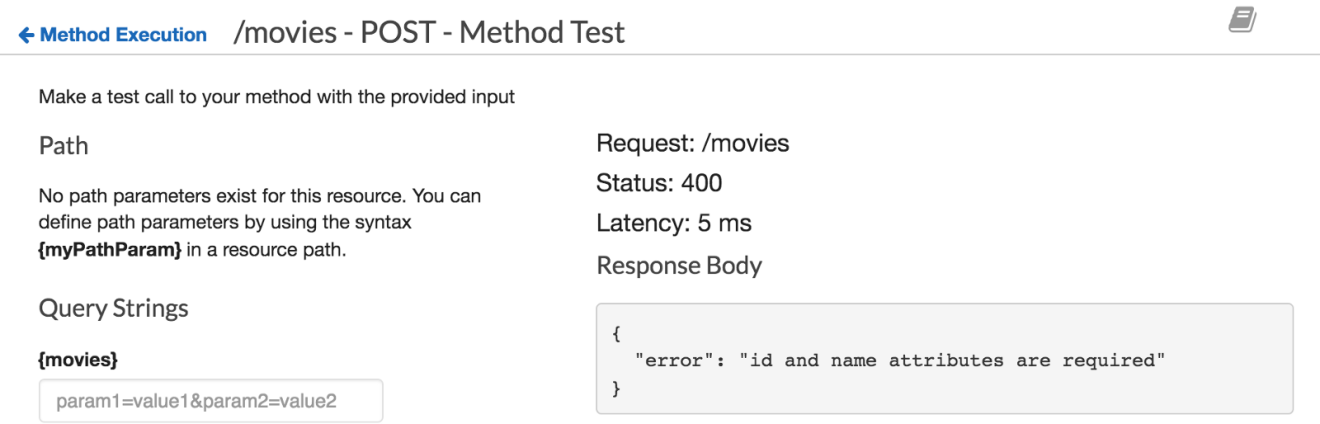
Try to insert a new movie without giving a movie’s name attribute. The following error will returned:
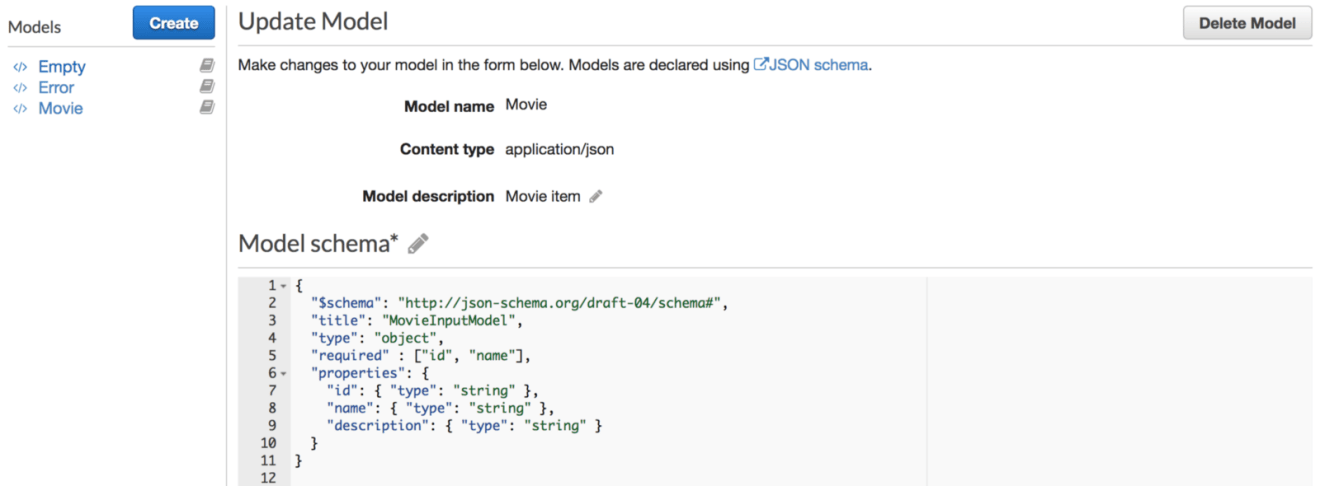
It’s a DynamoDB PutItem error. Fortuently, API Gateway allows you to validate your request body before invoking the downstream resources (In our example the DynamoDB table). To achieve this, we will use API Gateway Models. A Model defines the payload data structure. Models definitions are written using JSON Schema draft 4.
In the API Gateway, navigate to the Models tab and create a new model. Fill in the form as so:
The model above defines a movie entity with 3 attributes and requires id and name attributes to be defined (used during validation).
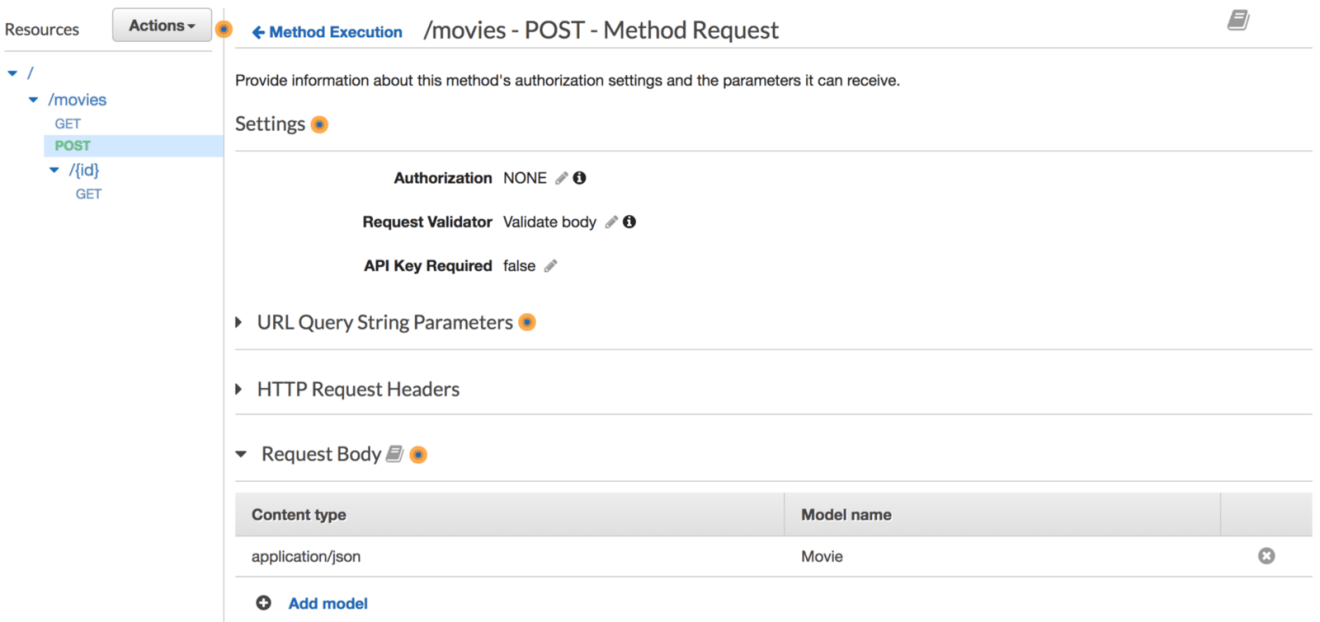
Head back to “Resources” page and click on “Method Request” from the POST method, enable the request validator option as below:
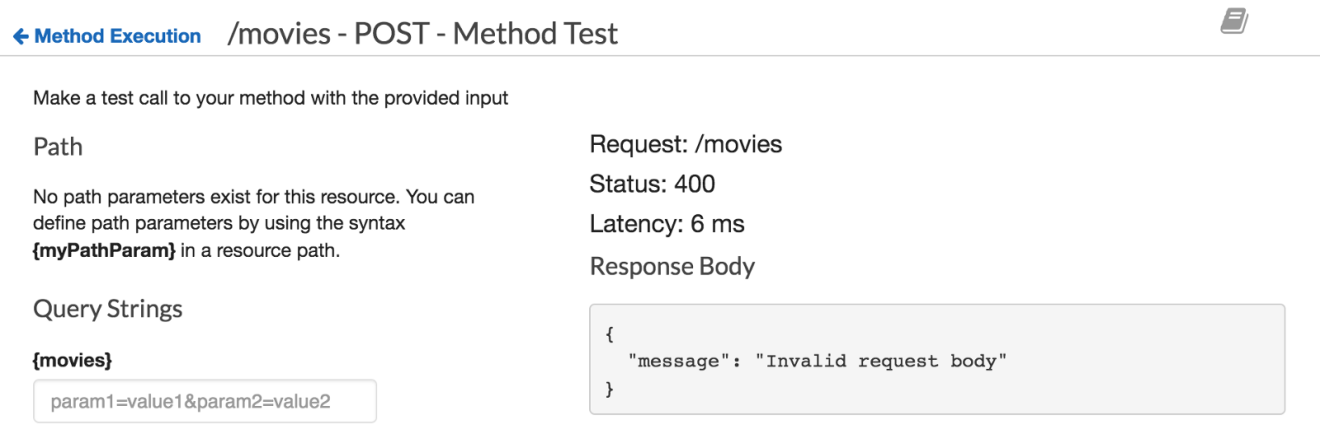
If you try to insert a new movie without providing the required parameters, a bad request message error will be returned:
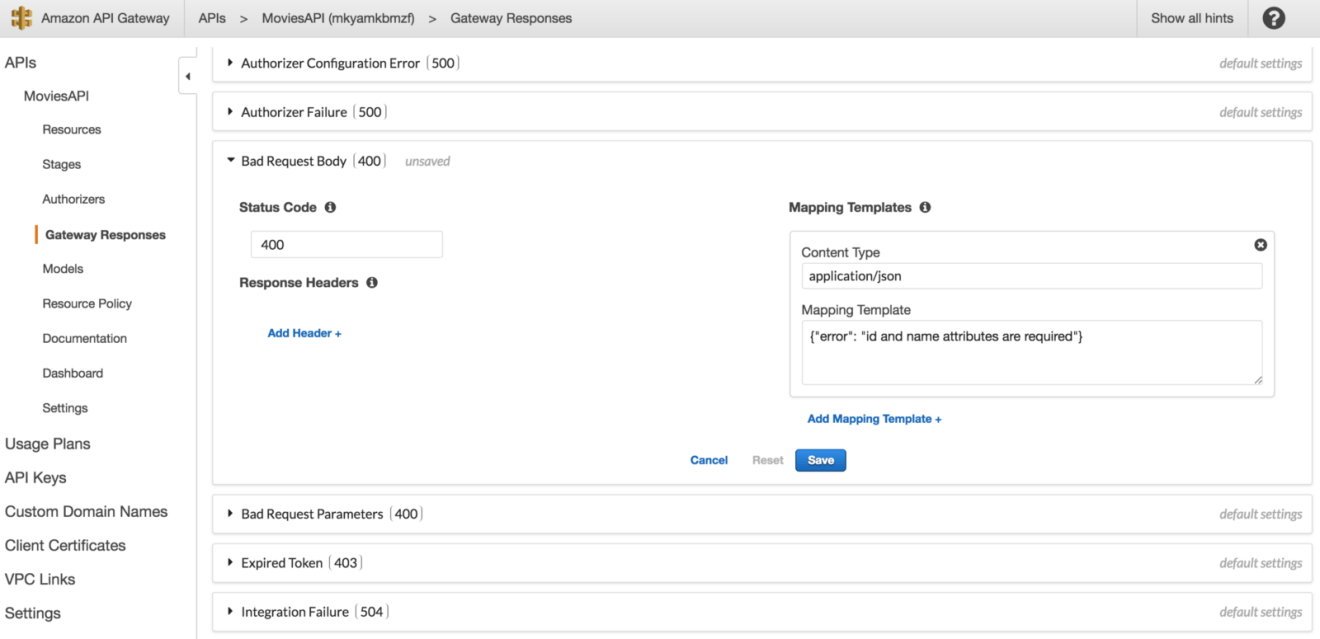
You can override the default 400 message from the “Gateway Responses” as follows:
As a result, the user defined error message will be returned:
Great! Try implementing the PUT and DELETE methods:
Authentication
The serverless API that we have built so far works like a charms. However, its open to the public, anyone can insert data into DynamoDB table if he/she has the API Gateway invocation URL. Luckily, API Gateway offers two ways to handle authentication:
API Gateway Authentication with Cognito and Lambda Authorizer
AMAZON COGNITO
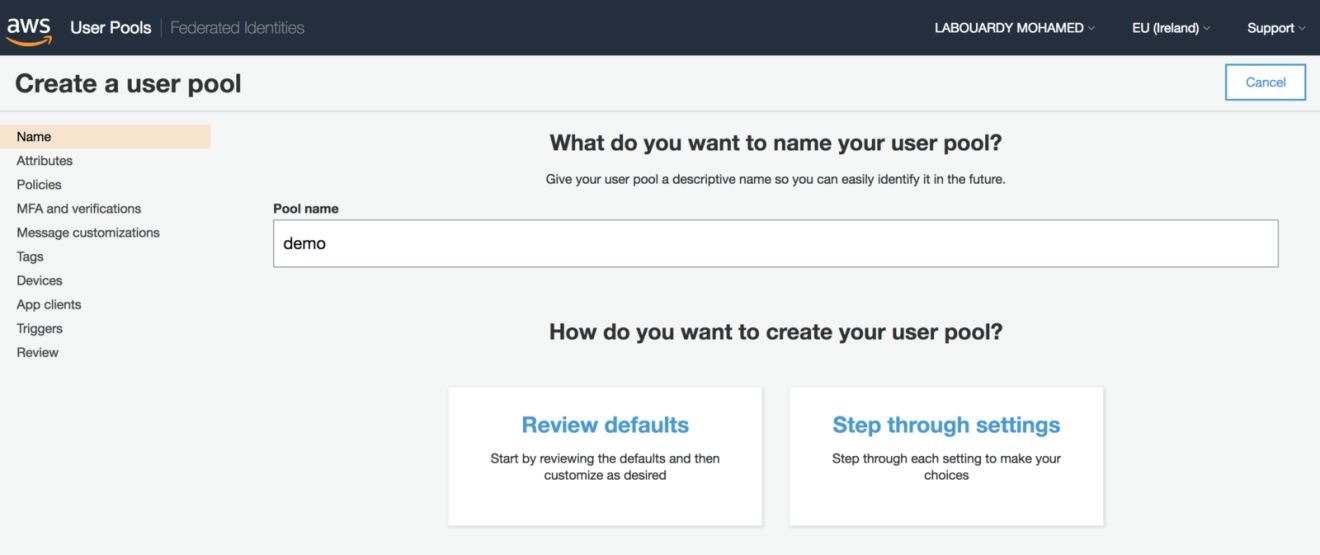
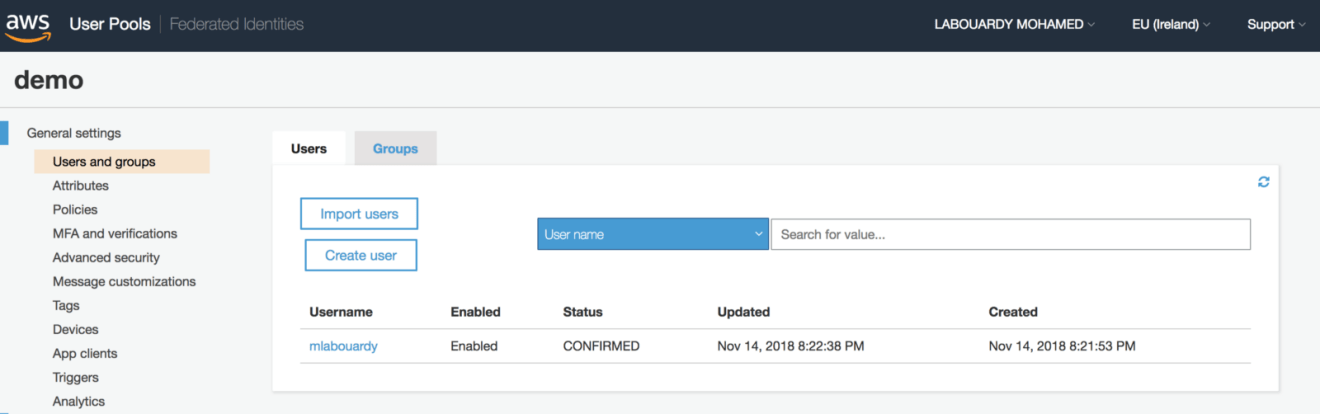
Create a new user pool, click on “Review defaults” to create a pool with default settings. A success message should be displayed at the end of the creation process:
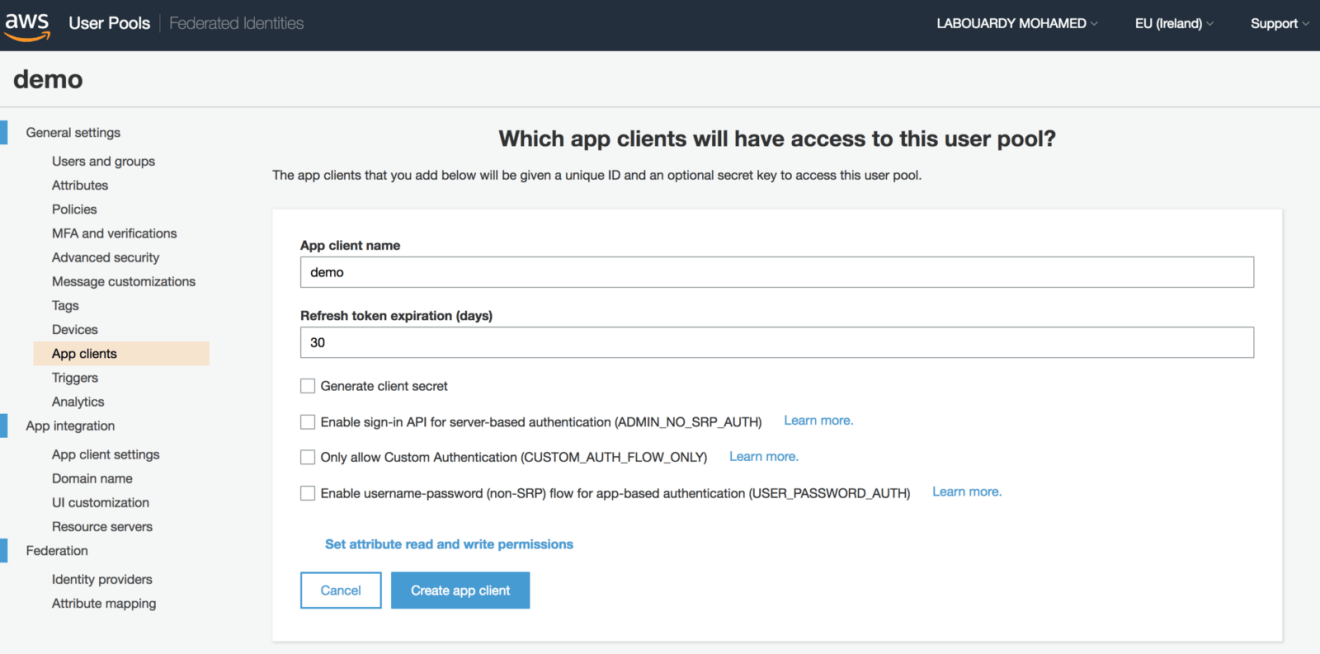
After creating your first user pool, register your serverless API from “App clients” under “General settings” and select “Add an app client”. Give the application a name and check the server-based authentication ADMIN_NO_SRP_AUTH option:
Now that the user pool has been created, we can configure the API Gateway to validate access tokens from a successful user pool authentication before granting access to DynamoDB.
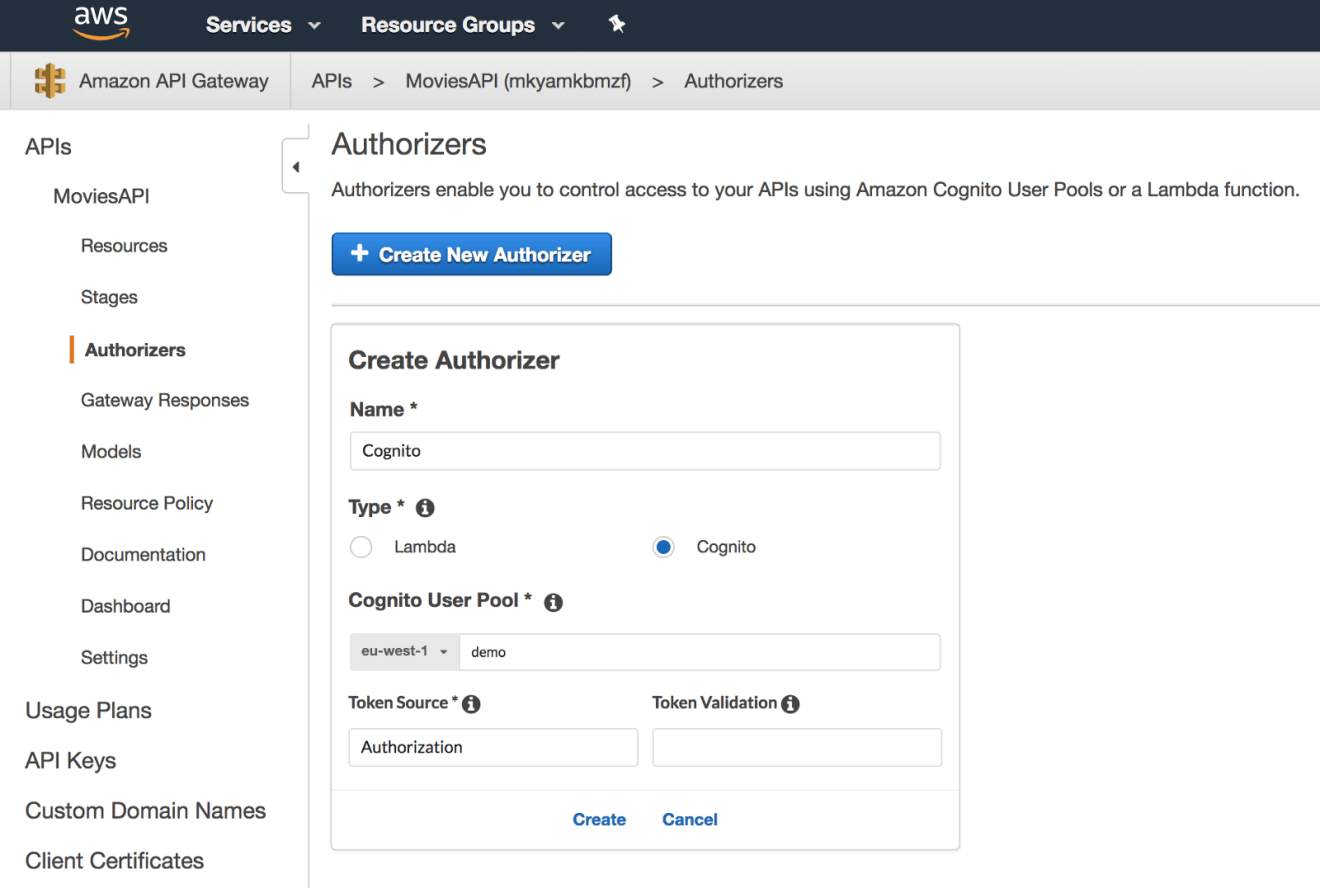
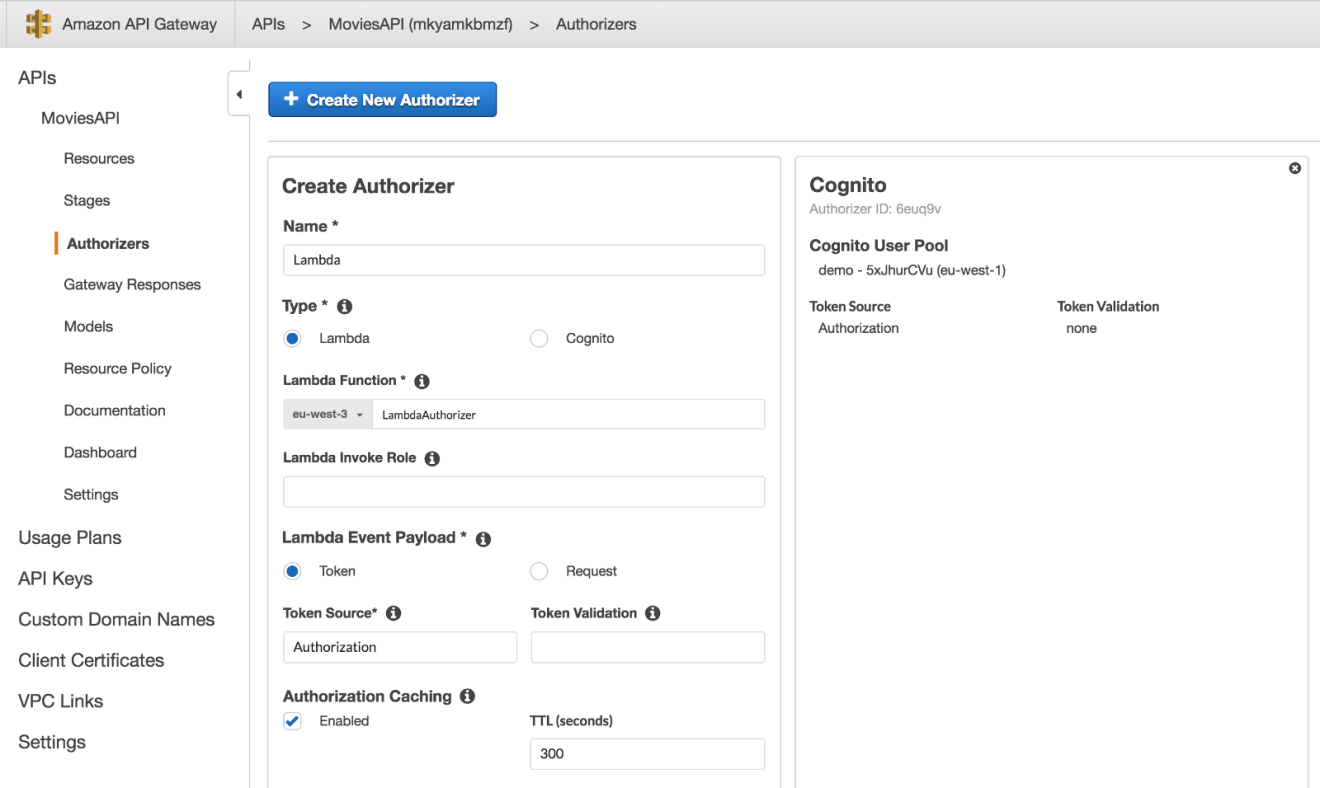
To begin securing API access, go to API Gateway console, choose the RESTful API that we built in the previously, and click on “Authorizers” from the navigation bar. Click on the “Create New Authorizer” button and select “Cognito”. Then, select the user pool that we created earlier and set the token source field to Authorization. This defines the name of the incoming request header containing the API caller’s identity token for Authorization:
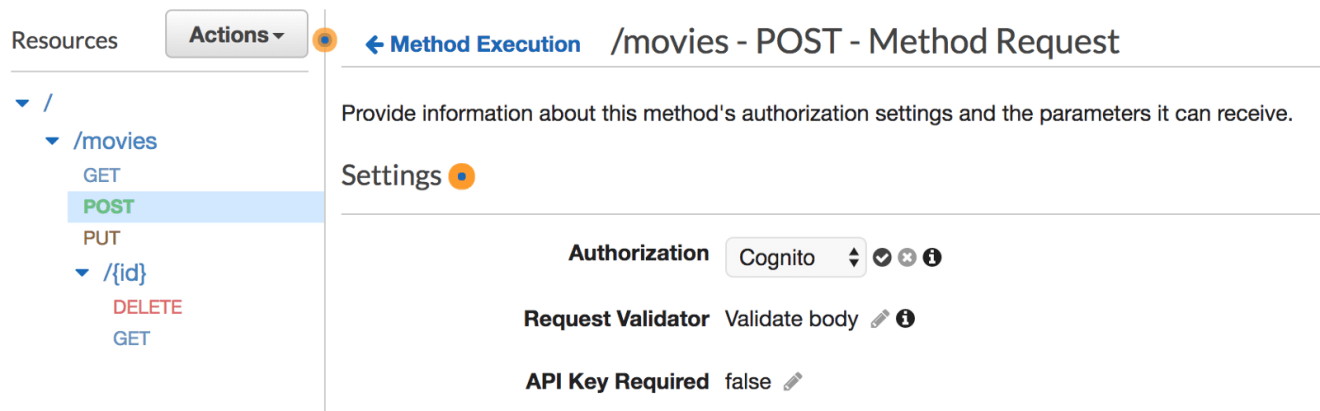
You can now secure all of the endpoints, for instance, in order to secure the endpoint responsible for creating an new movie. Click on the corresponding POST method under the /movies resource. Click on the “Method Request” box, then on “Authorization”, and select the user pool we created previously:
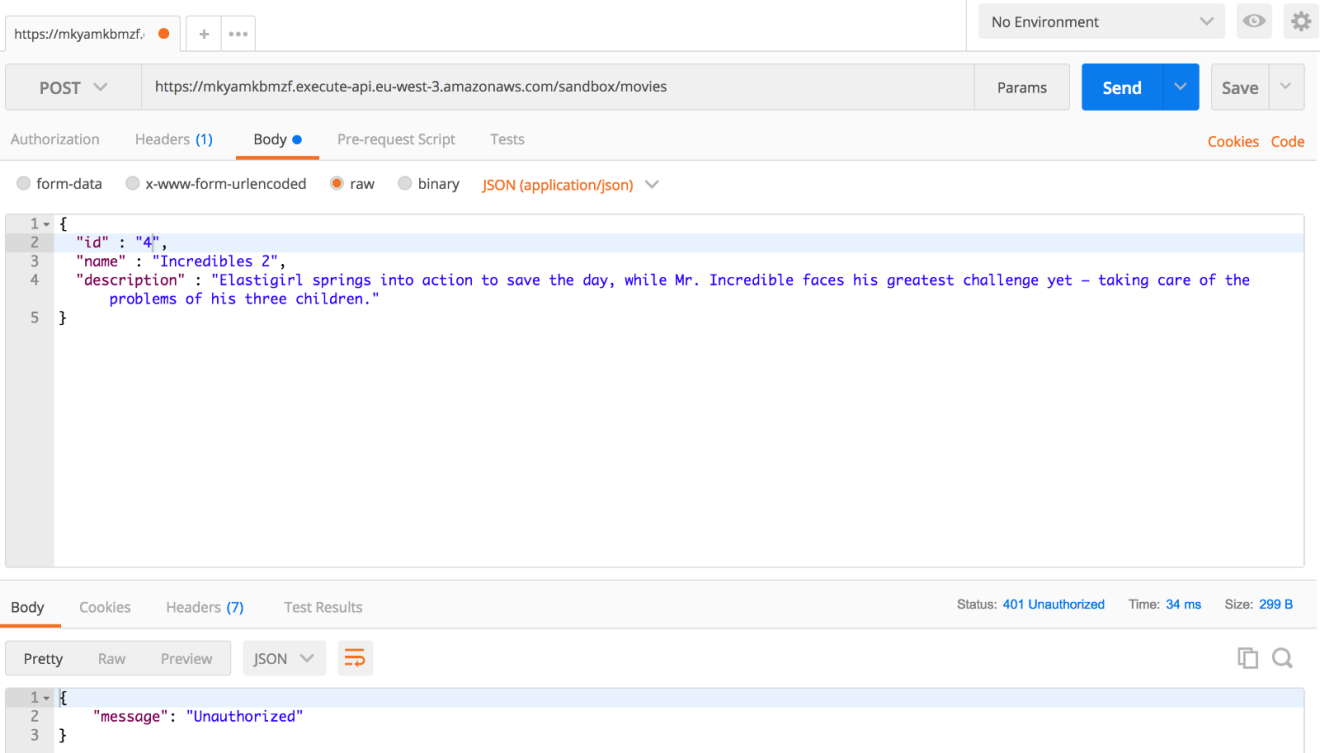
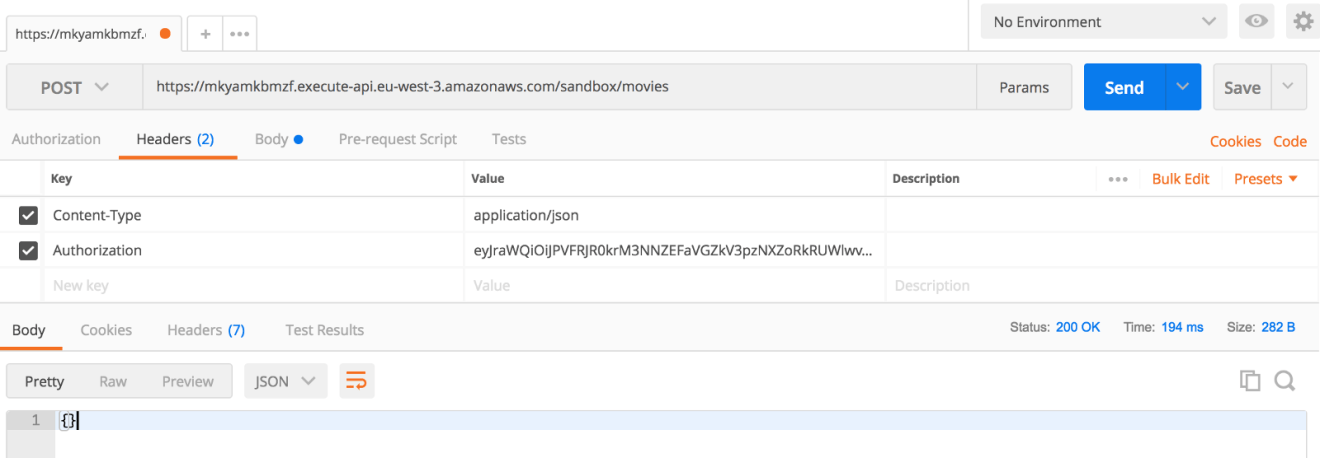
Once done, redeploy the API and try to insert a new movie using the API invocation URL. This time, the endpoint is secured and requires authentication:
In order to authenticate, we need to obtain an identity token for the signed-in user from the the user pool and include the identity token in the Authorization header for the API Gateway requests. Issue the following AWS CLI command to get a new token:
Copy the ID token and add it to the Authorization header of your request:
The API Gateway will verify the token and will invoke the PutItem operation on the movies table, which will insert a new movie into the table:
LAMBDA AUTHORIZER
When a client sends a request to your API, it will go through the API Gateway, which will extracts the token from the request and calls your Lambda function authorizer with it. The function evaluates the token, generates a policy and sends it back to API Gateway. API Gateway evaluates the policy and invoke the DynamoDB action registered for the API endpoint.
For the sake of simplicity, our function will verify if the token provided by the client equals to our secret (environment variable) and returns a policy document based on the result. The following is the function handler source code written in Node.JS:
Head back to API Gateway and created a new “Lambda Authorizer” and set Authorization to be the header API Gateway will extract the token from:
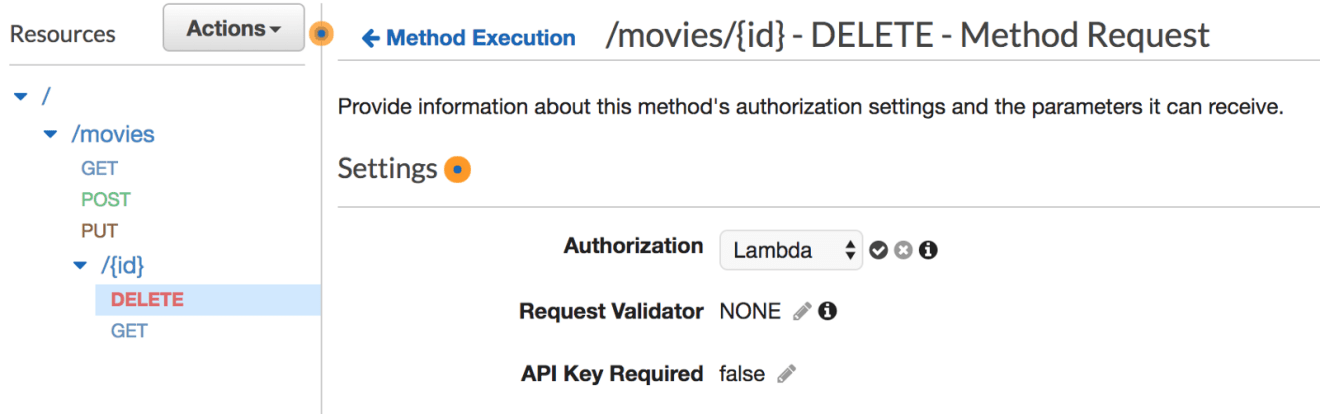
Choose the method you want to secure, let’s say, it will be the endpoint responsible of deleting a movie from the table. Click on “Method Request” and under Authorization select your new authorizer:
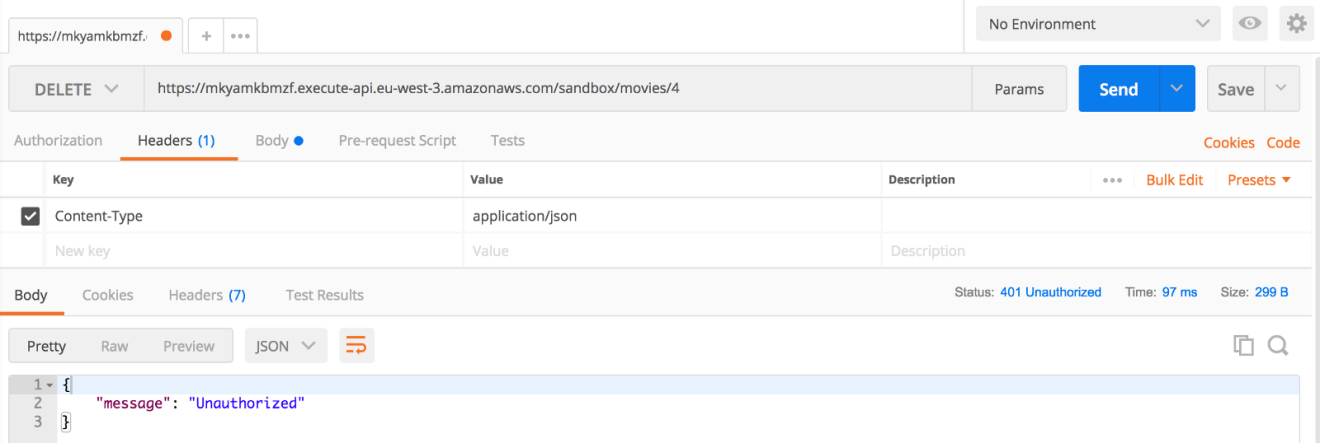
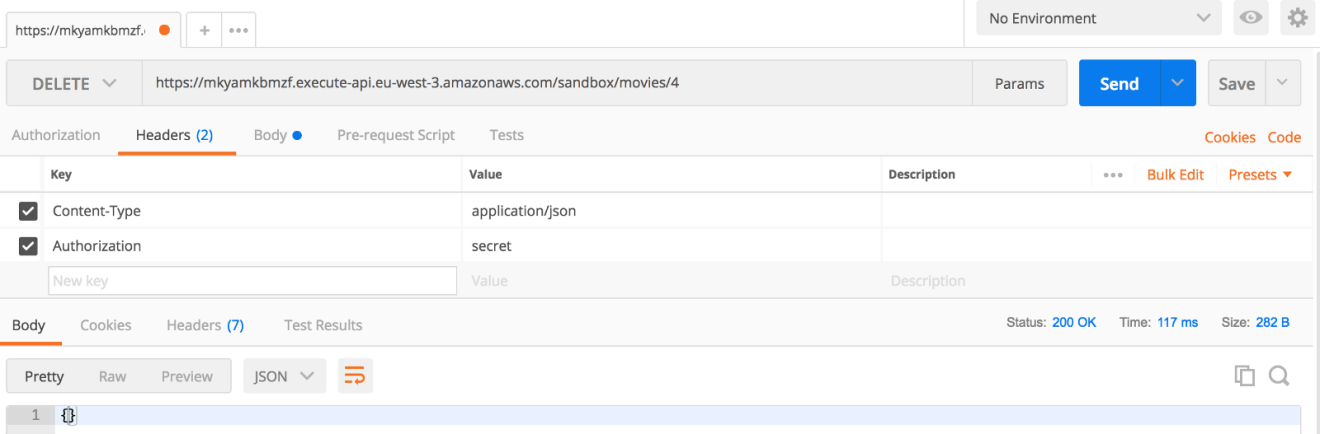
Let’s try calling the endpoint, As expected, we’re not getting through to our real endpoint:
If you include the secret token to the Authorization header of your request, you should be able to delete an item:
Looks good!
API Throttling
You can use usage plans combined with API keys to set method-level throttling limits for your API and define how much and how fast clients can access your API (request rates and quotas).
The following procedure describes how to create a usage plan:
API USAGE
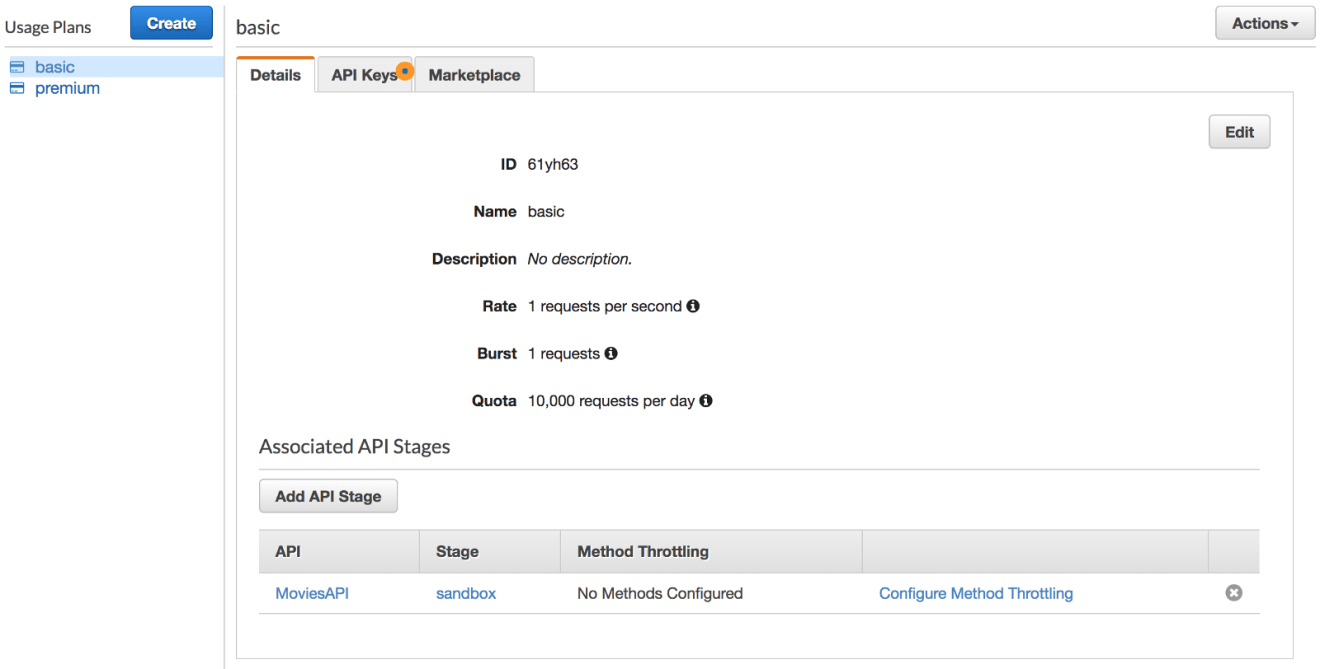
Create a usage plan called basic, with a throttling limit of 1 request per second and quota limit of 10000 requests per day:
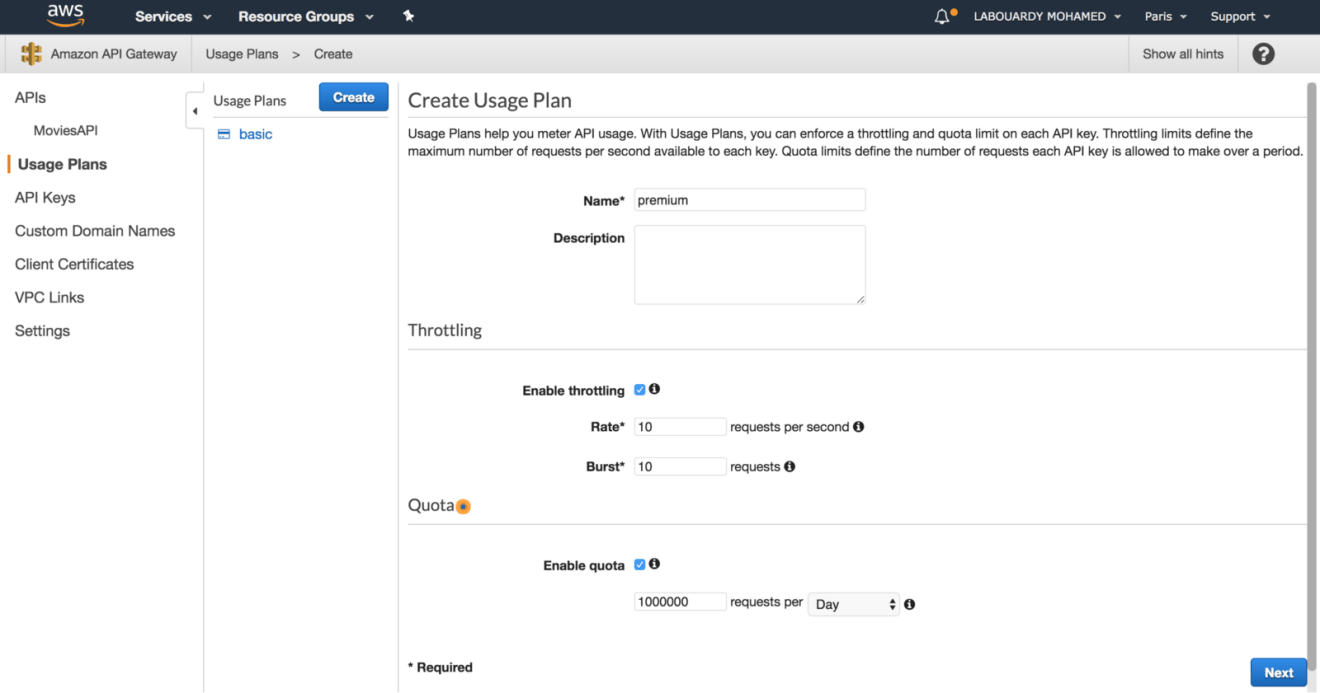
Create a 2nd usage plan called premium, with a throlling limit of 10 requests per second and a quota limit of 1 million requests per day:
API KEYS
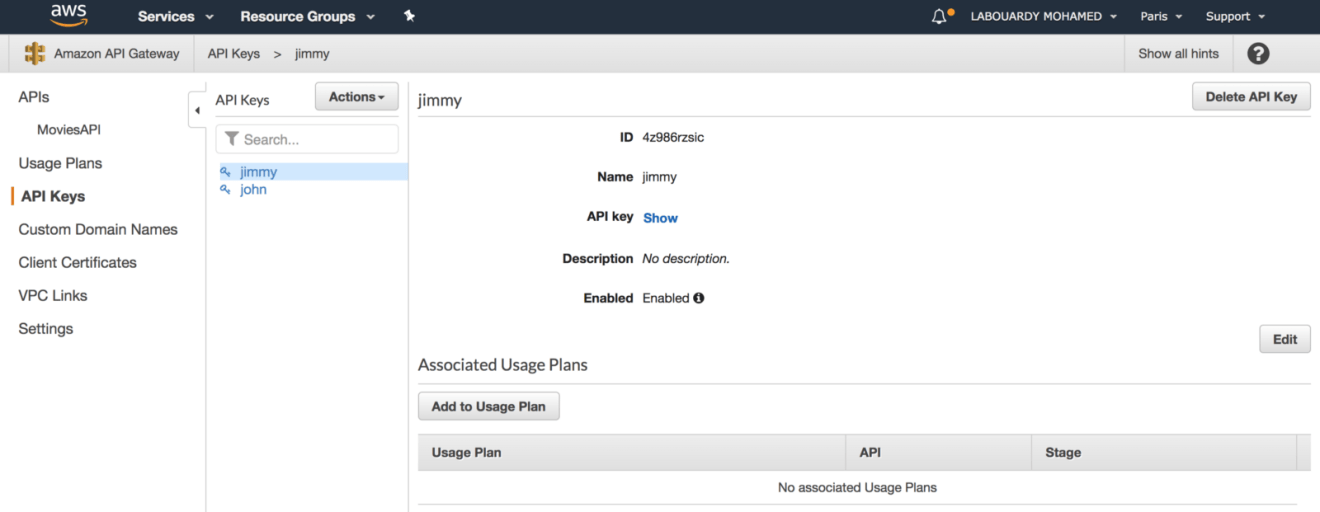
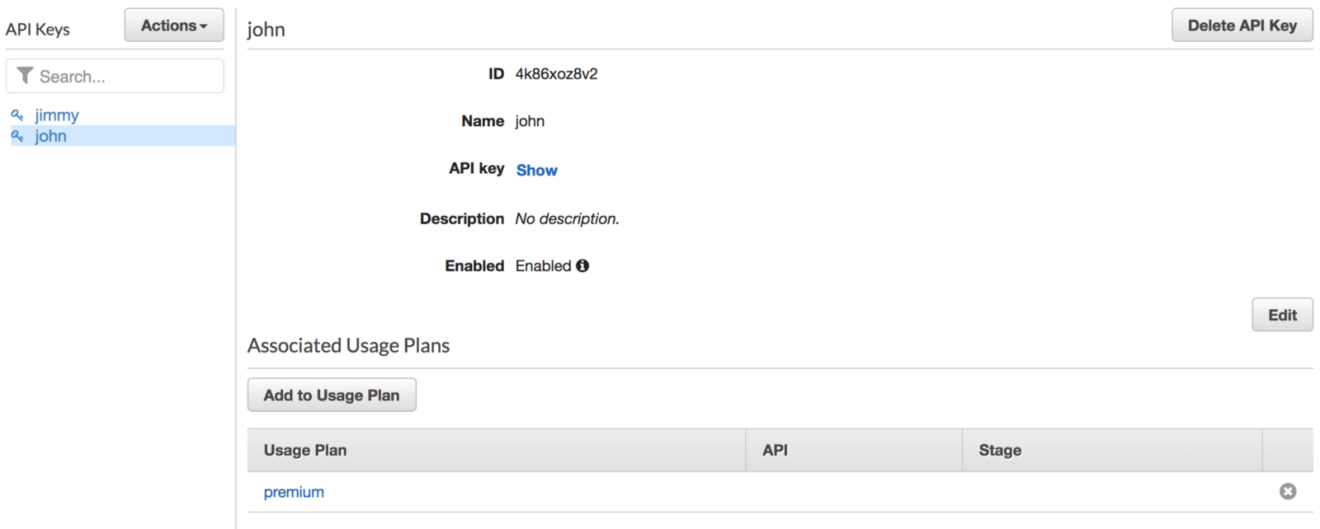
Next, create two API keys:
Assign the first API key to basic usage plan and second key to premium usage plan:
Associate the usage plans we created to the API deployment stage:
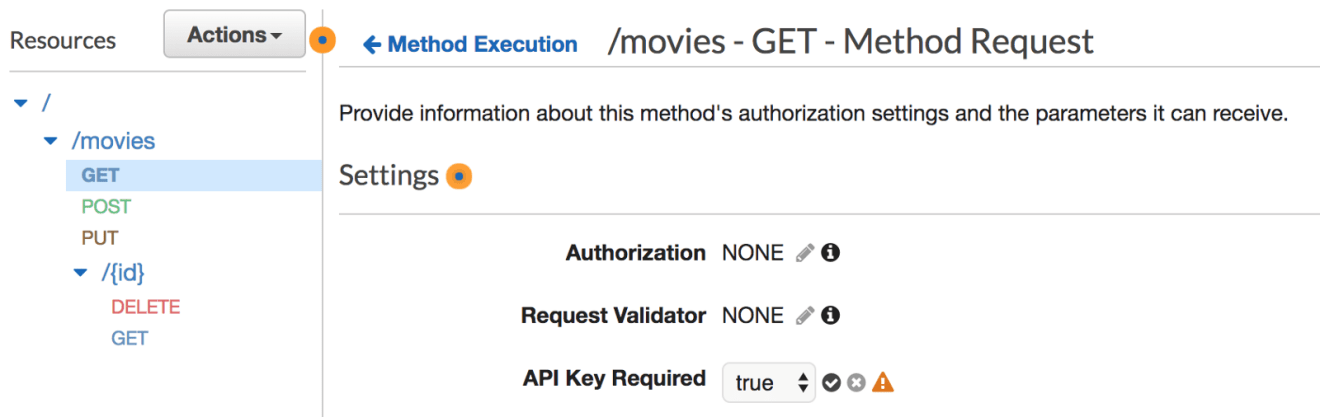
Configure an API method to require an API key:
Deploy or redeploy the API for the requirement to take effect:
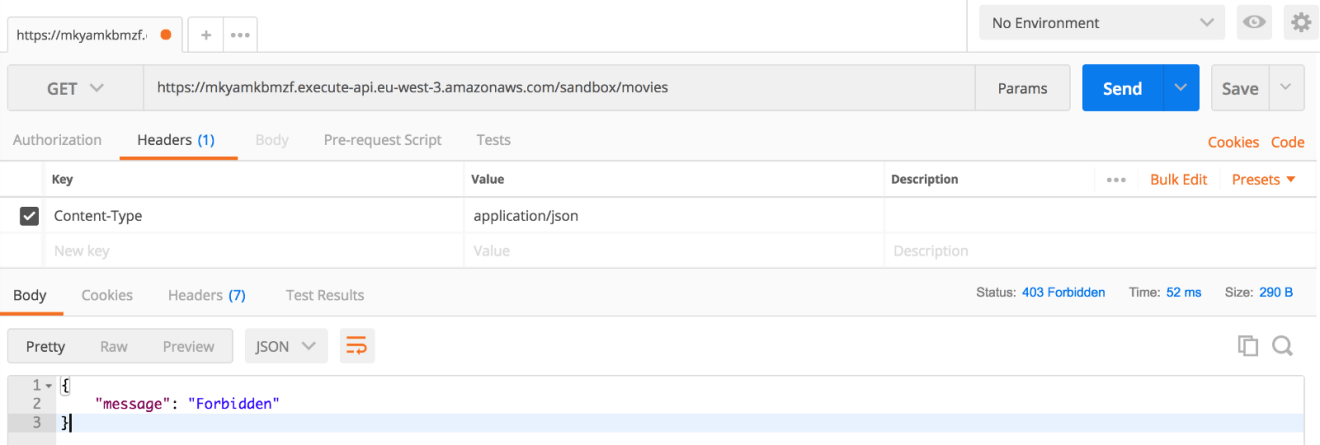
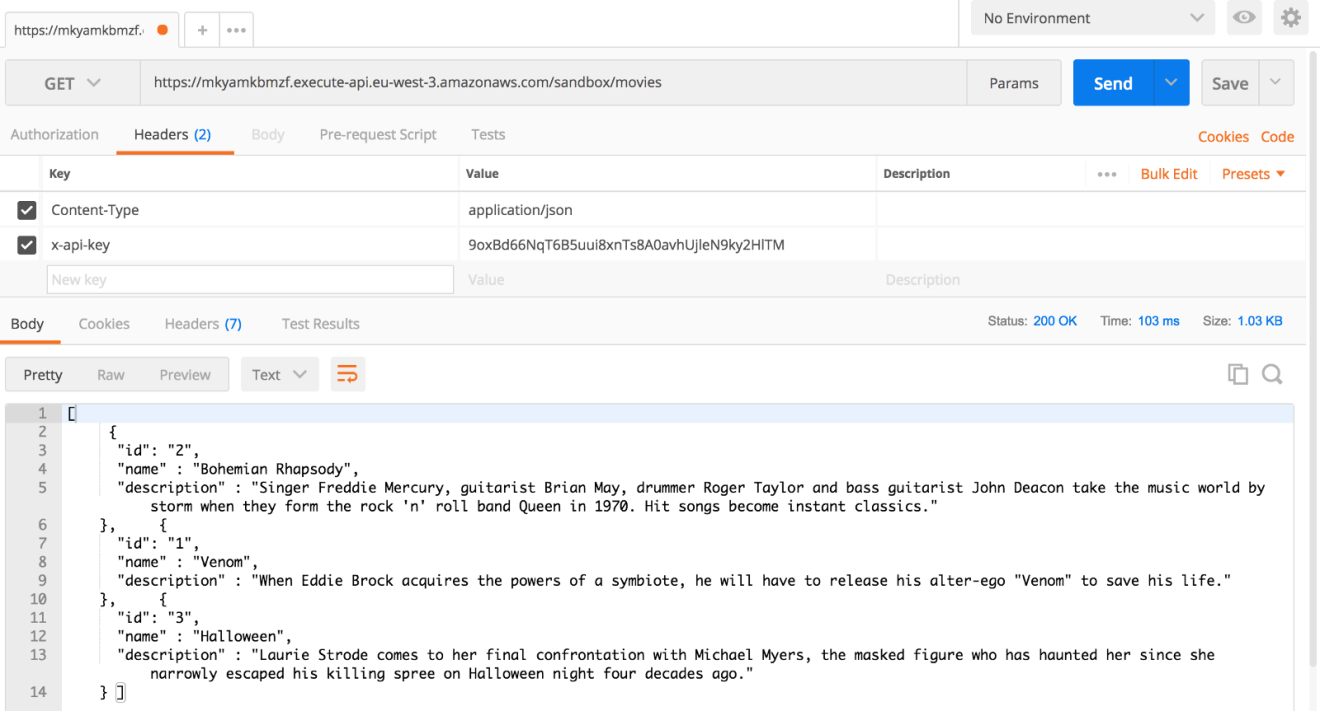
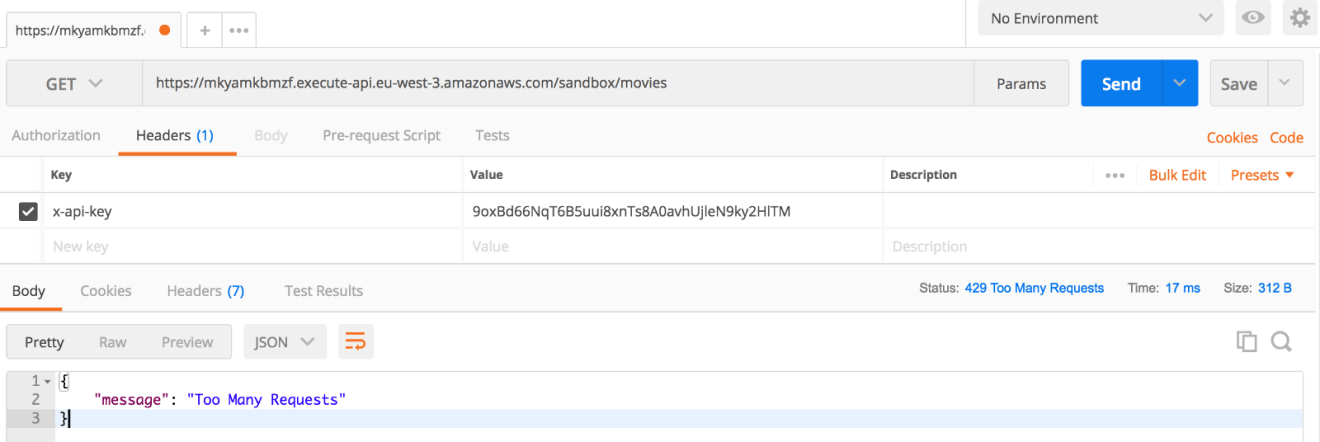
Now if you added the x-api-key header. If all goes well you will receive output like this:
If you exceed the rate limit or quota limit associated with your API key, a “Too many requests” HTTP error will be returned:
Custom Domains
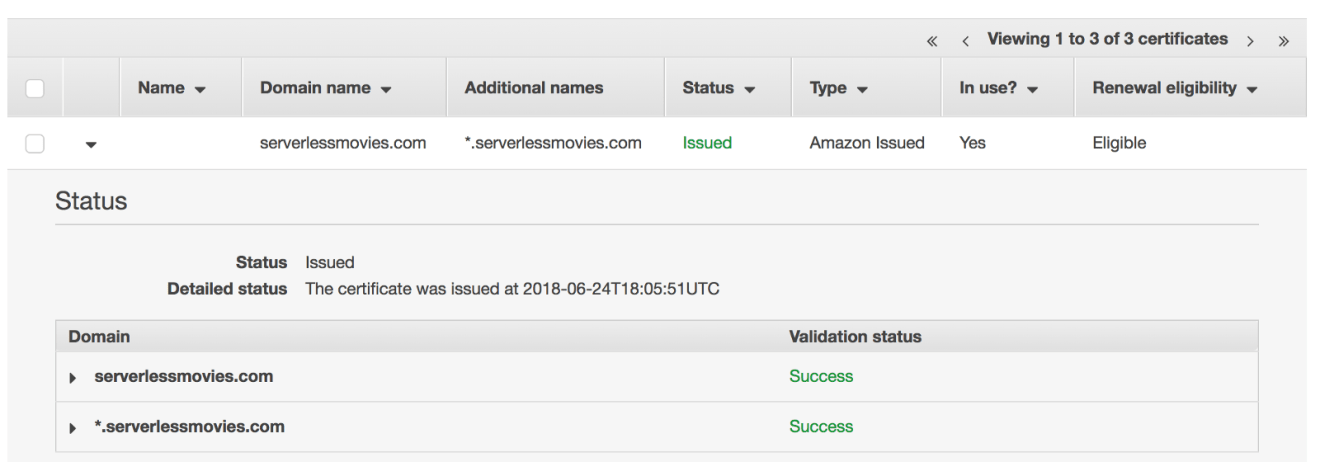
You can use your own domain name for an API and deployment stage, create a Custom Domain Name backed by an ACM (Amazon Certificate Manager) certificate:
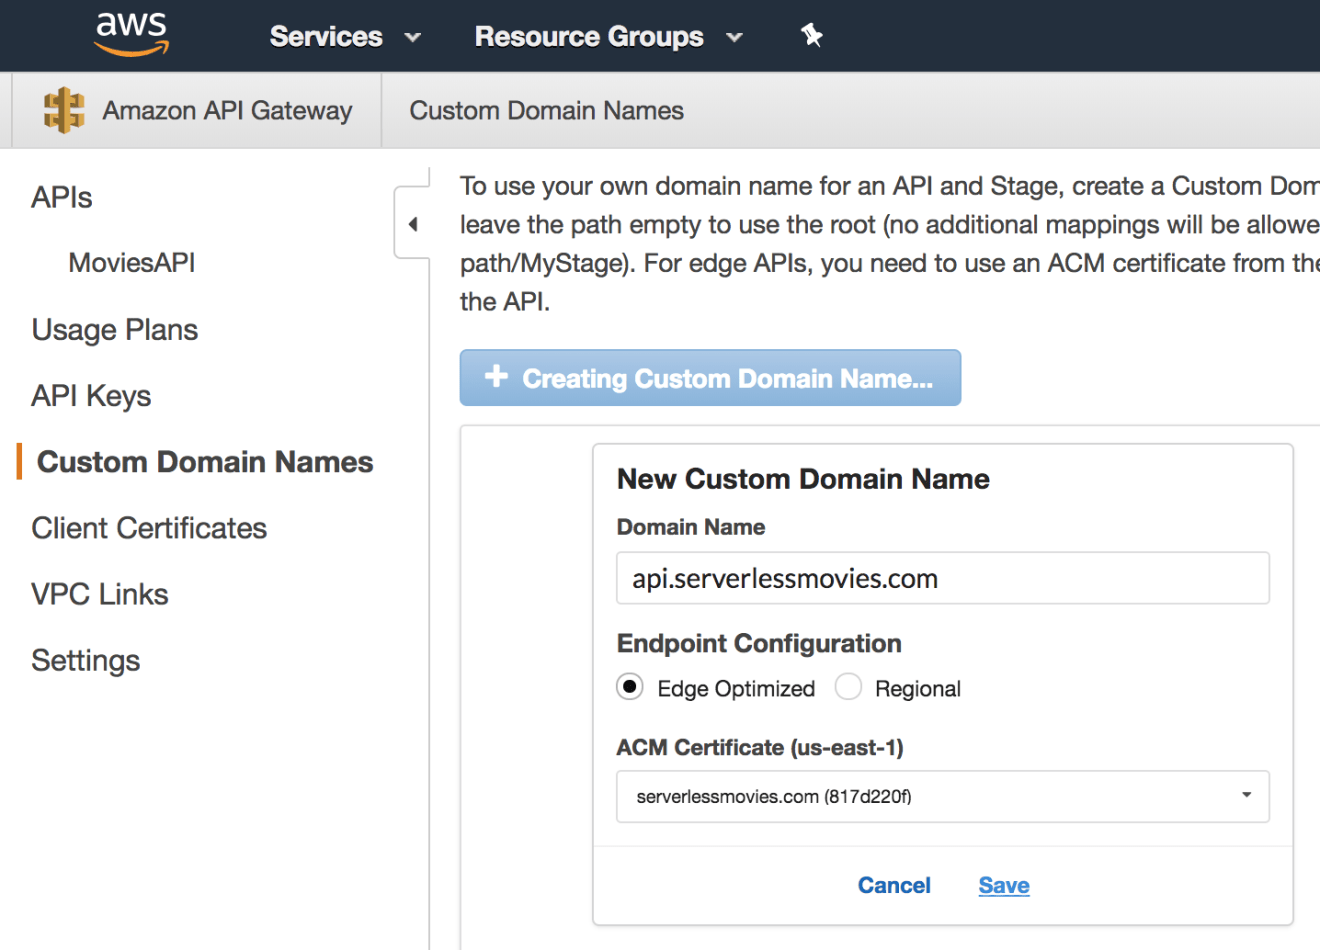
Create a new custom domain name from API Gateway Console:
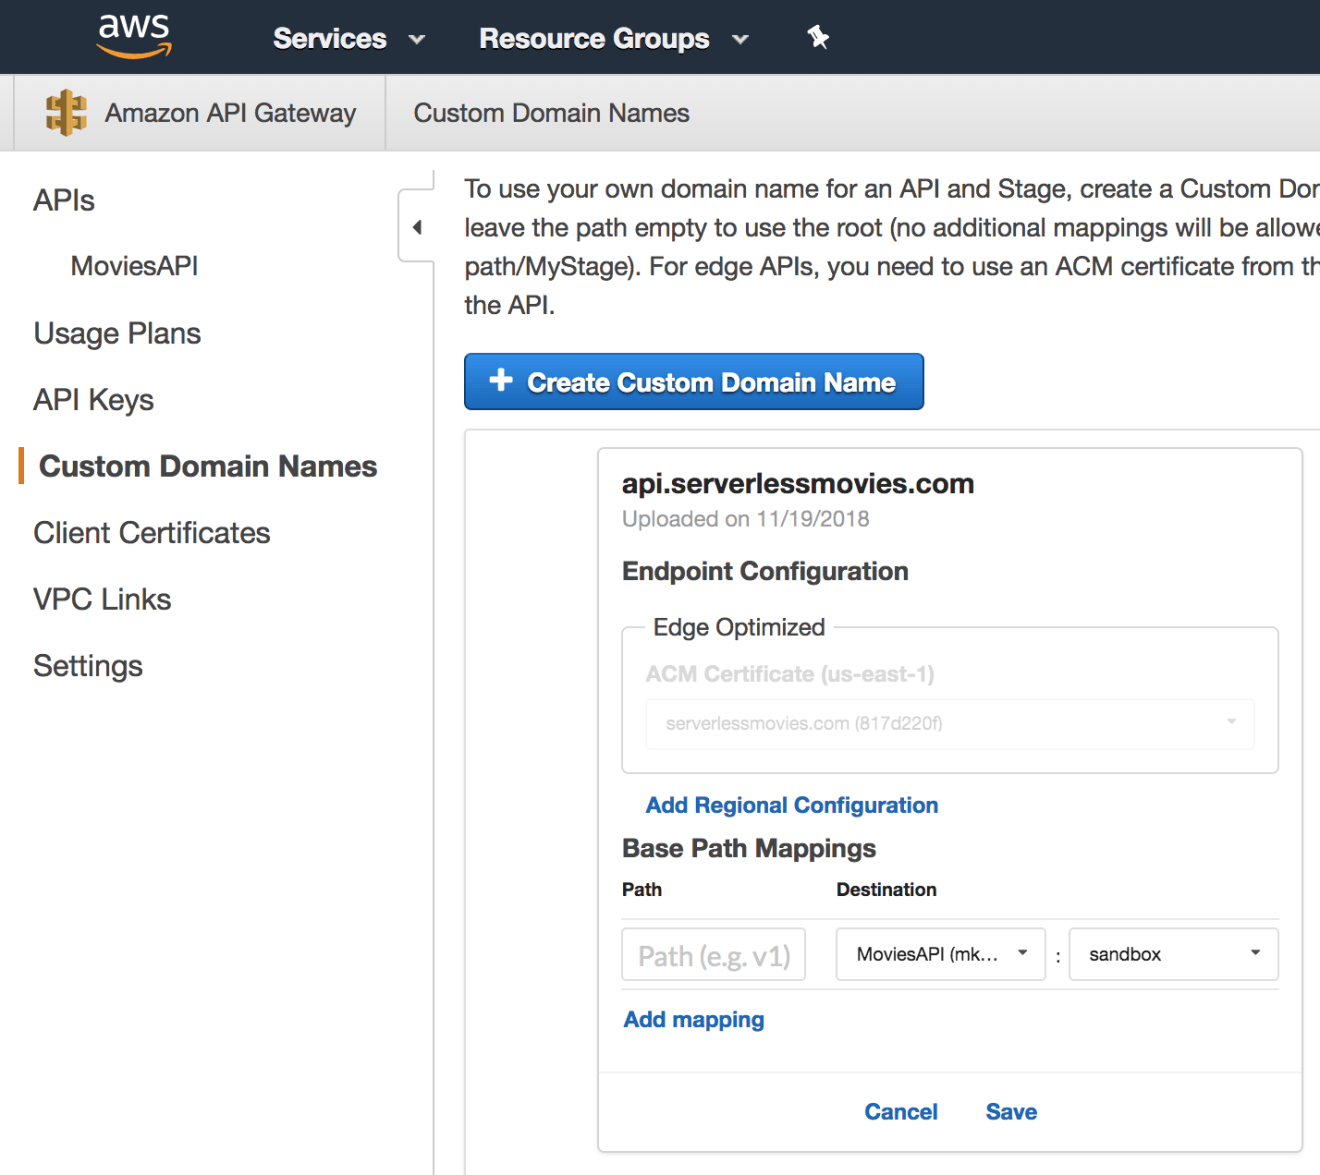
Add a path mapping to map your domain name to your API deployment stage:
Before finishing this guide, we will go through how to create documentation for the serverless API we’ve built so far.
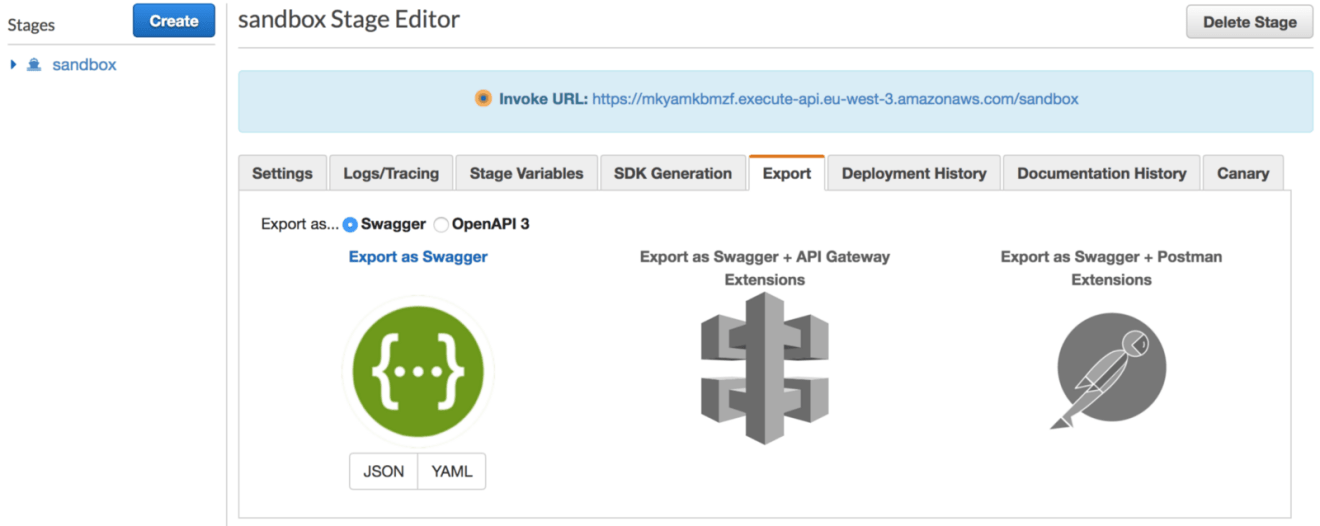
On the API Gateway console, select the deployment stage that you’re interested in generating documentation for. In the following example, I chose the sandbox environment. Then, click on the Export tab and click on the Export as Swagger section:
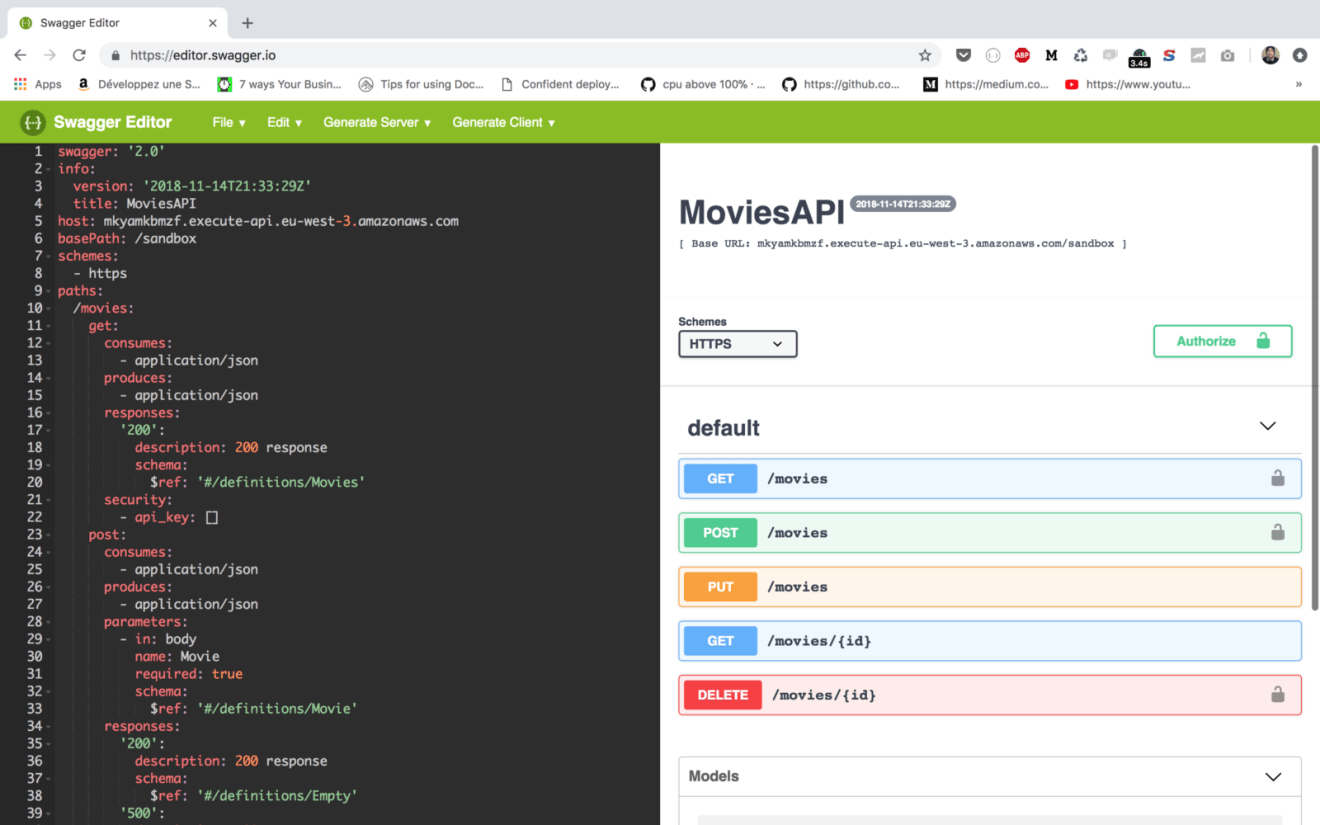
Swagger is an implementation of the OpenAPI, which is a standard defined by the Linux Foundation on how to describe and define APIs. This definition is called the OpenAPI specification document.
You can save the document in either a JSON or YAML file. Then, navigate to https://editor.swagger.io/ and paste the content on the website editor, it will be compiled and an HTML page will be generated as follows:
Like what you’re reading? Check out my book and learn how to build, secure, deploy and manage production-ready Serverless applications in Golang with AWS Lambda.
Drop your comments, feedback, or suggestions below — or connect with me directly on Twitter @mlabouardy.
Serverless architecture is popular in the tech community due to AWS Lambda. Go is simple to learn, straightforward to work with, and easy to read for other developers; and now it’s been heralded as a supported language for AWS Lambda. This book is your optimal guide to designing a Go serverless application and deploying it to Lambda.
This book starts with a quick introduction to the world of serverless architecture and its benefits, and then delves into AWS Lambda using practical examples. You’ll then learn how to design and build a production-ready application in Go using AWS serverless services with zero upfront infrastructure investment. The book will help you learn how to scale up serverless applications and handle distributed serverless systems in production. You will also learn how to log and test your application.
Along the way, you’ll also discover how to set up a CI/CD pipeline to automate the deployment process of your Lambda functions. Moreover, you’ll learn how to troubleshoot and monitor your apps in near real-time with services such as AWS CloudWatch and X-ray. This book will also teach you how to secure the access with AWS Cognito.
By the end of this book, you will have mastered designing, building, and deploying a Go serverless application.
Hands-On Serverless Applications with Go is available at the online stores below:
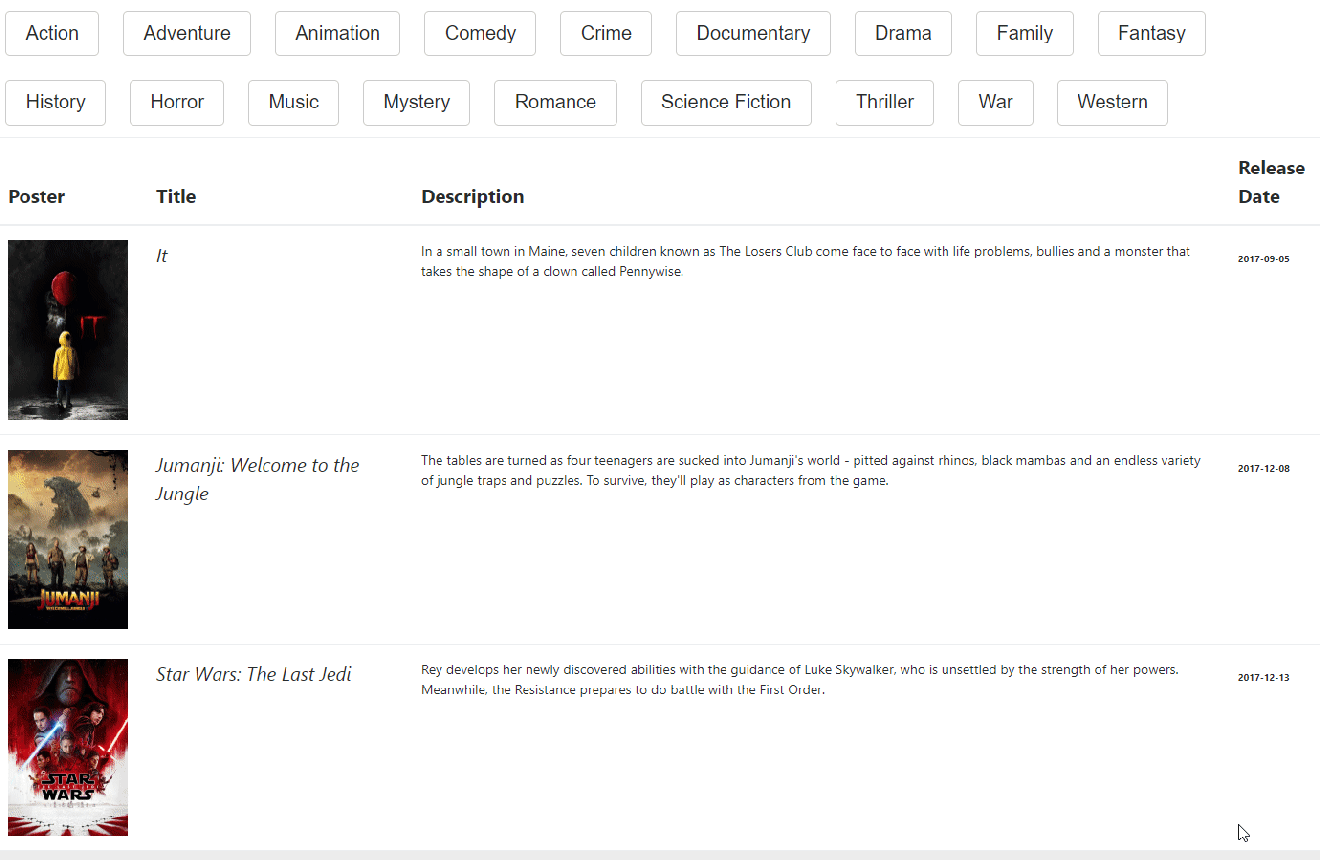
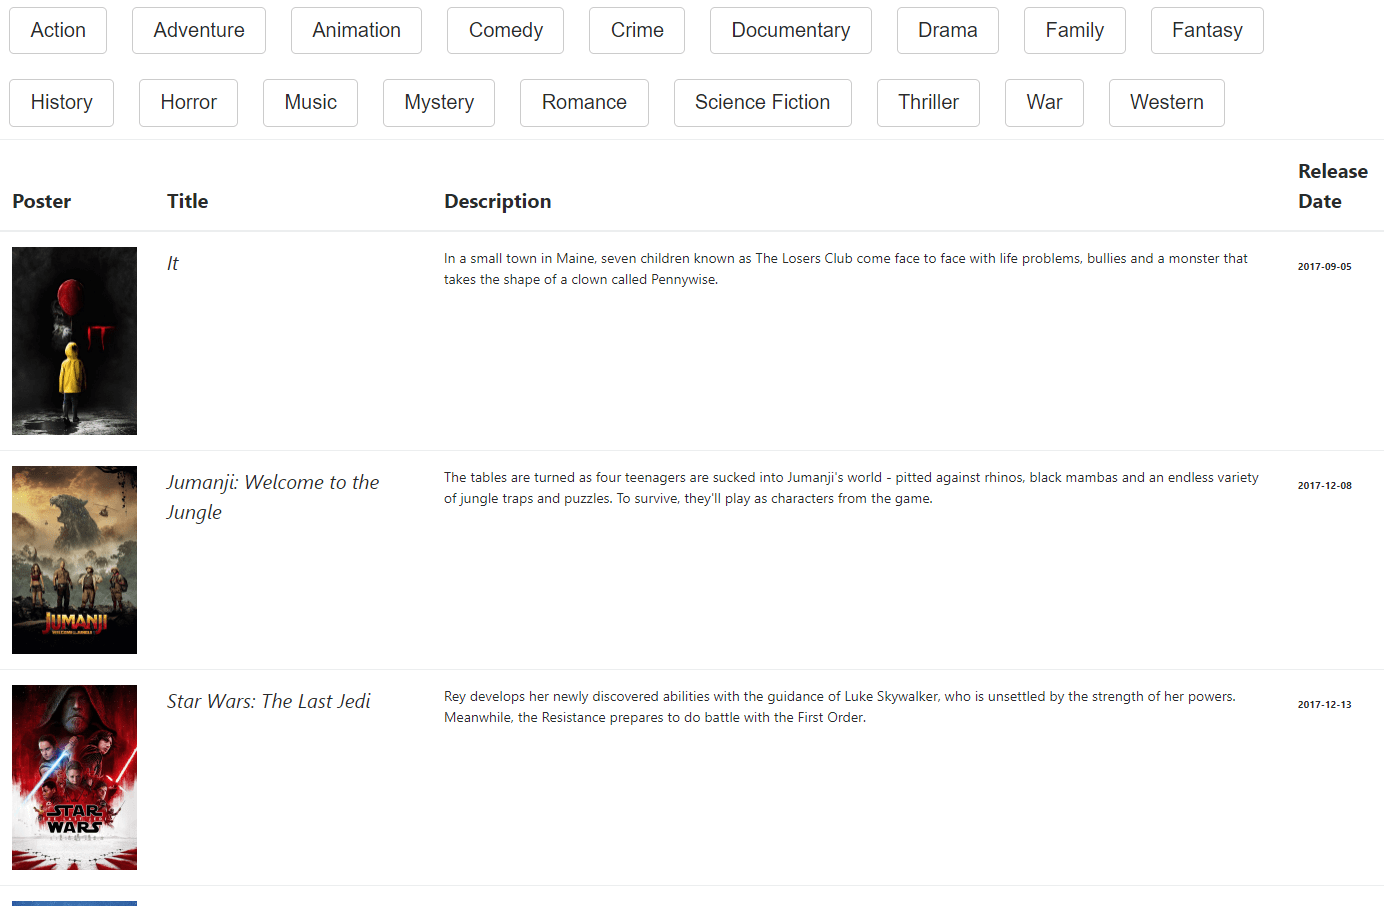
AWS has announced few days ago, Go as supported language for AWS Lambda. So, I got my hand dirty and I made a Serverless Golang Lambda Function to discover new Movies by genres, I went even further and created a Frontend in top of my API with Angular 5.
Note: The full source code for this application can be found on GitHub
To get started, install the dependencies below:
1
2
go get github.com/aws/aws-lambda-go/lambda # for handler registration
go get github.com/stretchr/testify # for unit tests
var ( API_KEY = os.Getenv("API_KEY") ErrorBackend = errors.New("Something went wrong") )
type Request struct { ID int`json:"id"` }
type MovieDBResponse struct { Movies []Movie `json:"results"` }
type Movie struct { Title string`json:"title"` Description string`json:"overview"` Cover string`json:"poster_path"` ReleaseDate string`json:"release_date"` }
var data MovieDBResponse if err := json.NewDecoder(resp.Body).Decode(&data); err != nil { return []Movie{}, ErrorBackend }
return data.Movies, nil }
funcmain() { lambda.Start(Handler) }
The handler function takes as a parameter the movie genre ID then query the TMDb API – Awesome free API for Movies and TV Shows – to get list of movies. I registred the handler using the lambda.Start() method.
To test our handler before deploying it, we can create a basic Unit Test:
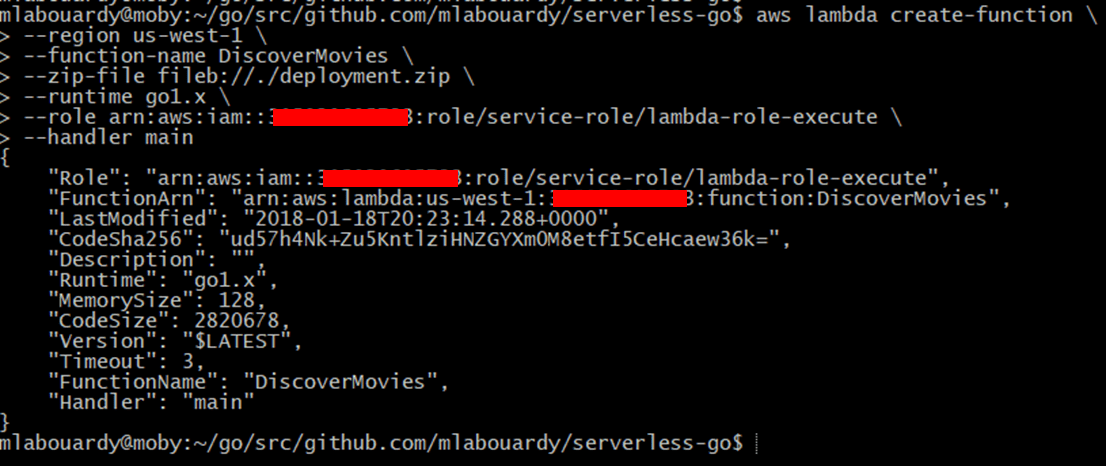
Note: substitute role flag with your own IAM role.
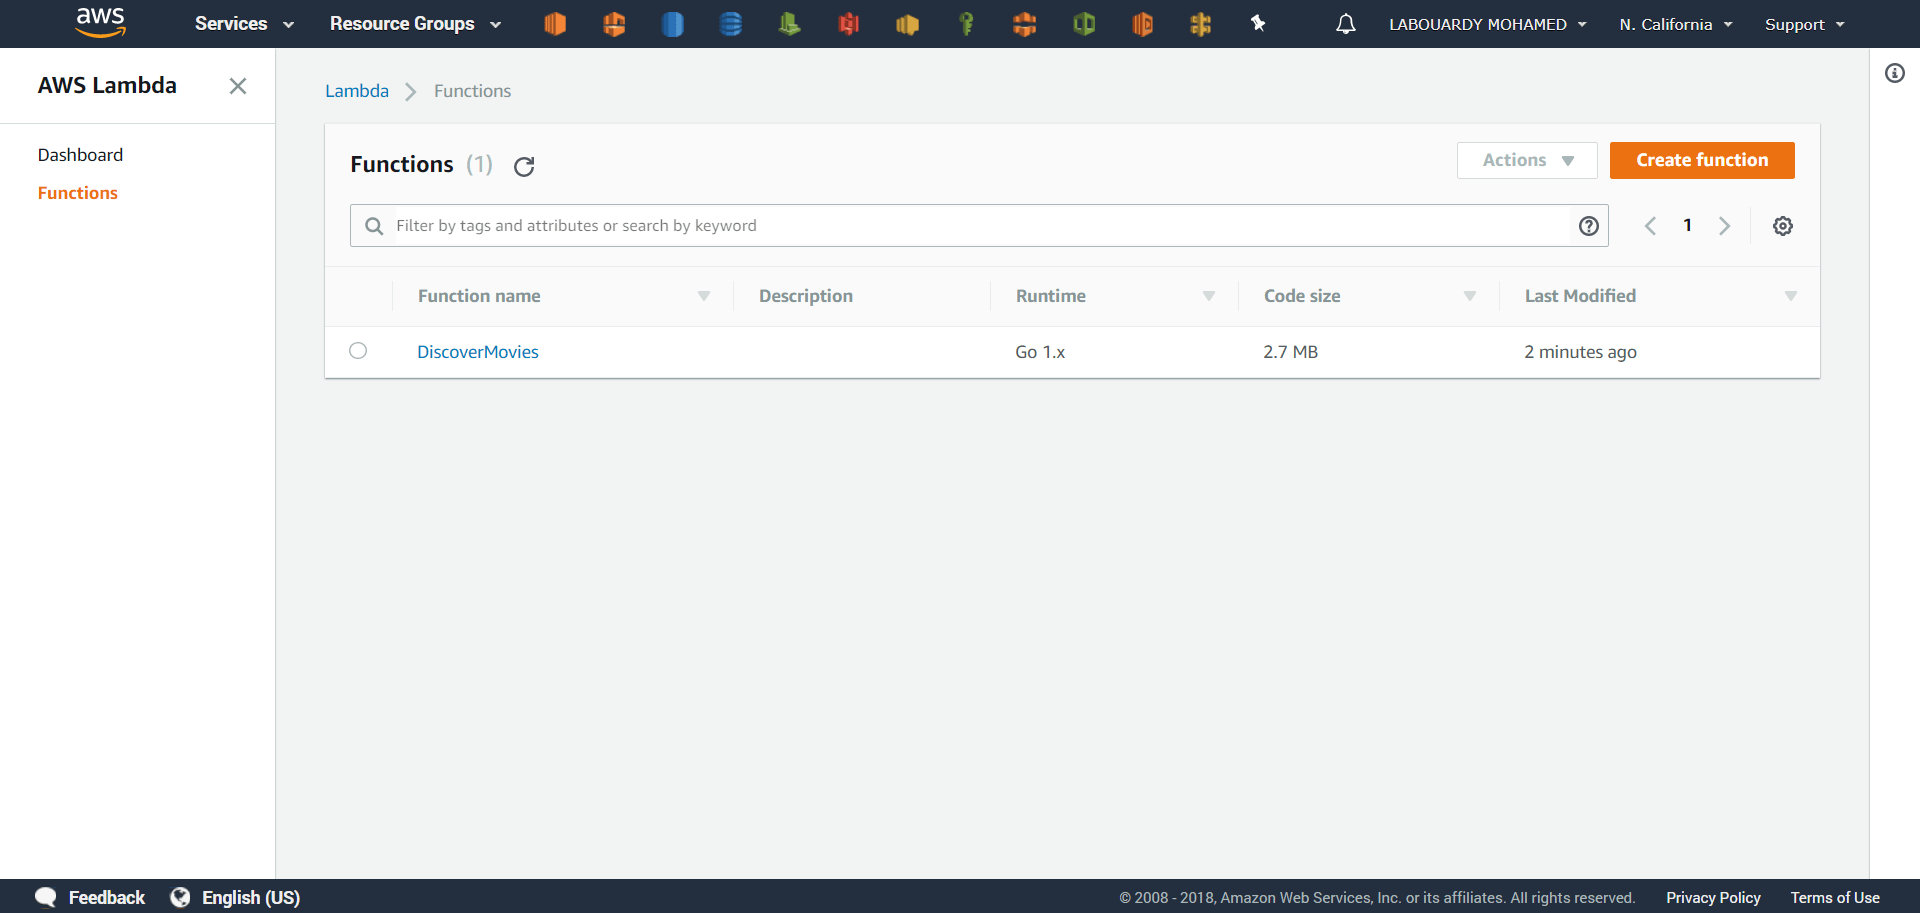
Sign in to the AWS Management Console, and navigate to Lambda Dashboard, you should see your lambda function has been created:
Set TMDb API KEY (Sign up for an account) as environment variable:
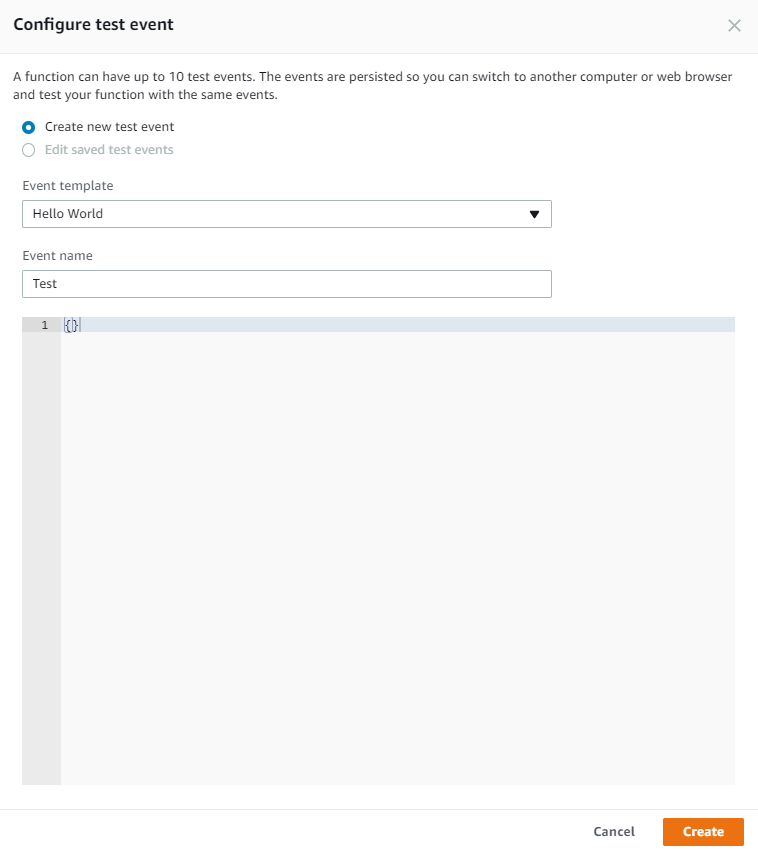
Create a new test event:
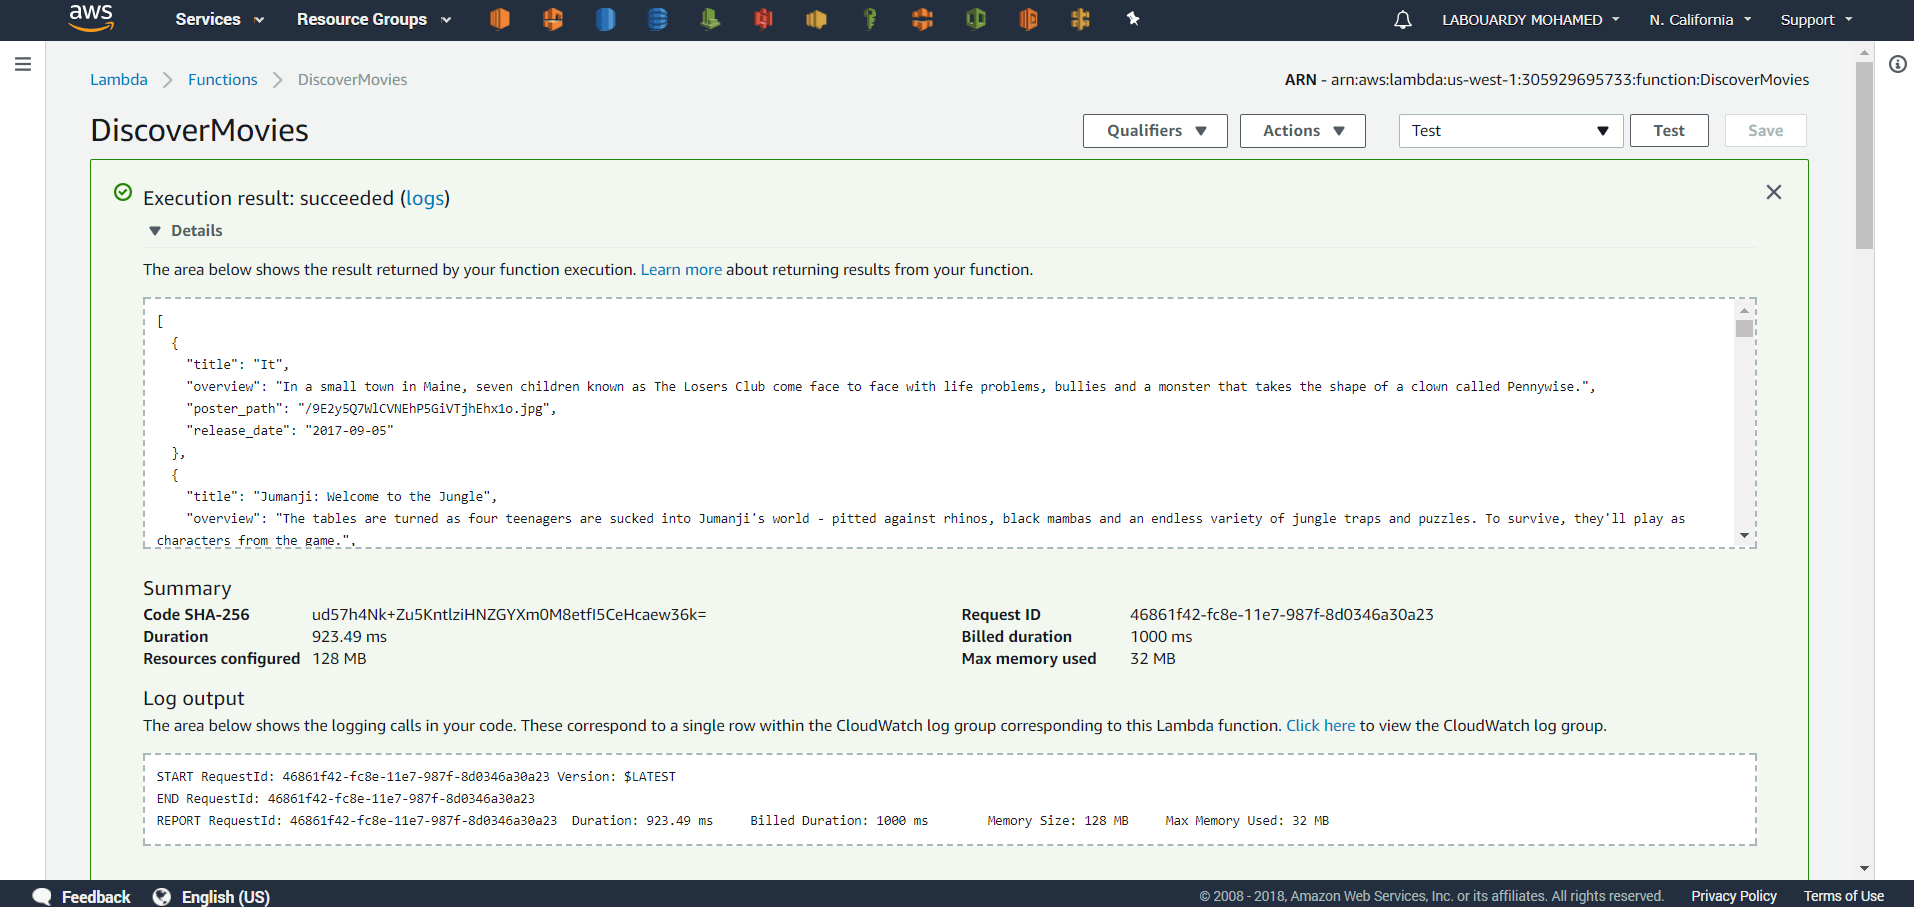
Upon successful execution, view results in the console:
To provide the HTTPS frontend for our API, let’s add API Gateway as a trigger to the function:
Deployment:
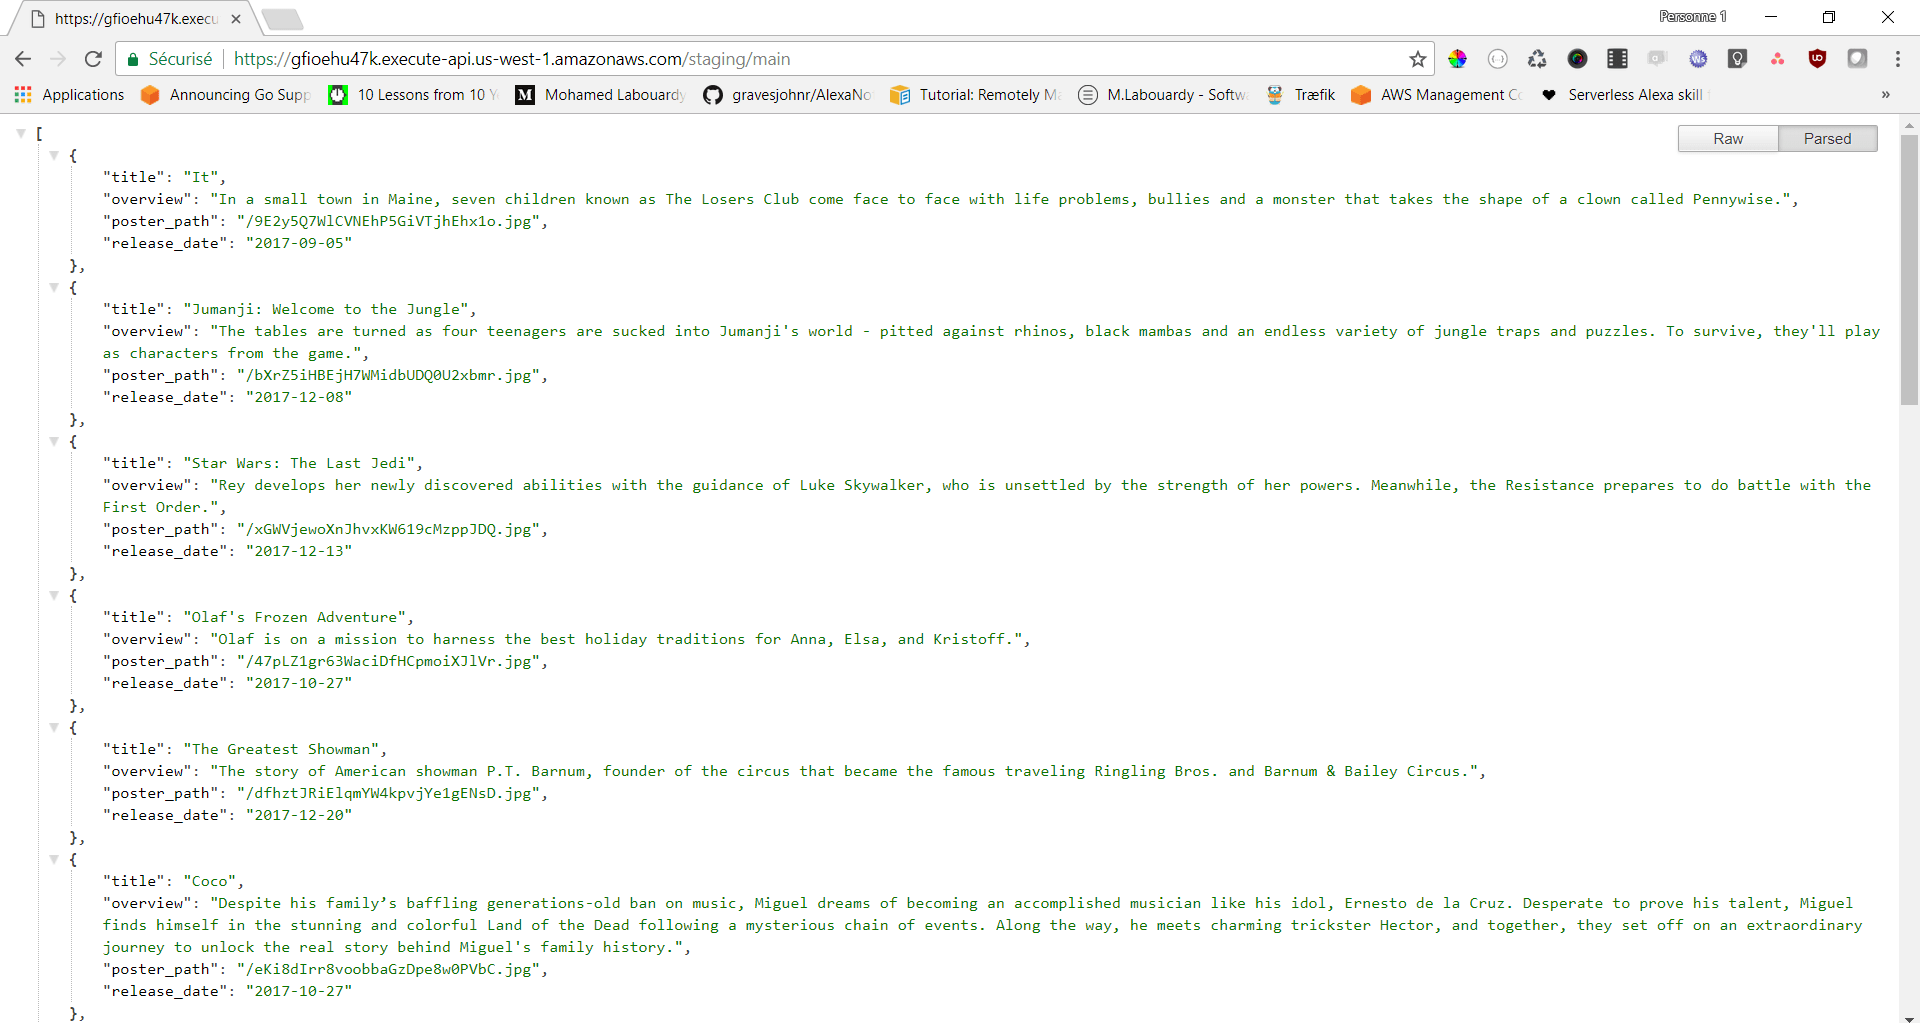
Now, if you point your favorite browser to the Invoke URL:
Congratulations ! you have created your first Lambda function in Go.
Let’s build a quick UI in top of the API with Angular 5. Create an Angular project from scratch using Angular CLI. Then, generate a new Service to calls the API Gateway URL:
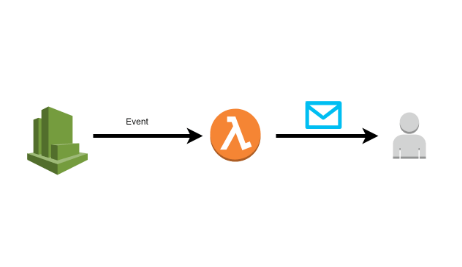
This post is part of my “Serverless” series. In this part, I will show you how to setup a Lambda function to send mails on a defined scheduled event from CloudWatch.
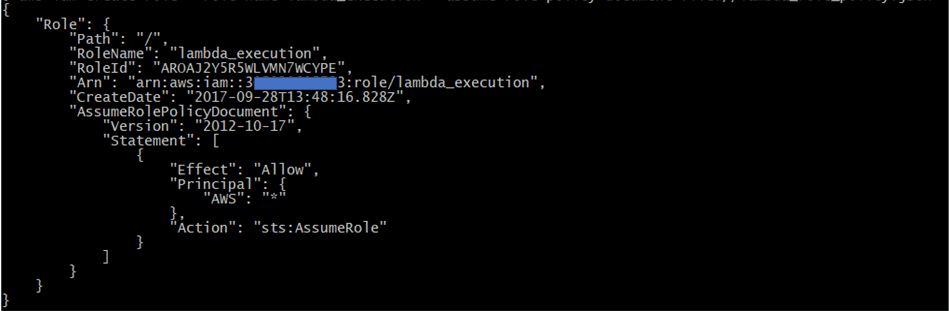
aws iam create-role --role-name lambda_execution --assume-role-policy-document file://lambda_role_policy.json
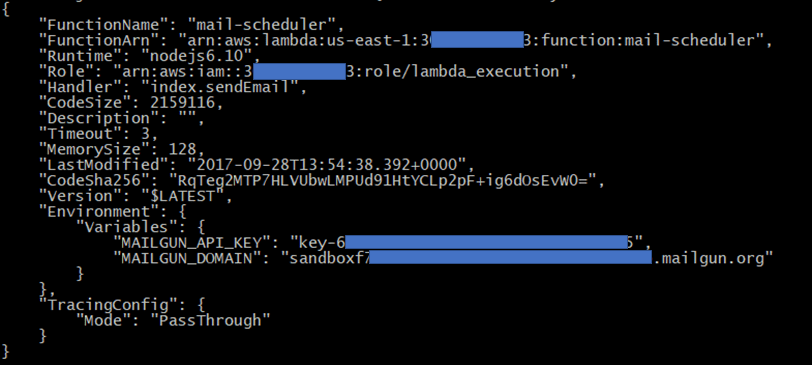
Execute the following Lambda CLI command to create a Lambda function. We need to provide the zip file, IAM role ARN we created earlier & set MAILGUN_API_KEY and MAILGUN_DOMAIN as parameters.
Note: the –runtime parameter uses Node.JS 6.10 but you can also specify Node.JS 4.3
Once created, AWS Lambda returns function configuration information as shown in the following example:
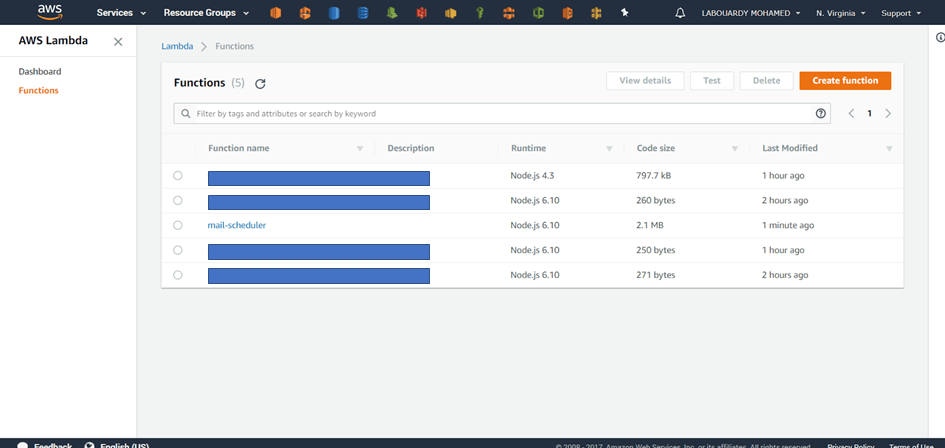
Now if we go back to AWS Lambda Dashboard we should see our function has been successfuly created:
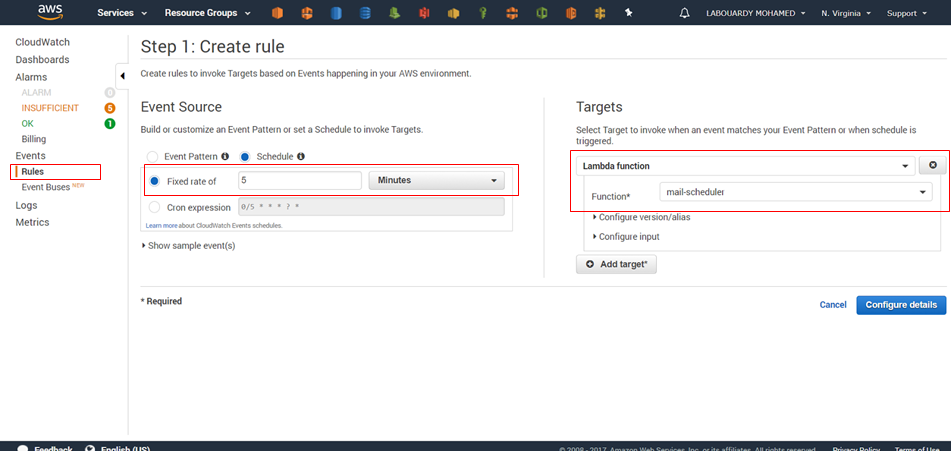
2 – Configure a CloudWatch Rule
Create a new rule which will trigger our lambda function each 5 minutes:
Note: you can specify the value as a rate or in the cron expression format. All schedules use the UTC time zone, and the minimum precision for schedules is one minute
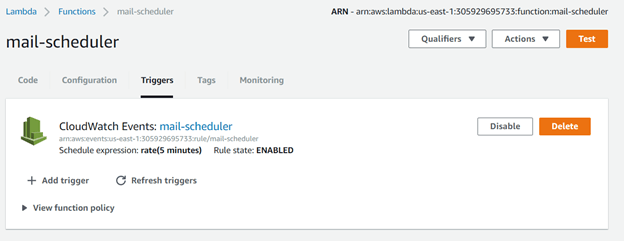
If you go back now to the Lambda Function Console and navigate to the Trigger tab, you should see the CloudWatch has been added:
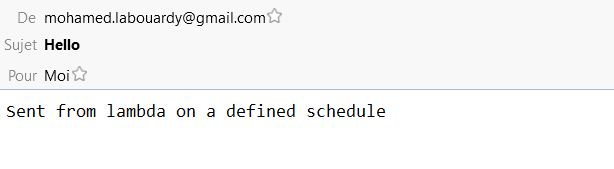
After 5 minutes, CloudWatch will trigger the Lambda Function and you should get an email notification:
Drop your comments, feedback, or suggestions below — or connect with me directly on Twitter @mlabouardy.