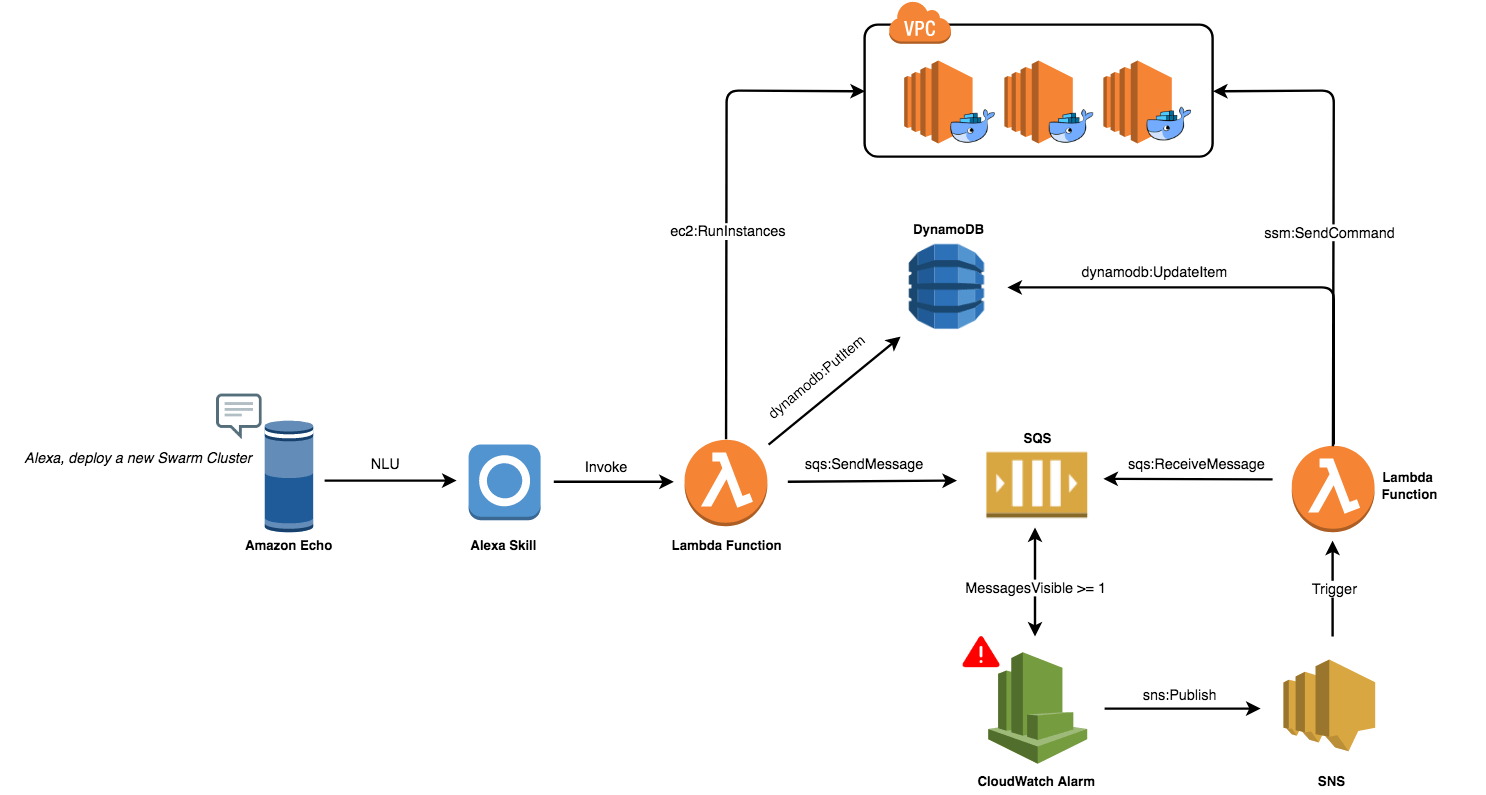
Serverless and Containers changed the way we leverage public clouds and how we write, deploy and maintain applications. A great way to combine the two paradigms is to build a voice assistant with Alexa based on Lambda functions – written in Go – to deploy a Docker Swarm cluster on AWS.
The figure below shows all components needed to deploy a production-ready Swarm cluster on AWS with Alexa.
A user will ask Amazon Echo to deploy a Swarm Cluster:
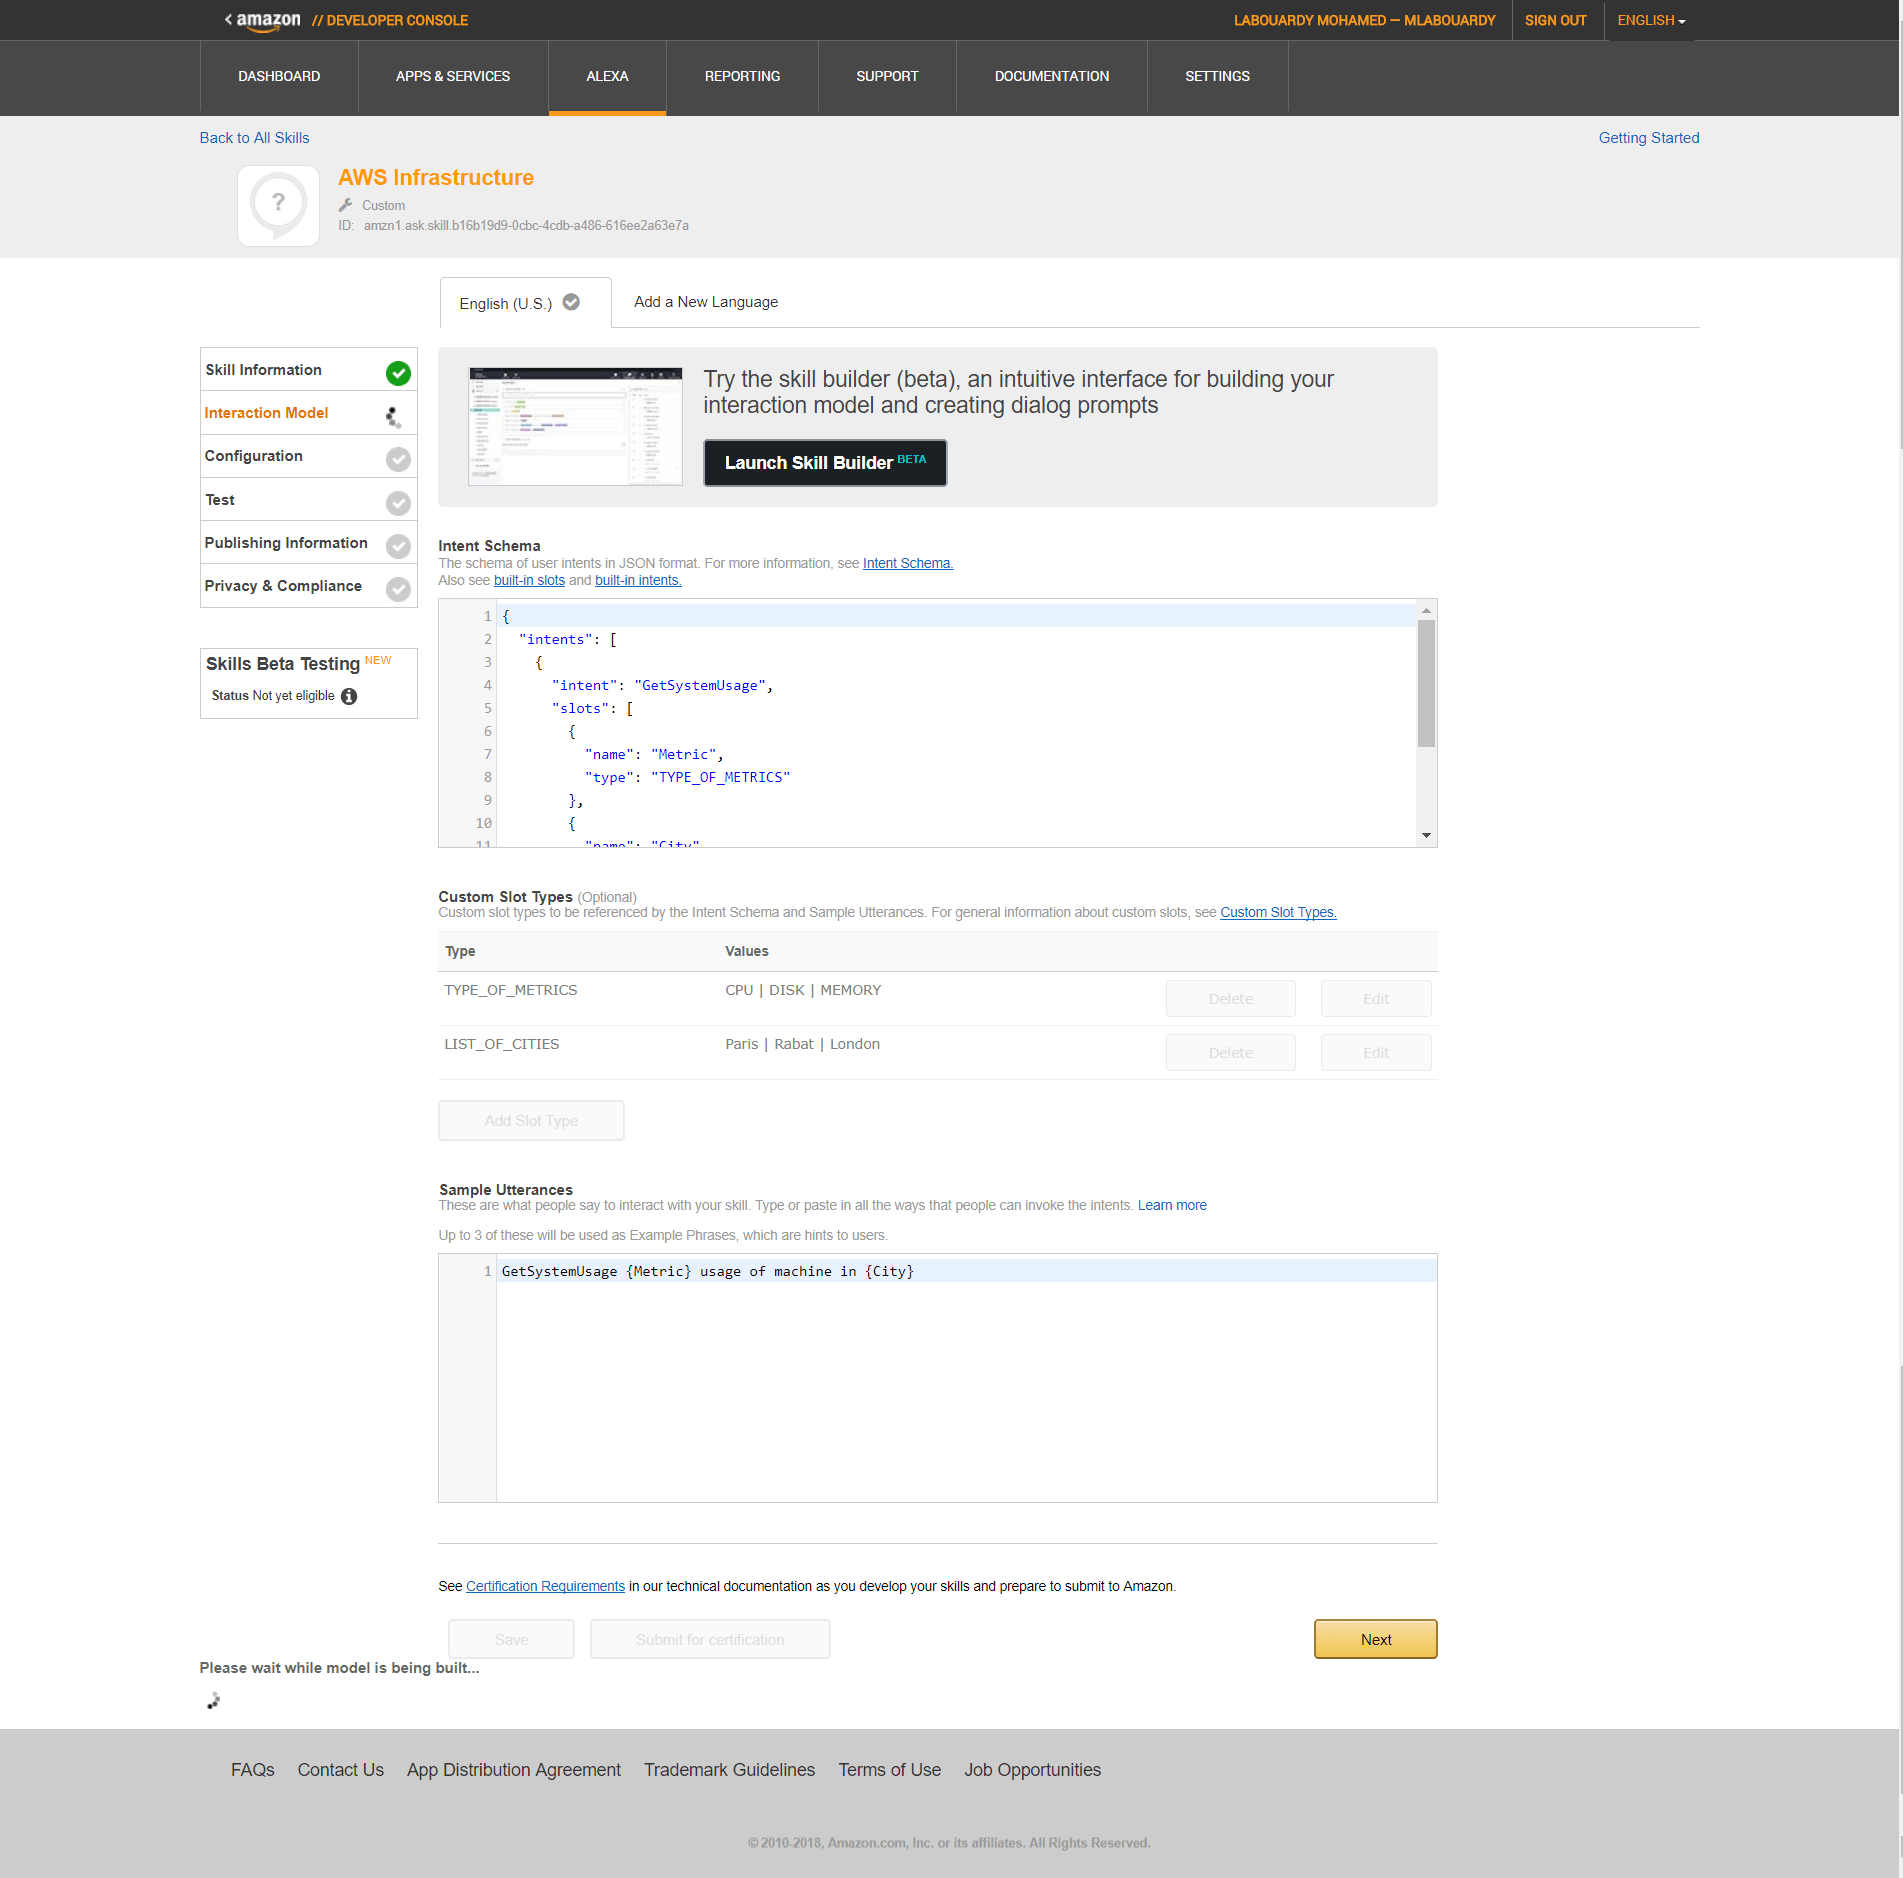
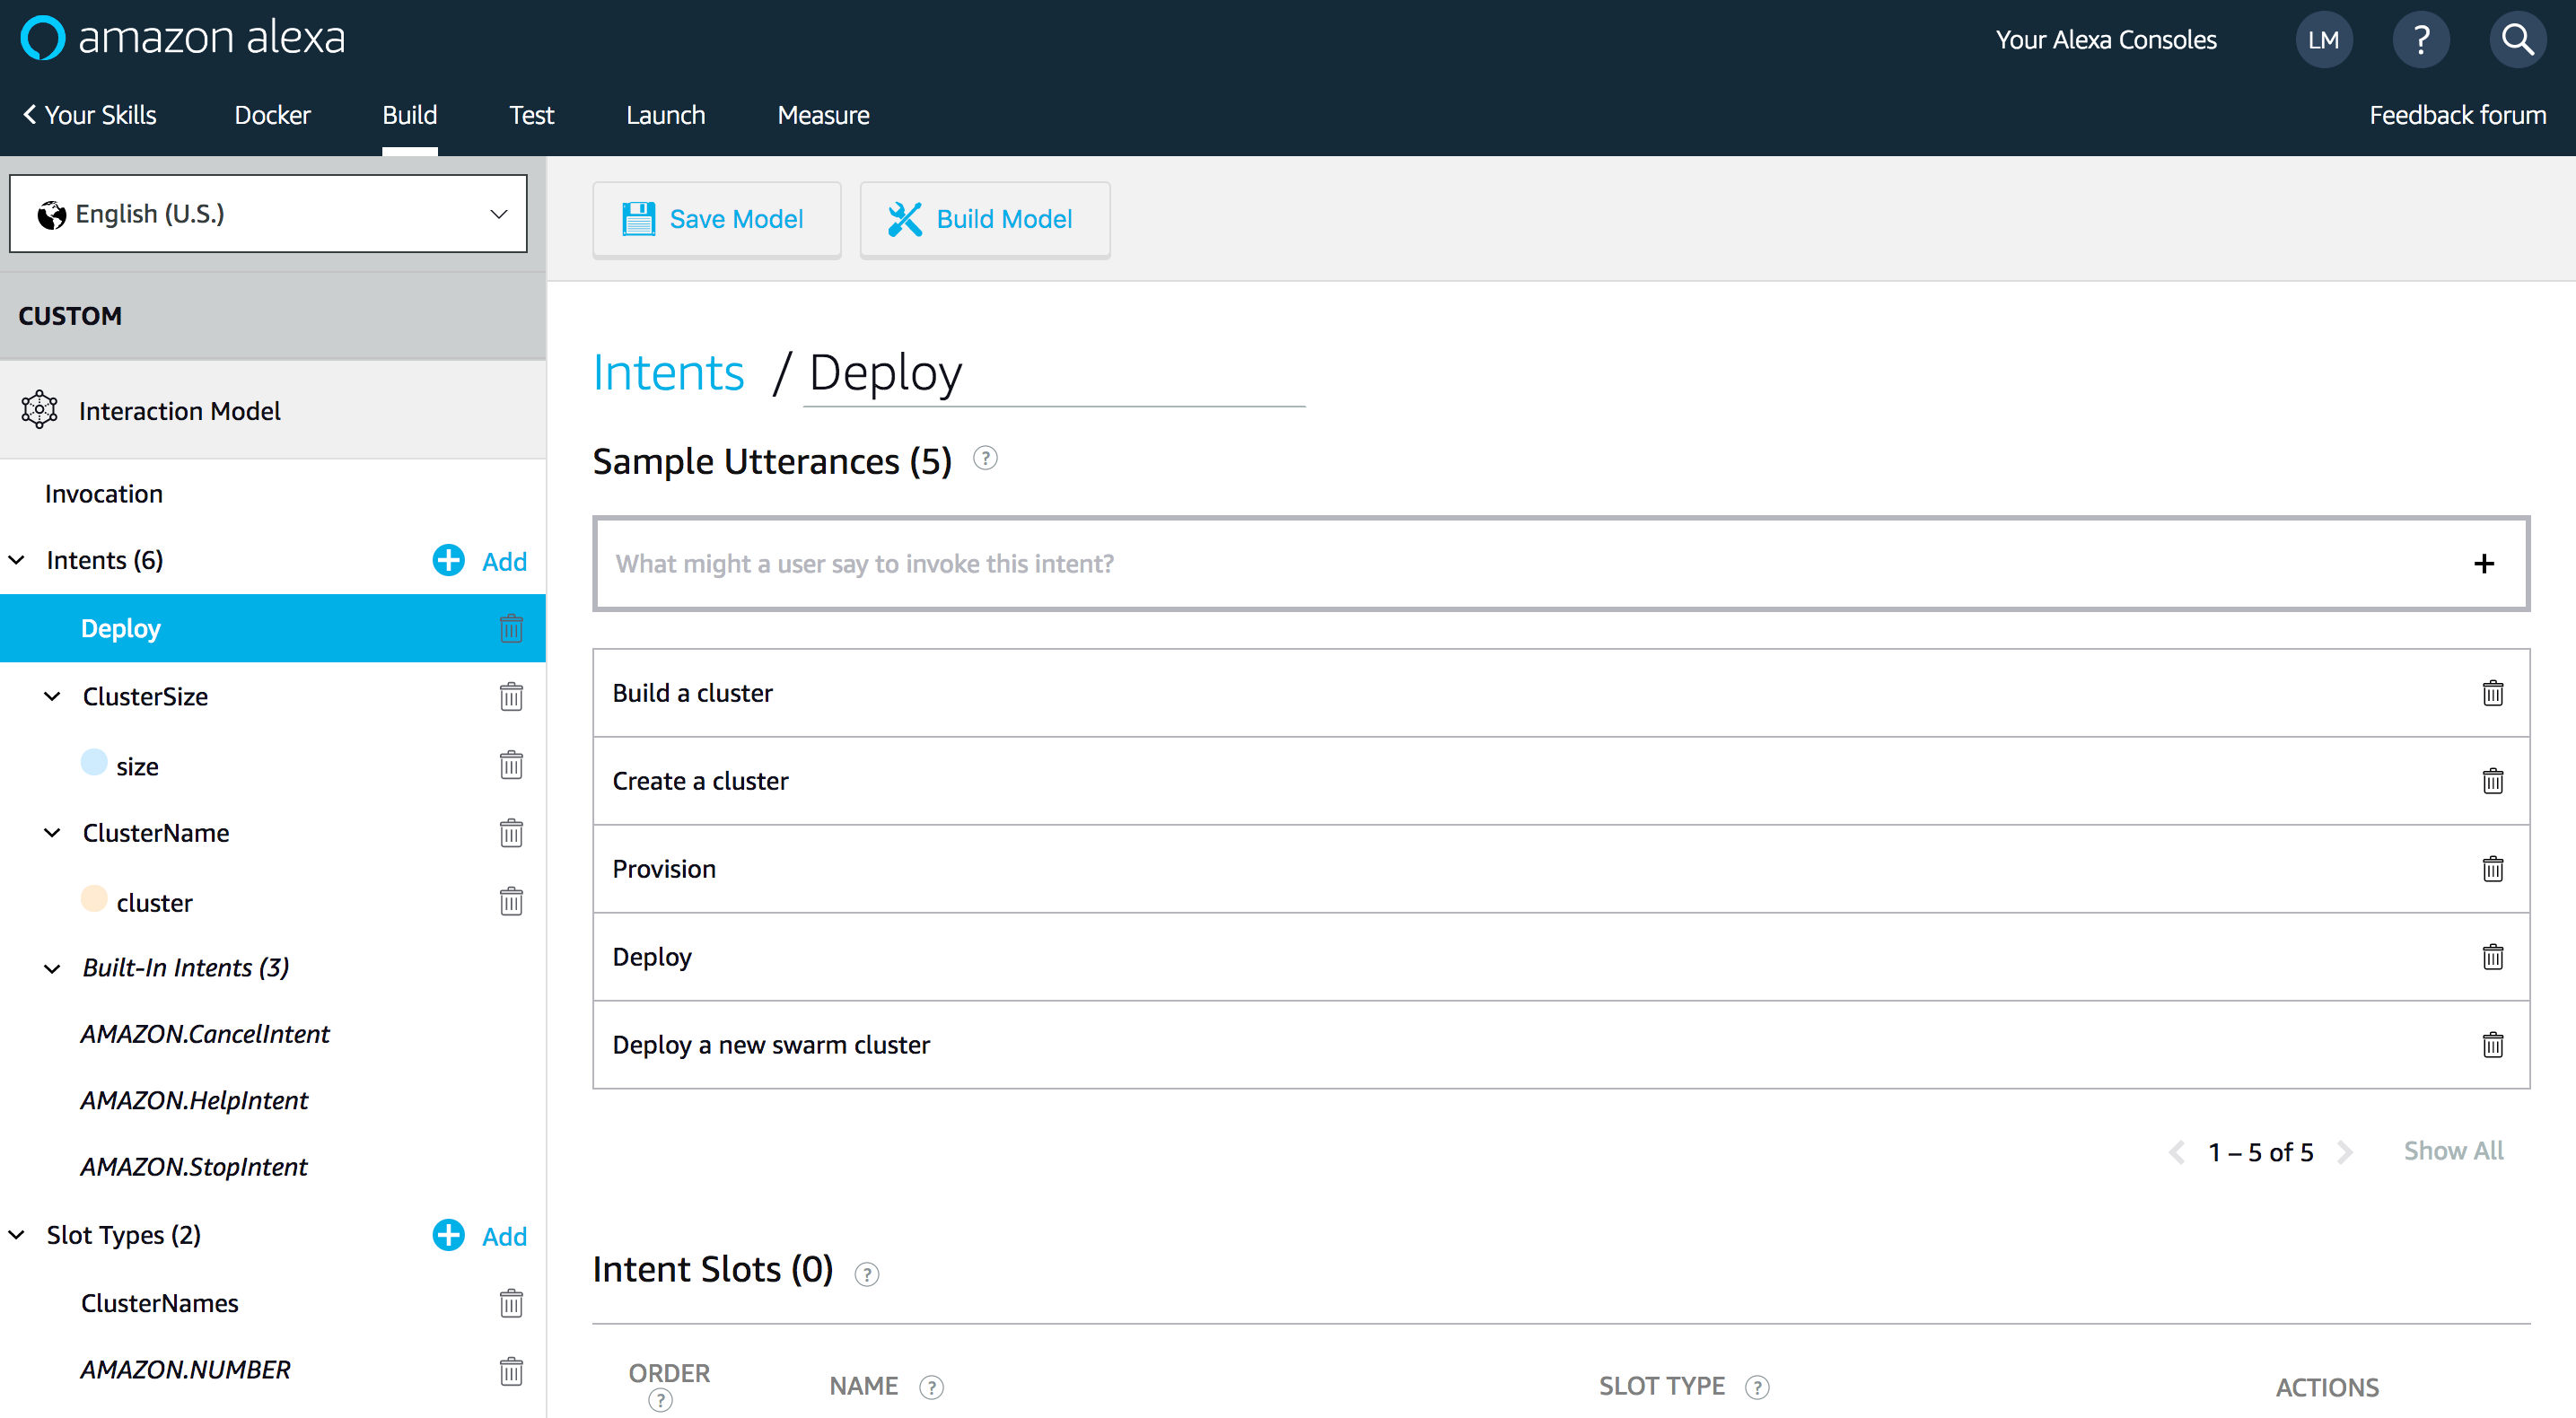
Echo will intercept the user’s voice command with built-in natural language understanding and speech recognition. Convey them to the Alexa service. A custom Alexa skill will convert the voice commands to intents:
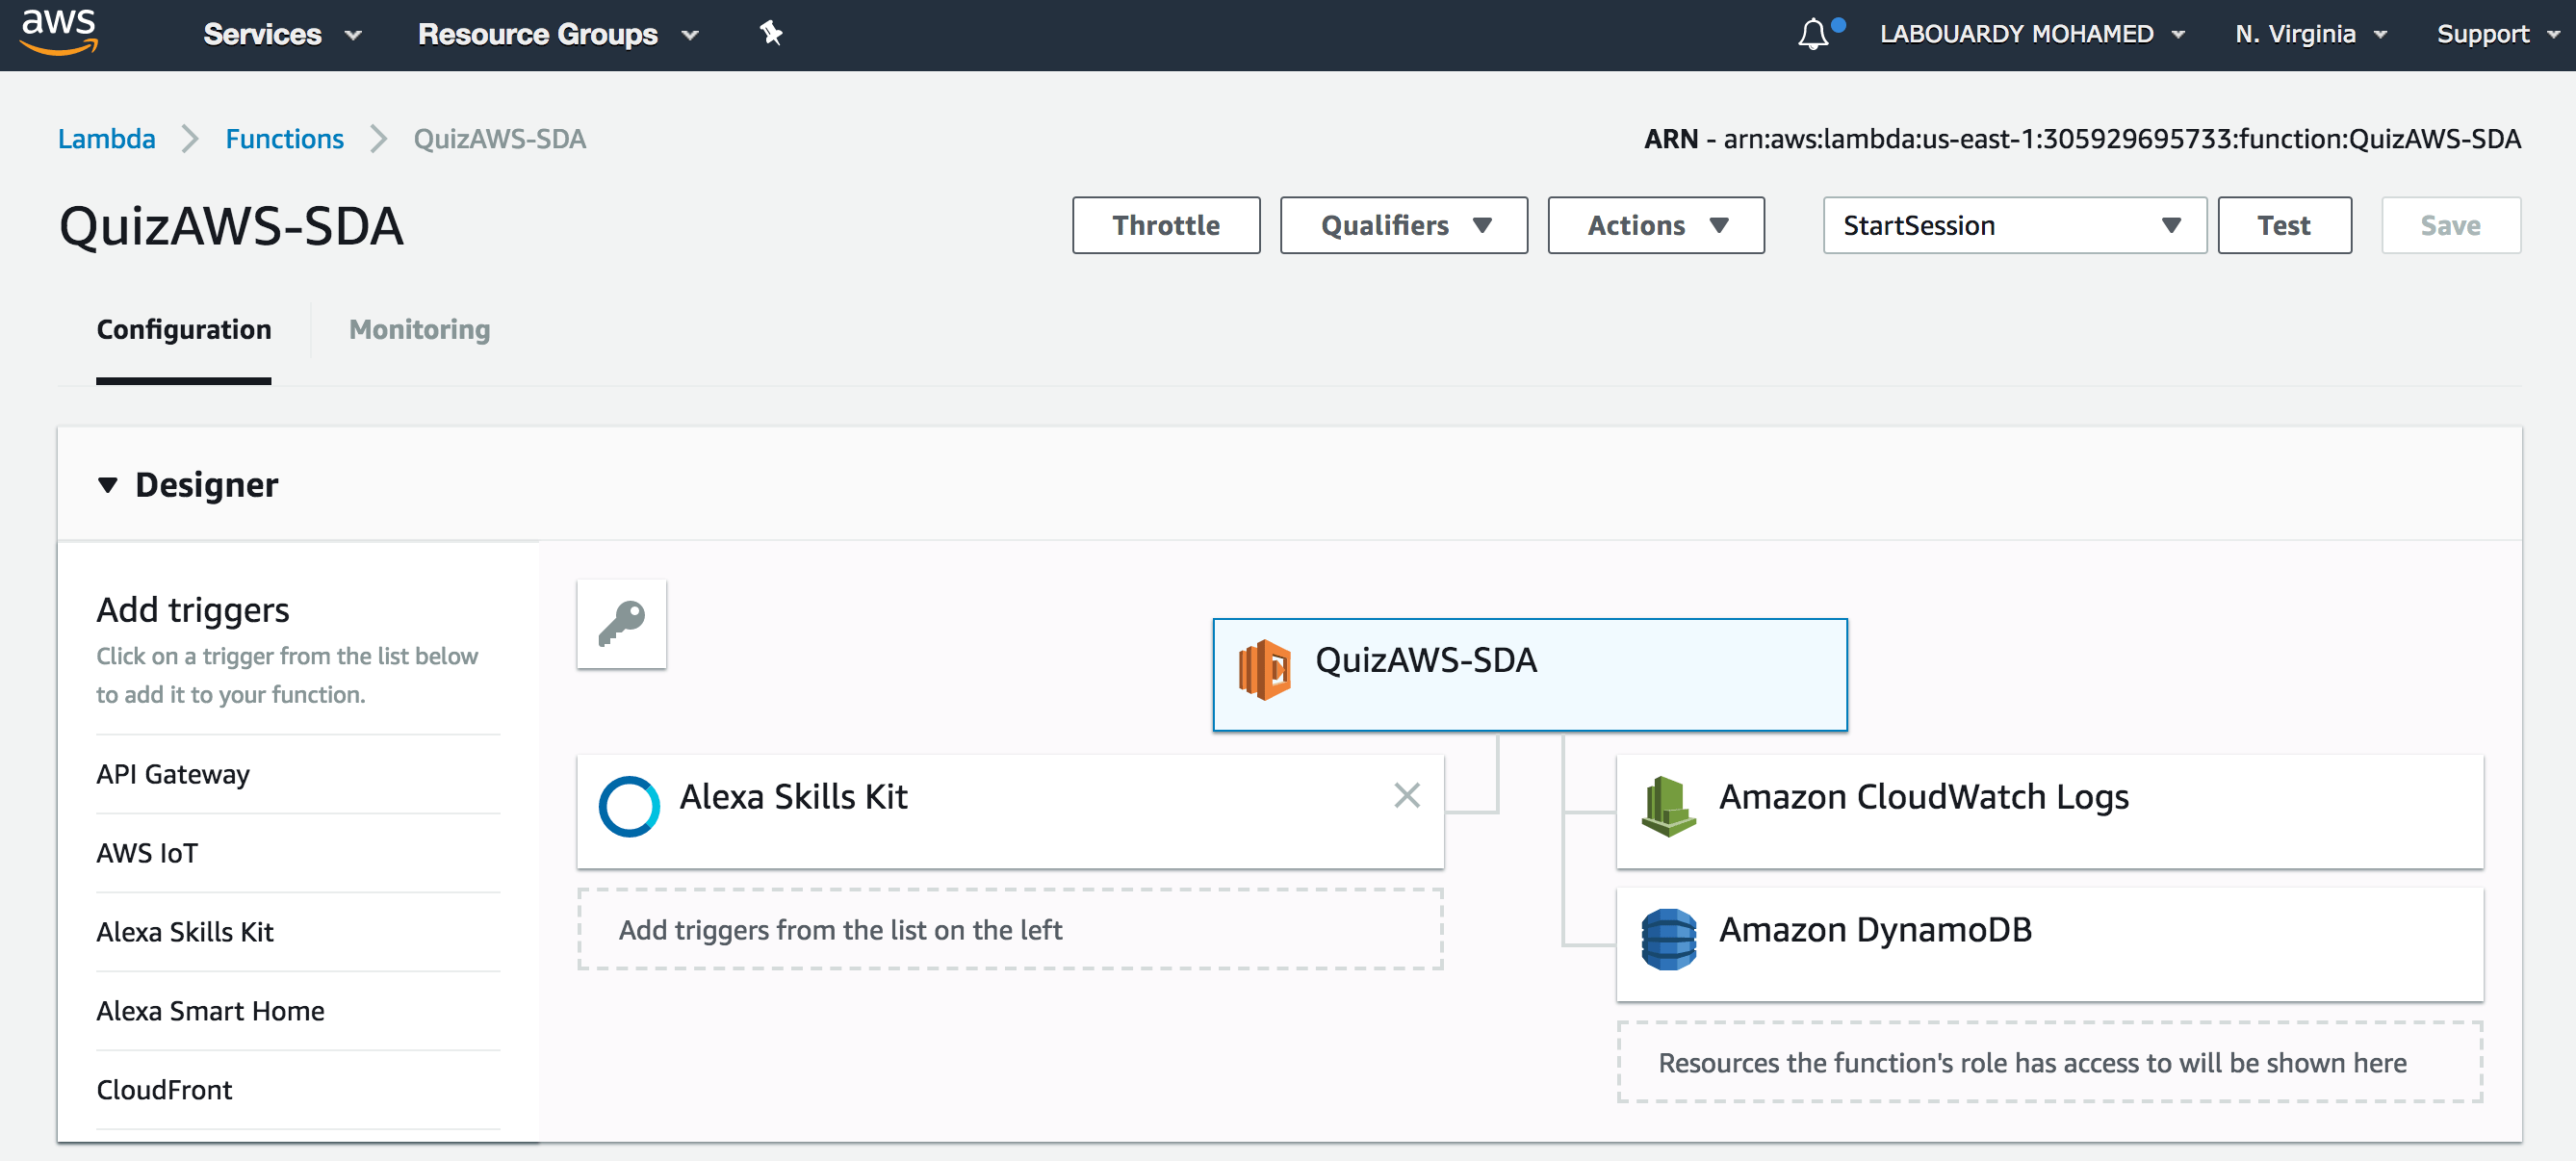
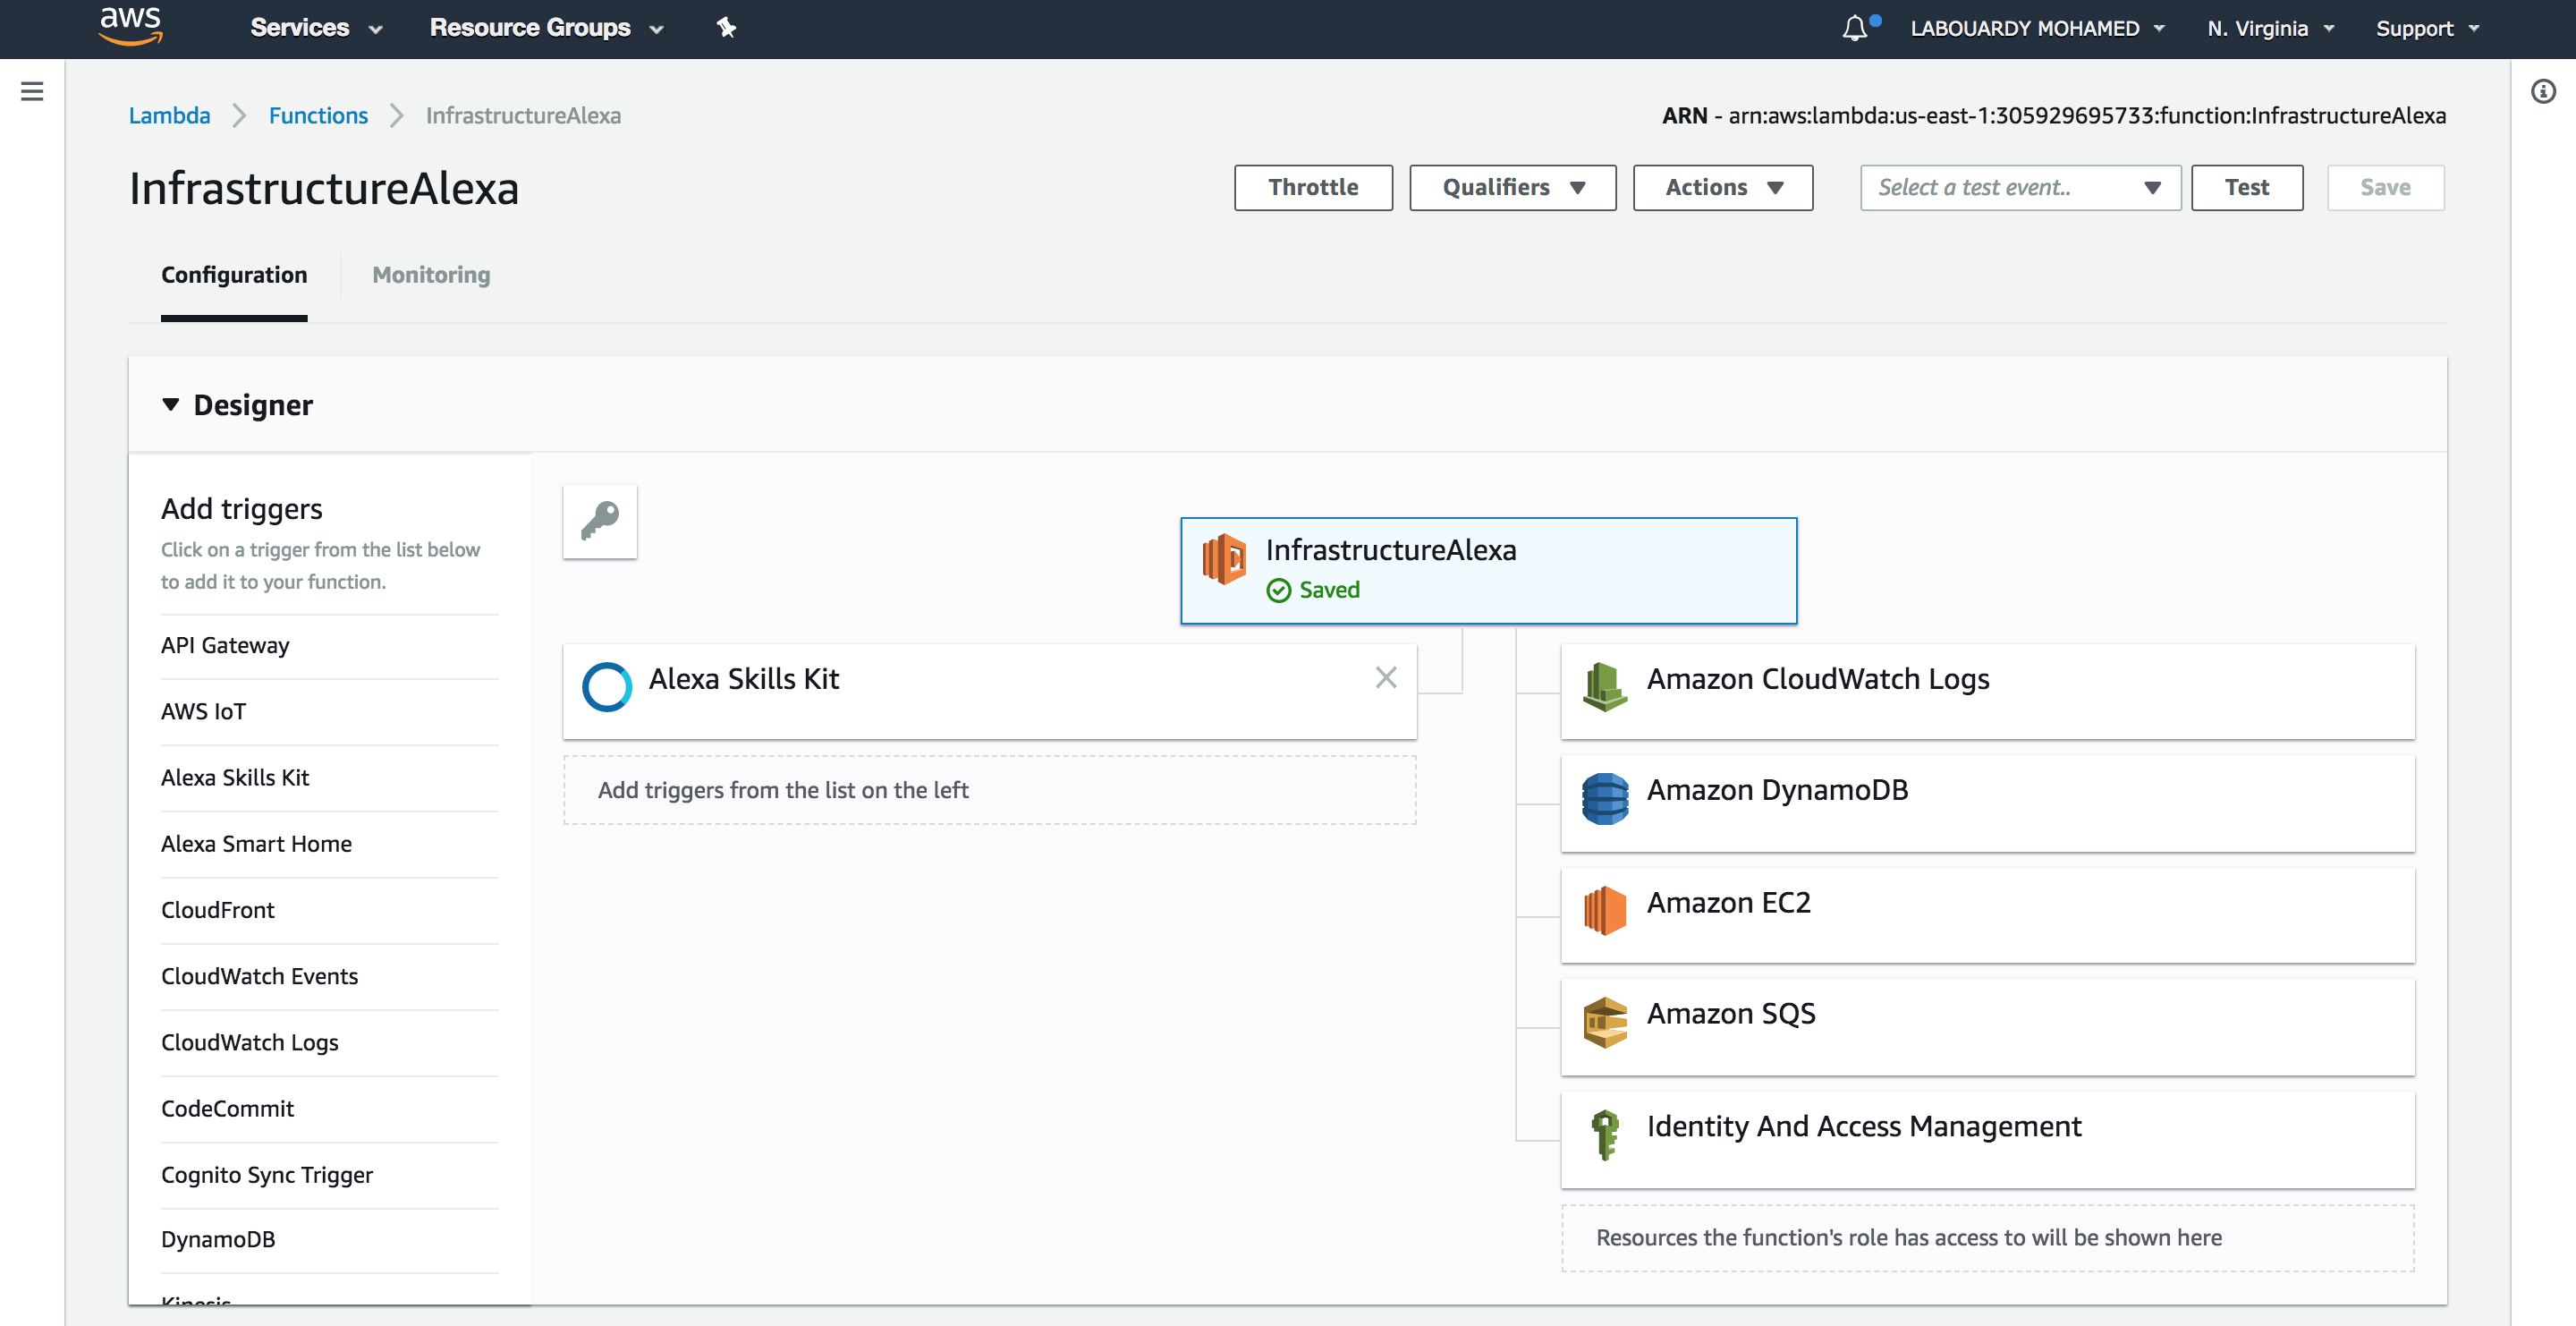
The Alexa skill will trigger a Lambda function for intent fulfilment:
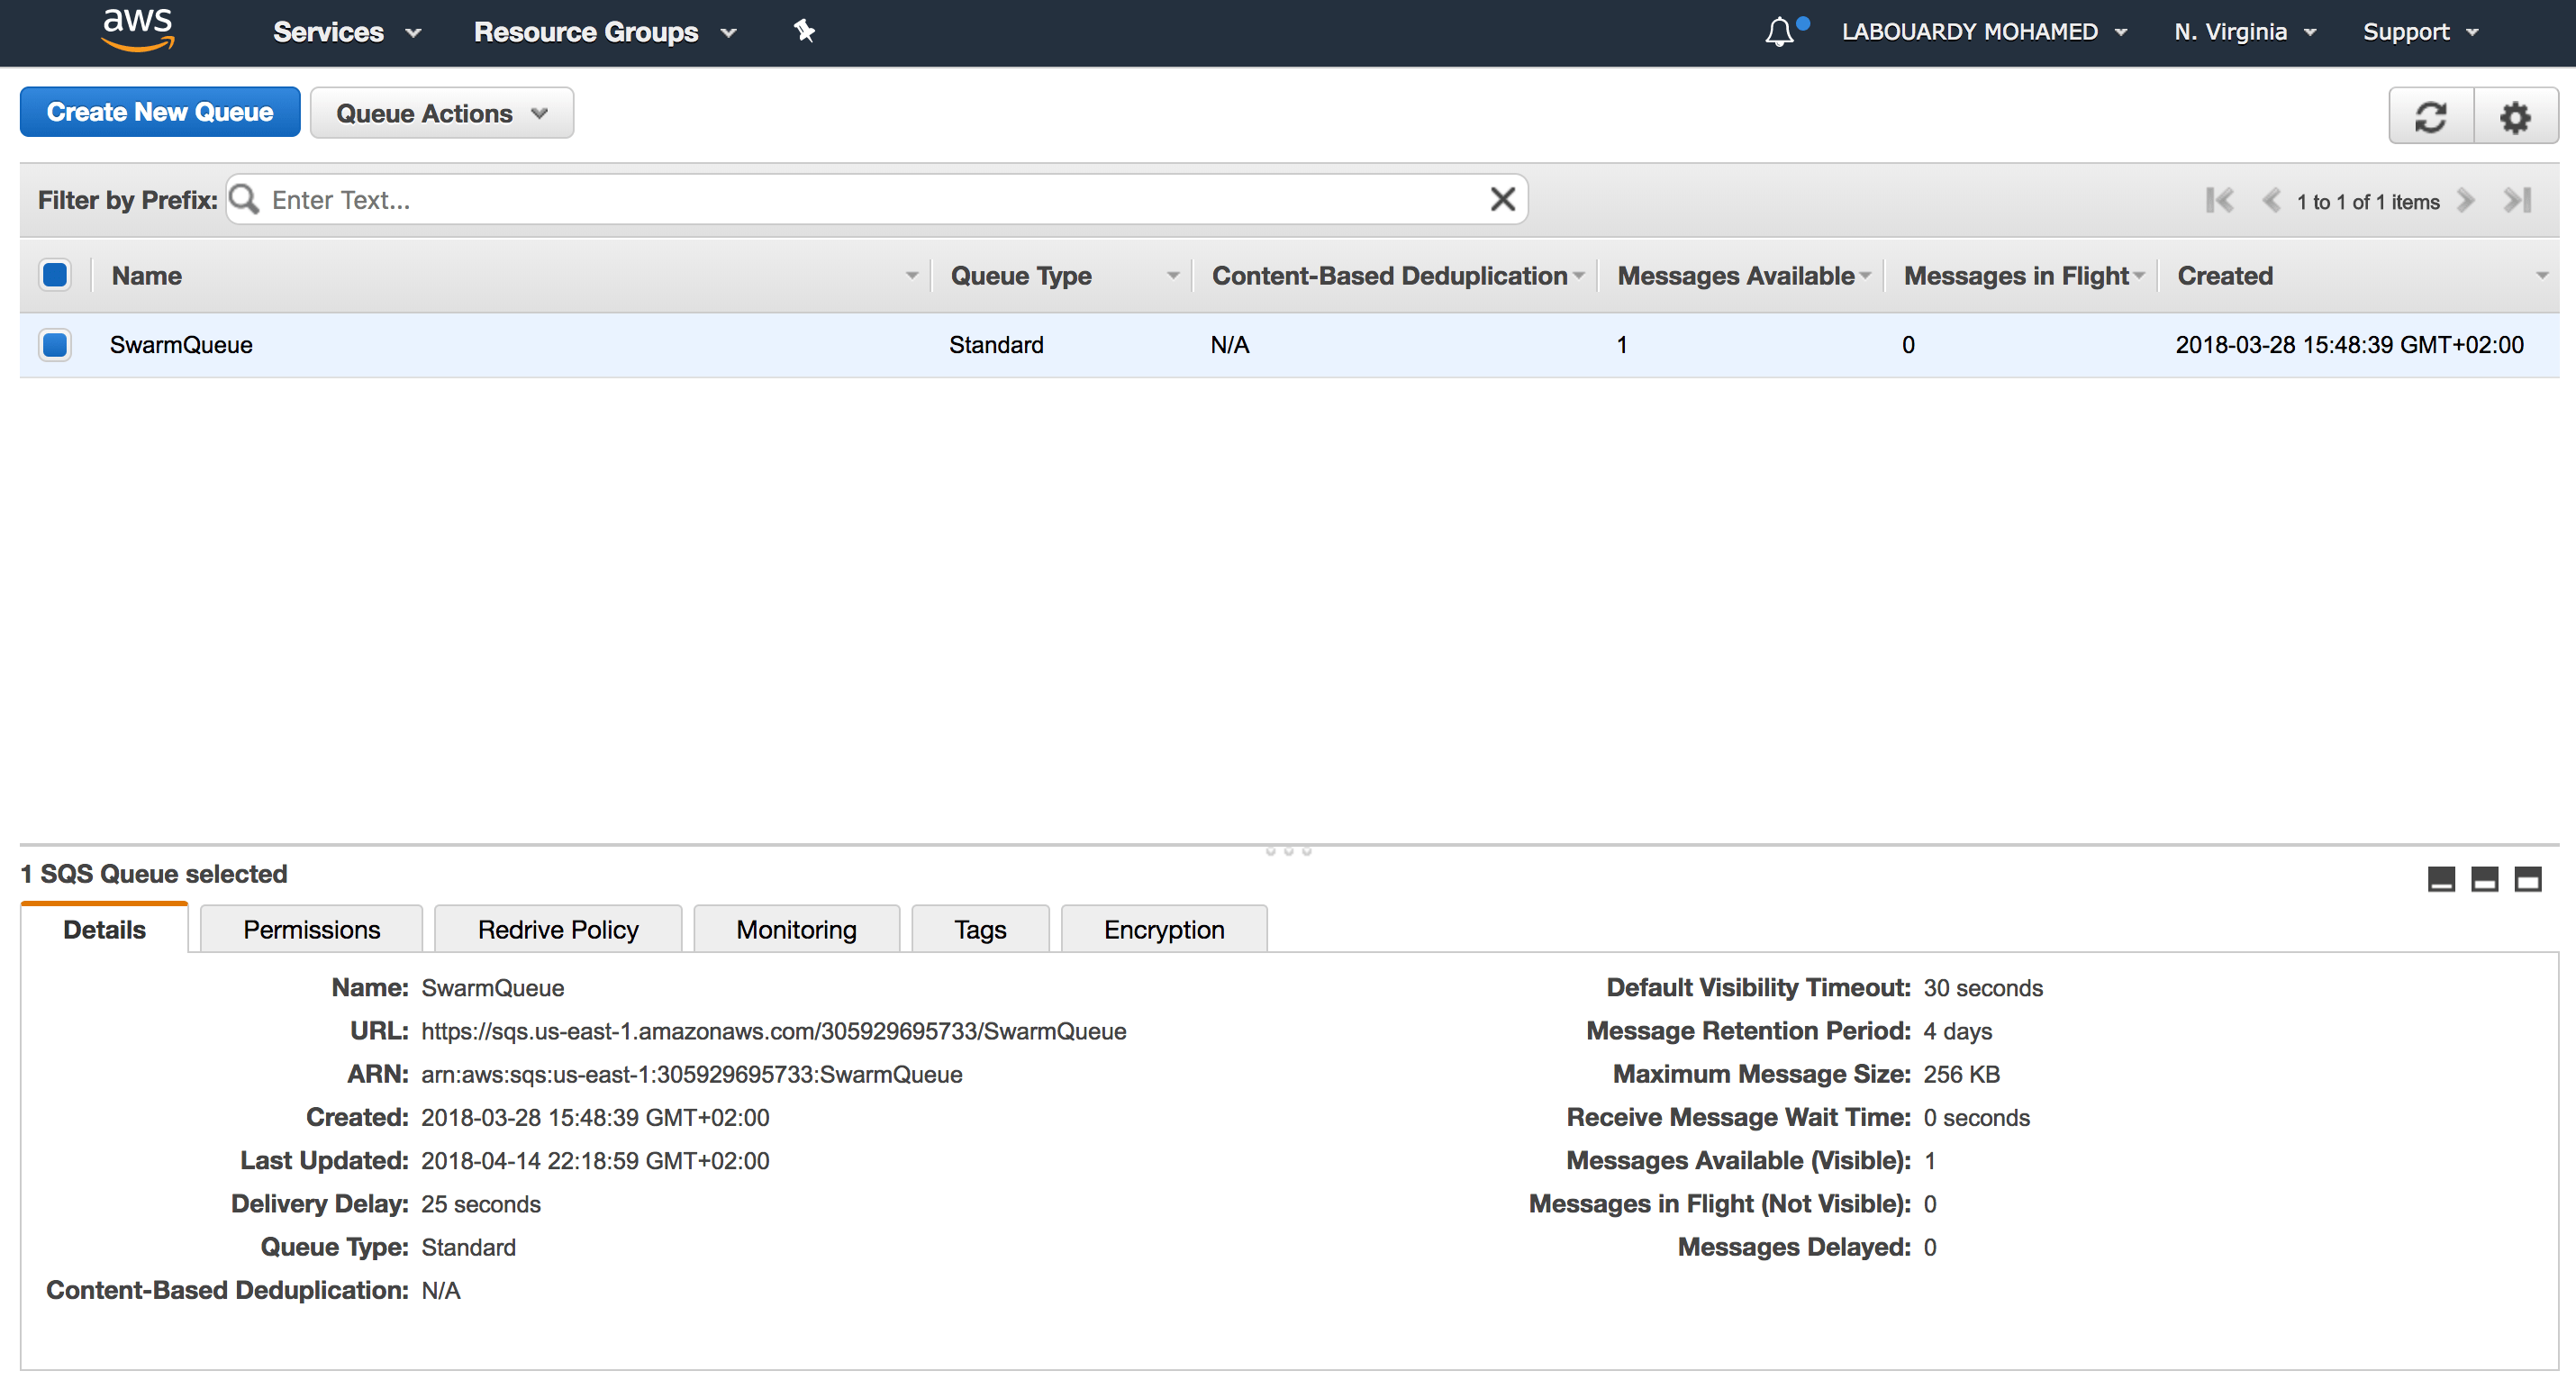
The Lambda Function will use the AWS EC2 API to deploy a fleet of EC2 instances from an AMI with Docker CE preinstalled (I used Packer to bake the AMI to reduce the cold-start of the instances). Then, push the cluster IP addresses to a SQS:
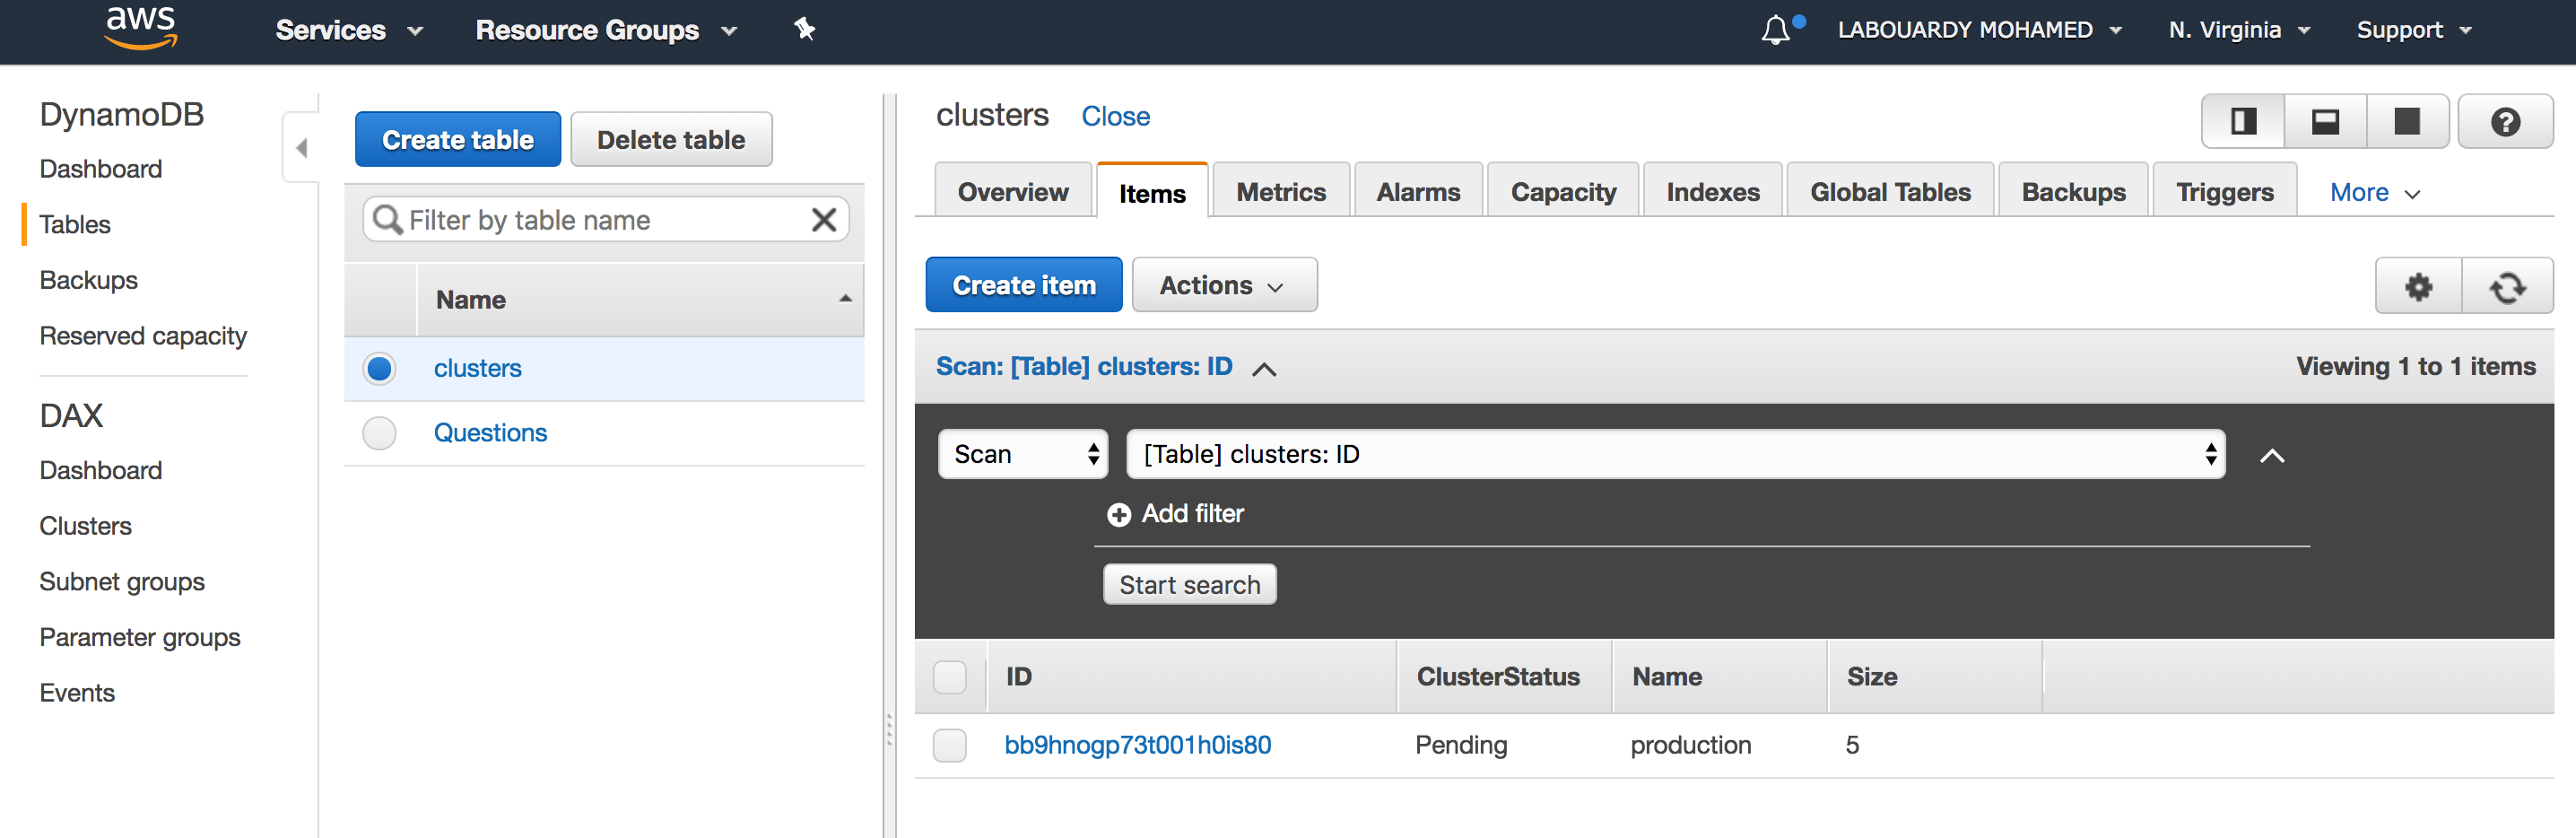
Next, the function will insert a new item to a DynamoDB table with the current state of the cluster:
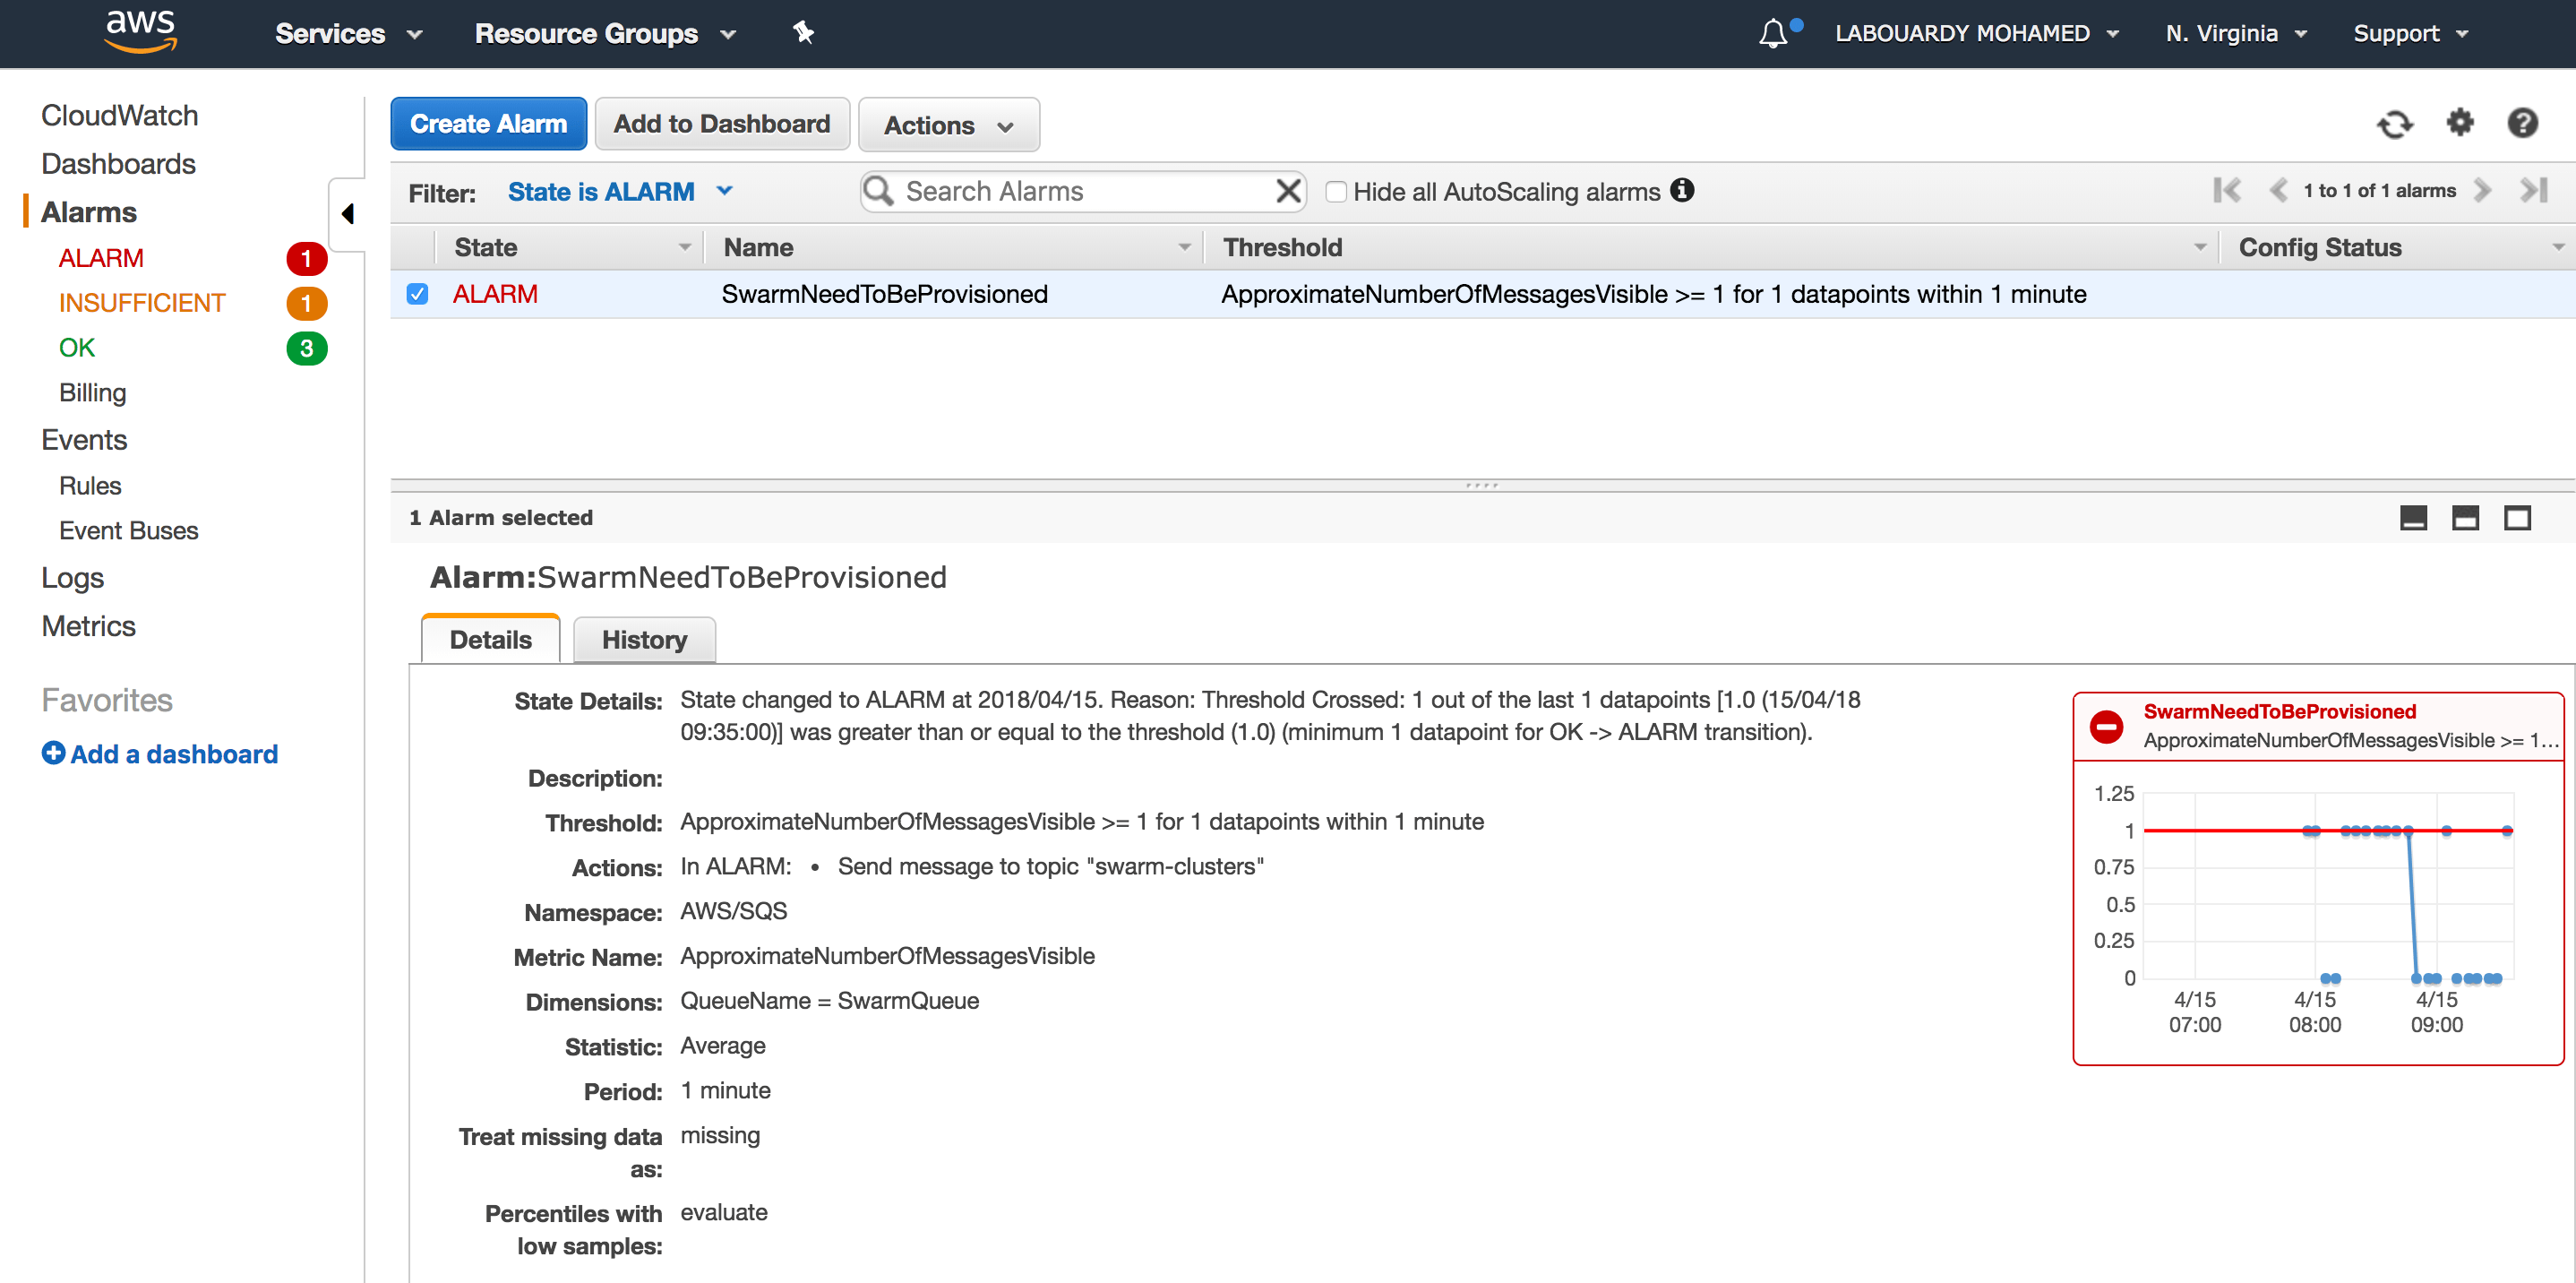
Once the SQS received the message, a CloudWatch alarm (it monitors the ApproximateNumberOfMessagesVisible parameter) will be triggered and as a result it will publish a message to an SNS topic:
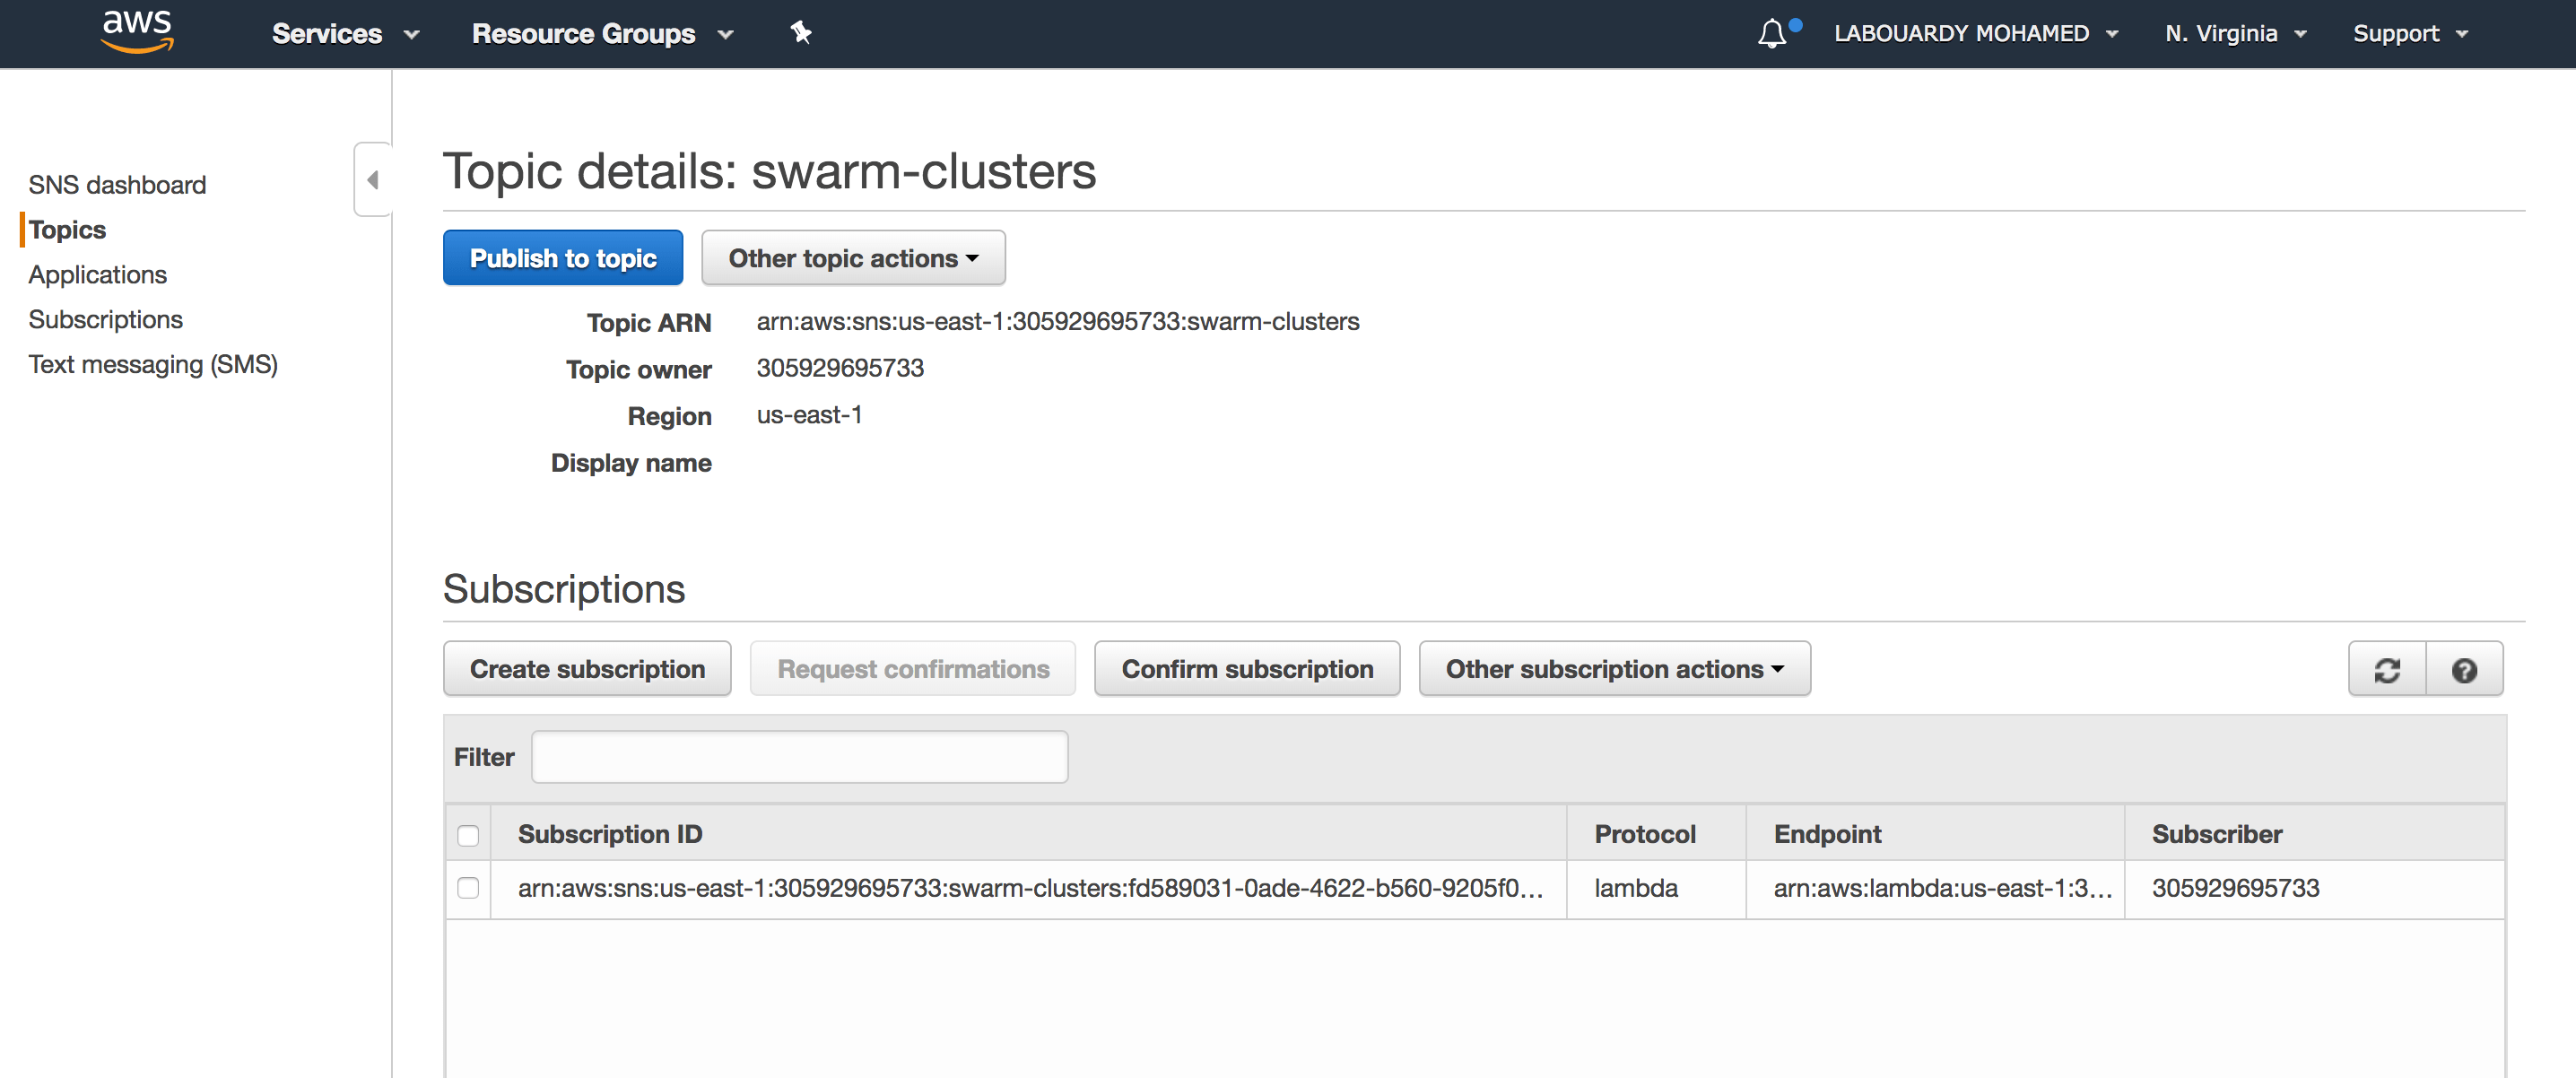
The SNS topic triggers a subscribed Lambda function:
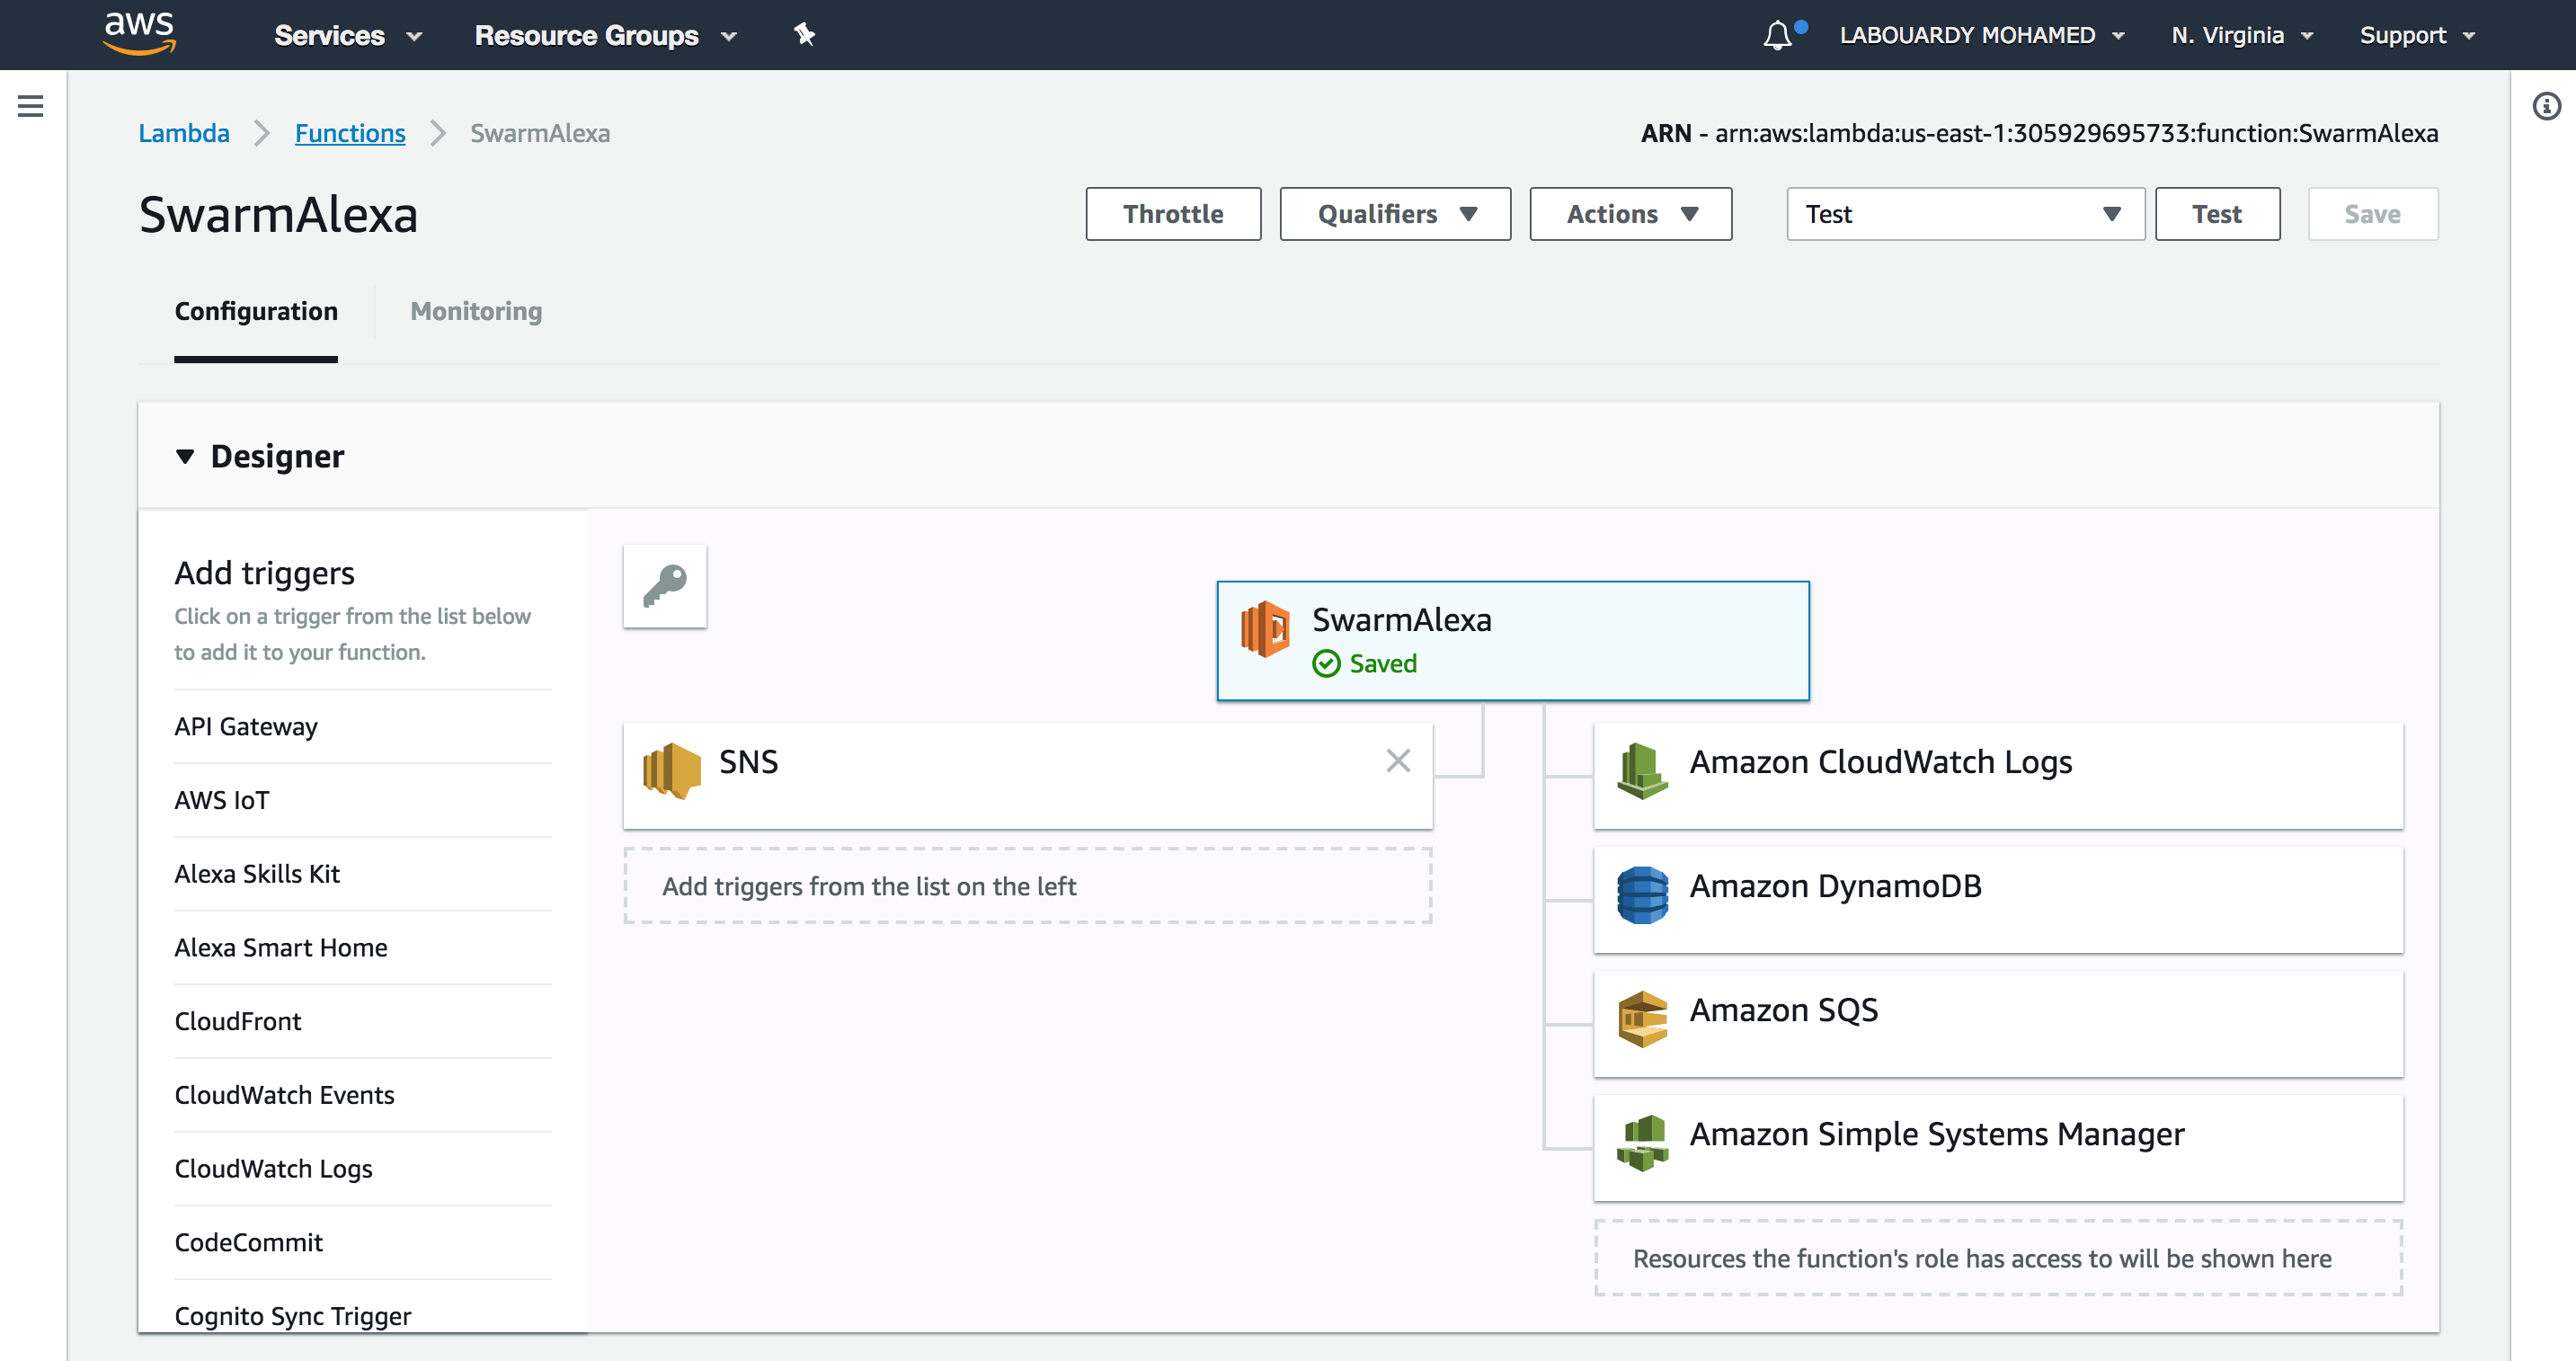
The Lambda function will pull the queue for a new cluster and use the AWS System Manager API to provision a Swarm cluster on the fleet of EC2 instances created earlier:
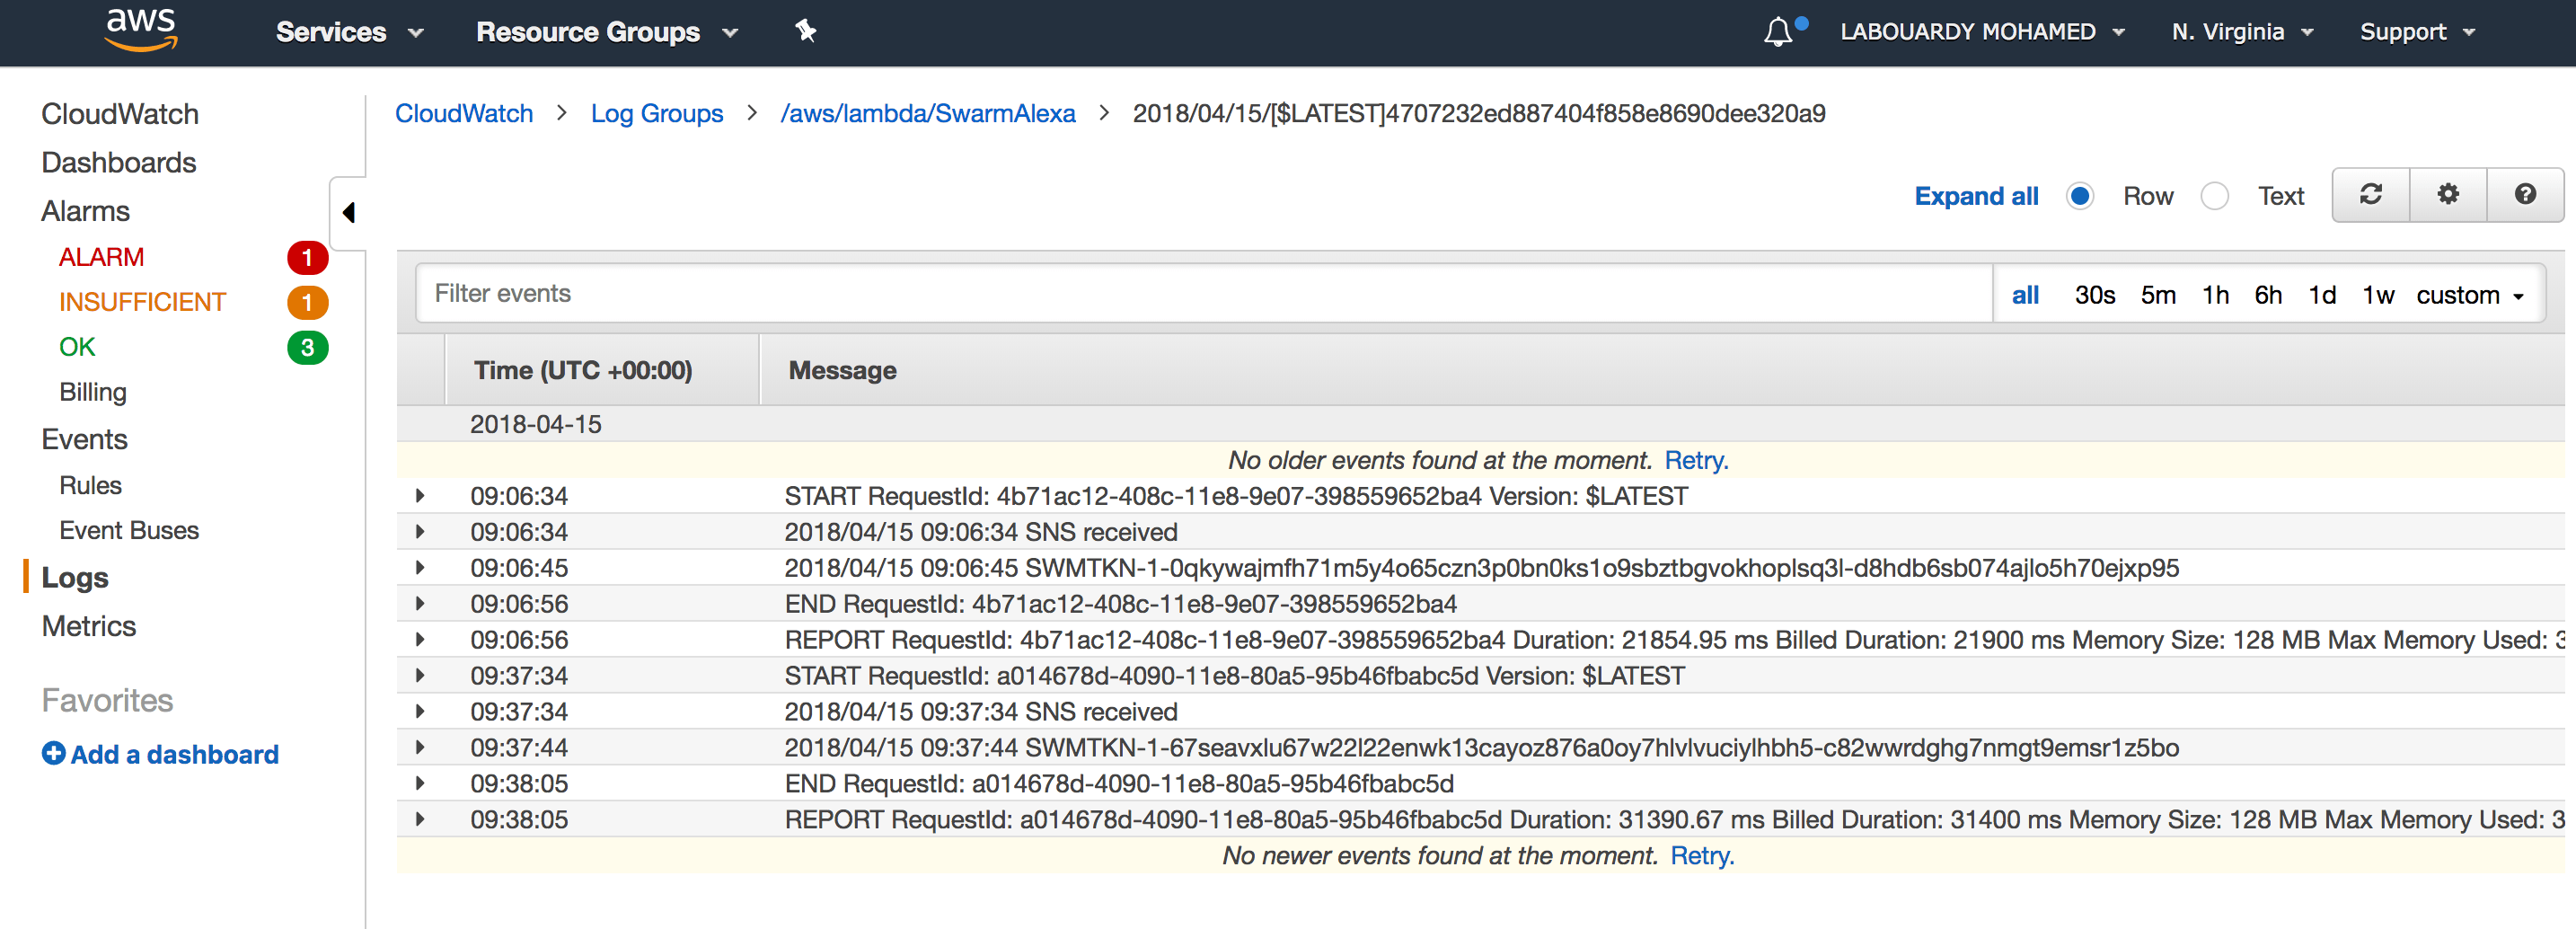
For debugging, the function will output the Swarm Token to CloudWatch:
Finally, it will update the DynamoDB item state from Pending to Done and delete the message from SQS.
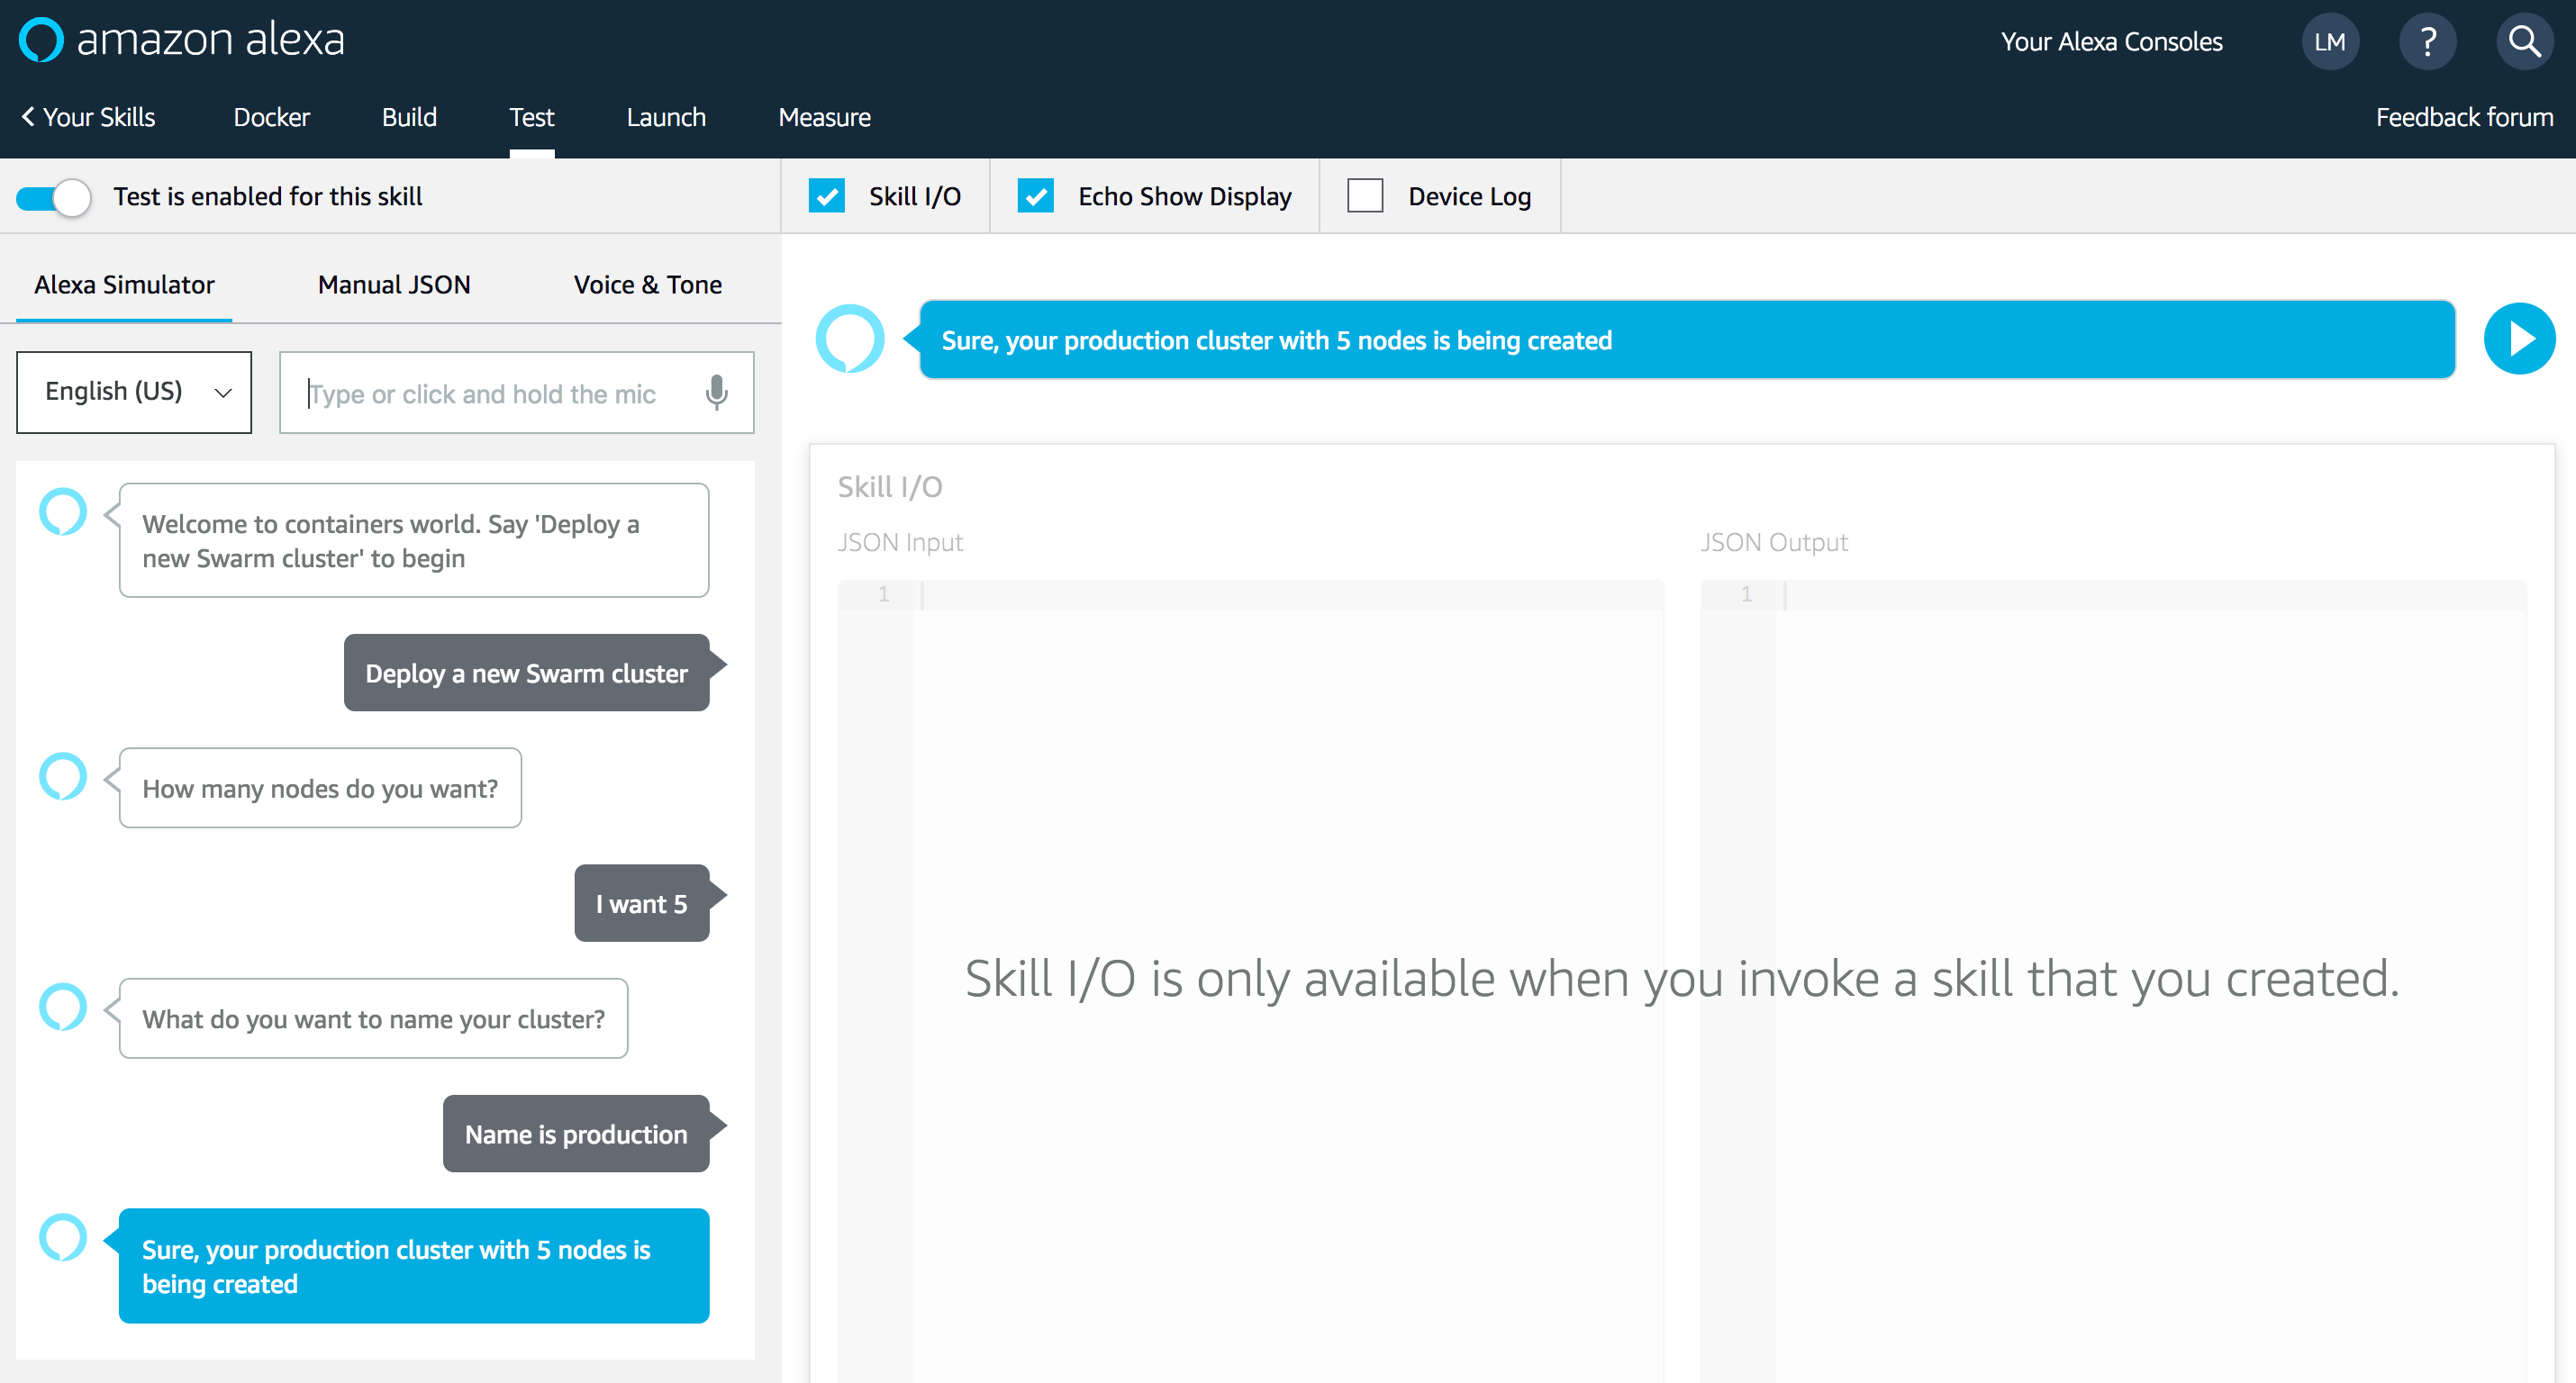
You can test your skill on your Amazon Echo, Echo Dot, or any Alexa device by saying, “Alexa, open Docker”
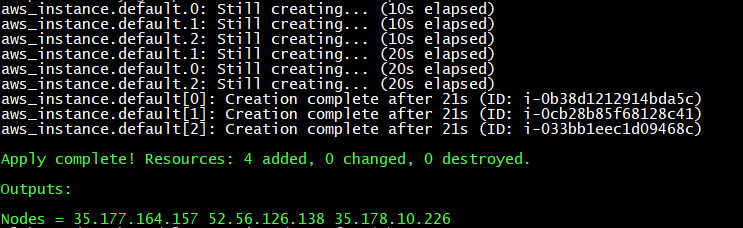
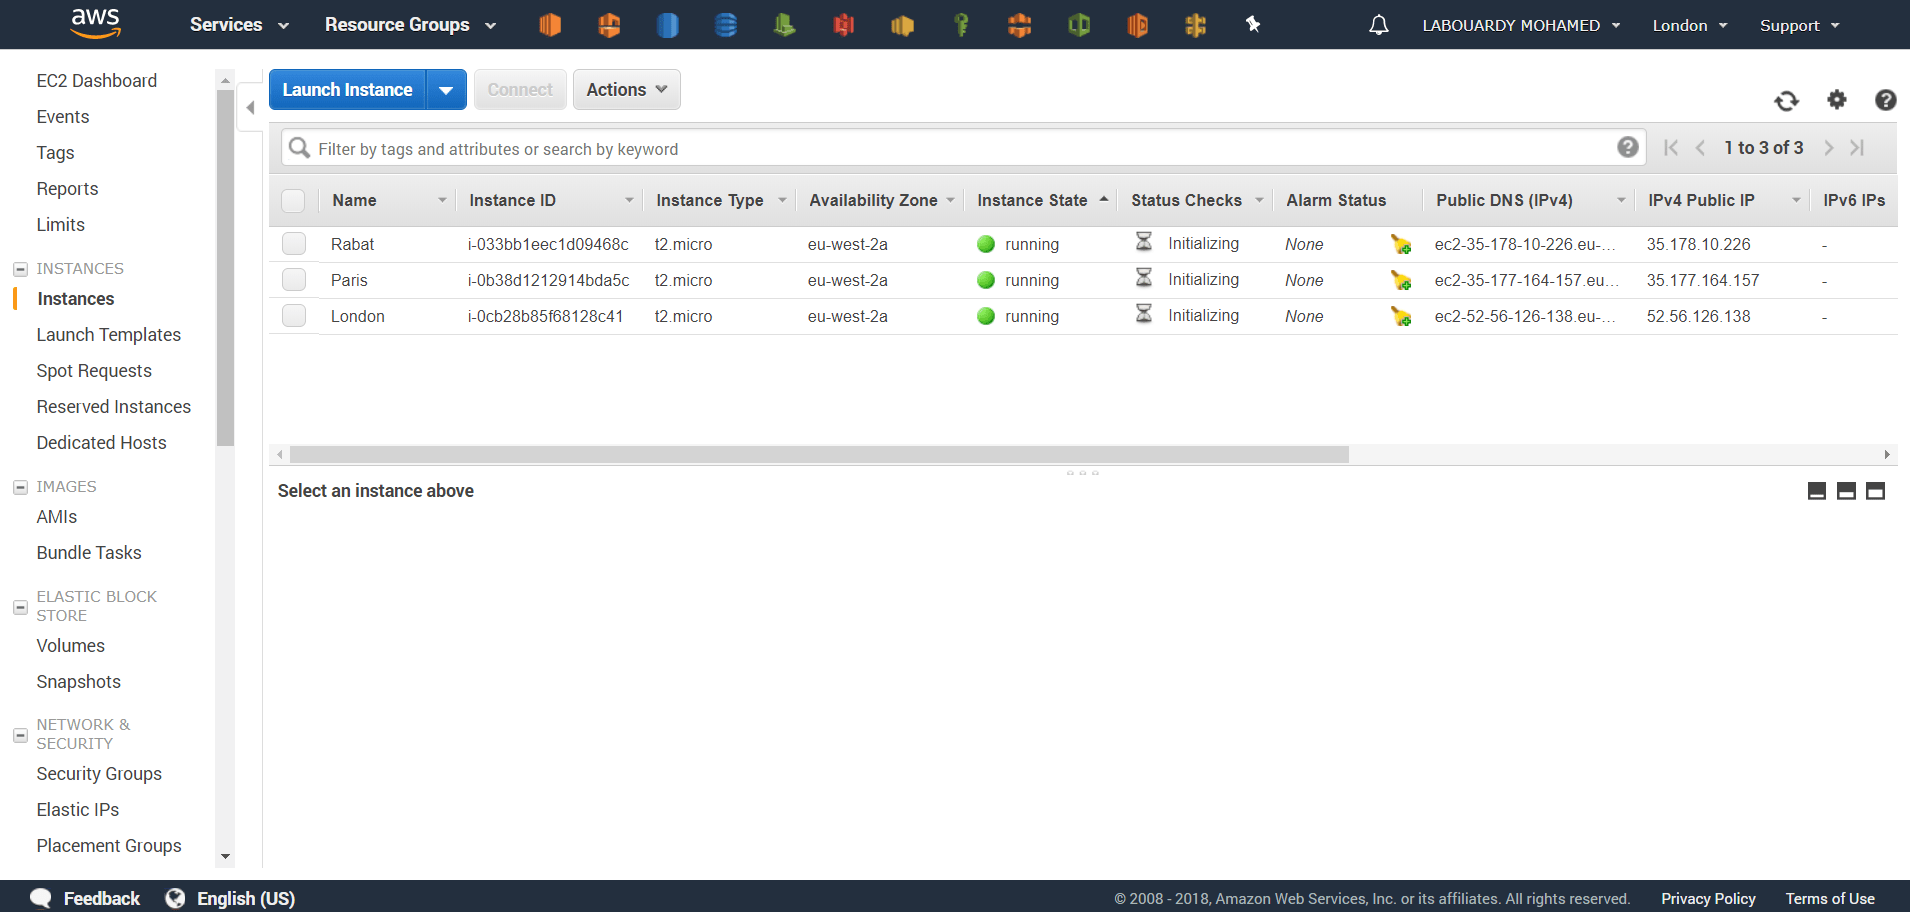
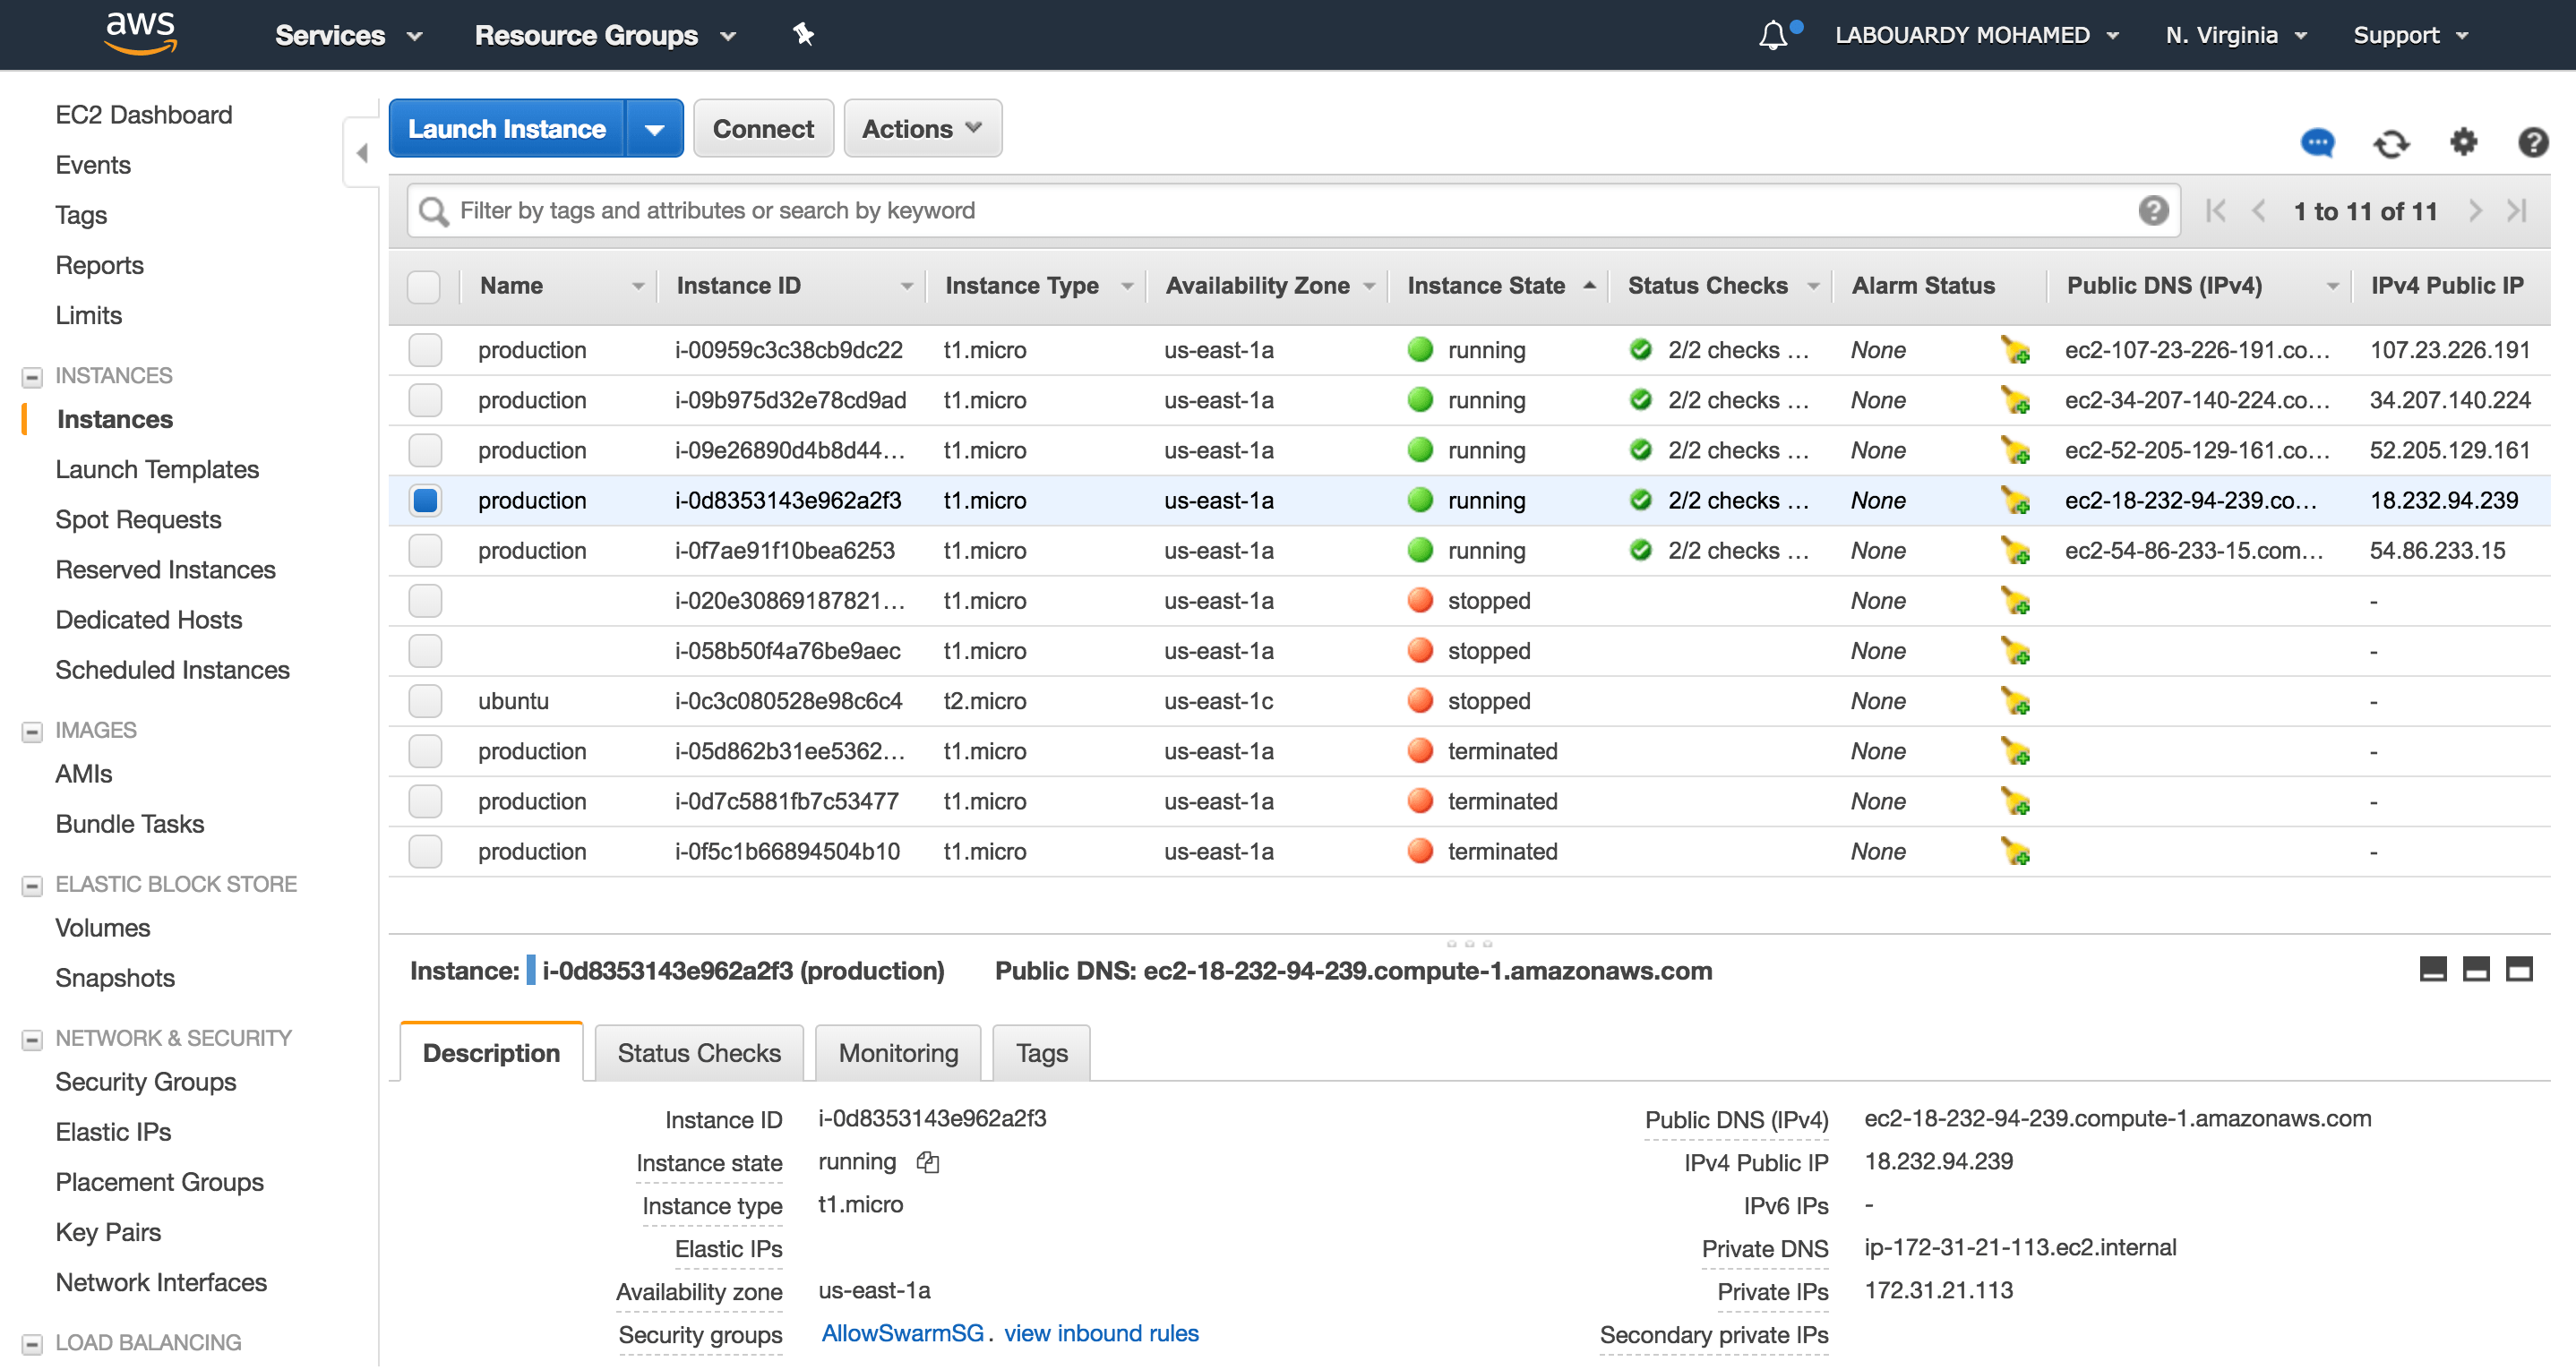
At the end of the workflow described above, a Swarm cluster will be created:
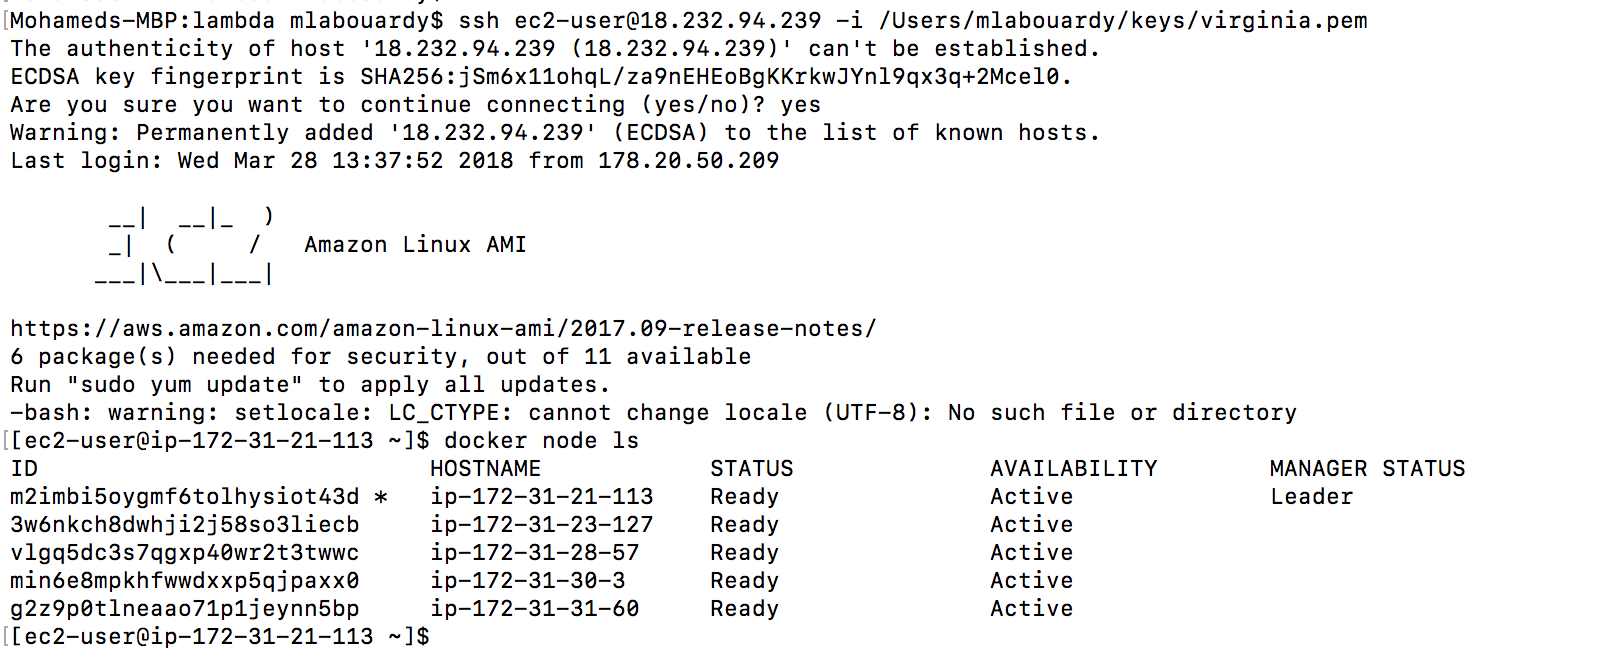
At this point you can see your Swarm status by firing the following command as shown below:
Improvements & Limitations:
Lambda execution timeout if the cluster size is huge. You can use a Master Lambda function to spawn child Lambda.
CloudWatch & SNS parts can be deleted if SQS is supported as Lambda event source (AWS PLEAAASE !). DynamoDB streams or Kinesis streams cannot be used to notify Lambda as I wanted to create some kind of delay for the instances to be fully created before setting up the Swarm cluster. (maybe Simple Workflow Service ?)
Inject SNS before SQS. SNS can add the message to SQS and trigger the Lambda function. We won’t need CloudWatch Alarm.
You can improve the Skill by adding new custom intents to deploy Docker containers on the cluster or ask Alexa to deploy the cluster on a VPC …
In-depth details about the skill can be found on my GitHub. Make sure to drop your comments, feedback, or suggestions below — or connect with me directly on Twitter @mlabouardy.
Being an AWS Certified can boost your career (increasing your salary, finding better job or getting a promotion) and make your expertise and skills relevant. Hence, there’s no better way to prepare for your AWS Certified Developer Associate exam than getting your hands dirty and build a Serverless Quiz game with Alexa Skill and AWS Lambda.
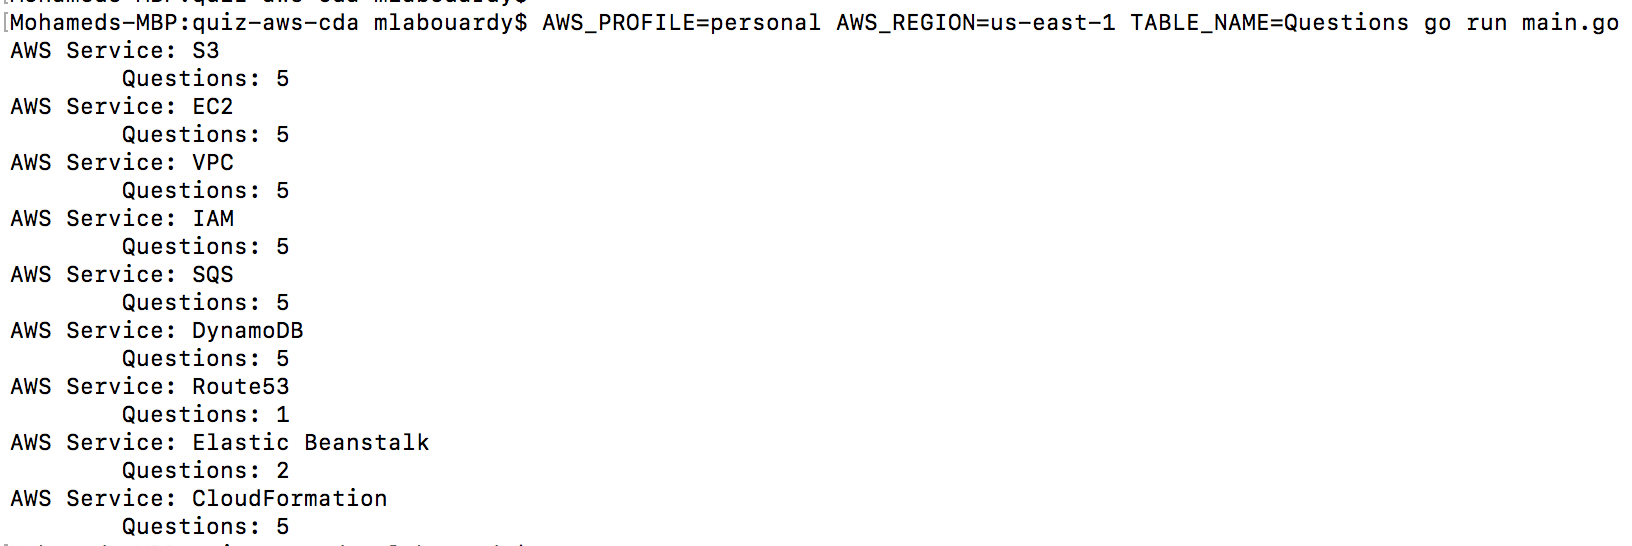
[ { "category" : "S3", "questions" : [ { "question": "In S3 what can be used to delete a large number of objects", "answers" : { "A" : "QuickDelete", "B" : "Multi-Object Delete", "C" : "Multi-S3 Delete", "D" : "There is no such option available" }, "correct" : "B" }, { "question": "S3 buckets can contain both encrypted and non-encrypted objects", "answers" : { "A" : "False", "B" : "True" }, "correct" : "B" } ] } ]
Run the main.go file by issuing the following command:
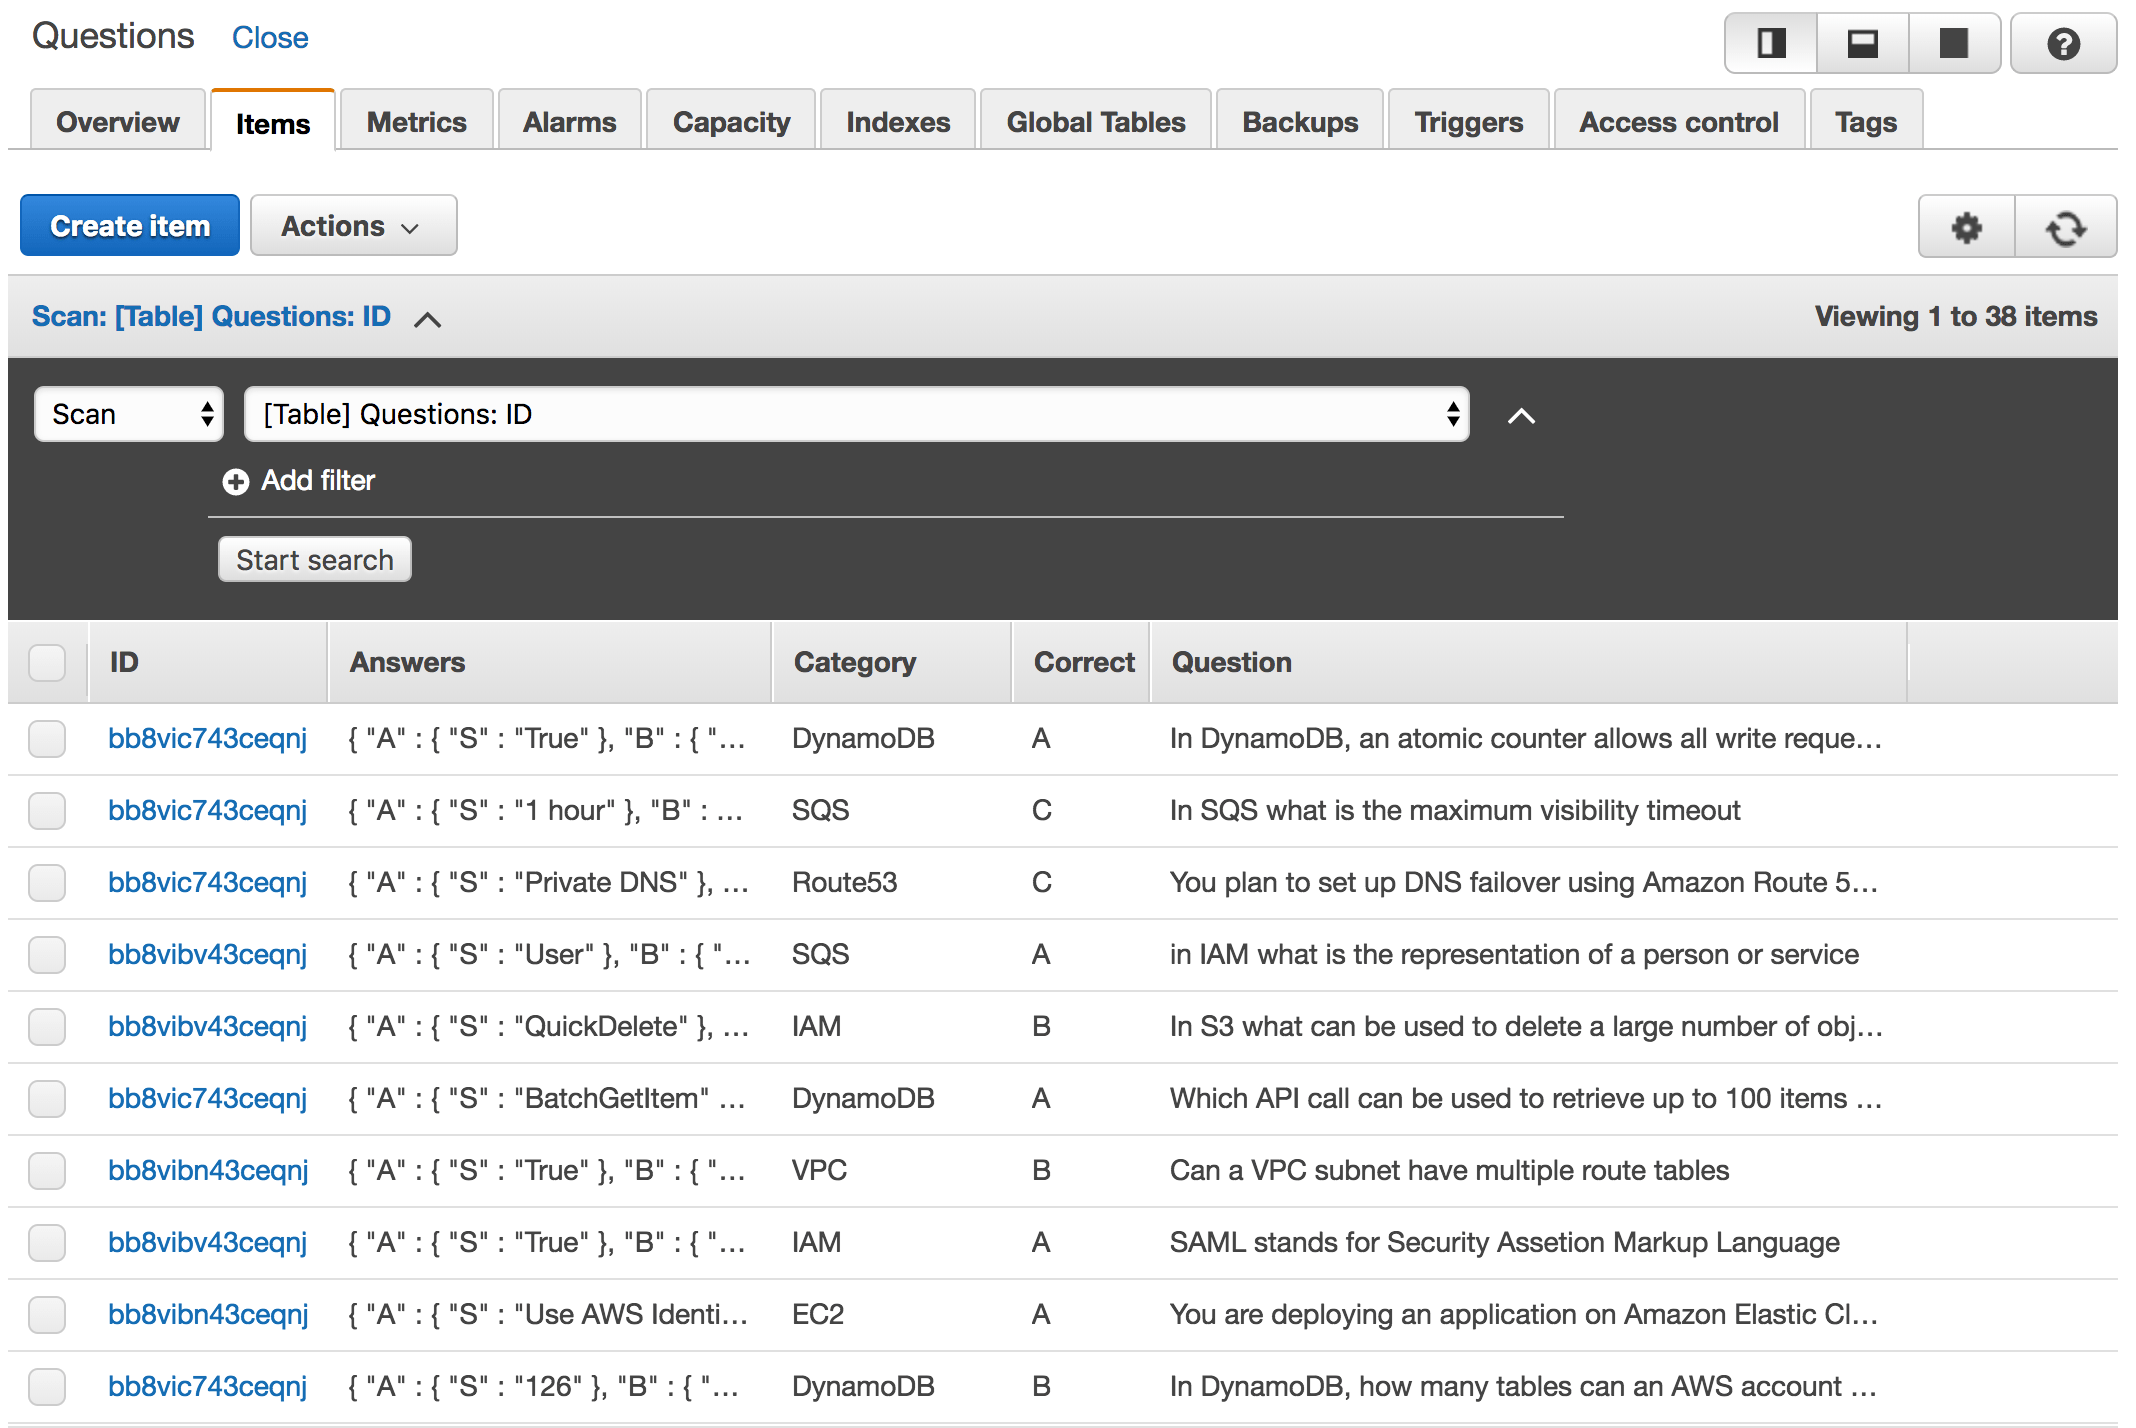
If you navigate to DynamoDB Dashboard, you should see that the list of questions has been successfully inserted:
2 – Alexa Skill
This is what ties it all together, by linking the phrases the user says to interact with the quiz to the intents.
For people who are not familiar with NLP. Alexa is based on an NLP Engine which is a system that analyses phrases (users messages) and returns an intent. Intents describe what a user want or want to do. It is the intention behind his message. Alexa can learn new intents by attributing examples of messages to an intent. Behind the scenes, the Engine will be able to predict the intent even if he had never seen it before.
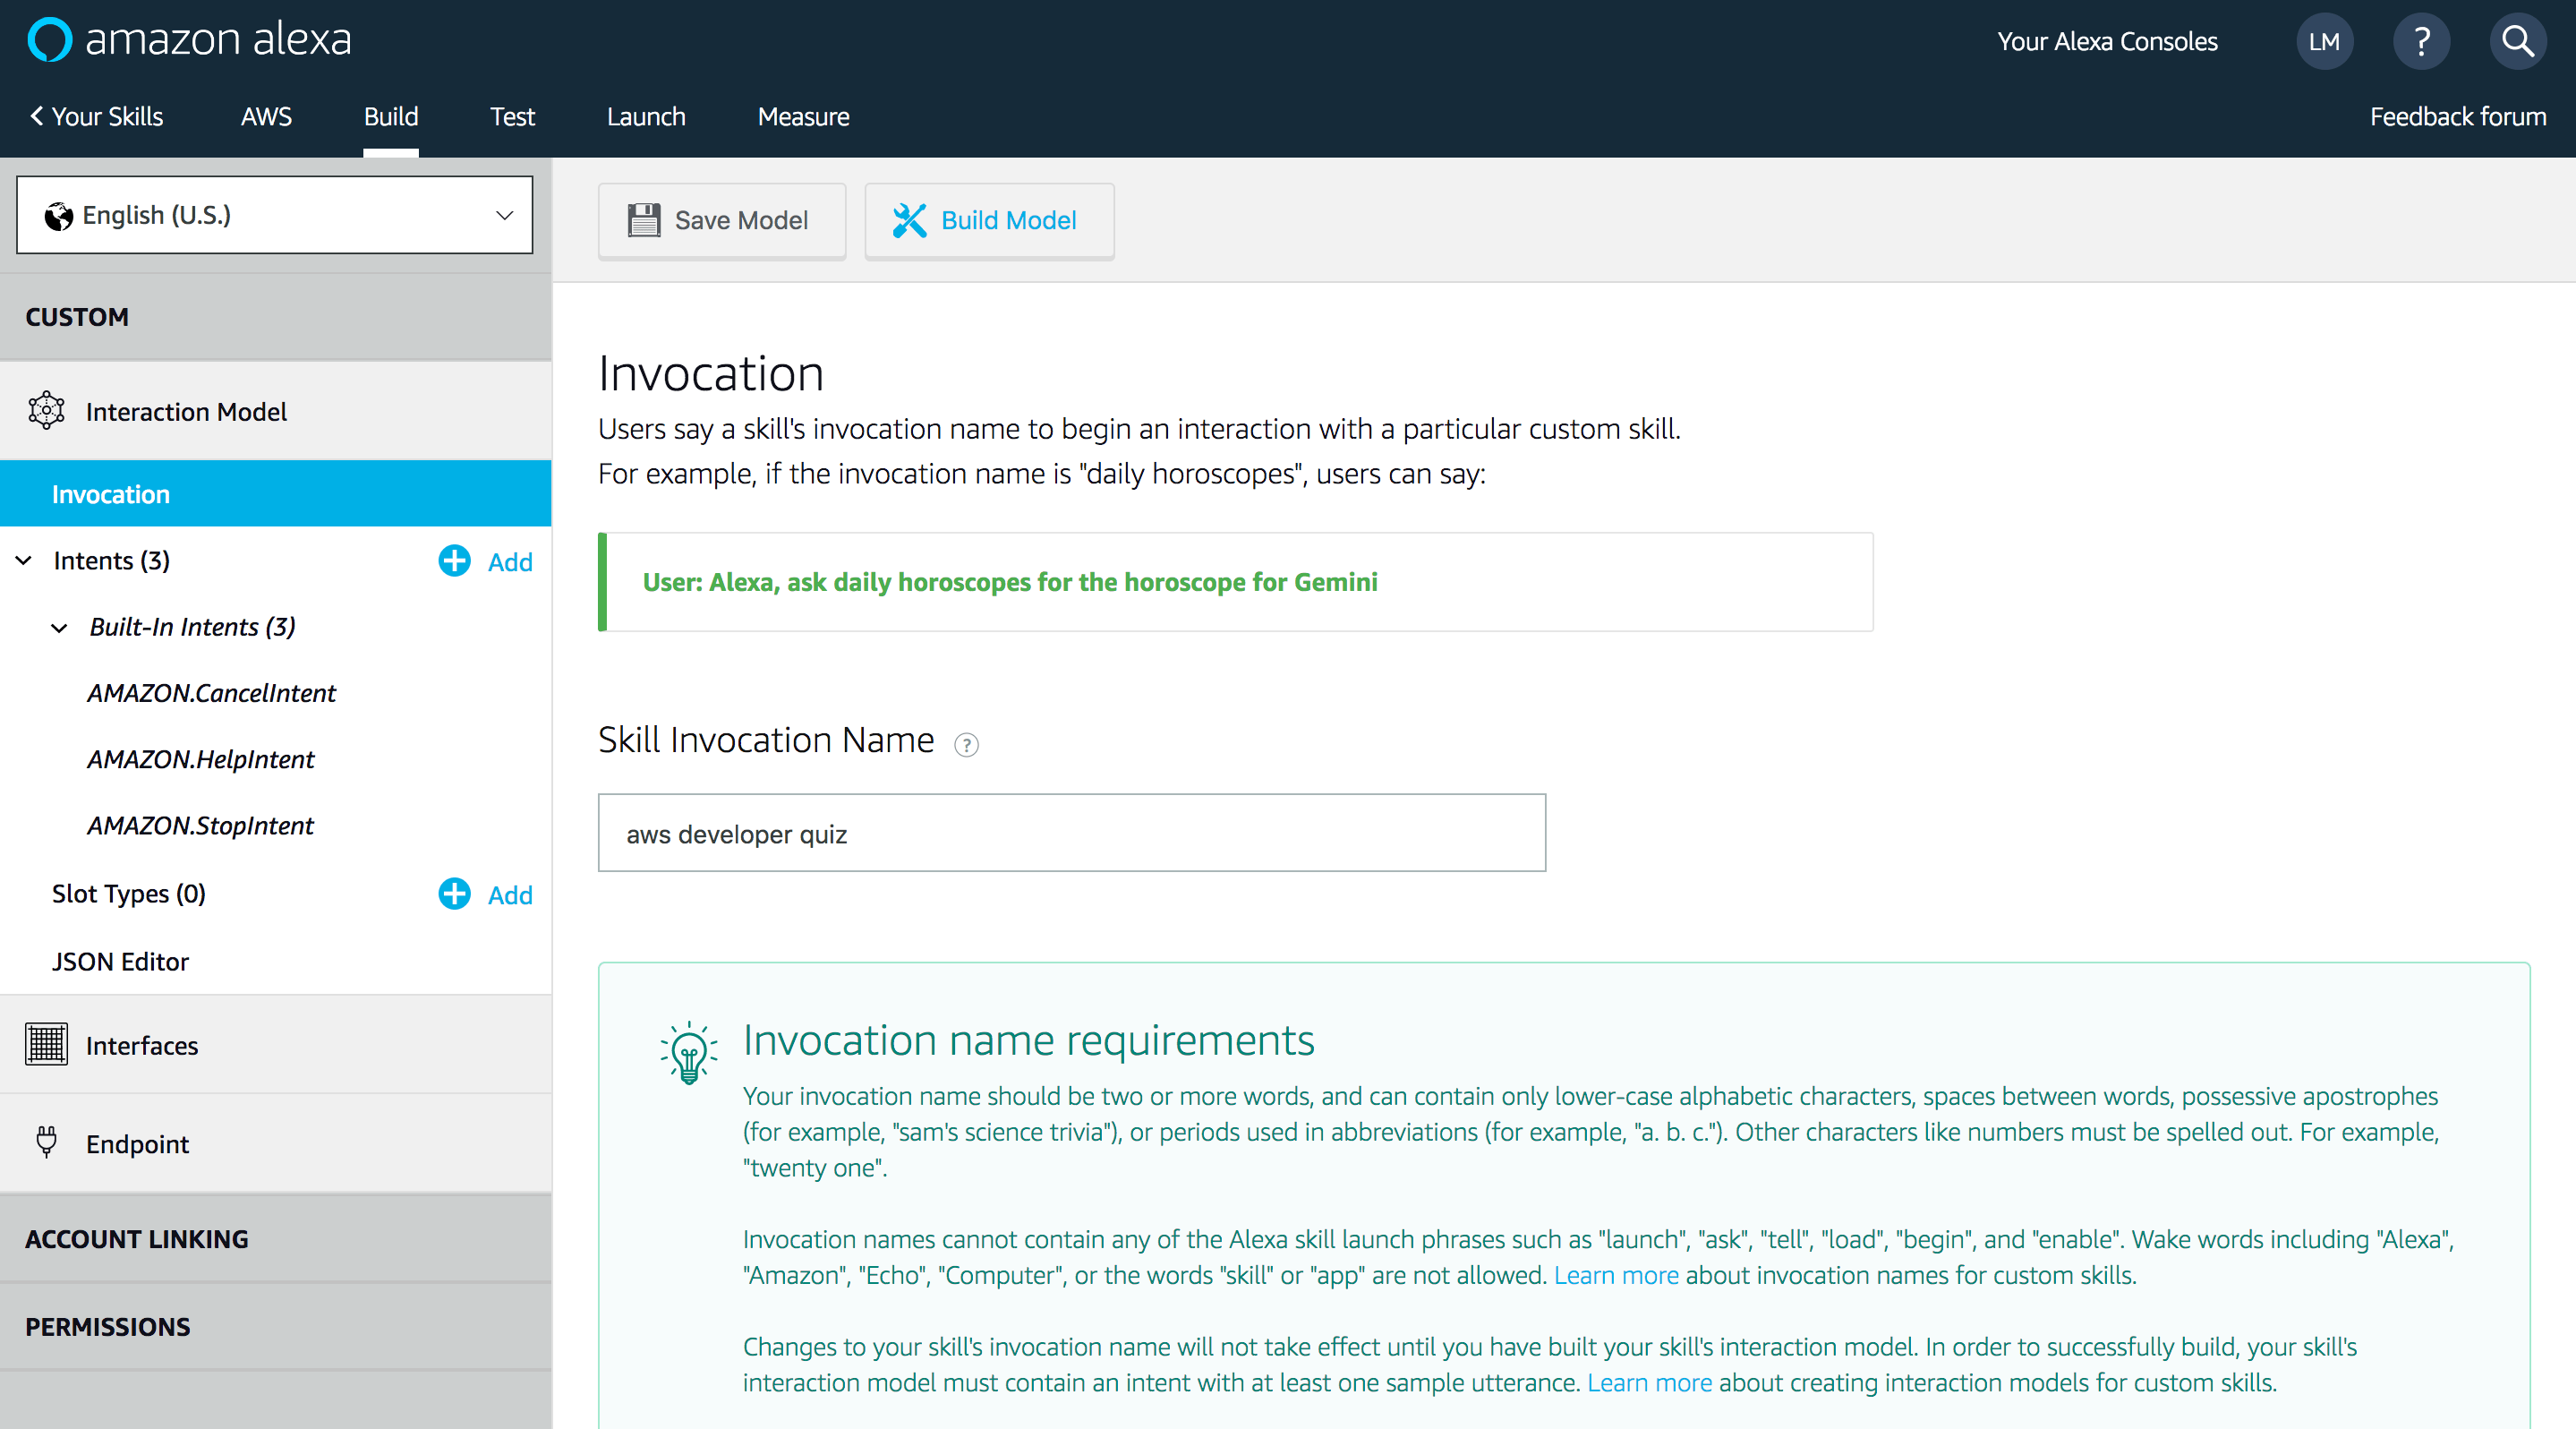
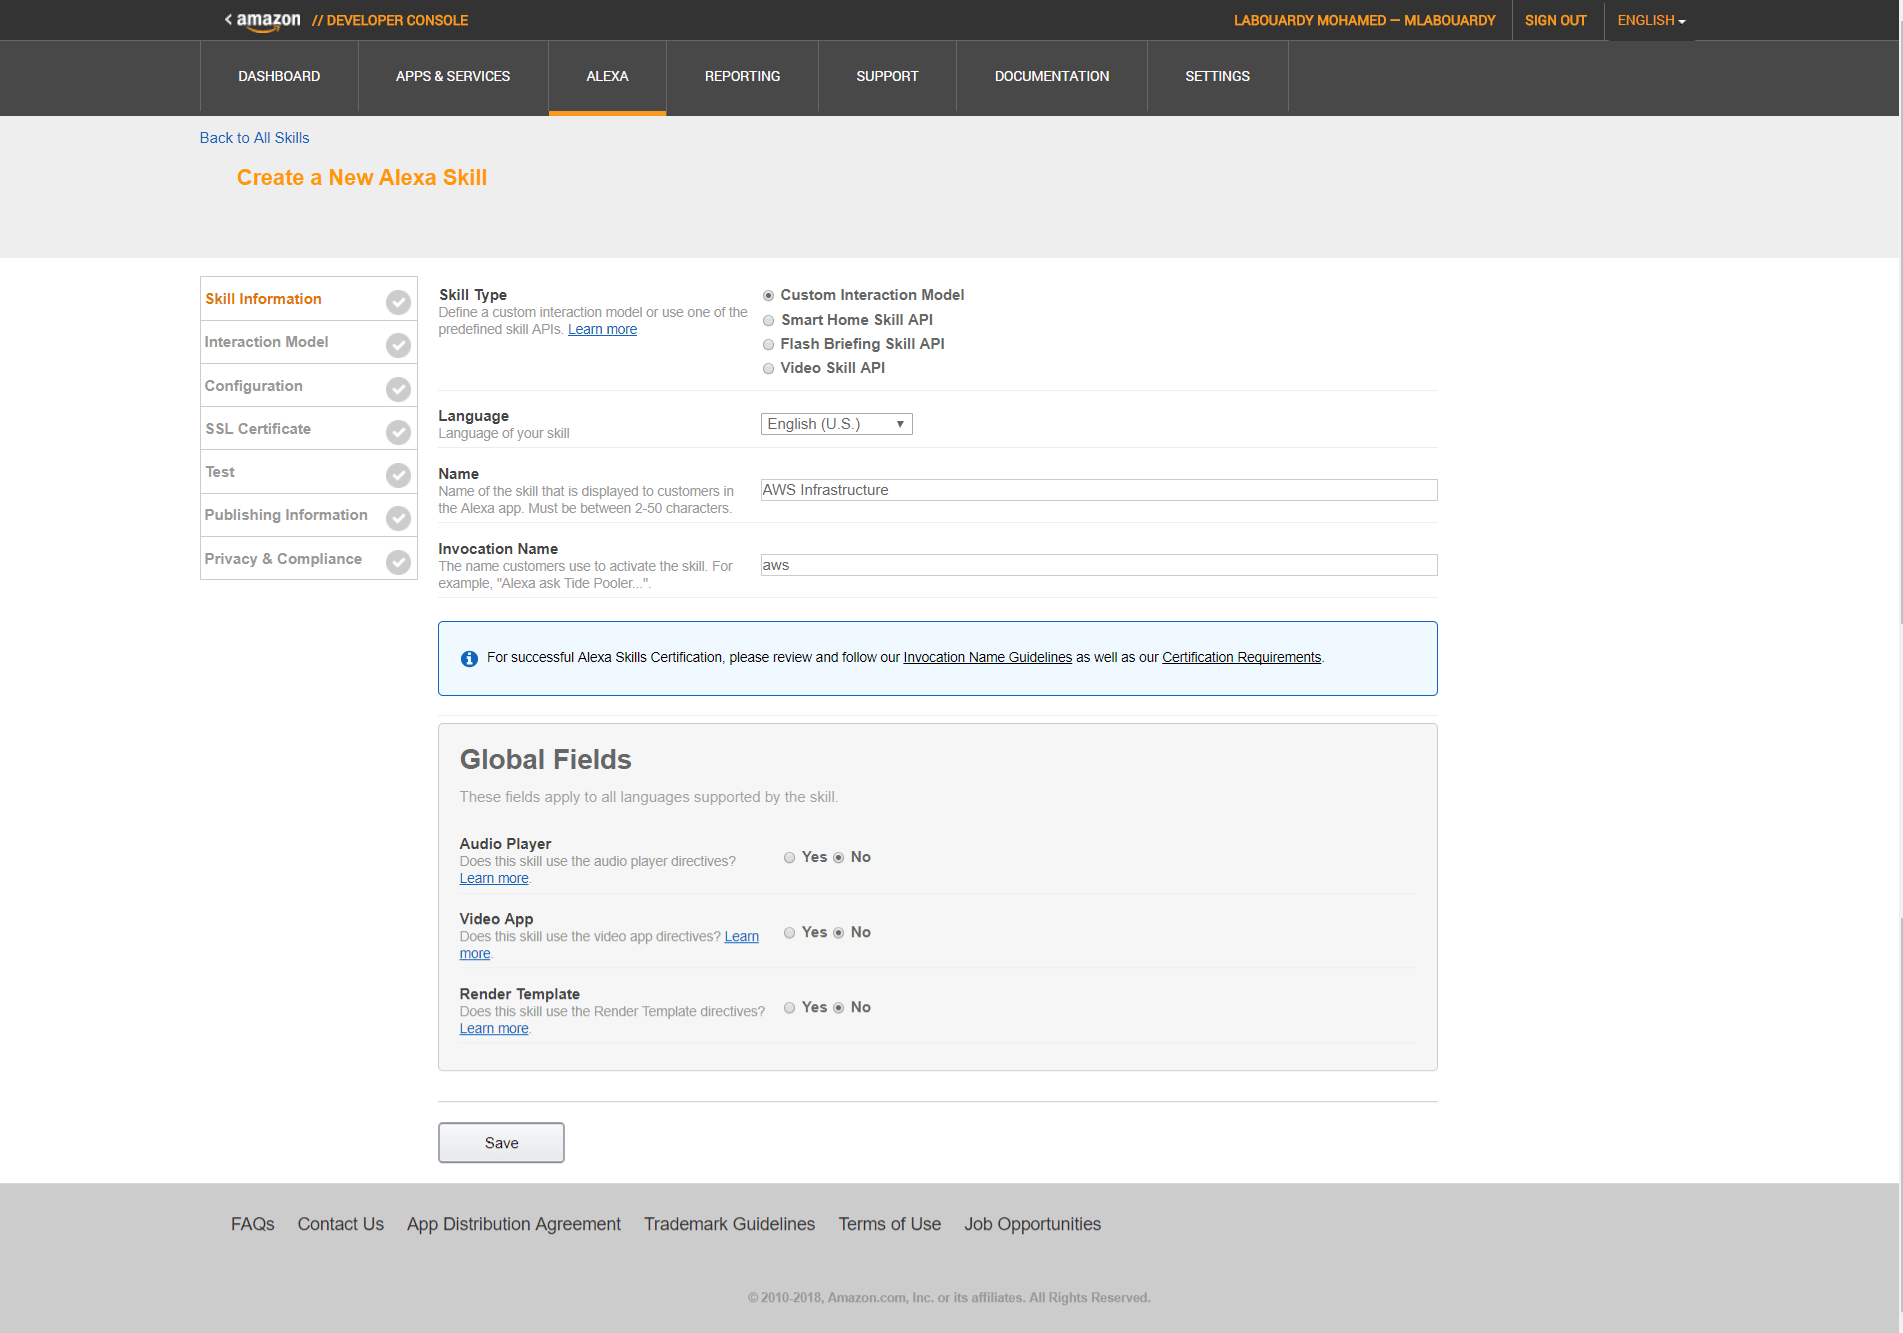
So, sign up to Amazon Developer Console, and create a new custom Alexa Skill. Set an invocation name as follows:
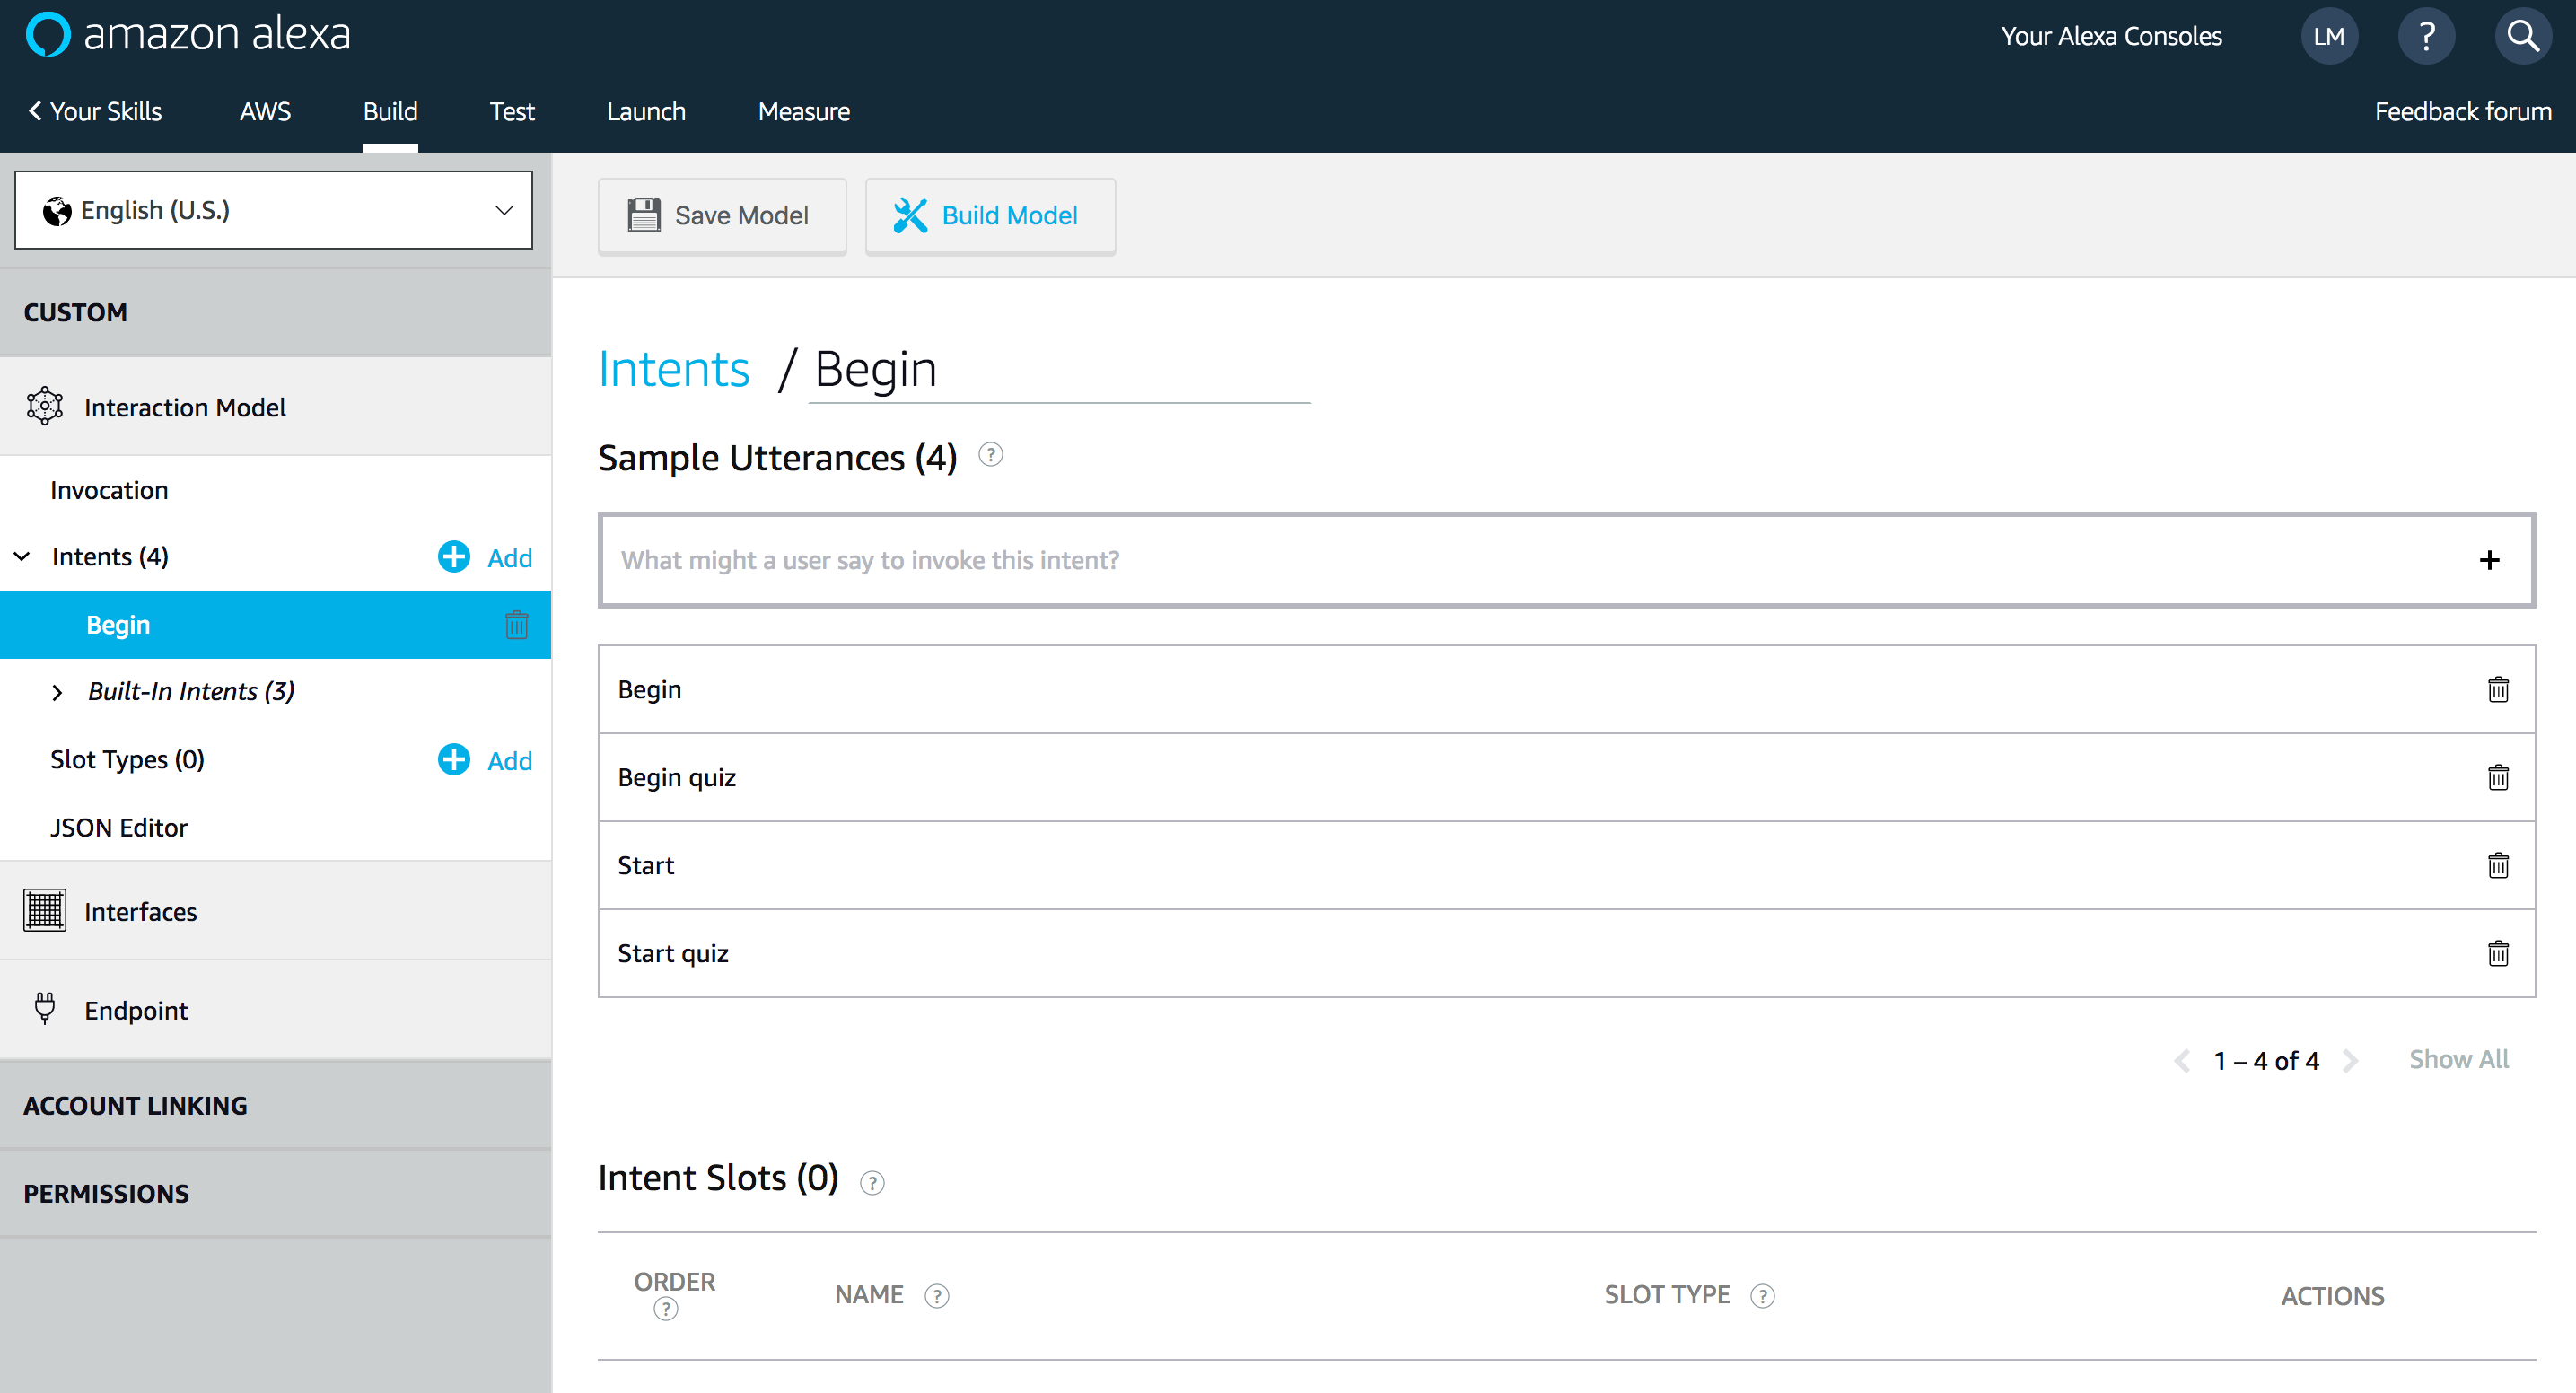
Create a new Intent for starting the Quiz:
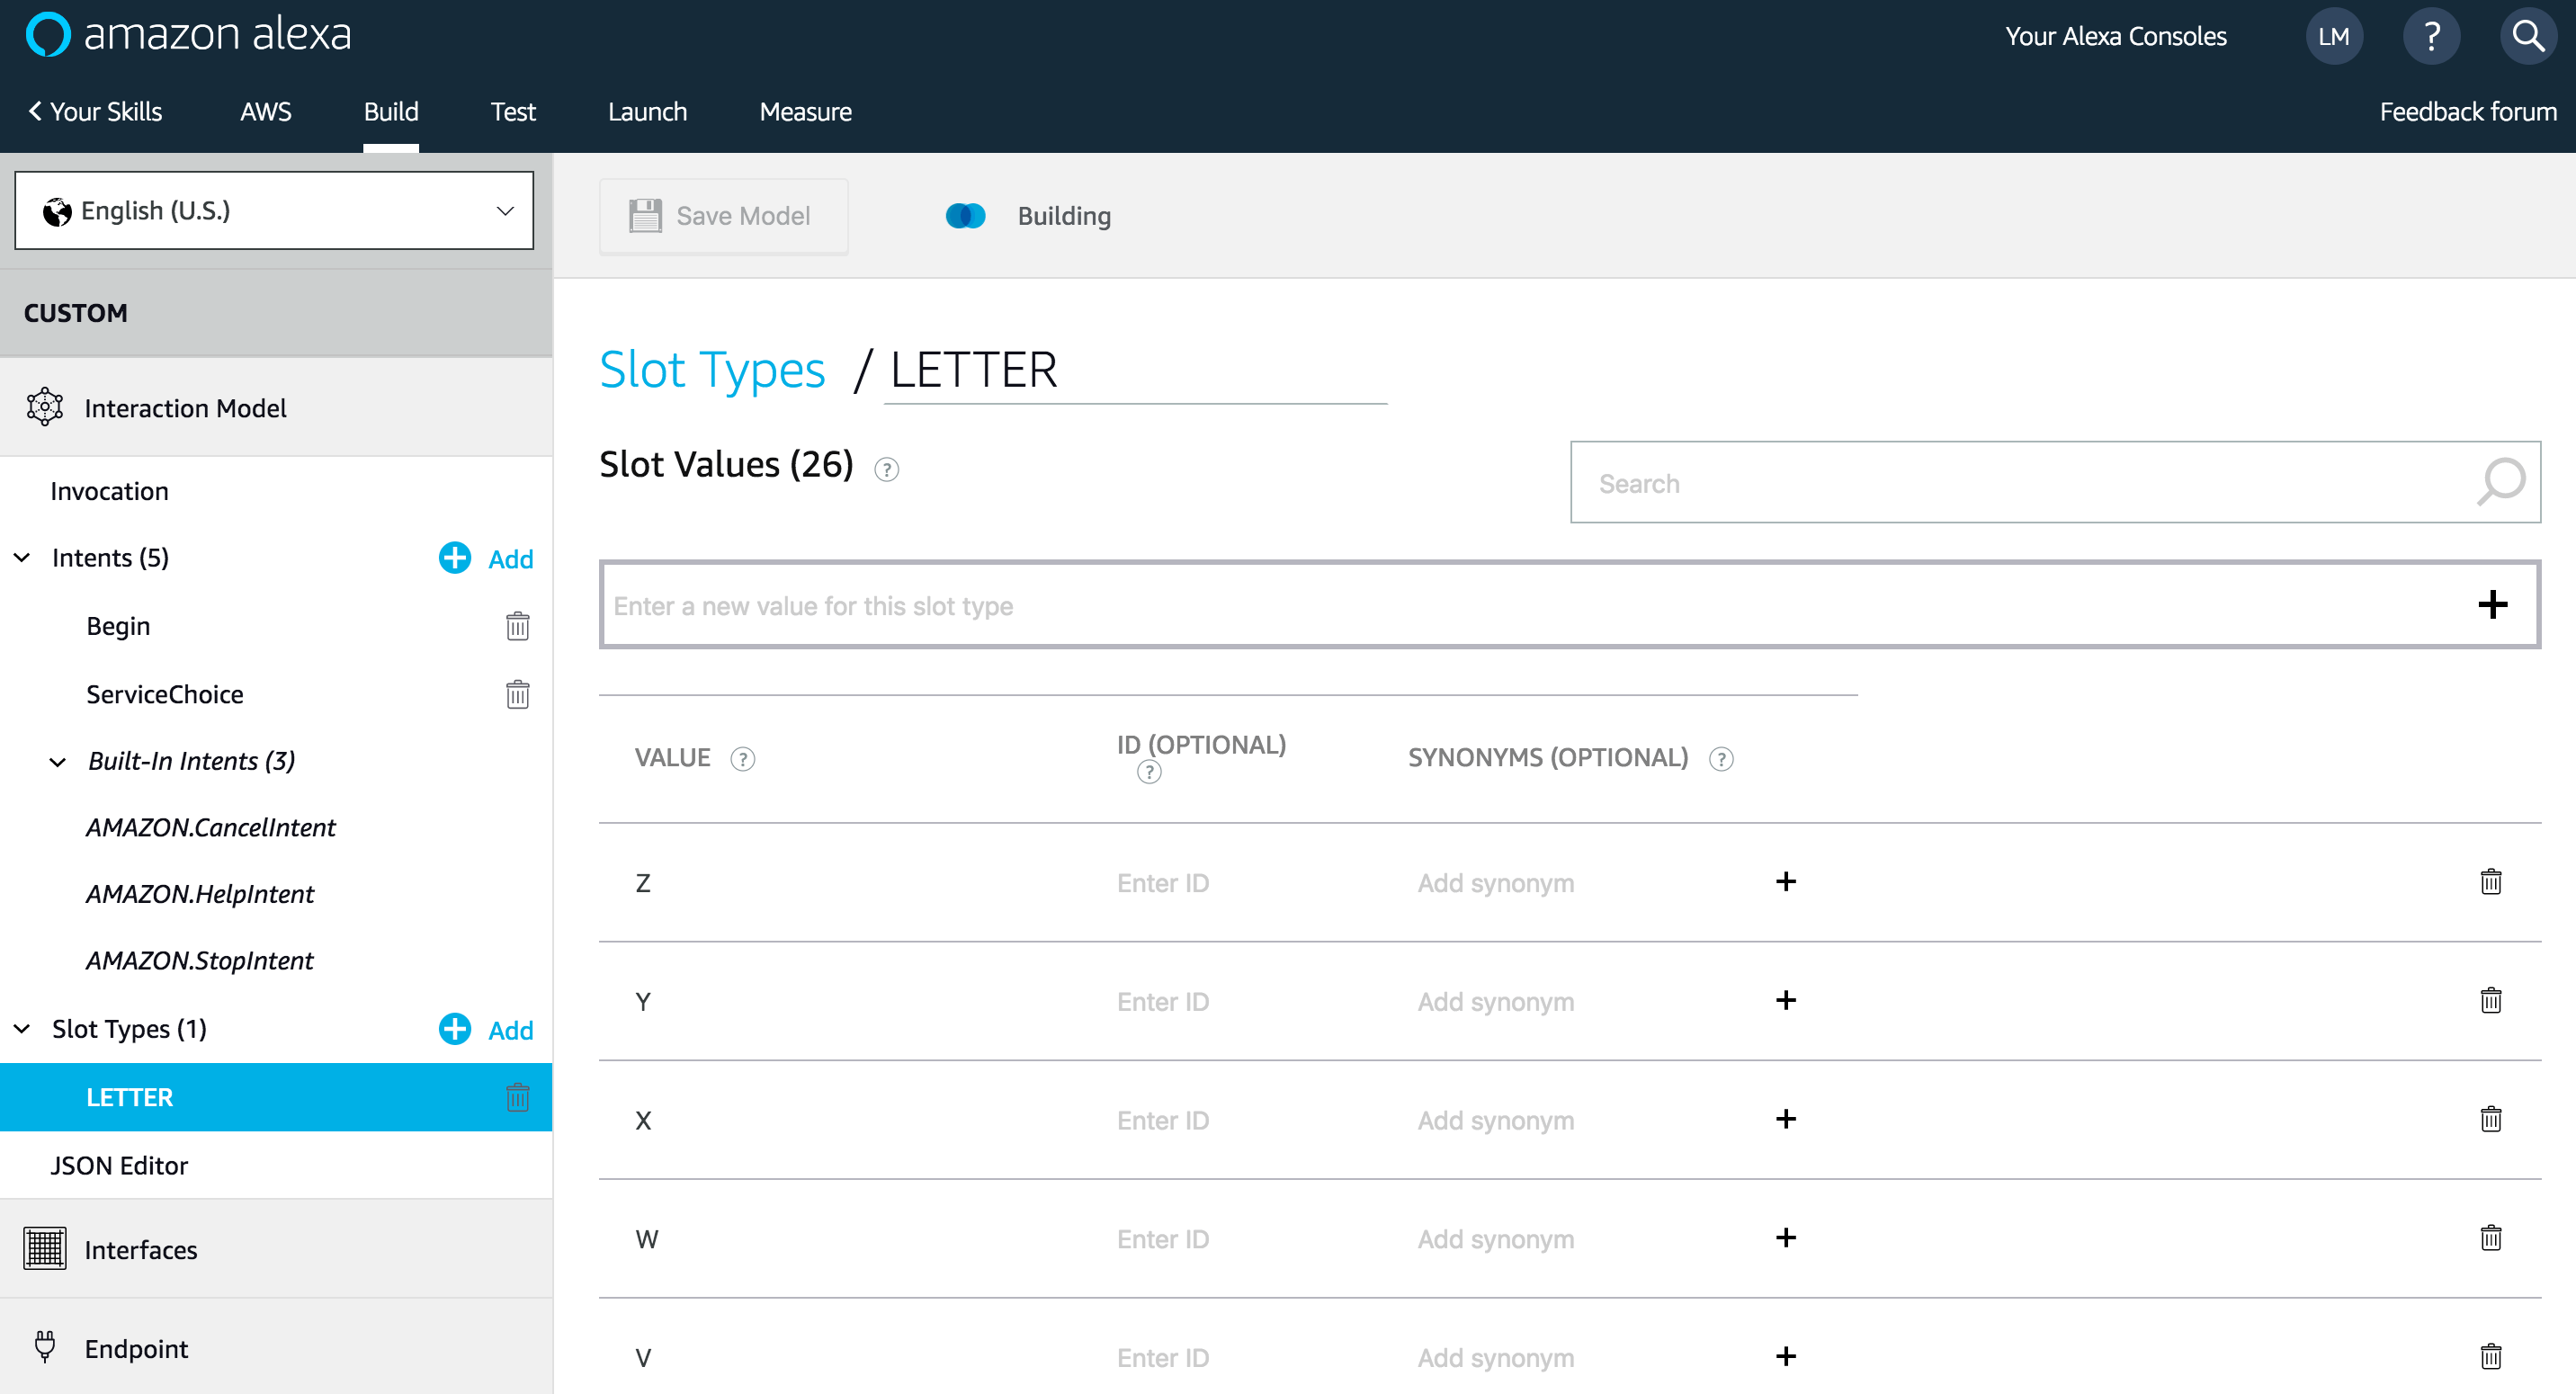
Add a new type “Slot” to store user choice:
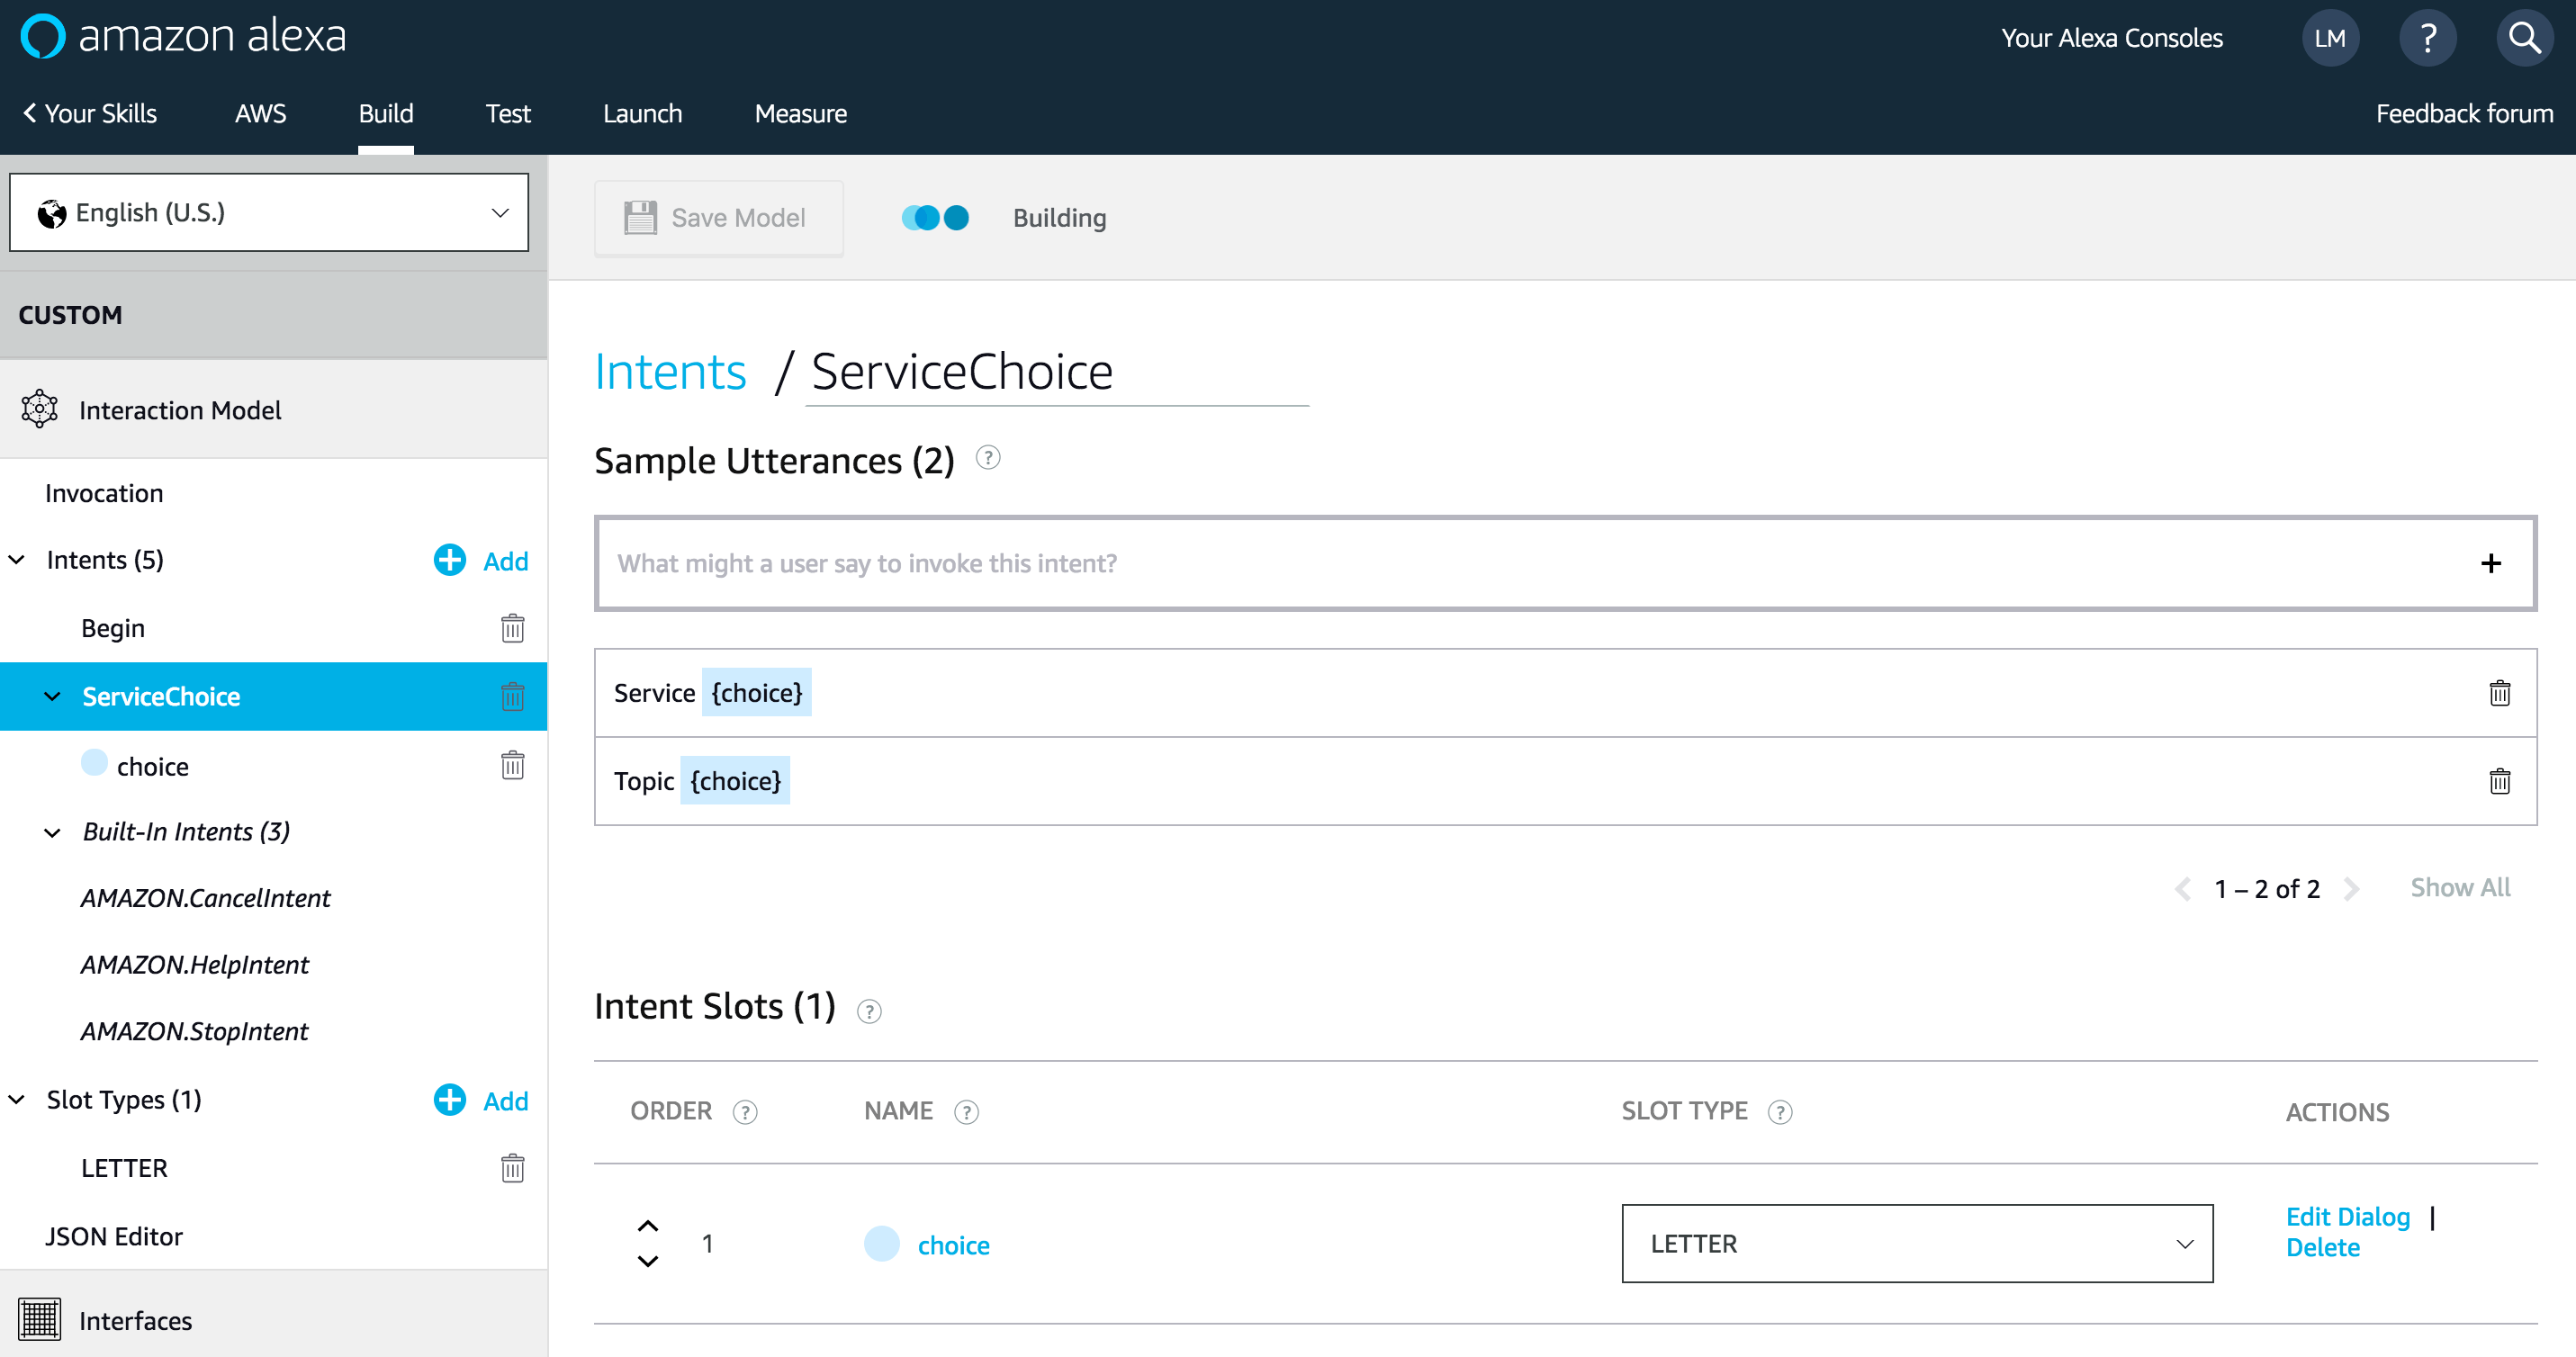
Then, create another intent for AWS service choice:
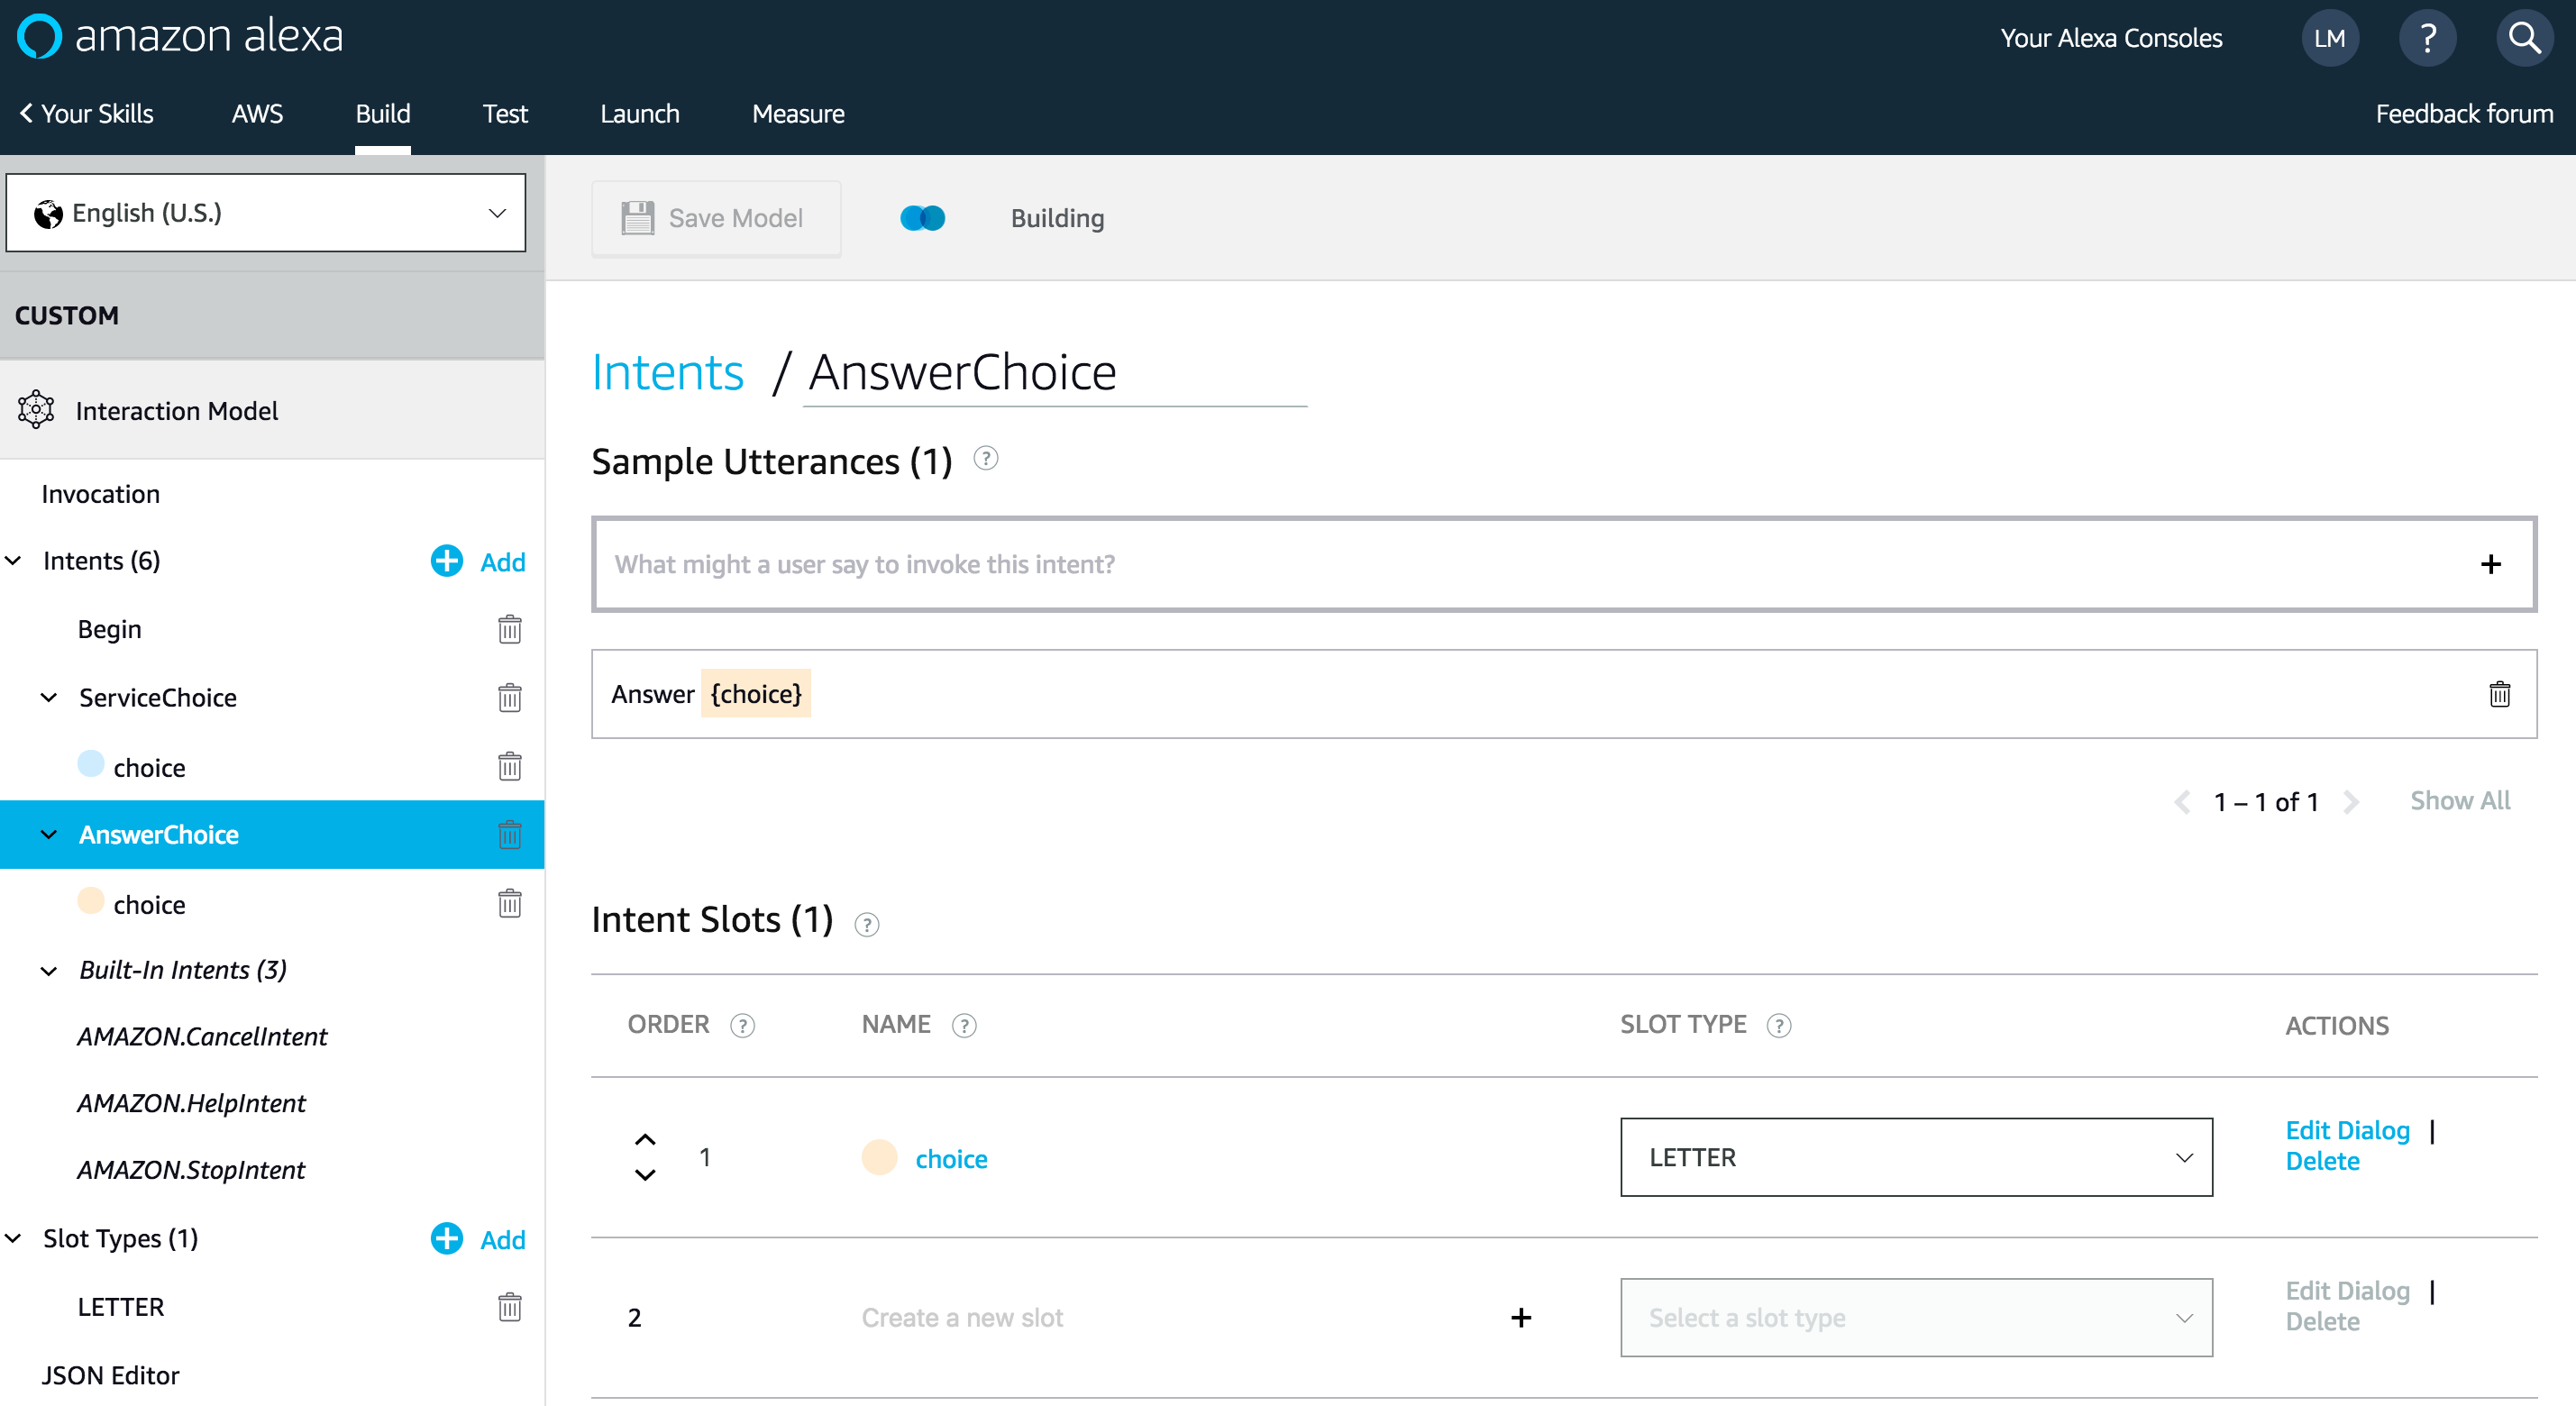
And for user’s answer choice:
Save your interaction model. Then, you’re ready to configure your Alexa Skill.
3 – Lambda Function
The Lambda handler function is self explanatory, it maps each intent to a code snippet. To keep track of the user’s score. We use Alexa sessionAttributes property of the JSON response. The session attributes will then be passed back to you with the next request JSON inside the session’s object. The list of questions is retrieved from DynamoDB using AWS SDK and SSML (Speech Synthesis Markup Language) is used to make Alexa speaks a sentence ending in a question mark as a question or add pause in the speech:
funcHandleRequest(ctx context.Context, r AlexaRequest)(AlexaResponse, error) { resp := CreateResponse()
switch r.Request.Intent.Name { case"Begin": resp.Say(`<speak> Choose the AWS service you want to be tested on <break time="1s"/> A <break time="1s"/> EC2 <break time="1s"/> B <break time="1s"/> VPC <break time="1s"/> C <break time="1s"/> DynamoDB <break time="1s"/> D <break time="1s"/> S3 <break time="1s"/> E <break time="1s"/> SQS </speak>`, false, "SSML") case"ServiceChoice": number := strings.TrimSuffix(r.Request.Intent.Slots["choice"].Value, ".")
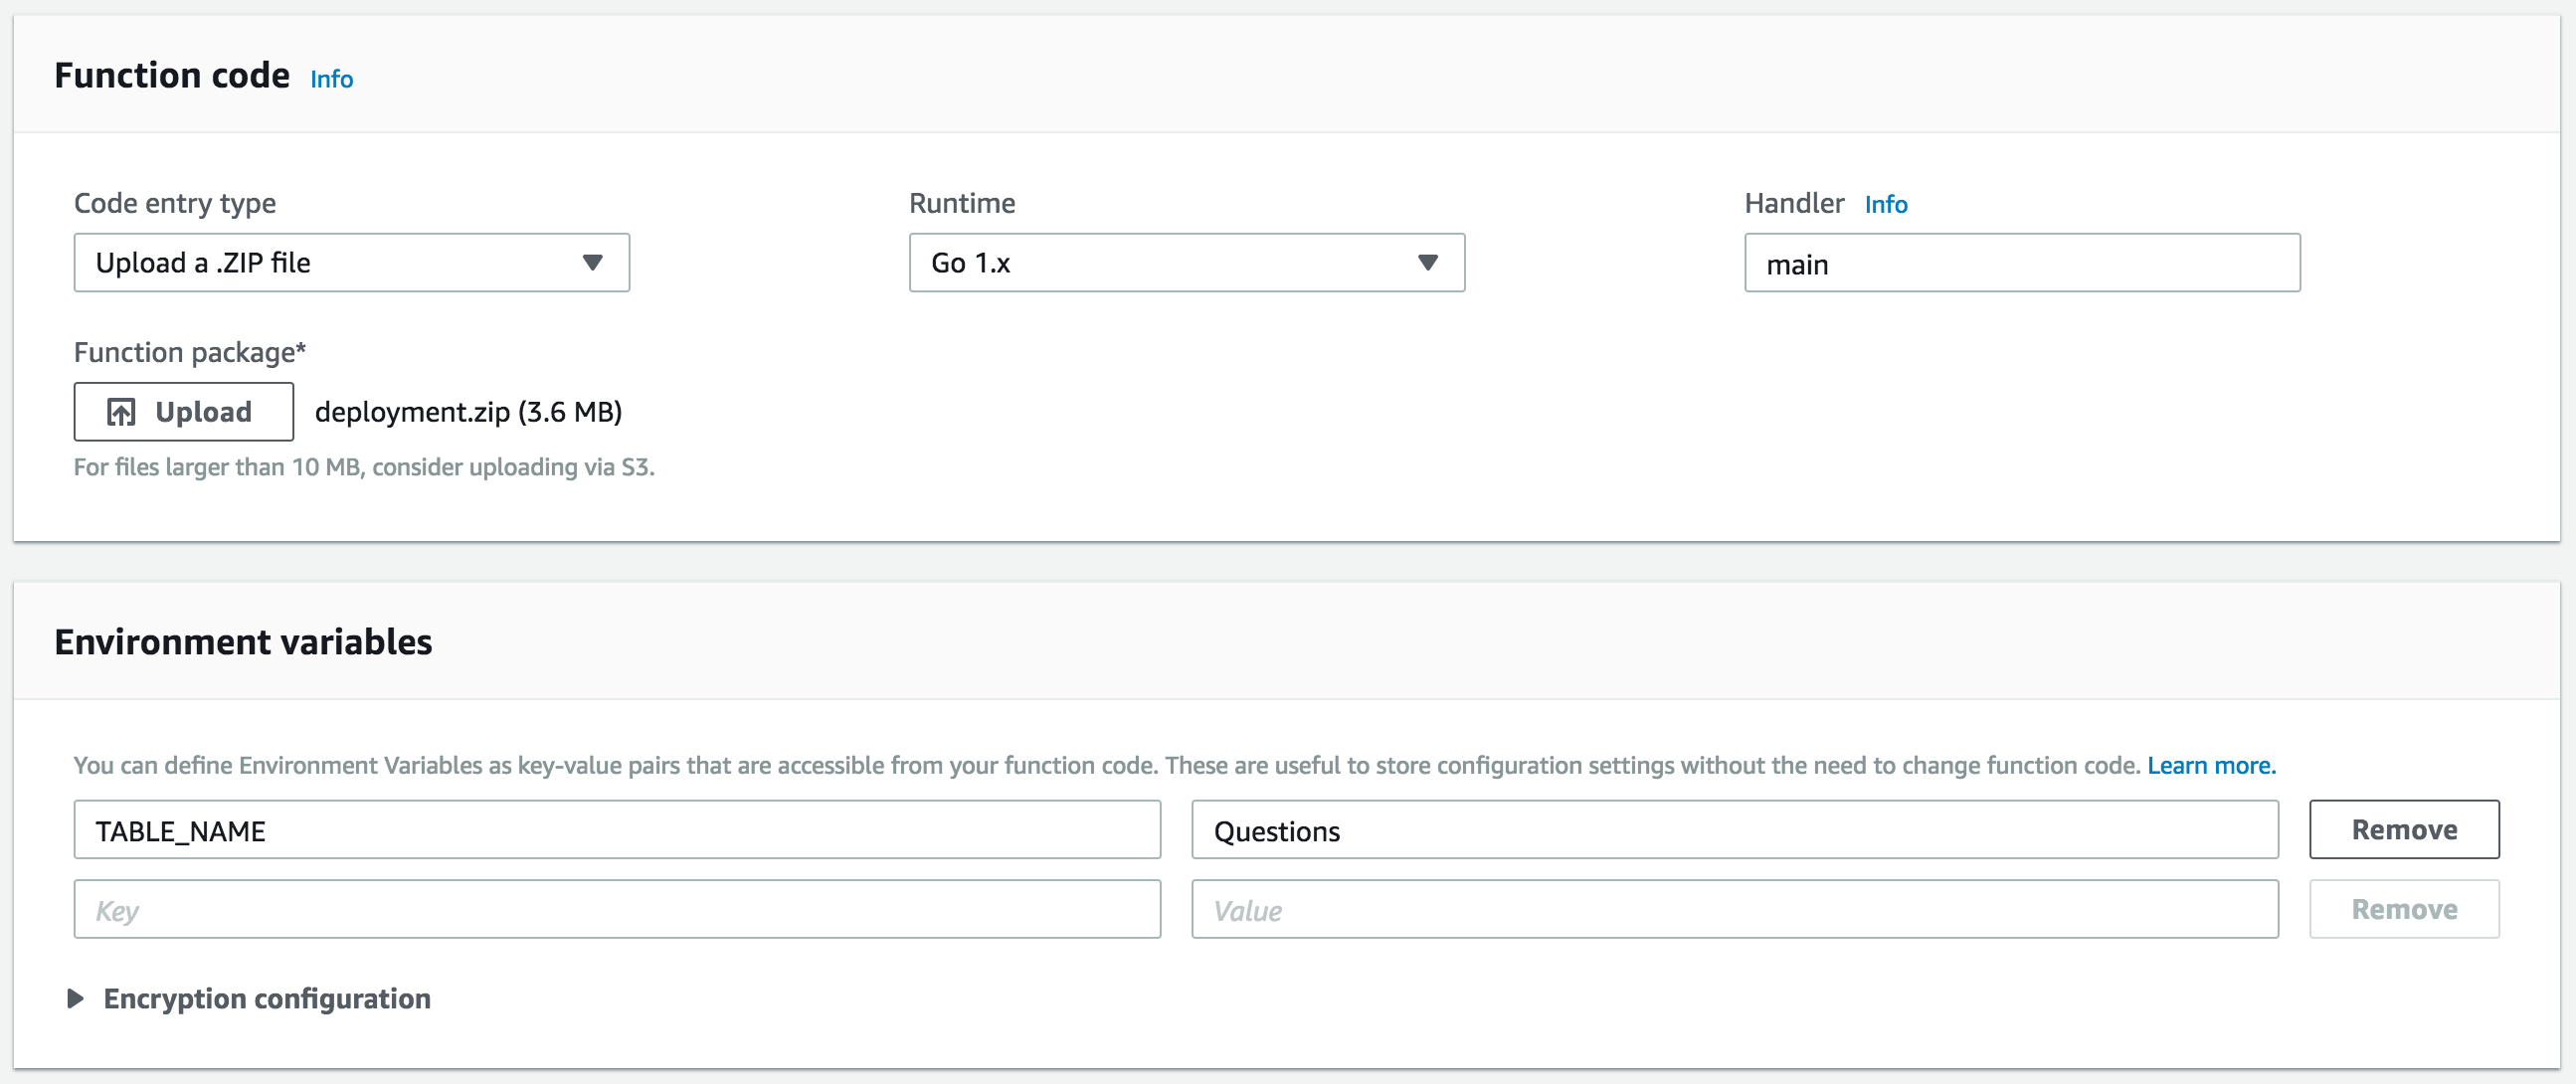
Generate the deployment package, and upload it to the Lambda Console and set the TABLE_NAME environment variable to the table name:
4 – Testing
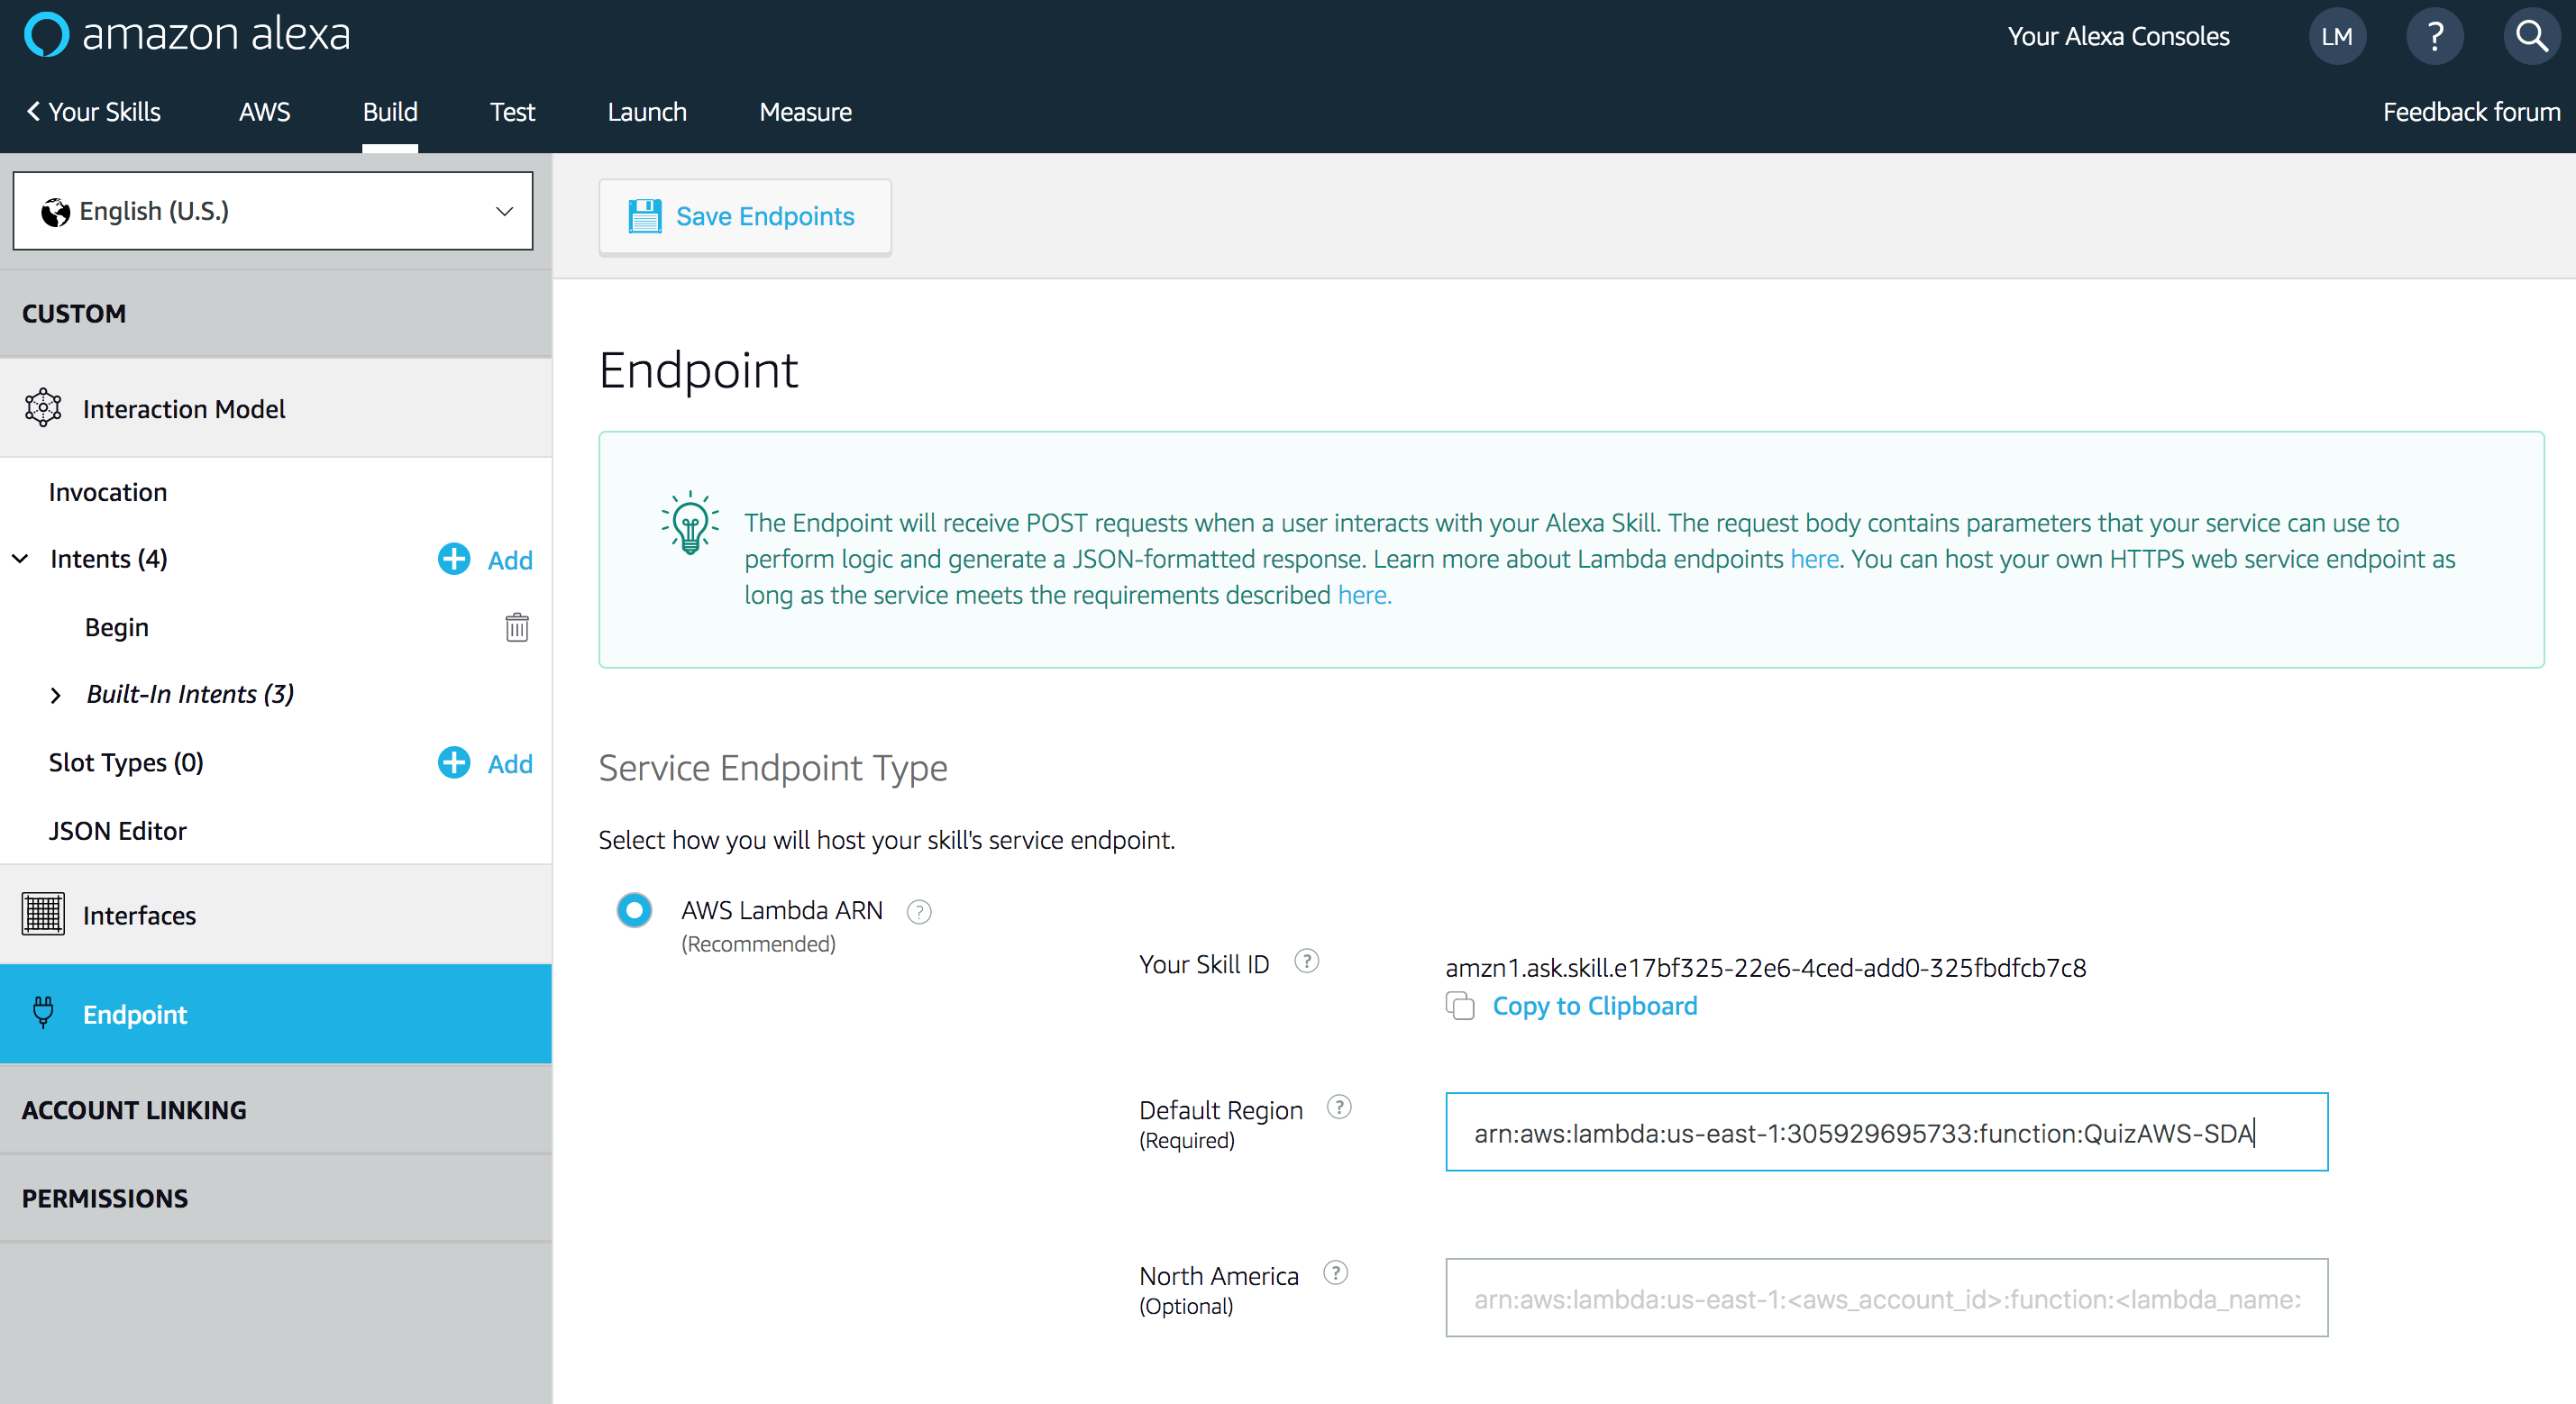
Now that you have created the function and put its code in place, it’s time to specify how it gets called. We’ll do this by linking the Lambda ARN to Alexa Skill:
Once the information is in place, click Save Endpoints. You’re ready to start testing your new Alexa Skill !
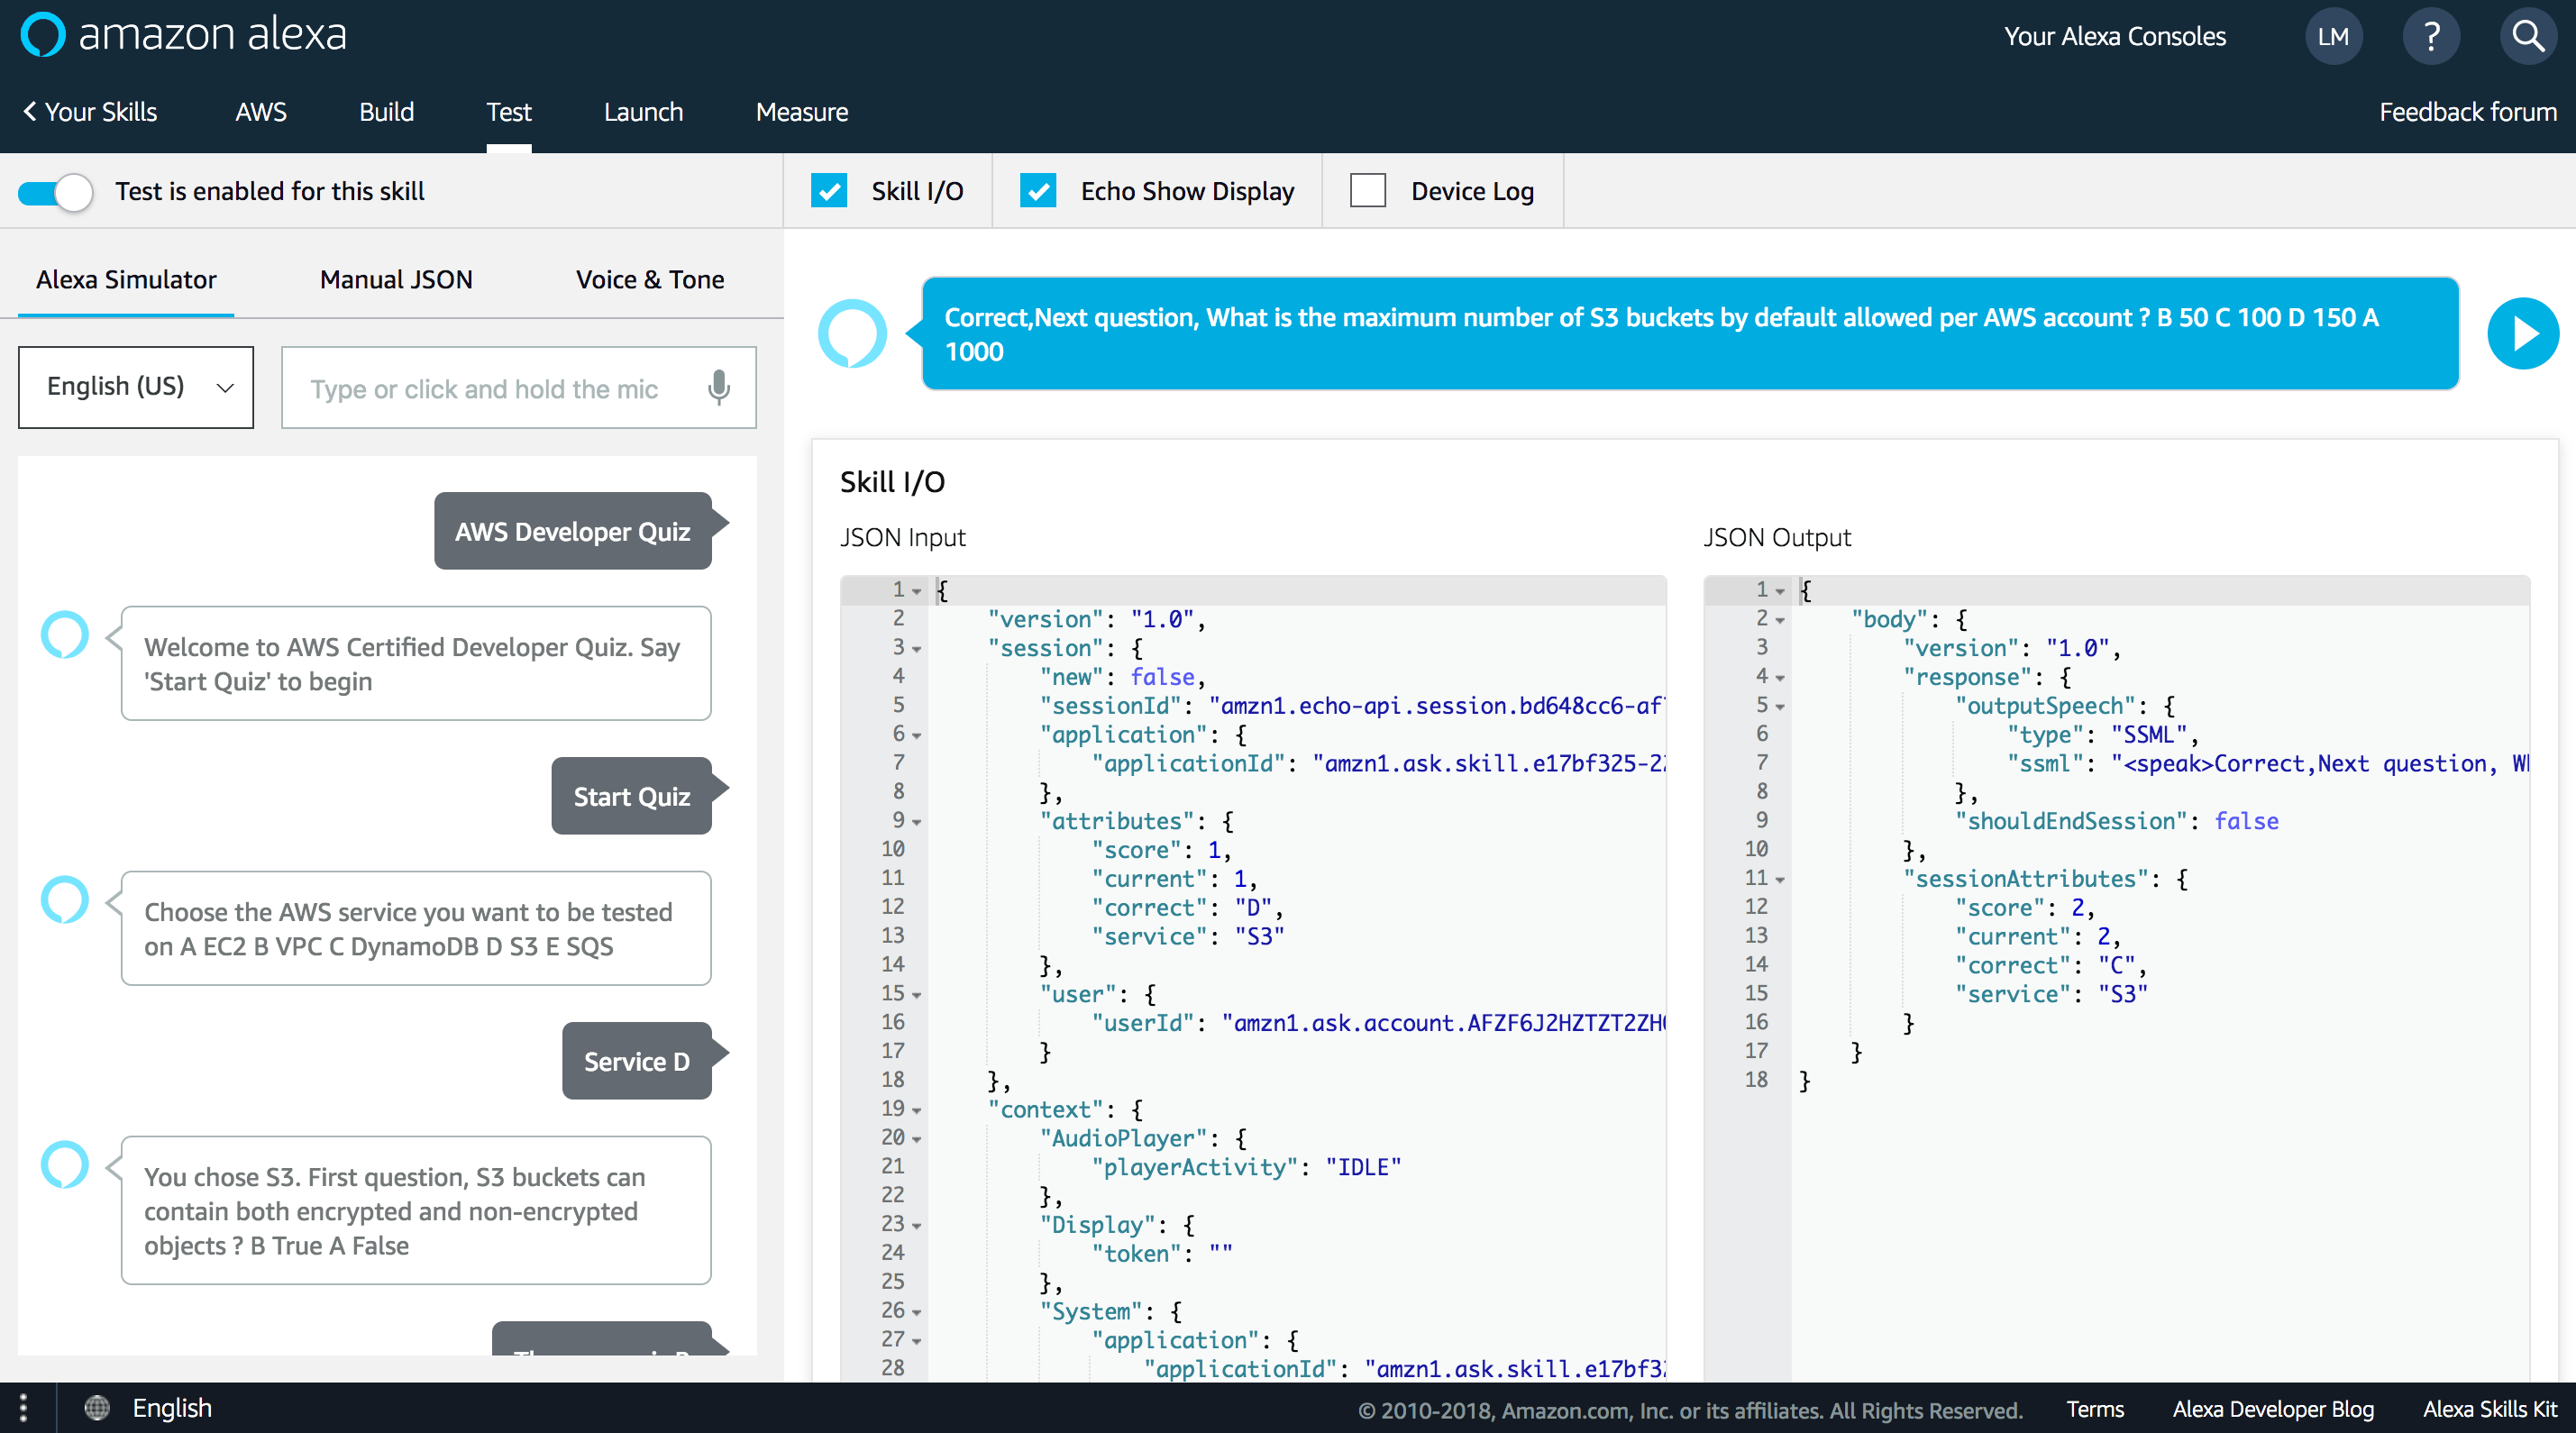
To test, you need to login to Alexa Developer Console, and enable the “Test” switch on your skill from the “Test” Tab:
Or use an Alexa enabled device like Amazon Echo, by saying “Alexa, Open AWS Developer Quiz” :
Drop your comments, feedback, or suggestions below — or connect with me directly on Twitter @mlabouardy.
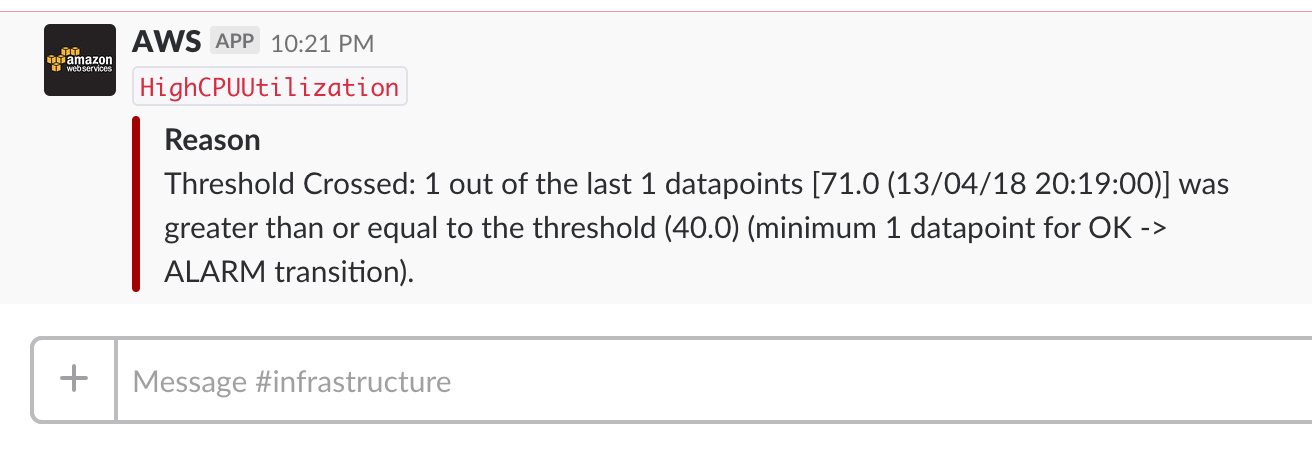
ChatOps has emerged as one of the most effective techniques to implement DevOps. Hence, it will be great to receive notifications and infrastructure alerts into collaboration messaging platforms like Slack & HipChat.
AWS CloudWatch Alarms and SNS are a great mix to build a real-time notification system as SNS supports multiple endpoints (Email, HTTP, Lambda, SQS). Unfortunately SNS doesn’t support out of the box sending notifications to tools like Slack.
CloudWatch will trigger an alarm to send a message to an SNS topic if the monitoring data gets out of range. A Lambda function will be invoked in response of SNS receiving the message and will call the Slack API to post a message to Slack channel.
To get started, create an EC2 instance using the AWS Management Console or the AWS CLI:
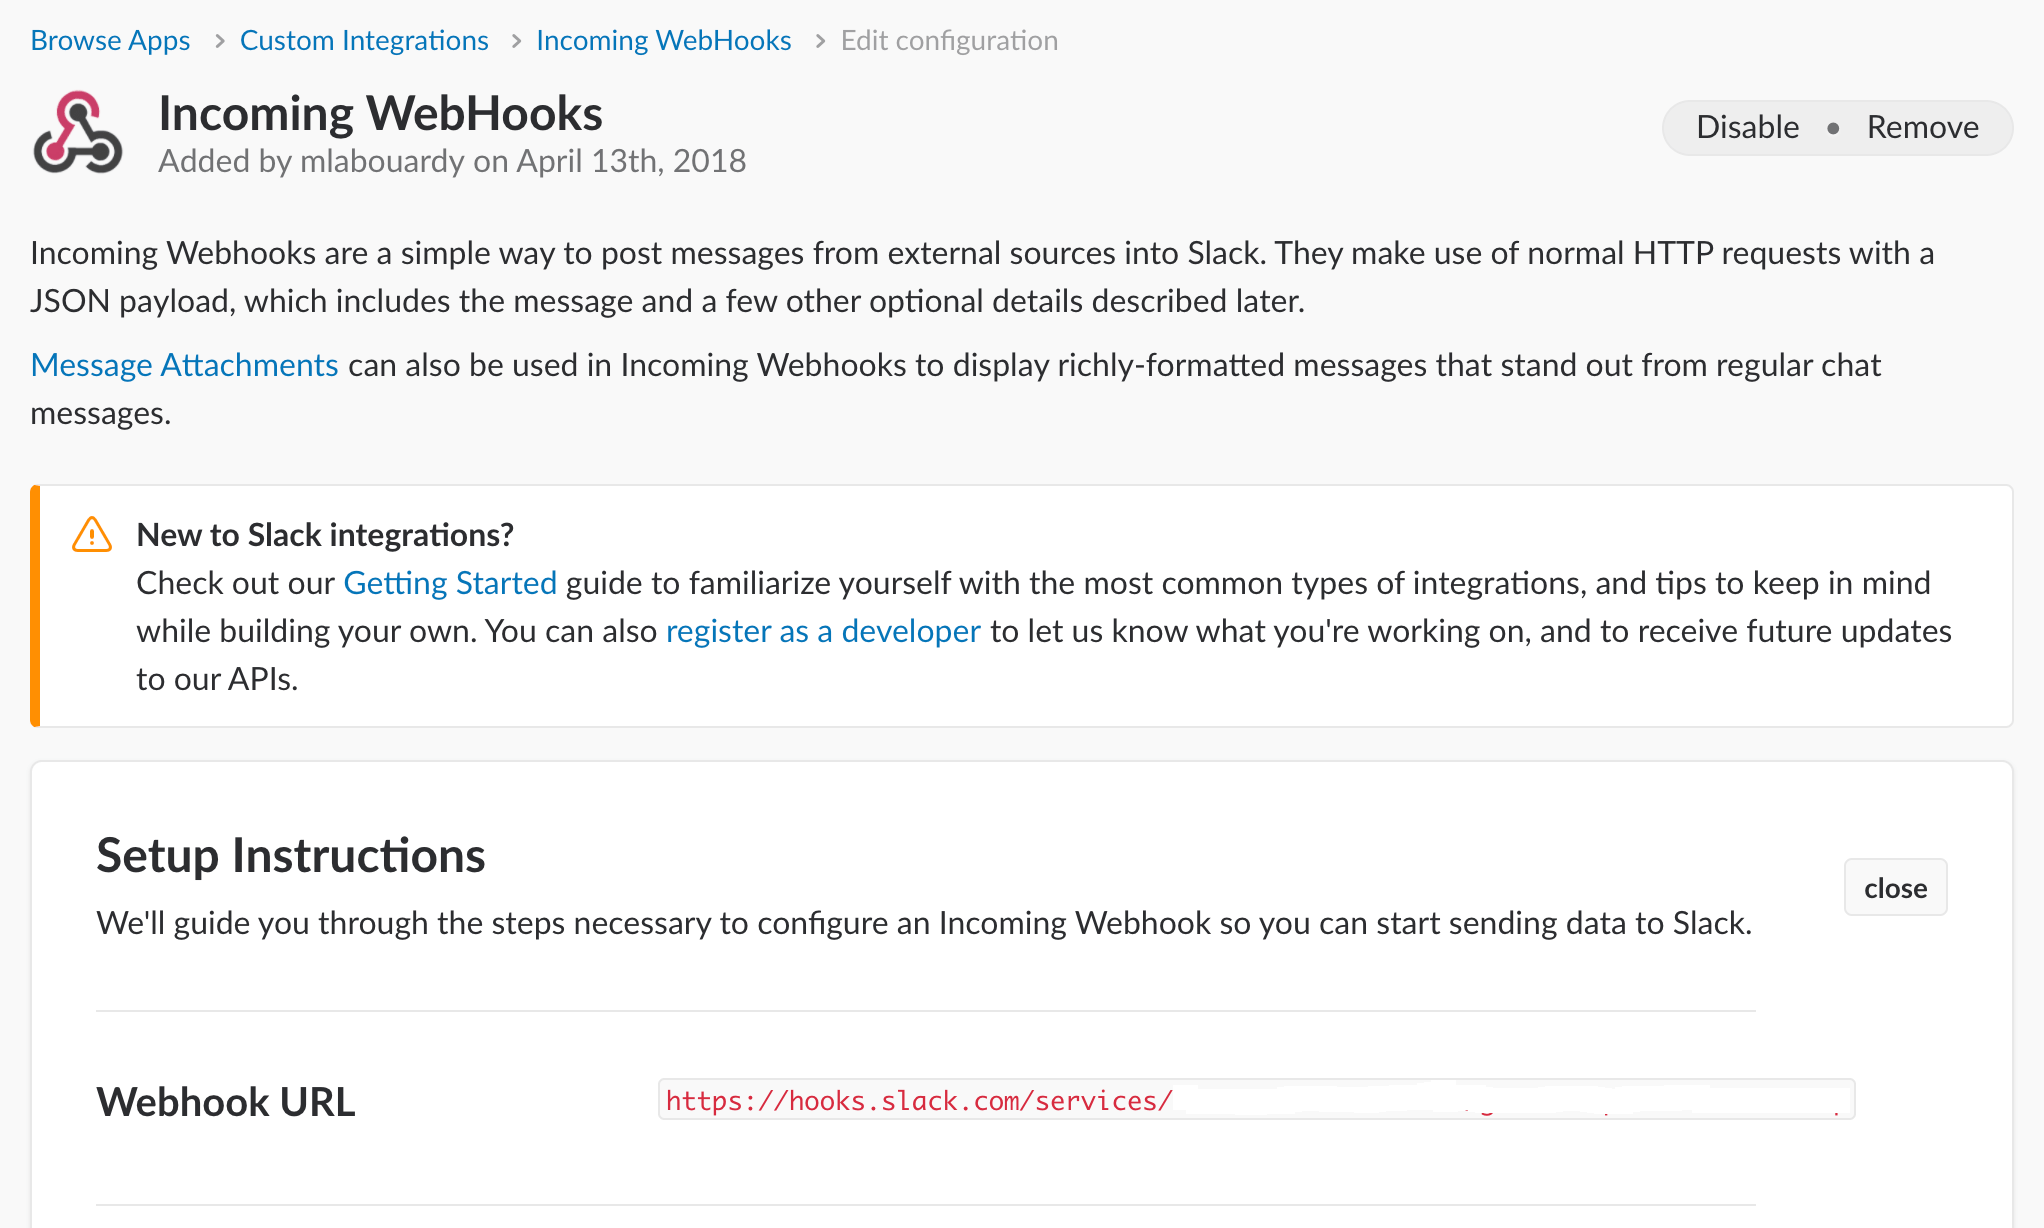
To be able to post messages to slack channel, we need to create a Slack Incoming WebHook. Start by setting up an incoming webhook integration in your Slack workspace:
Note down the returned WebHook URL for upcoming part.
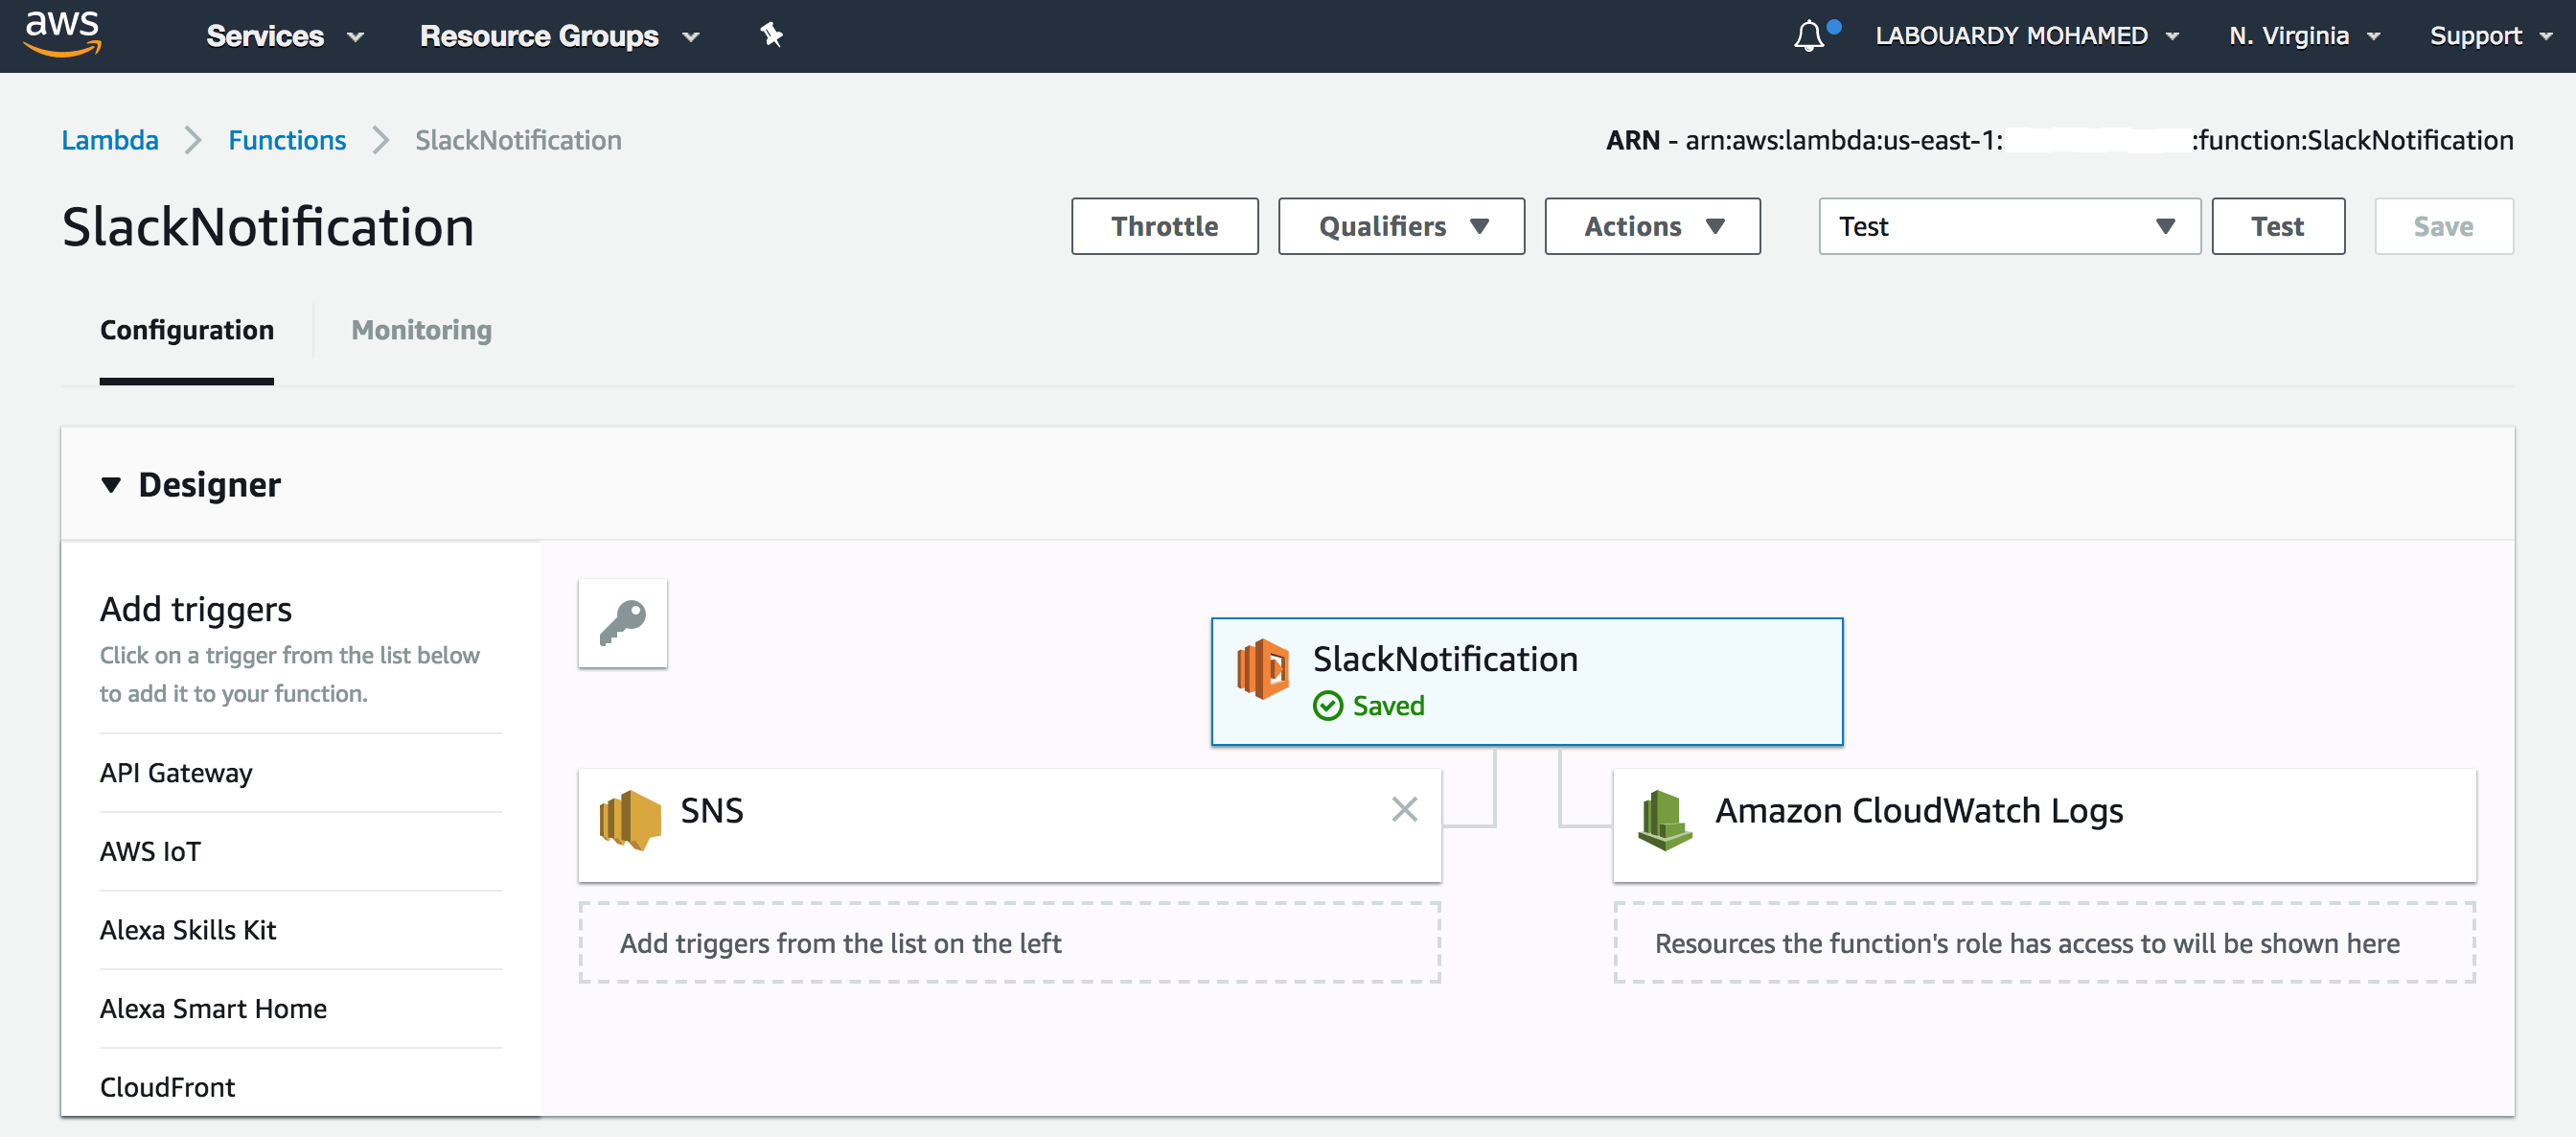
The Lambda handler function is written in Go, it takes as an argument the SNS message. Then, it parses it and queries the Slack API to post a message to the Slack channel configured in the previous section:
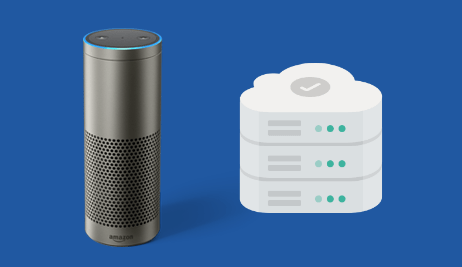
Years ago, managing your infrastructure through voice was a science-fiction movie, but thanks to virtual assistants like Alexa it becomes a reality. In this post, I will show you how I was able to monitor my infrastructure on AWS using a simple Alexa Skill.
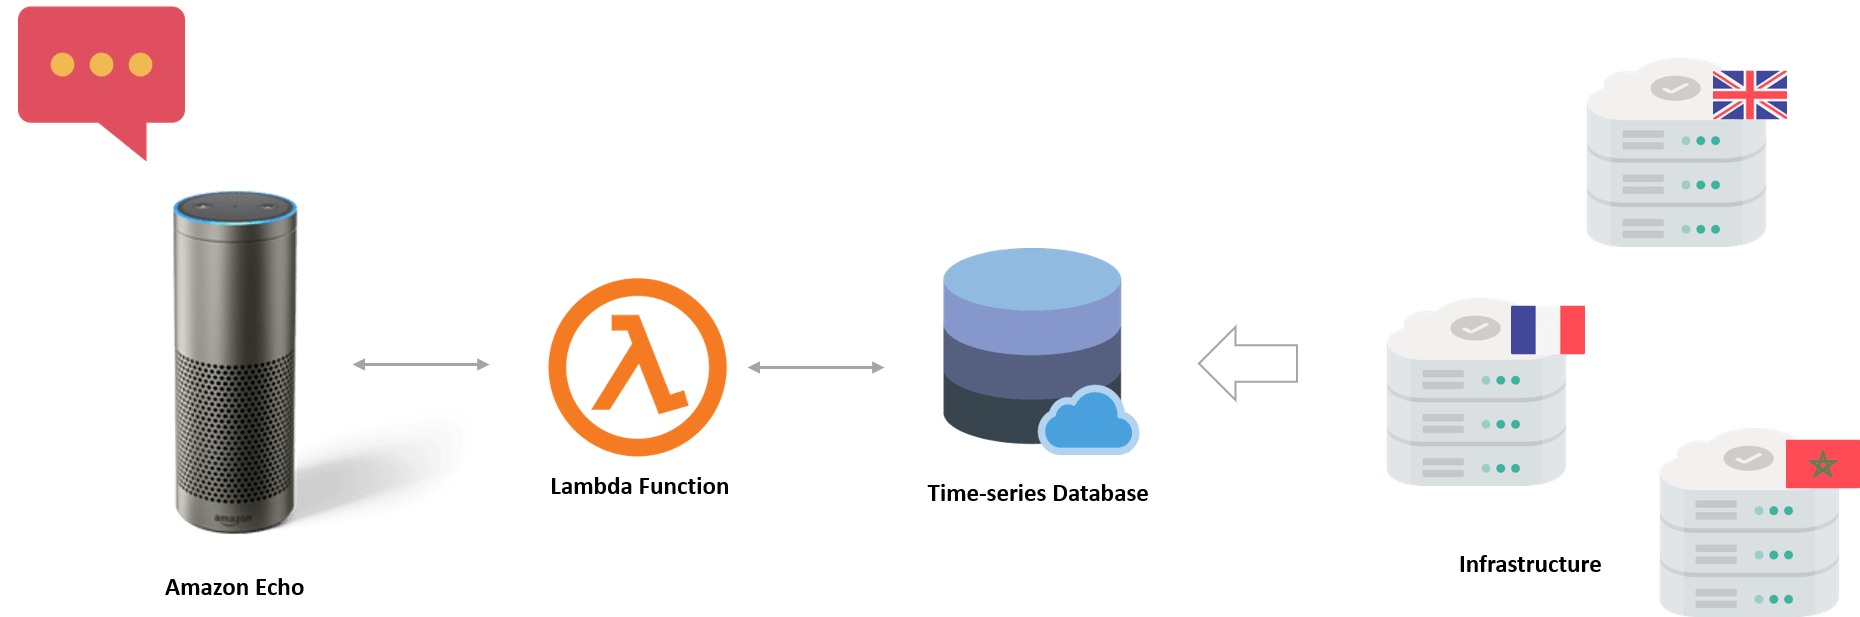
At a high level, the architecture of the skill is as follows:
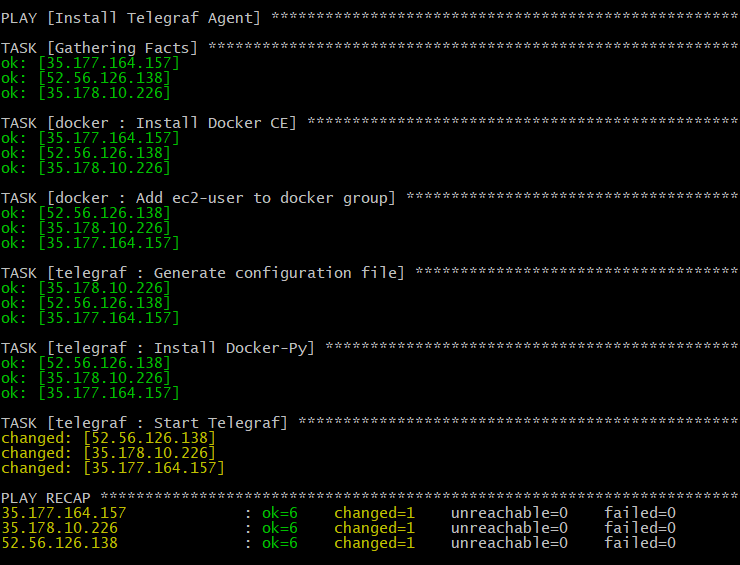
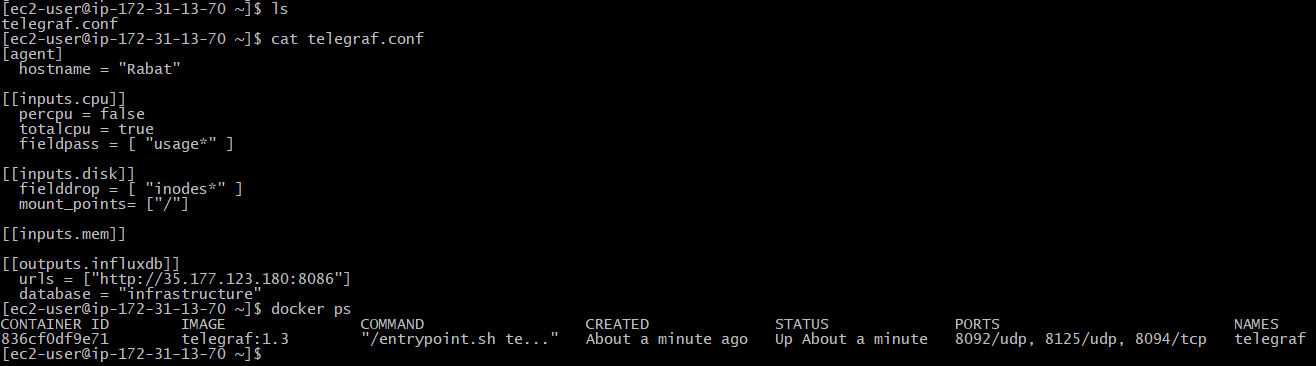
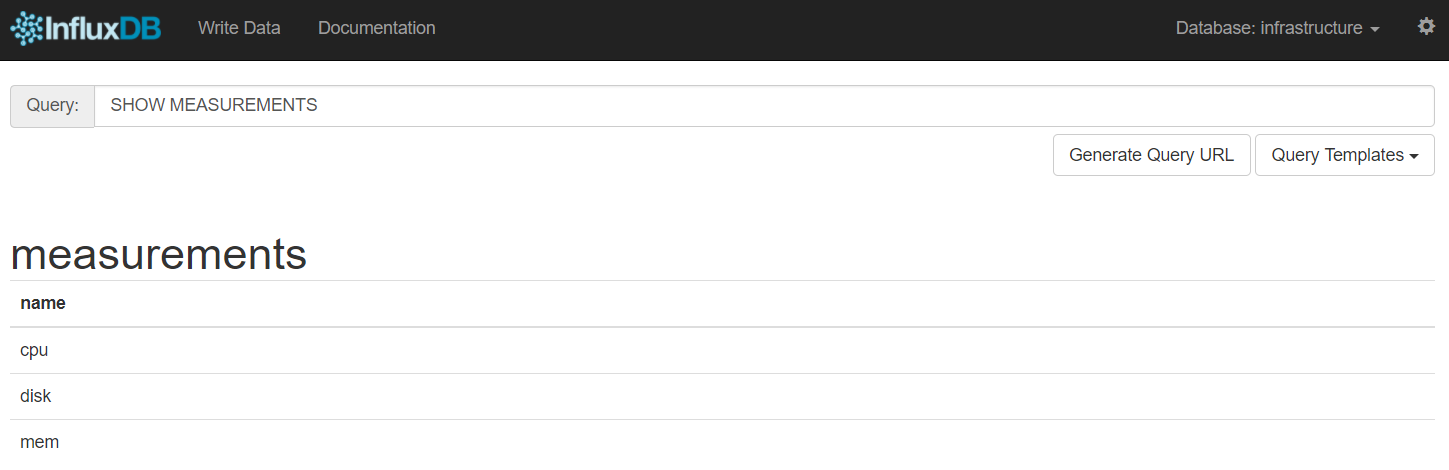
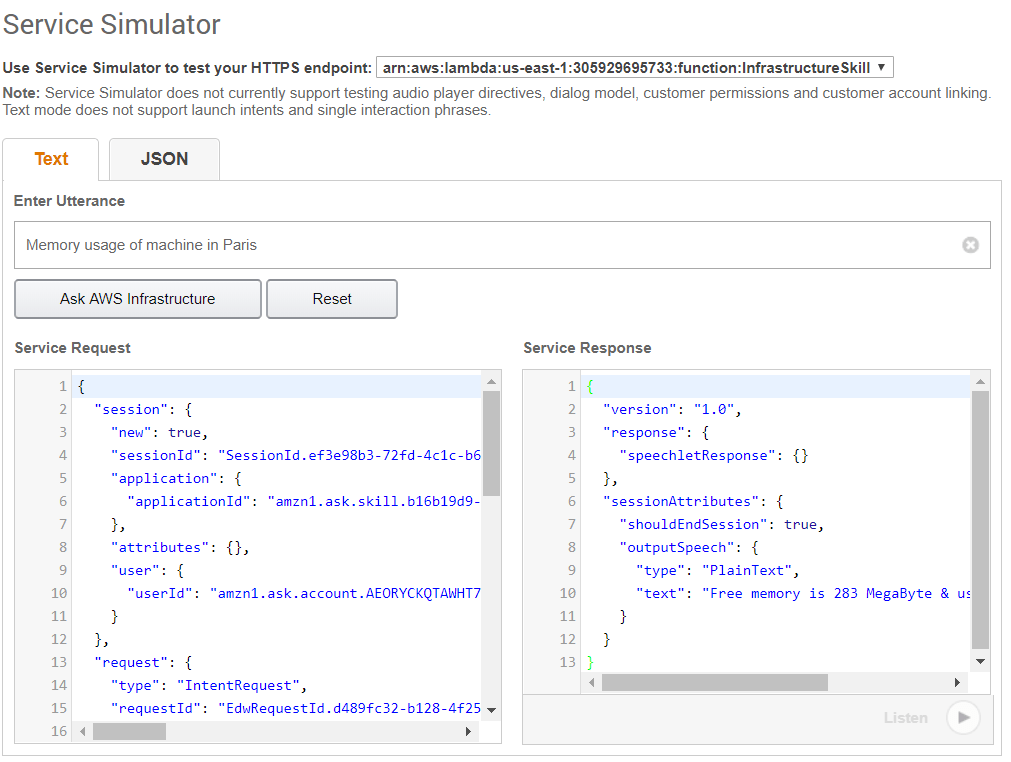
I installed data collector agent (Telegraf) in each EC2 instance to collect metrics about system usage (disk, memory, cpu ..) and send them to a time-series database (InfluxDB)
Once my database is populated with metrics, Amazon echo will transform my voice commands to intents that will trigger a Lambda function, which will use the InfluxDB REST API to query the database.
Enough with talking, lets build this skill from scratch, clone the following GitHub repository:
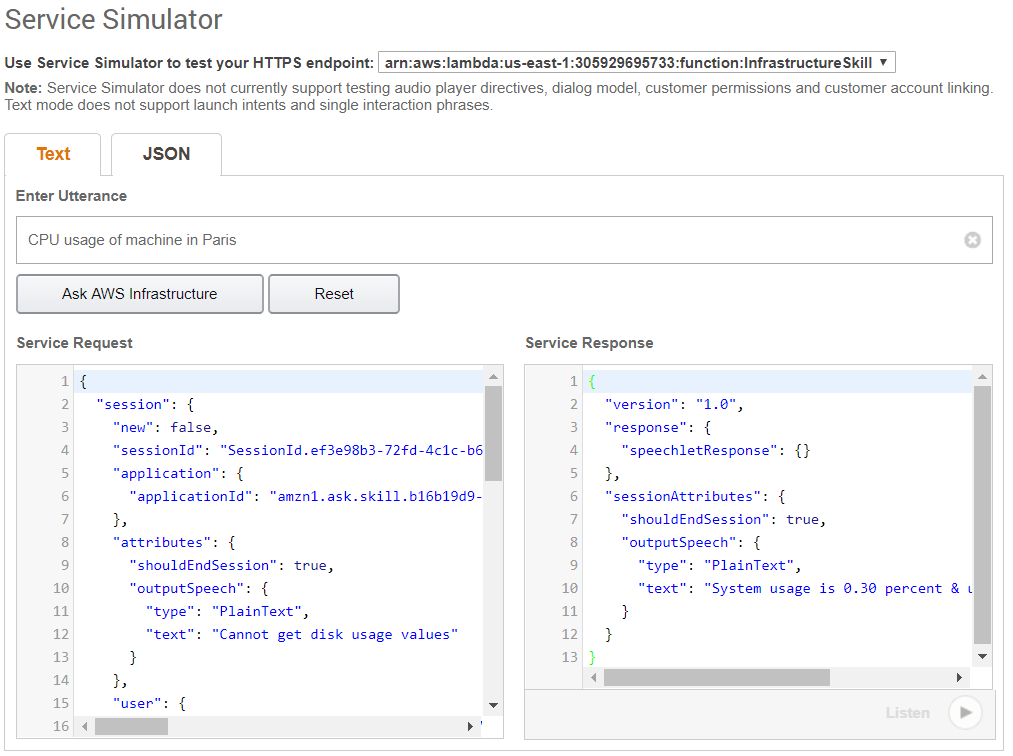
MetricsDB.prototype.getCPU = function(machine, callback){ this.influx.query(` SELECT last(usage_system) AS system, last(usage_user) AS "user" FROM cpu WHERE time > now() - 5m AND host='${machine}' `).then(result => { var system_usage = result[0].system.toFixed(2) var user_usage = result[0].user.toFixed(2) callback(`System usage is ${system_usage} percent & user usage is ${user_usage} percent`) }).catch(err => { callback(`Cannot get cpu usage values`) }) }
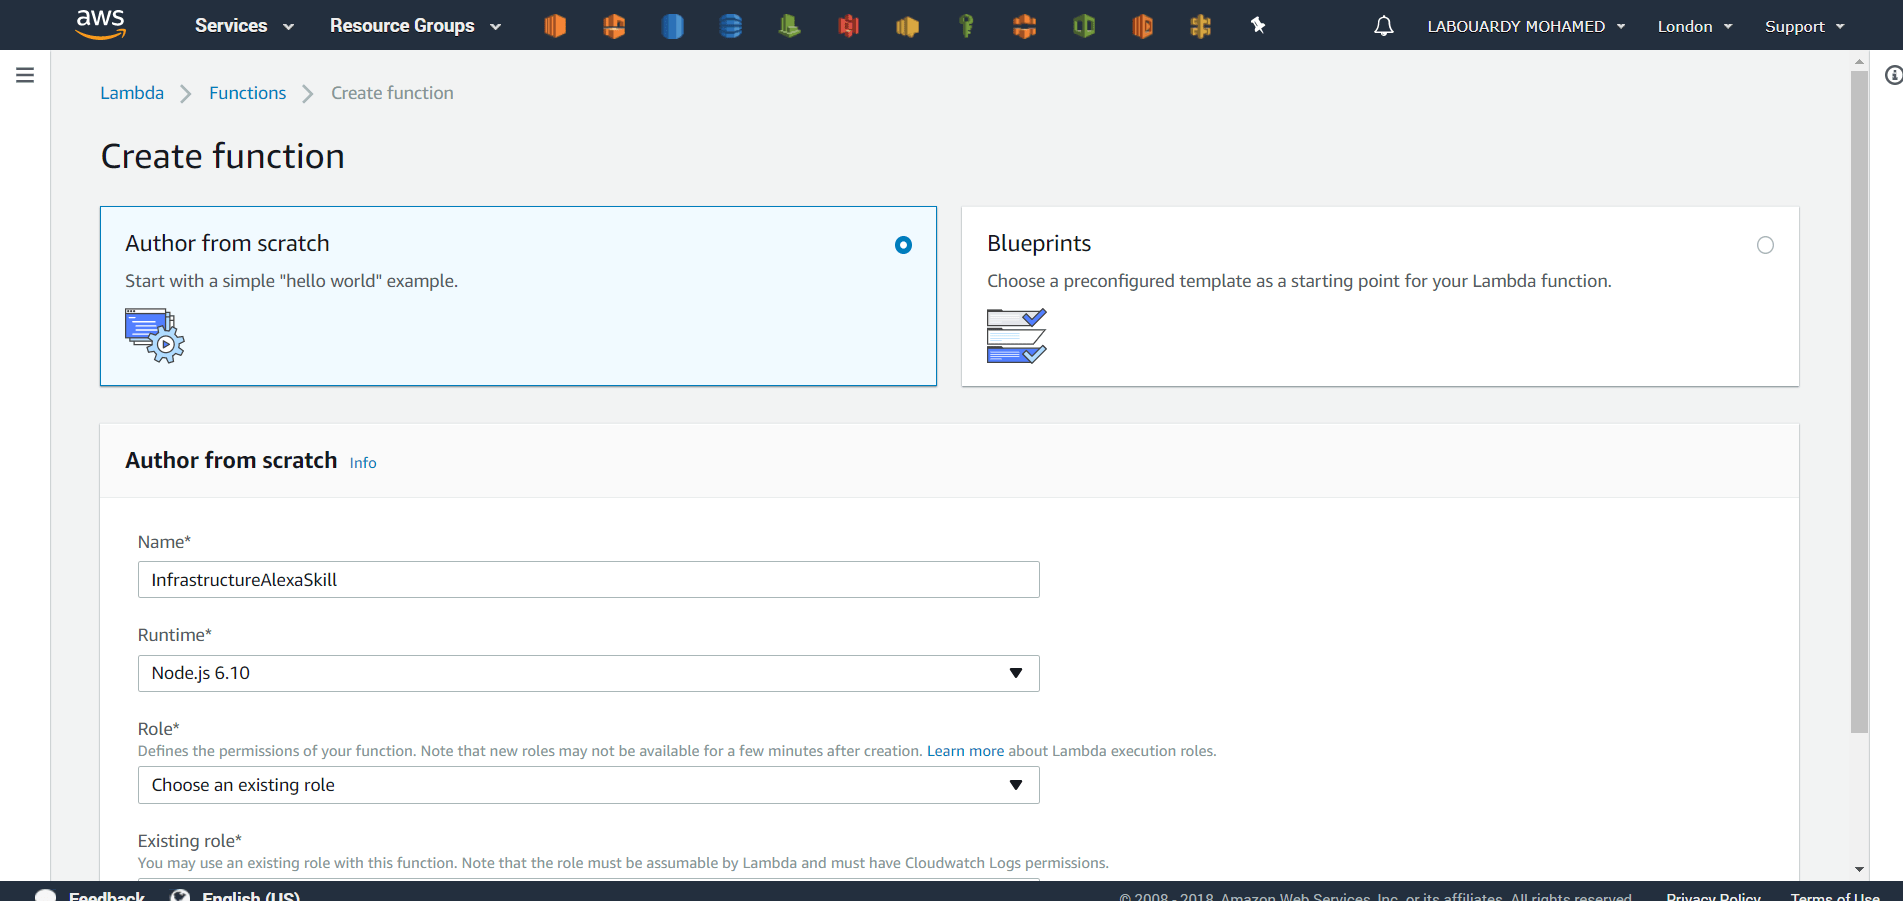
Specify the .zip file name as your deployment package at the time you create the Lambda function. Don’t forget to set the InfluxDB Hostname & Database name as an environment variables:
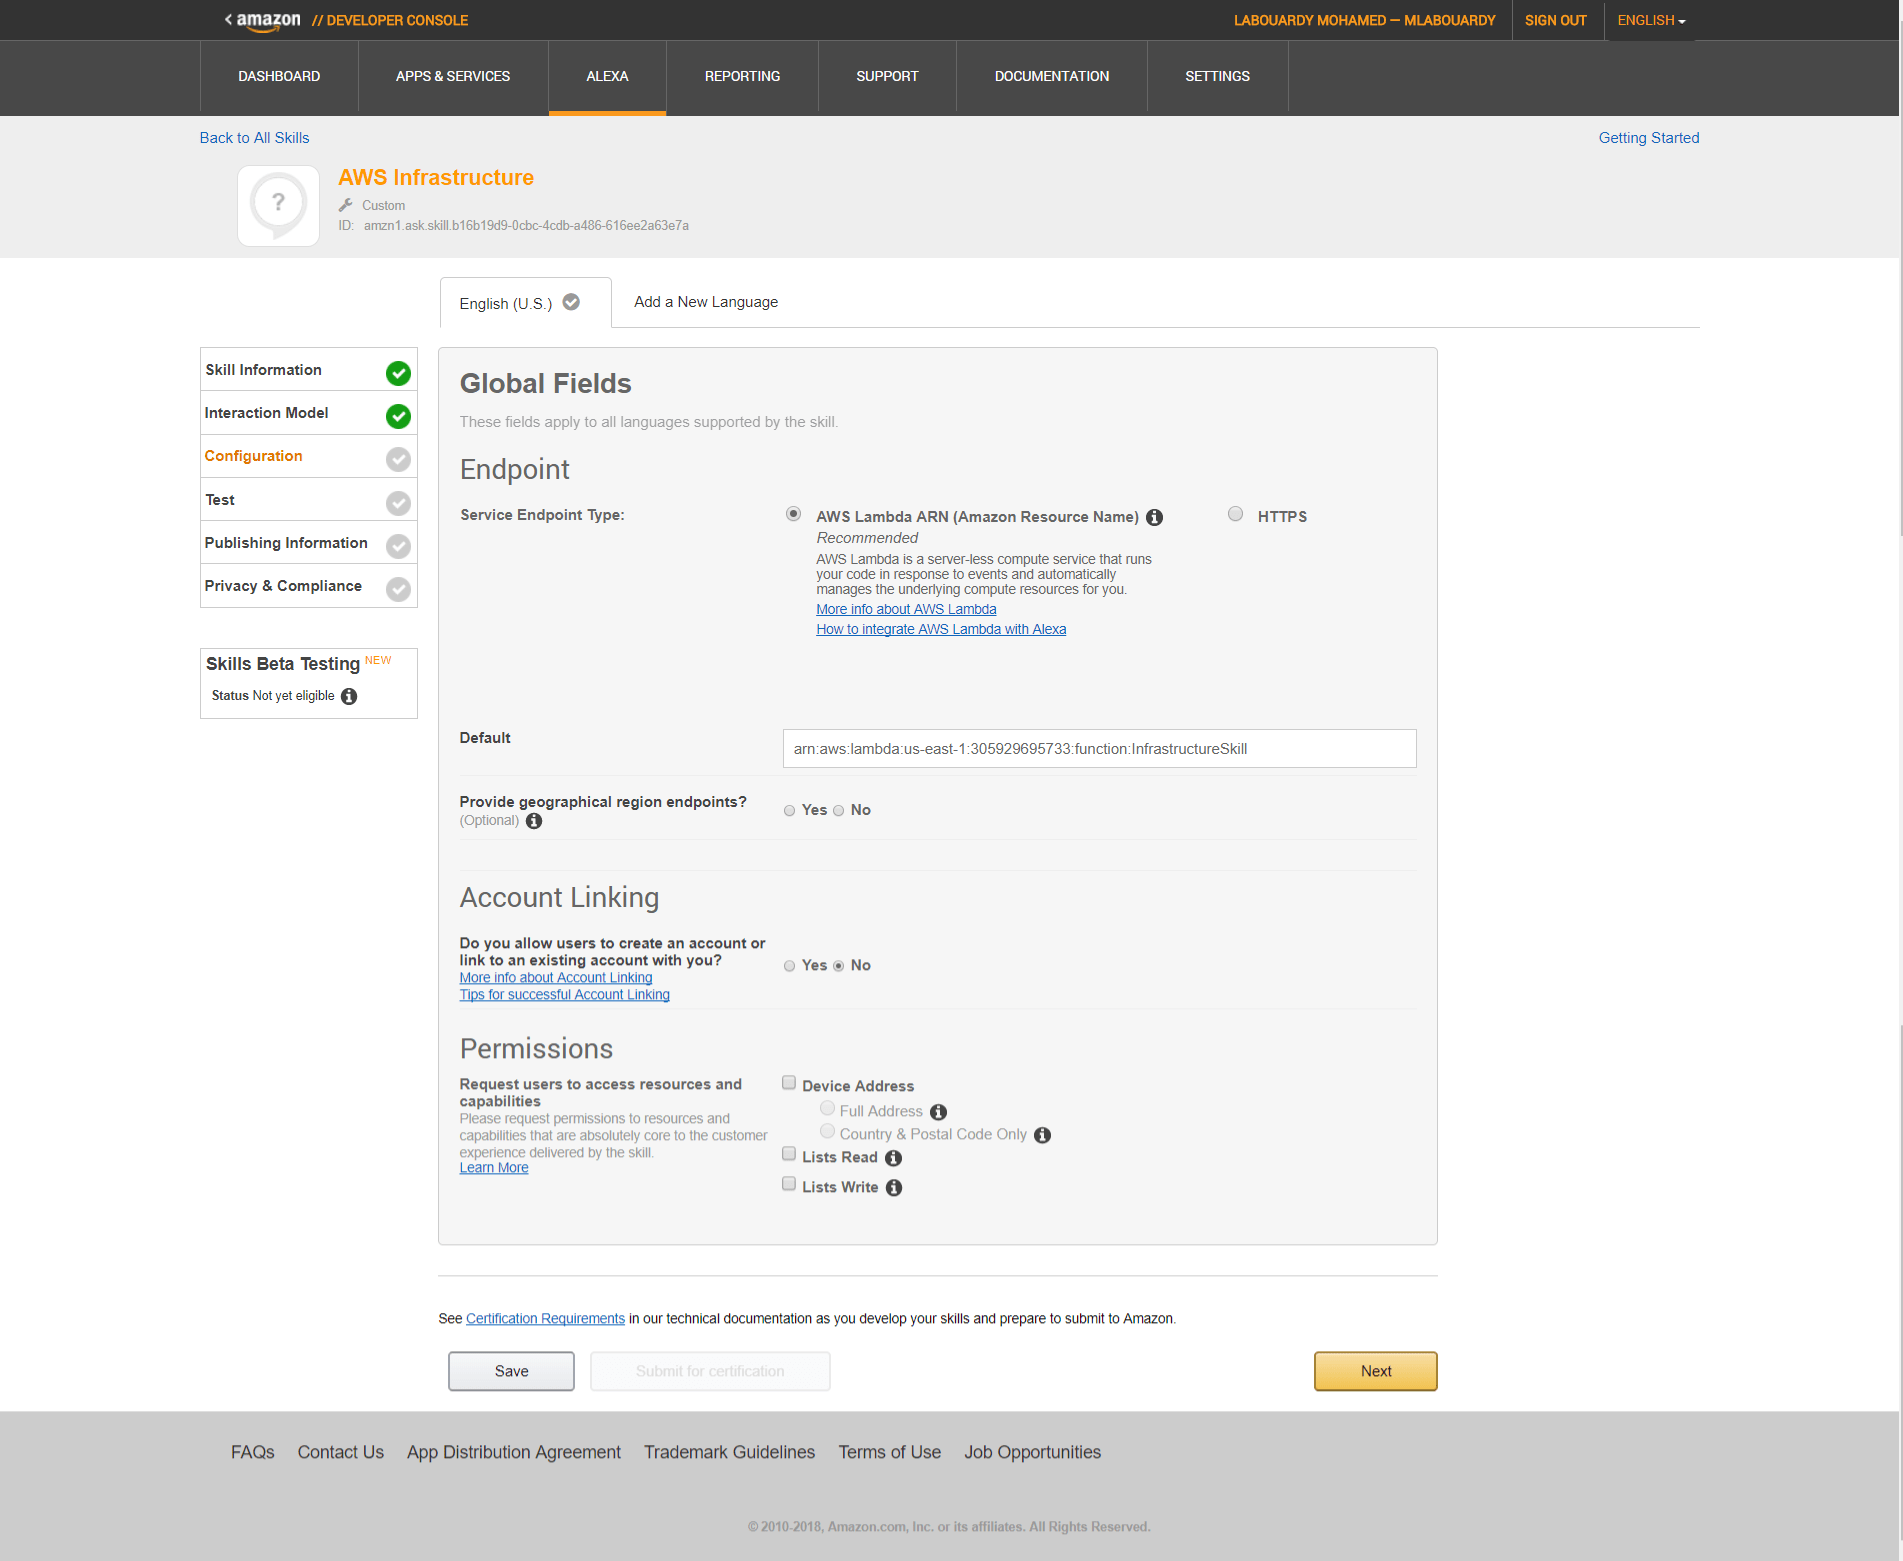
Then go to the Configuration step of your Alexa Skill in the Amazon Developer Console and enter the Lambda Function ARN:
Click on “Next“. Under the “Service Simulator” section, you’ll be able to enter a sample utterance to trigger your skill:
Memory Usage
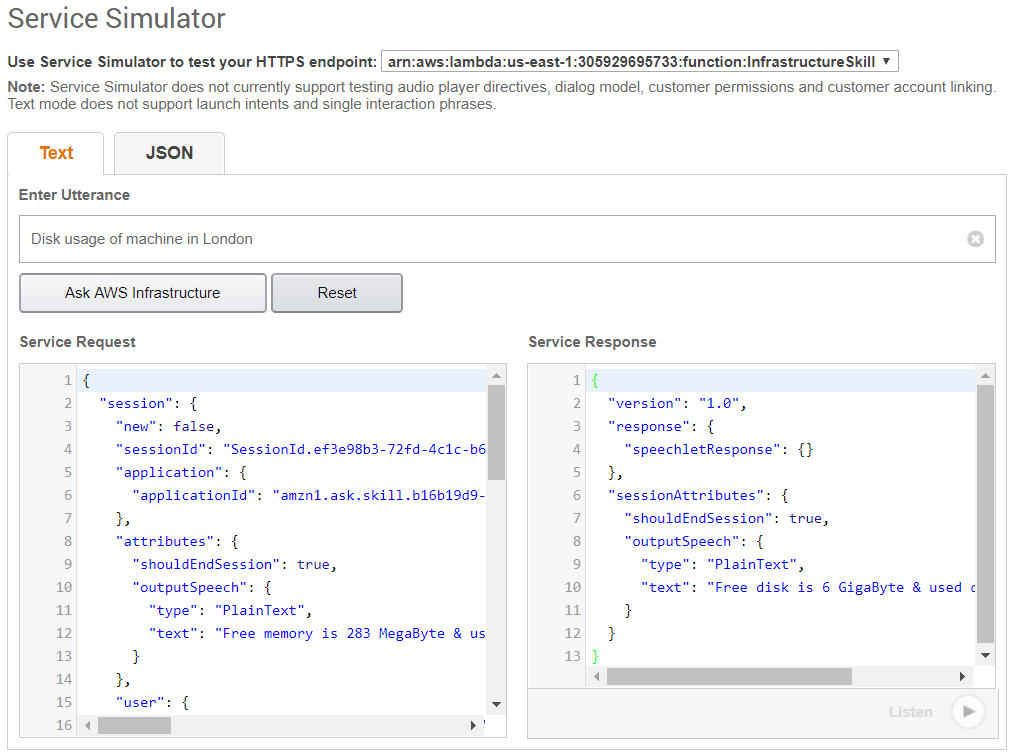
Disk usage:
CPU usage:
Test your skill on your Amazon Echo, Echo Dot, or any Alexa device by saying, “Alexa, ask AWS for disk usage of machine in Paris“
Drop your comments, feedback, or suggestions below — or connect with me directly on Twitter @mlabouardy.
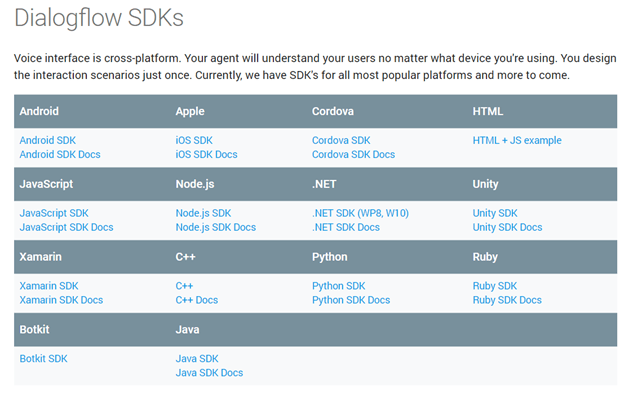
DialogFlow (formerly API.AI) gives users new ways to interact with your bot by building engaging voice and text-based conversational interfaces powered by AI.
DialogFlow offers many SDKs in different programming languages:
But unfortunately, there’s no SDK for Golang
But dont be sad, I made an SDK to integrate DialogFlow with Golang:
This library allows integrating agents from the DialogFlow natural language processing service with your Golang application.
Issue the following command to install the library:
entities, err := client.EntitiesFindAllRequest() if err != nil { log.Fatal(err) } for _, entity := range entities { fmt.Println(entity.Name) } }
Note: for more details about the available methods, check the project GitHub repository.
For a real world example on how to use this library, check my previous tutorial, on how to create a Messenger Bot in Golang to show list of movies playing in cinema, and tv shows airing on TV:
Drop your comments, feedback, or suggestions below — or connect with me directly on Twitter @mlabouardy.
When people hear DevOps, they often relate it to “automation”, “team work” and many “tools”, which is right. DevOps is all about CAMS : a culture of automation, measurement and sharing. The purpose of this article is to show how can ChatOps boost DevOps by bringing CAMS to everyday practice.
What is DevOps ?
Set of practices that emphasize the collaboration and communication of both Software Engineers and IT & Infrastructure Operations to reduce the time to market of a Product. One main goal of DevOps is to deploy features into production quickly and to detect and correct problems when they occur, without disrupting other services (Self-healing, Blue/Green deployment, Canary updates …)
There are several guidelines in order to achieve DevOps maturity, here are a few you need to know:
Continuous Integration is the practice of integrating, building and testing code within the development environment. It requires developers team to integrate code into a shared repository (Version Control System). Checks out the code and runs all the pre-deployment tests (Do not require code to be deployed to a server). In case it passed compile and package the code into an Artifact (JAR, Docker Image, gem …). Push it into an Artifact Repository Manager. The Artifact is deployed then inside an immutable container to a test environment (Quality Assurance). Once deployed post-deployment tests (Functional, integration & performance tests) are executed.
Continuous Delivery is an extension to continuous integration pipeline. It aims to make any change to the system releasable, it requires a person or business rule to decide when the final push to production should occur.
Continuous Deployment is an advanced evolution of continuous delivery. It’s the practice of deploying all the way into production without any human intervention.
In addition to those practices discussed above. Today, most DevOps teams embrace collaborative messaging platforms, such as Slack, to communicate with each other. And get real time updates about the system through online chat. And that’s certainly the spirit behind ChatOps.
What is ChatOps ?
“Placing tools directly in the middle of the conversation” — Jesse Newland, GitHub
Collaboration and conversation are a force that let work and learn together to produce new things. And this is happening in an exponential way that accelerates every year.
ChatOps (an amalgamation of chat and operations) is an emerging movement that led to ease the integration between teams and various tools/platforms of DevOps and others. It is about conversation driven development by bringing the tools into conversations. Robots are today members of your team to whom you can send a request and get an instant response.
ChatOps is a model where people, tools, process and automation are connected in a transparent flow. It also helps collaborate and control pipelines in one window.
Today, DevOps practices toolchain puts in many grades of tools, including : development software, networks and servers management, tests, monitoring, etc. Collaborating and controlling the practices’ pipelines in one window has helped developers teams work in more efficient and agile way.
Three main components in Chatops: Collaboration tool: It’s the Chat Client where stakeholders and teams are connected between them and to the systems they work on. The are several chat platforms :
Slack: a leading chat platform for teams which accumulated more that 4 million daily active users. It is also one of the first platforms that integrated bots into its system.
HipChat by Atlassian is a group chat, file sharing, video chat & screen sharing built for teams & business.
Bot: It is the core of chatops methodology. The Bot comes in the middle of the collaboration tool and the Devops tools. The Bot receives requests from team members, retrieves information from integrated systems by executing set of commands (scripts).
Hubot, a leading bot tool for ChatOps. It is a valuable open source robot (CoffeeScript) for automating chat rooms by Github made back in 2013. Hubot is useful and powerful via Scripts. They define the skills of your Hubot instance. Hundreds of them are written and maintained by the community and you can create your own. It mainly helps to automate most of ops-related tasks.
Lita is a framework for bots dedicated to company chat rooms written in Ruby. It is heavily inspired from Hubot. This framework can be used to build operational task automations and has a very comprehensive list of plugins which means that it can be integrated in many chat platforms as : Slack, Facebook Messenger and others.
Cog, made by Operable, is another chatbot framework to help automate DevOps workflows. It’s designed to be chat platform and language agnostic, and uses a Unix-style pipeline to activate complex functionality.
ErrBot is a chatbot daemon that generates bots that are in the middle of a chat platform and DevOps tools. It is written in Python and aims to make integrating and tool that provides an API, easily to a chat platform via commands.
System integration: Third key element in ChatOps. Simply put, it is the DevOps tools allowing more productivity. Such as :
Issue tracking: JIRA, OTRS, TeamForge …
Version Control Systems: Github, Gitlab, Bitbucket …
Nowadays ChatOps are operational. Several teams around the world already connected their chat platforms to their build systems to get notifications, query and execute processes on their continuous integration servers. Same thing happens in QA (Quality Assurance) teams, support teams and the rest.
With ChatOps, trust is build among the team especially that work is shared and brought into the foreground by putting it all in one place. Your chat platform is your new command line.
Conversation-driven collaboration is not new, but with ChatOps, we observed a combination of the oldest form of collaboration and the newest techies. We are not surprised that this combination have changed the way staff members work. This should make people often think of making software that allows this collaboration to be more contributory , soft and secure.
For further Information on DevOps and ChatOps approaches, check out our DevOps Wiki on Github.
In this first tutorial of the “ChatOps” series , I will show you quickly how to create a Facebook Messenger Bot in Golang. All the code used in this demo can be found on my Github.
1 – Messenger bot
We will start by creating a dummy web server with one endpoint to print a hello world message. I’ll use “gorilla/mux” package to do that. I found it much easier to setup routes for our server rather than using the go standard library.
We first need to install “gorilla/mux” library:
1
go get github.com/gorilla/mux
Then, create a file called app.go with the following content:
funcHomeEndpoint(w http.ResponseWriter, r *http.Request) { fmt.Fprintln(w, "Hello from mlabouardy :)") }
funcmain() { r := mux.NewRouter() r.HandleFunc("/", HomeEndpoint) if err := http.ListenAndServe(":8080", r); err != nil { log.Fatal(err) } }
So basically, we have a main function which create a new route “/”, and associate to this path a HomeEndpoint function that use ResponseWrite reference to print a message. Then it start a HTTP server on port 8080.
To verify that things are working, start your local server with:
It simply looks for the Verify Token and responds with the challenge sent in the verification request.
1.2 – Messages Handler Endpoint: (POST /webhook)
1 2 3 4 5 6 7 8 9 10 11 12 13 14 15 16
funcMessagesEndpoint(w http.ResponseWriter, r *http.Request) { var callback Callback json.NewDecoder(r.Body).Decode(&callback) if callback.Object == "page" { for _, entry := range callback.Entry { for _, event := range entry.Messaging { ProcessMessage(event) } } w.WriteHeader(200) w.Write([]byte("Got your message")) } else { w.WriteHeader(404) w.Write([]byte("Message not supported")) } }
It serialize the request body into Callback object , then it parse it and fetch the message object and pass it as an argument to ProcessMessage function that will use Facebook Graph API to send the response to the user (in this case we will send an image):
Our local server url http://localhost:8080 is not available to all the other people in the internet and doesn’t support HTTPS which is necessary for Facebook Messenger bot. Therefore, we need to expose it to the public.
2 – Deployment
Note: You could also use a tool like ngrok. It basically creates a secure tunnel on your local machine along with a public URL you can use for browsing your local server. Keep in mind, to use your bot in production, you need to use a real IaaS like AWS, Heroku, Clever Cloud, etc
In this tutorial I will choose CleverCloud as IaaS provider, it deploys your Go application for free and offer you extra add ons like monitoring, logs, scaling, continuous delivery …
In order to deploy to CleverCloud you’ll need a CleverCloud user account. Signup is free and instant. After signing up:
We click on “Add an application”, then you can either upload your app code from local repository or from Github:
Next, We choose GO as our server side language. Then, we click on “Next”
We left all fields as default, and we click on “Create”
Our server does not use any external resources (MySQL, Redis …) so we will simply skip this part by clicking on “I don’t need any add-on”
Congratulations! You have successfully deployed your server.
ID is the string on the bottom right of the dashboard,
3 – Facebook Setup
3.1 – Create Facebook Page
If you don’t already have one, you need to create a facebook page that we will use to connect our bot to.
Just give it a name, and that’s it now you have created a Facebook page for you Bot
3.2 – Create Facebook App
Once the page was created, we will create a facebook app which will be connected your webhook server and your public page: which works as middleware that connects your Webhook (APP URL) and your public page.
You need to give your app a name then click on “Skip and Create App ID”
After creating an app, we need to add Messenger as a platform. So we click on “Add Product” then select Messenger as a product
Now you’re in the Messenger settings. There are few things in here you’ll need to fill out in order to get your chatbot wired up to the server endpoint we set up earlier.
3.2.1 – Generate a Page Access Token
Using the page we created earlier, you’ll get a random “Page Access Token”
You need to copy the token to your clipboard. We’ll need it as an environment variable (PAGE_ACCESS_TOKEN) for our server.
3.2.2 – Setup subscription
Next, we click on “Setup webhook” button on “Webhooks” section, a new popup will show up:
Callback URL : Clever Cloud we set up earlier
Verify Token : A secret token that will be sent to your bot, in order to verify the request is coming from Facebook, Make sure to remember the value because we will need it as a second environment variable (VERIFY_TOKEN) for the server
Subscription Fields : represents which events you want Facebook to notify your webhook about, in this case, we will choose “messages”
After you’ve configure your subscription, you’ll need to subscribe to the specific page, you want to receive message notification for
3.2.3 – Set environment variables
Once you’ve gotten your PAGE_ACCESS_TOKEN and VERIFY_TOKEN, make sure you add those two as environment variables for the server on clever cloud dashboard
Then restart the application and you should be good to go !
4 – Test the Bot
Go to your Facebook Page and send a message to it. You should see a gif back to you
5 – Customize your Bot’s behavior
In this quick tutorial I showed you how to build a simple & dumb bot for facebook messenger, to make it smarter and have more interactions with the user. We need to use a NLP backend like api.ai (Google), wit.ai (Facebook) or motion.ai. And that will be the subject of my upcoming tutorial