This guide walks you through setting up a free bucket to serve a static website through a custom domain name using Google Cloud Platform services.
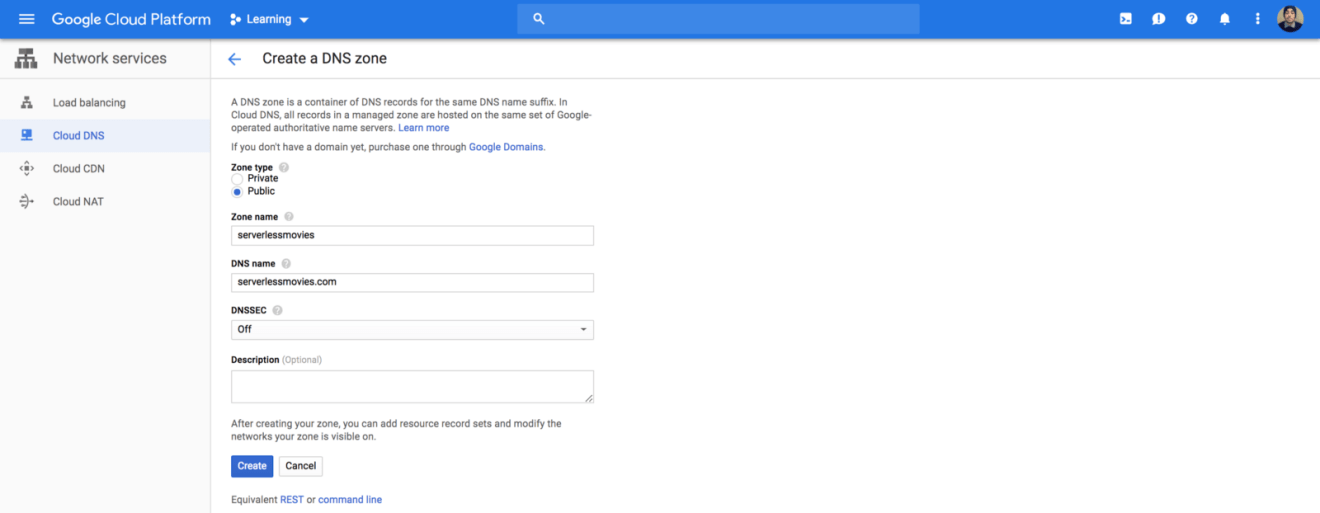
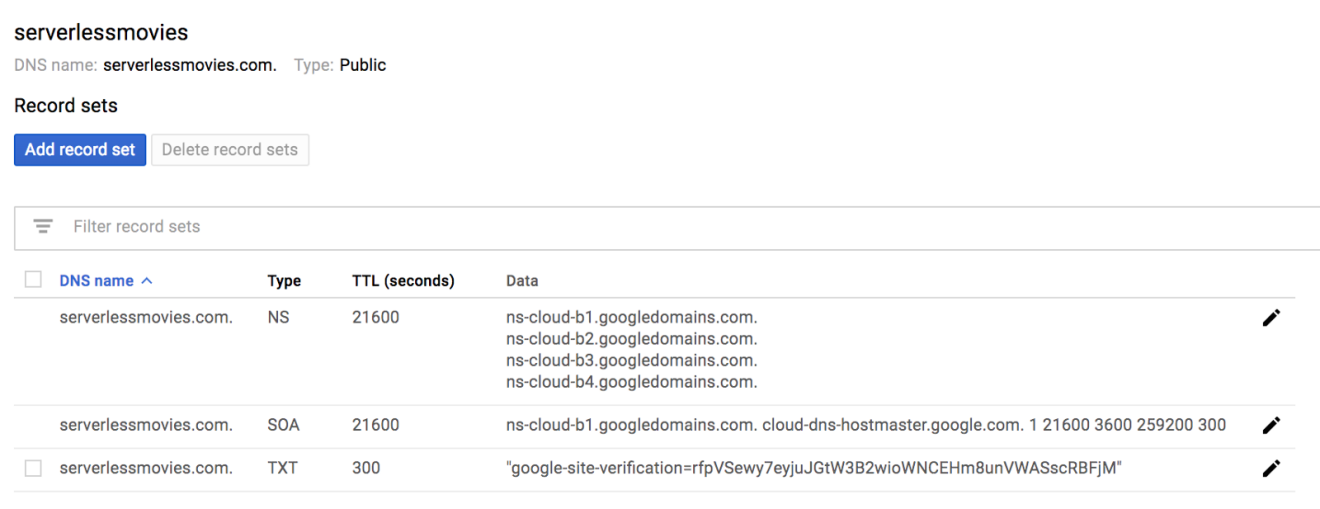
Sign in to Google Cloud Platform, navigate to Cloud DNS service and create a new public DNS zone:
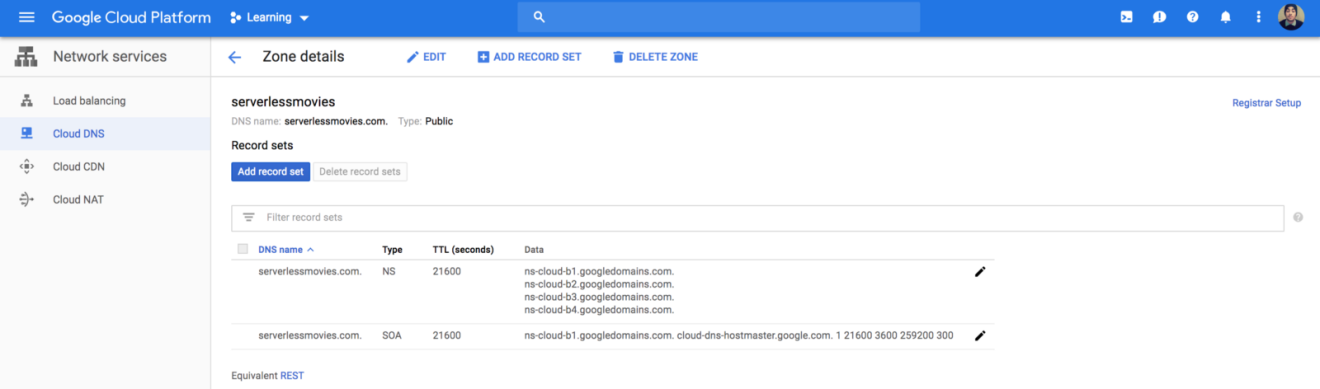
By default it will have a NS (Nameserver) and a SOA (Start of Authority) records:
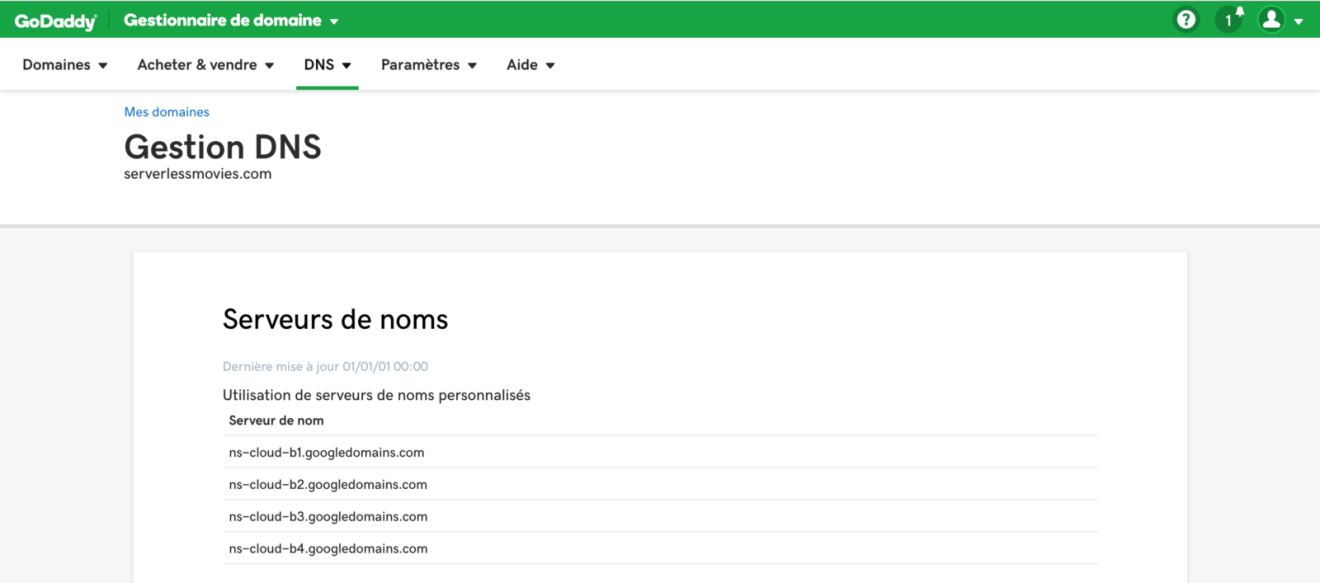
Go to you domain registrar, in my case I purchased a domain name from GoDaddy (super cheap). Add the nameserver names that were listed in your NS record:
PS: It can take some time for the changes on GoDaddy to propagate through to Google Cloud DNS.
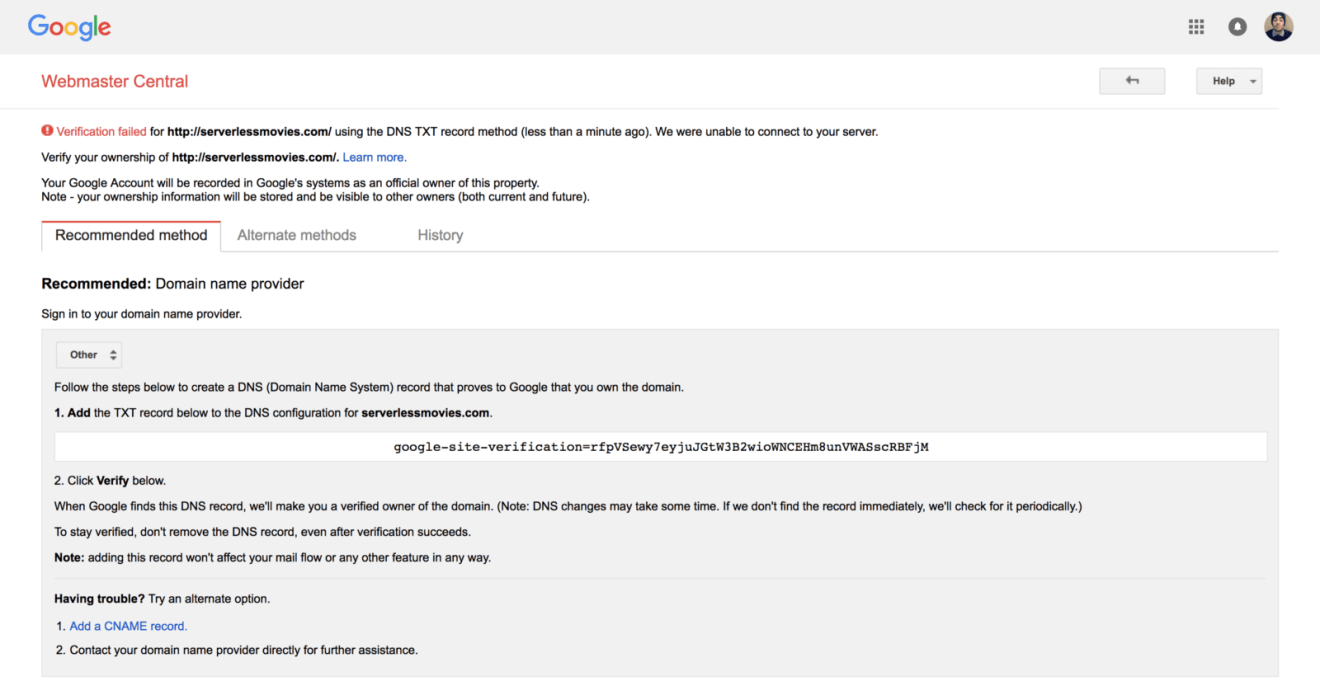
Next, verify you own the domain name using the Open Search Console. Many methods are available (HTML Meta data, Google Analytics, etc). The easiest one is DNS verification through a TXT record:
Add the TXT record to your DNS zone created earlier:
DNS changes might take some time to propagate:
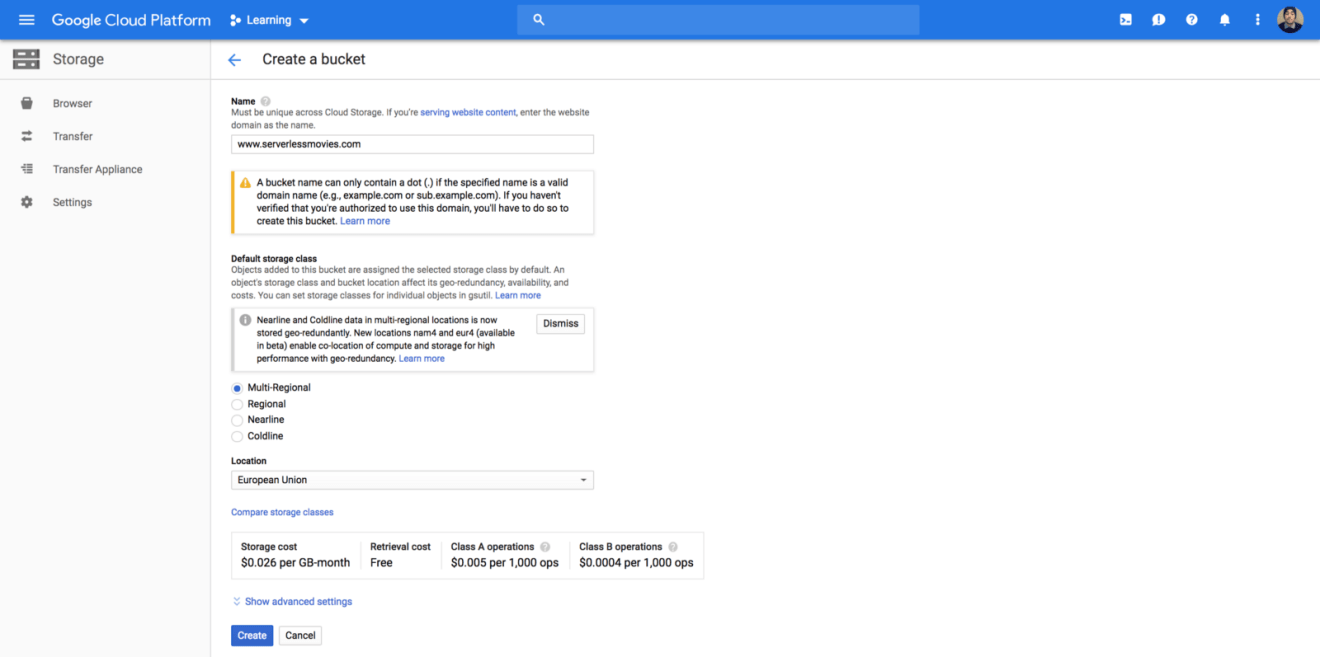
Once you have verified domain, you can create a bucket with Cloud Storage under the verified domain name. The storage class should be “Multi-Regional” (geo redundant bucket, in case of outage) :
Copy the website static files to the bucket using the following command:
1
gsutil rsync -R . gs://www.serverlessmovies.com/
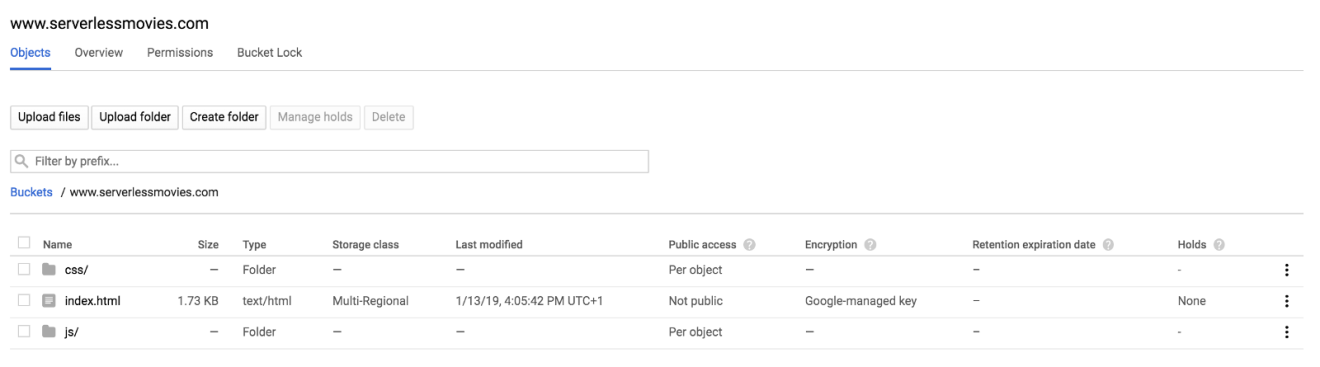
After the upload completes, your static files should be available on the bucket as follows:
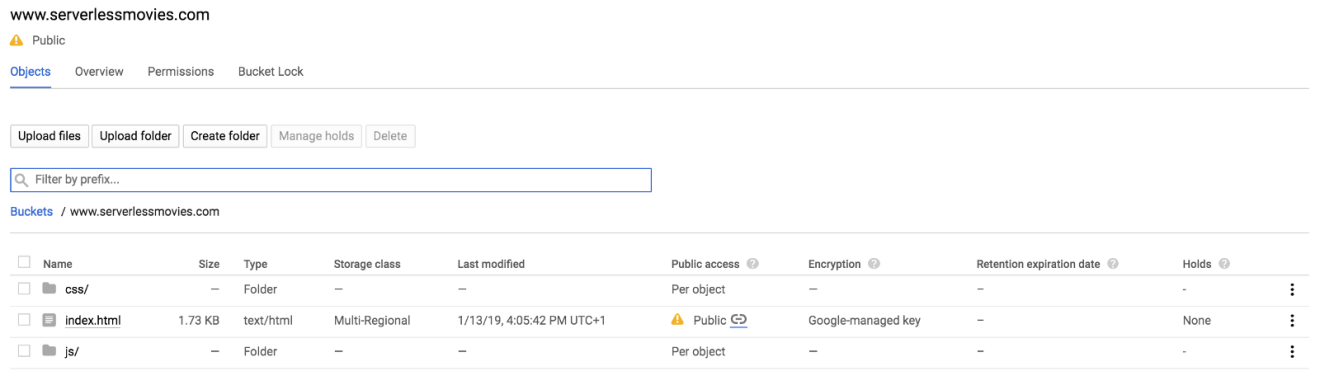
Next, make the files publicly accessible by adding allUsers entity with Object Viewer role to the bucket permissions:
Once shared publicly, a link icon appears for each object in the public access column. You can click on this icon to get the URL for the object:
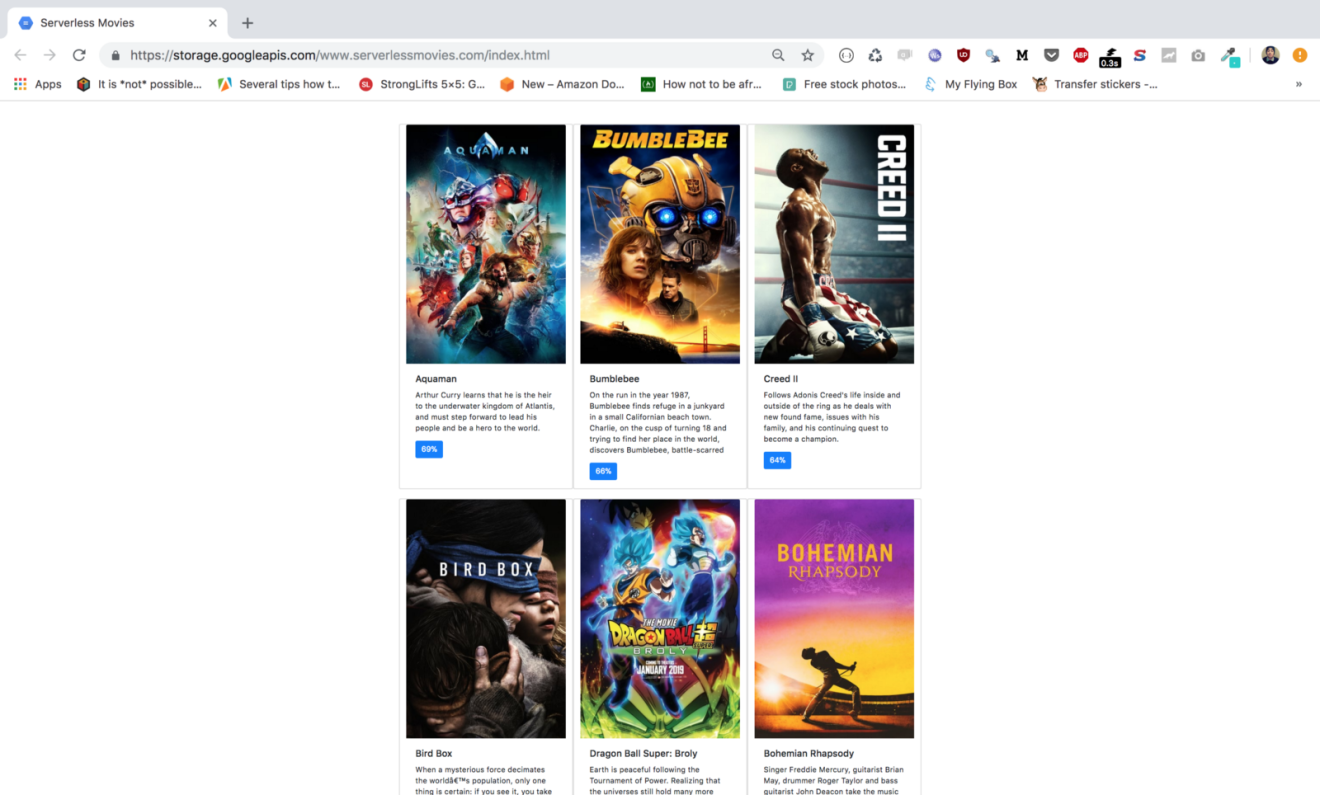
Verify that content is served from the bucket by requesting the index.html link in you browser:
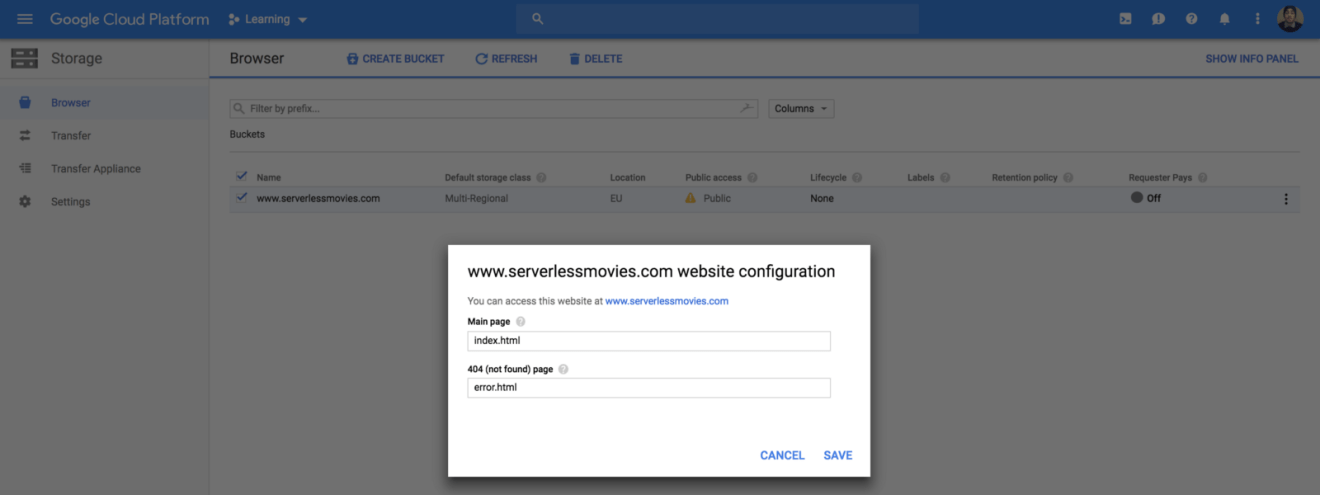
Next, set the main page to be index.html from “Edit website configuration” section:
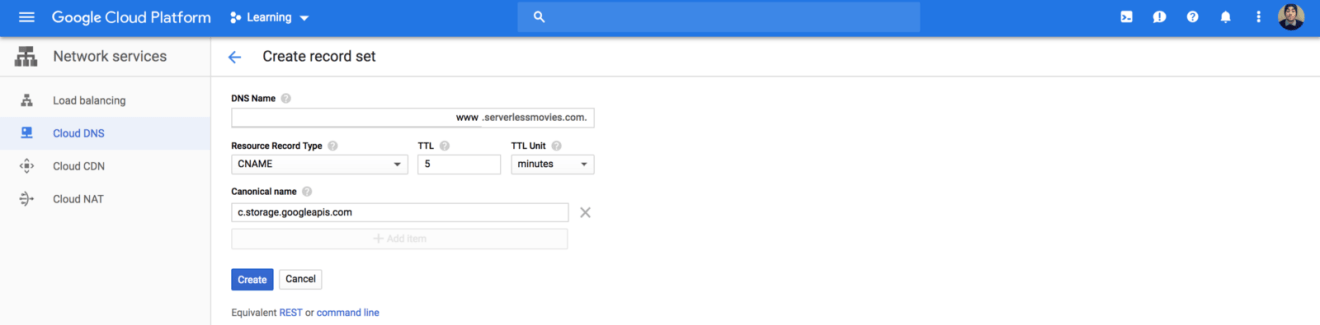
Now, we need to map our domain name with the bucket we created earlier. Create a CNAME record that points to c.storage.googleapis.com:
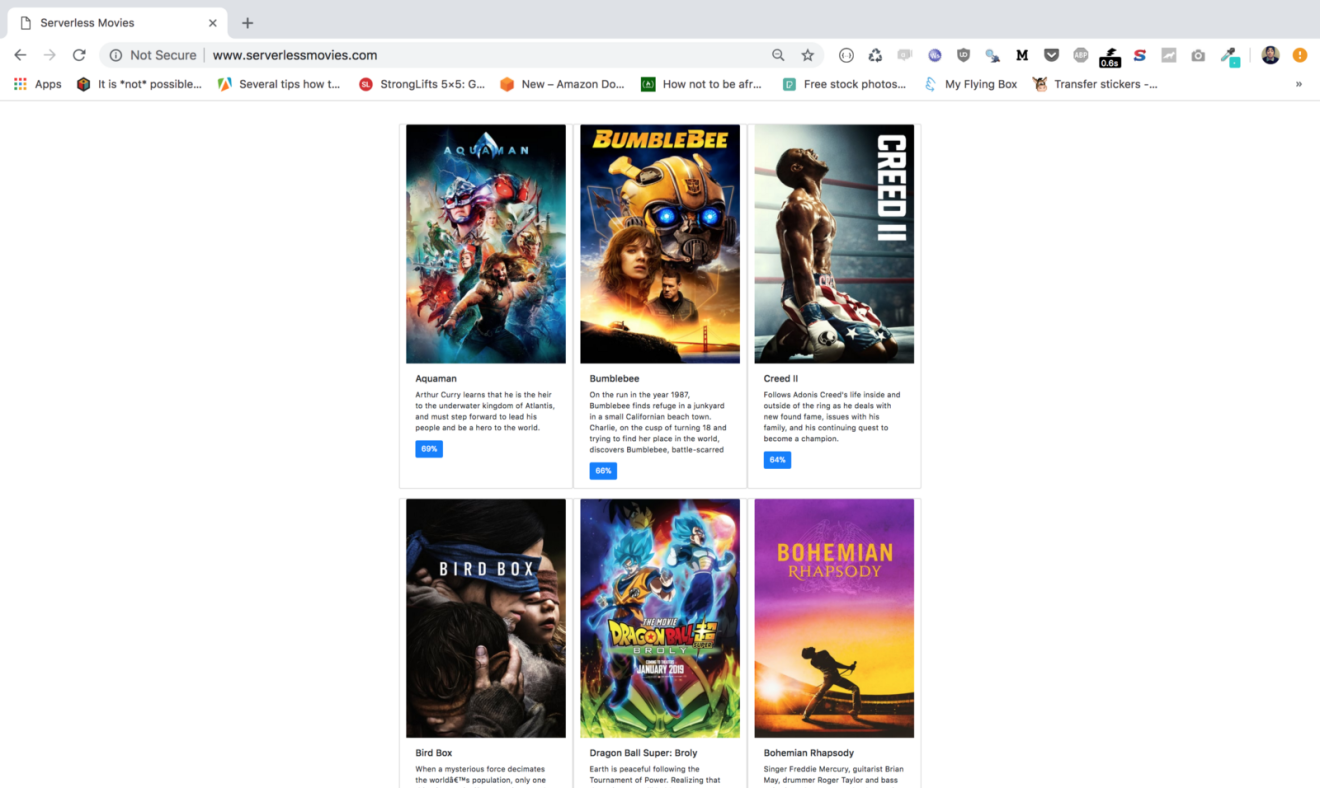
Point your browser to your domain name, your website should be served:
While our solution works like a charm, we can access our content through HTTP only (Google Cloud Storage only supports HTTP when using it through a CNAME record). In the next post, we will serve our content through a custom domain over SSL using a Content Delivery Network (CDN).
Drop your comments, feedback, or suggestions below — or connect with me directly on Twitter @mlabouardy.
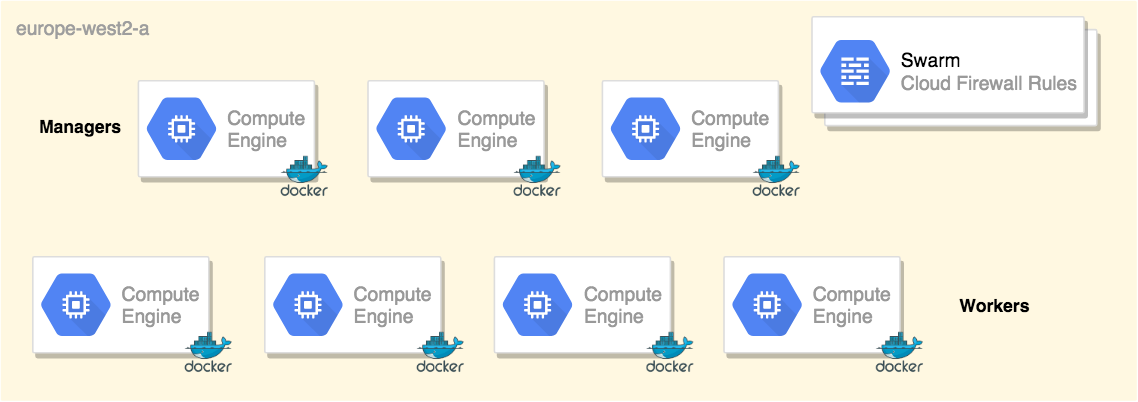
Kubernetes might be the ultimate choice when deploying heavy workloads on Google Cloud Platform. However, Docker Swarm has always been quite popular among developers who prefer fast deployments and simplicity— and among ops who are learning to get comfortable with an orchestrated environment.
In this post, we will walk through how to deploy a Docker Swarm cluster on GCP using Terraform from scratch. Let’s do it!
All the templates and playbooks used in this tutorial, can be found on my GitHub.
Get Started
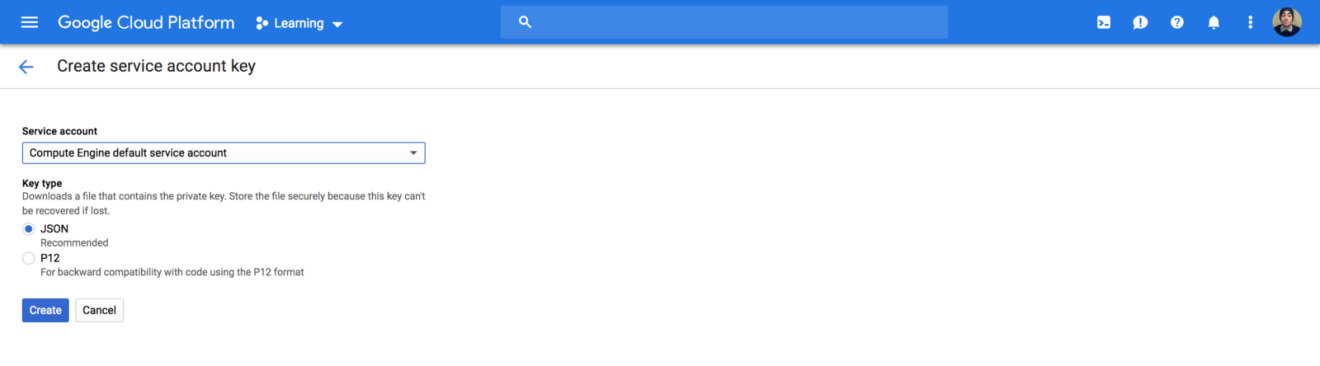
To get started, sign in to your Google Cloud Platform console and create a service account private key from IAM:
Download the JSON file and store it in a secure folder.
For simplicity, I have divided my Swarm cluster components to multiple template files — each file is responsible for creating a specific Google Compute resource.
1. Setup your swarm managers
In this example, I have defined the Docker Swarm managers based on the CoreOS image:
Similarly, a set of Swarm workers based on CoreOS image, and I have used the resource dependencies feature of Terraform to ensure the Swarm managers are deployed first. Please note the usage of depends_on keyword:
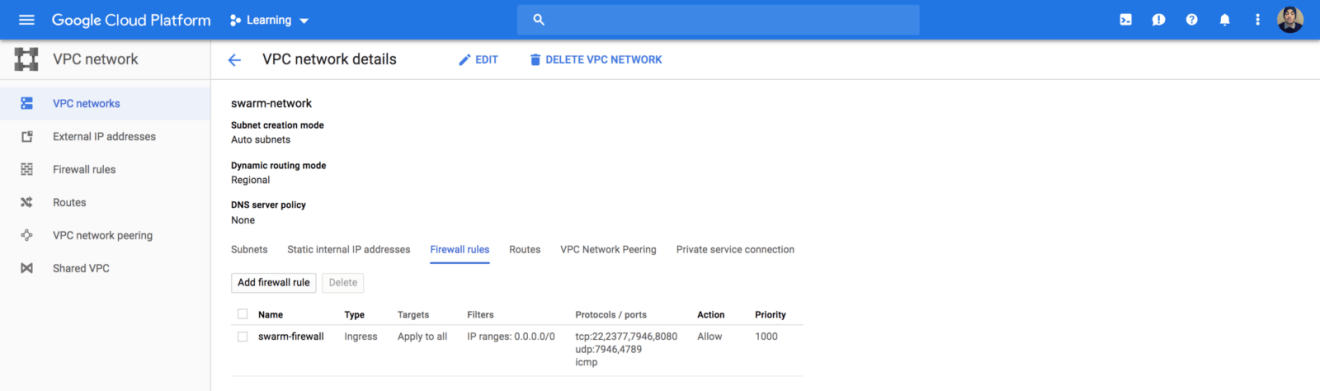
Also, I have defined a network interface with a list of firewall rules that allows inbound traffic for cluster management, raft sync communications, docker overlay network traffic and ssh from anywhere:
resource "google_compute_network" "swarm" { name = "swarm-network" }
4. Automate your inventory with Terraform
In order to take automation to the next level, let’s use Terraform template_file data source to generate a dynamic Ansible inventory from Terraform state file:
Once the templates are defined, we will use Ansible to provision our instances and turn them to a Swarm cluster. Hence, I created 3 Ansible roles:
python: as its name implies, it will install Python on the machine. CoreOS ships only with the basics, it’s a minimal linux distribution without much except tools centered around running containers.
swarm-init: execute the docker swarm init command on the first manager and store the swarm join tokens.
swarm-join: join the node to the cluster using the token generated previously.
By now, your main playbook will look something like:
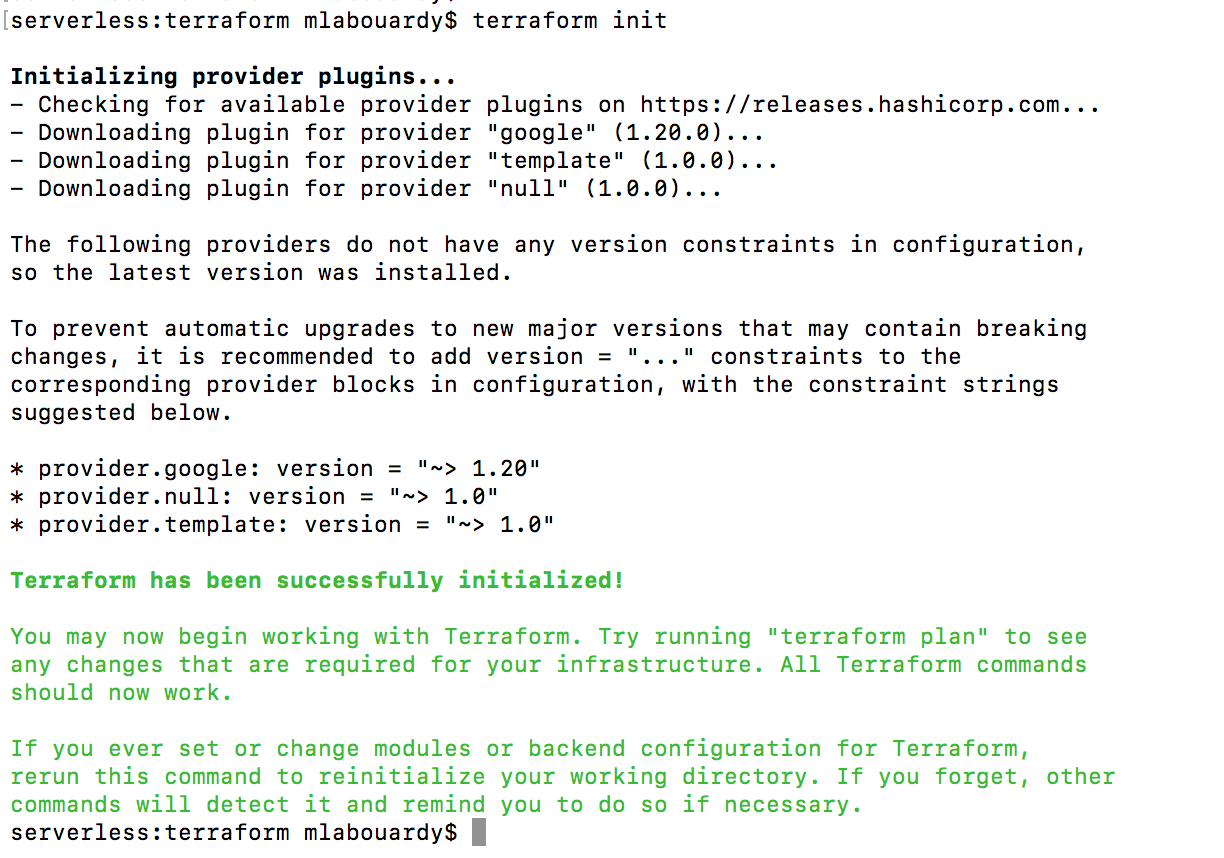
To test it out, open a new terminal session and issue terraform init command to download the google provider:
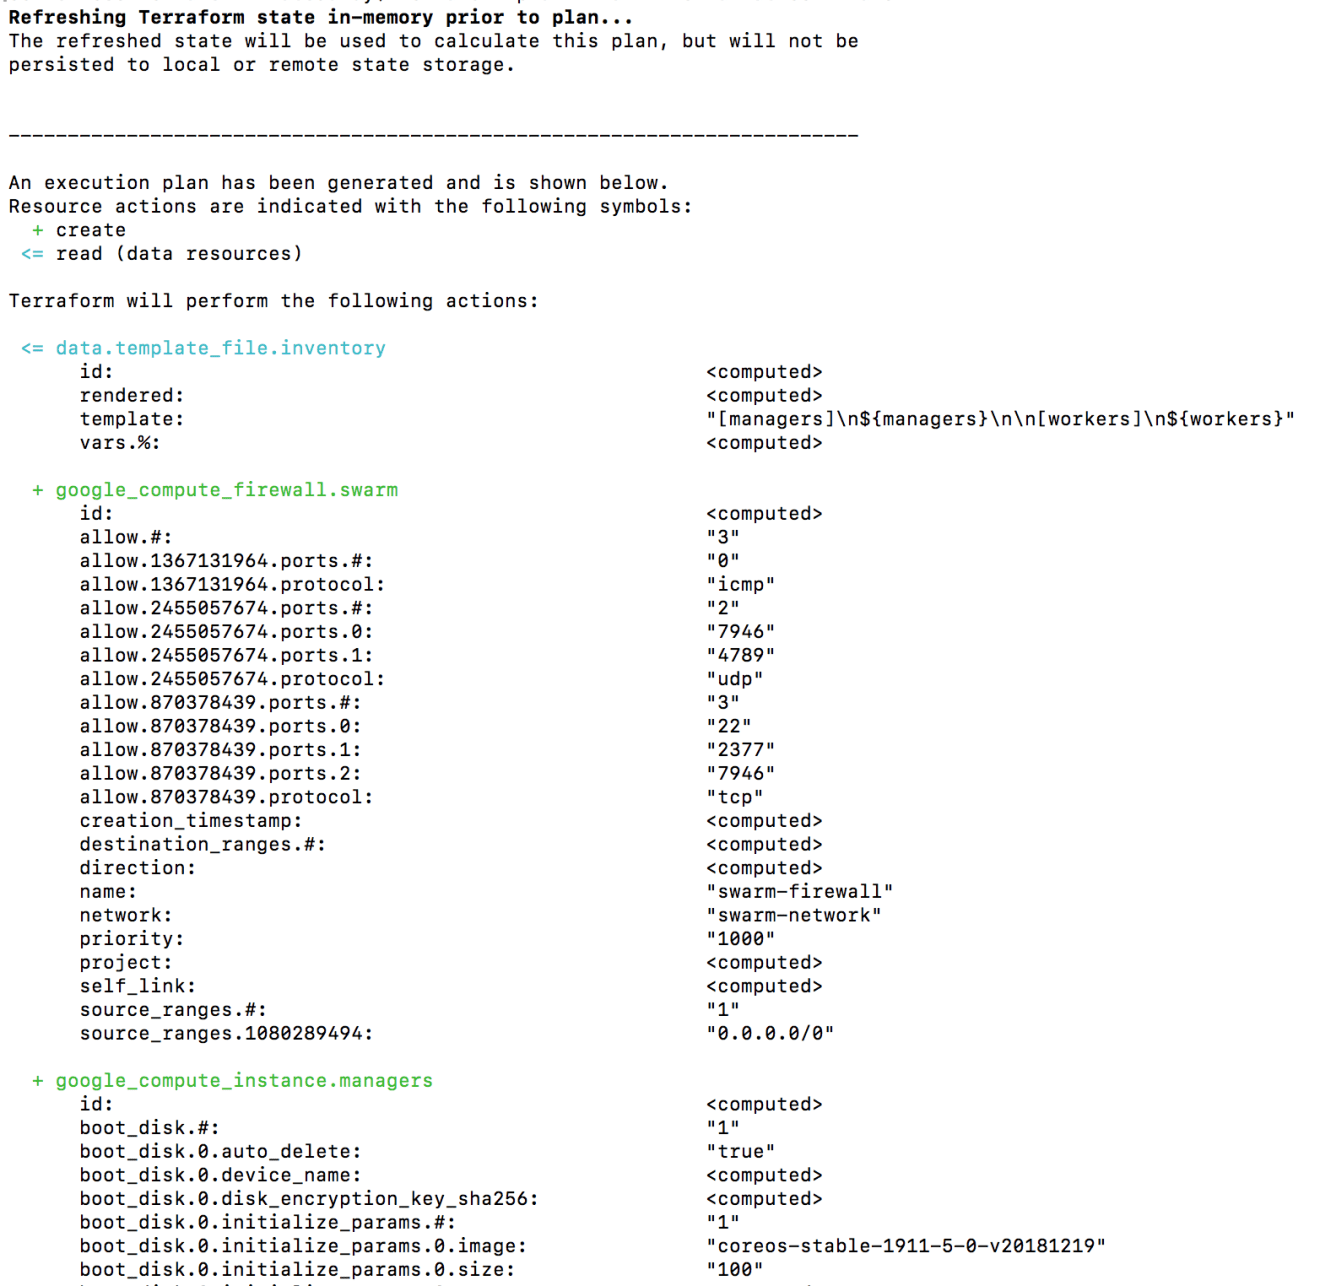
Create an execution plan (dry run) with the terraform plan command. It shows you things that will be created in advance, which is good for debugging and ensuring that you’re not doing anything wrong, as shown in the next screenshot:
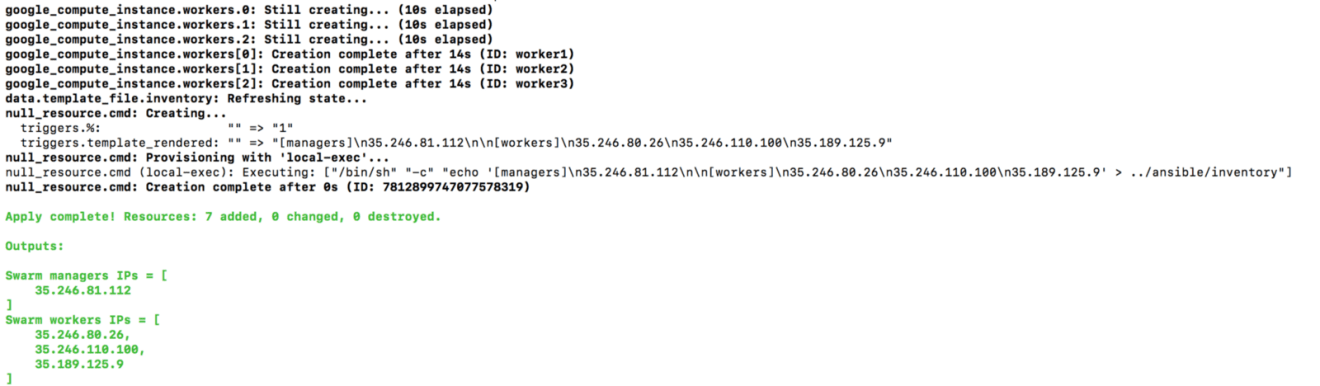
You will be able to examine Terraform’s execution plan before you deploy it to GCP. When you’re ready, go ahead and apply the changes by issuing terraform apply command.
The following output will be displayed (some parts were cropped for brevity):
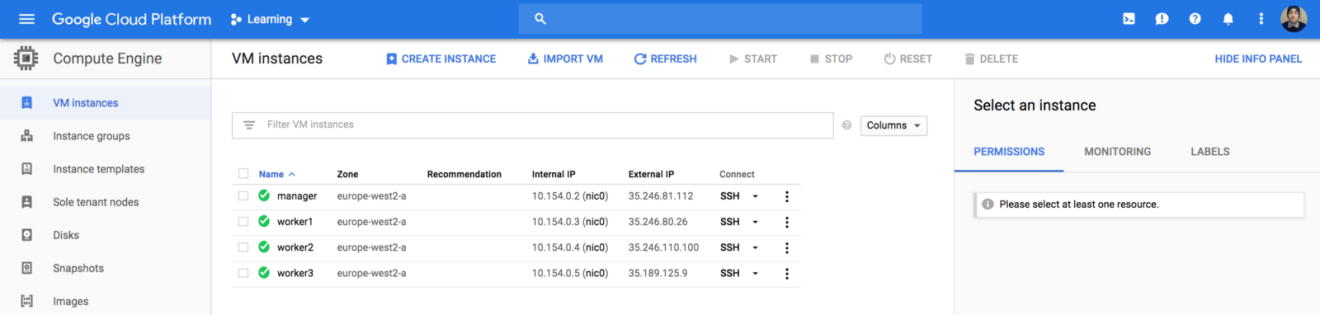
If you head back to Compute Engine Dashboard, your instances should be successfully created:
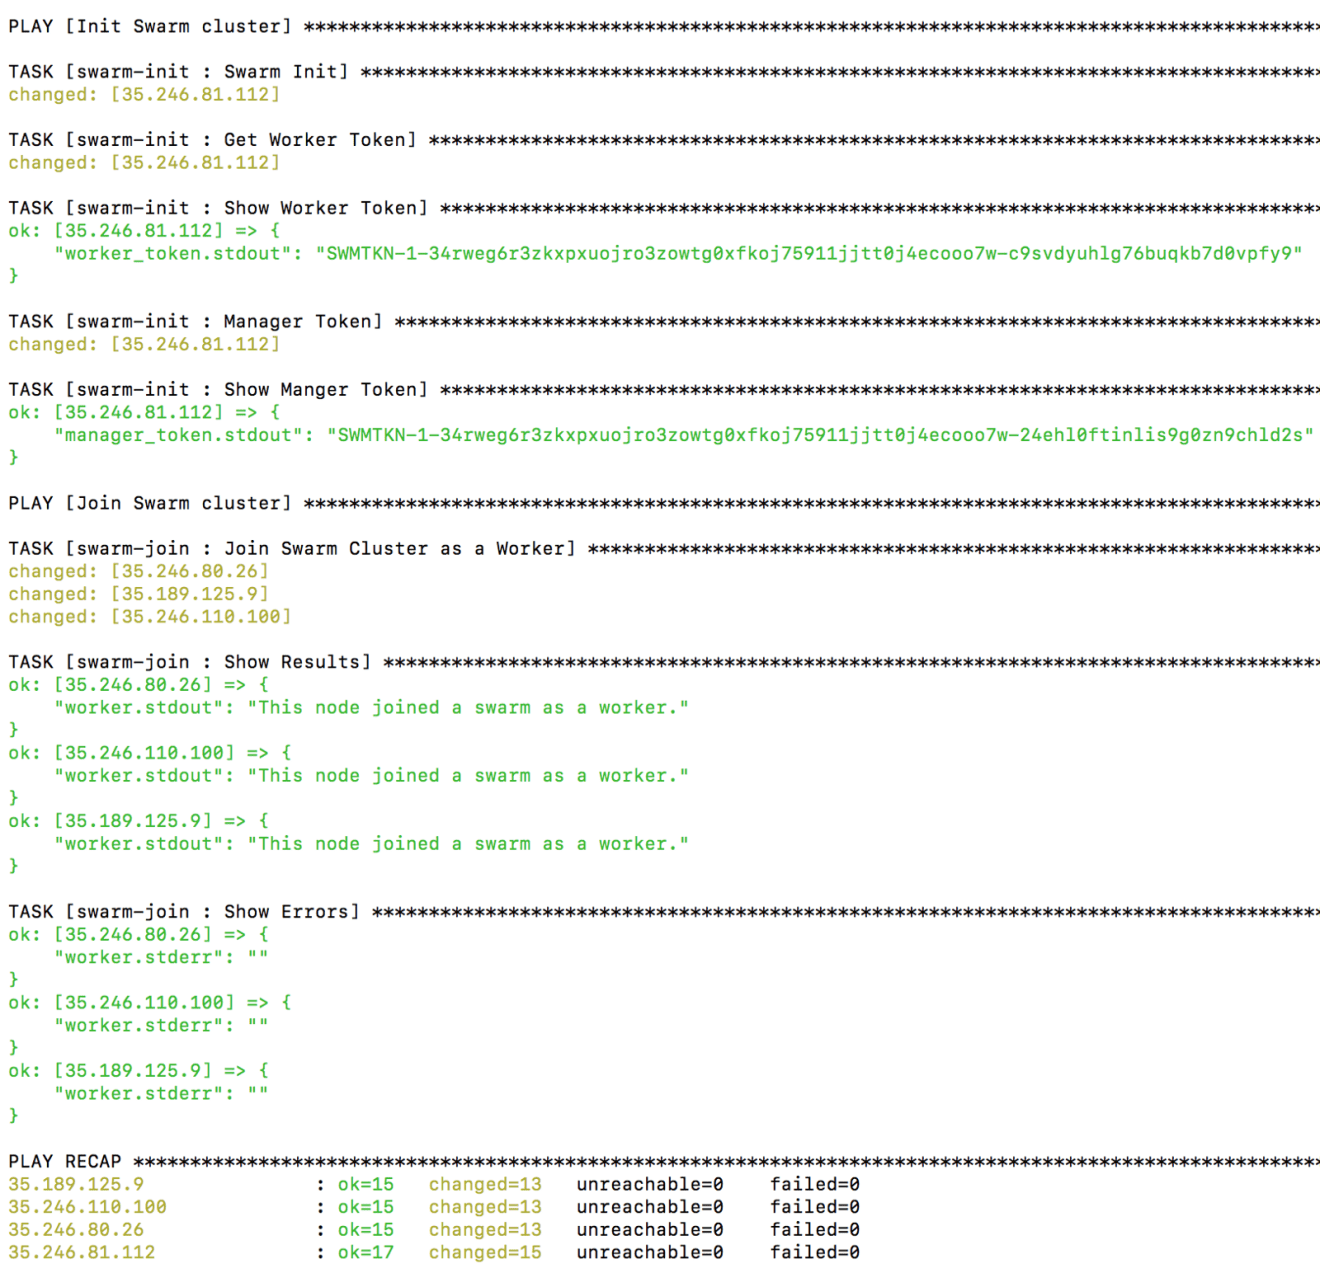
7. Create your Swarm cluster with Ansible
Now our instances are created, we need to turn them to a Swarm cluster with Ansible. Issue the following command:
1
ansible-playbook -i inventory main.yml
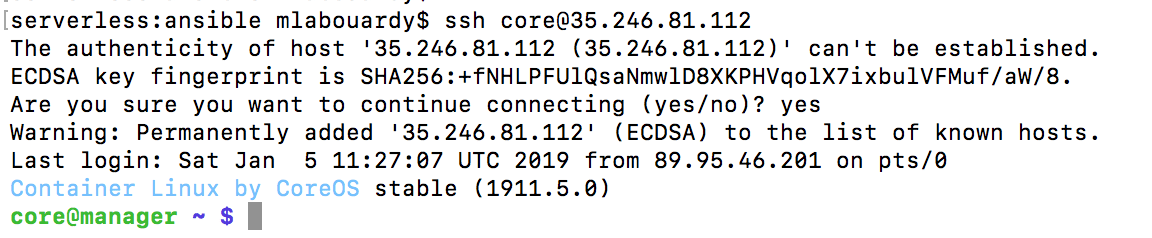
Next, SSH to the manager instance using it’s public IP address:
If you run docker node ls, you will get a list of nodes in the swarm:
Deploy the visualizer service with the following command:
1 2 3
docker service create --name=visualizer --publish=8080:8080/tcp \ --constraint=node.role==manager --mount=type=bind,src=/var/run/docker.sock,dst=/var/run/docker.sock \ dockersamples/visualizer
8. Update your network rules
The service is exposed on port 8080 of the instance. Therefore, we need to allow inbound traffic on that port, you can use Terraform to update the existing firewall rules:
resource "google_compute_network" "swarm" { name = "swarm-network" }
Run terraform apply again to create the new ingress rule, it will detect the changes and ask you to confirm it:
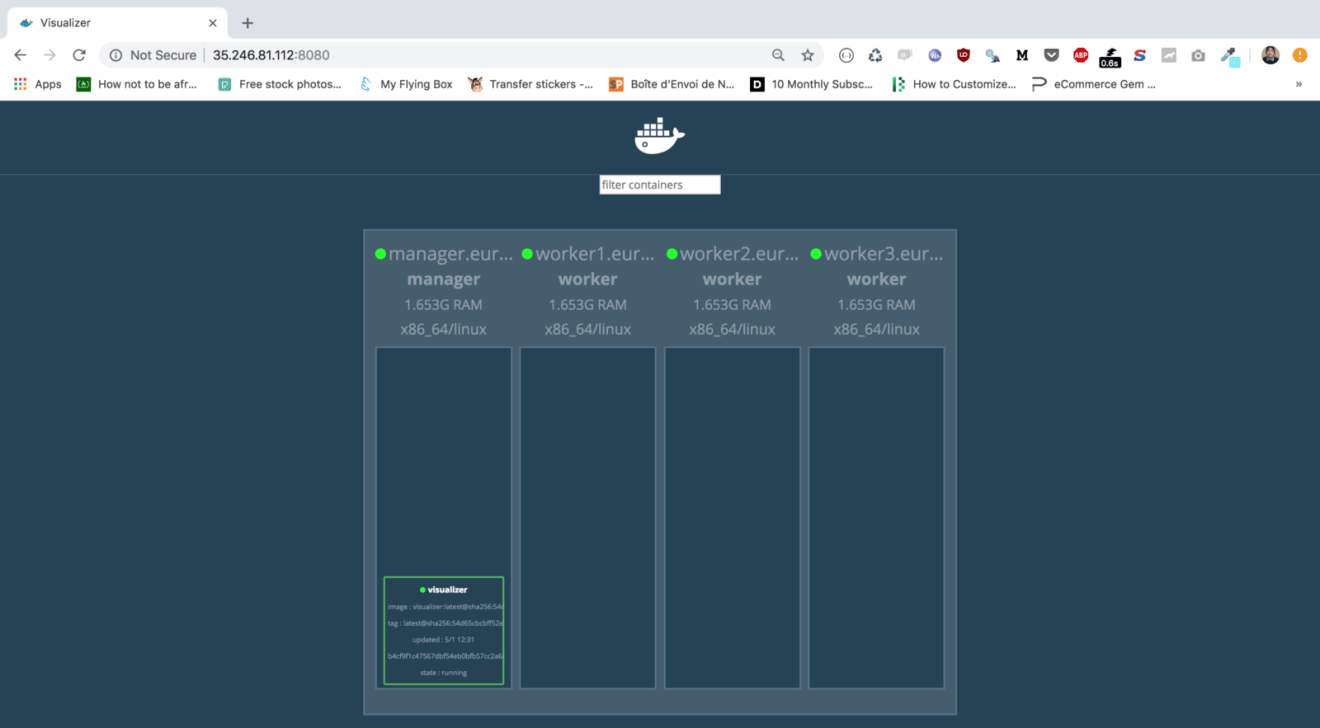
If you point your favorite browser to your http://instance_ip:8080, the following dashboard will be displayed which confirms our cluster is fully setup:
In an upcoming post, we will see how we can take this further by creating a production-ready Swarm cluster on GCP inside a VPC — and how to provision Swarm managers and workers on-demand using instance groups based on increases or decreases in load.
We will also learn how to bake a CoreOS machine image with Python preinstalled with Packer, and how to use Terraform and Jenkins to automate the infrastructure deployment!
Drop your comments, feedback, or suggestions below — or connect with me directly on Twitter @mlabouardy.
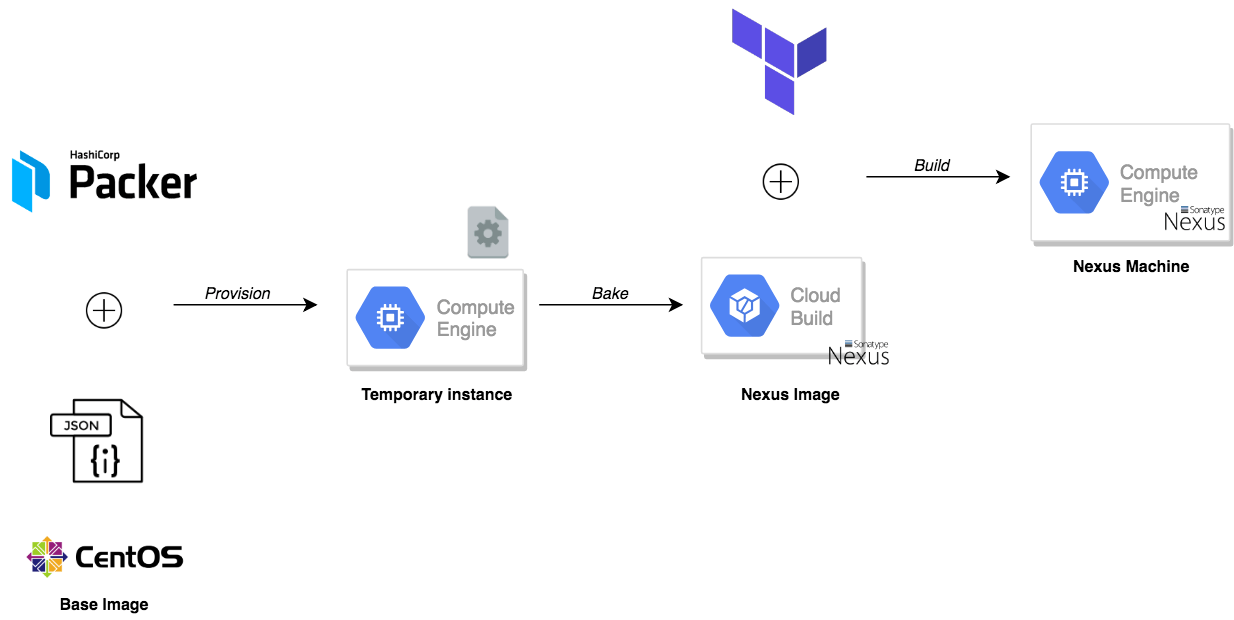
In this post, I will walk you through how to deploy Sonatype Nexus OSS 3 on Google Cloud Platform and how to create a private Docker hosted repository to store your Docker images and other build artifacts (maven, npm and pypi, etc). To achieve this, we need to bake our machine image using Packer to create a gold image with Nexus preinstalled and configured. Terraform will be used to deploy a Google compute instance based on the baked image. The following schema describes the build workflow:
PS : All the templates used in this tutorial, can be found on my GitHub.
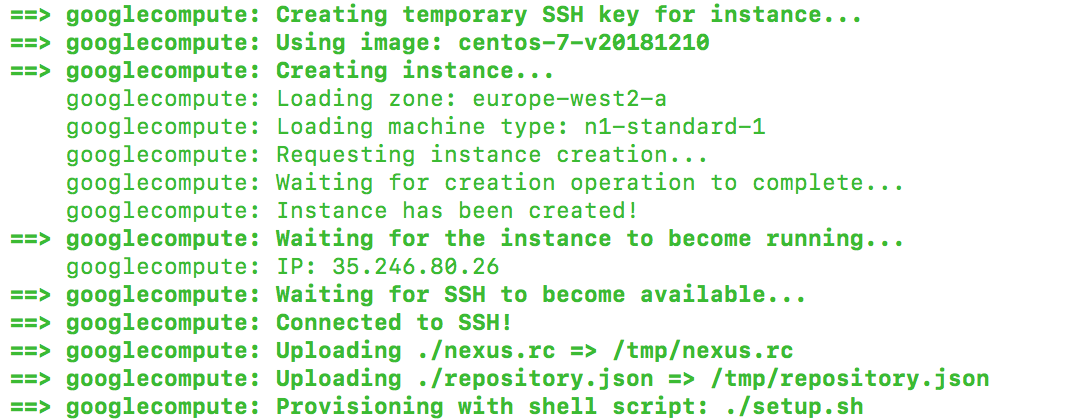
To get started, we need to create the machine image to be used with Google Compute Engine (GCE). Packer will create a temporary instance based on the CentOS image and use a shell script to provision the instance:
The shell script, will install the latest stable version of Nexus OSS based on their official documentation and wait for the service to be up and running, then it will use the Scripting API to post a groovy script:
Once the template files are defined, issue packer build command to bake our machine image:
If you head back to Images section from Compute Engine dashboard, a new image called nexus should be created:
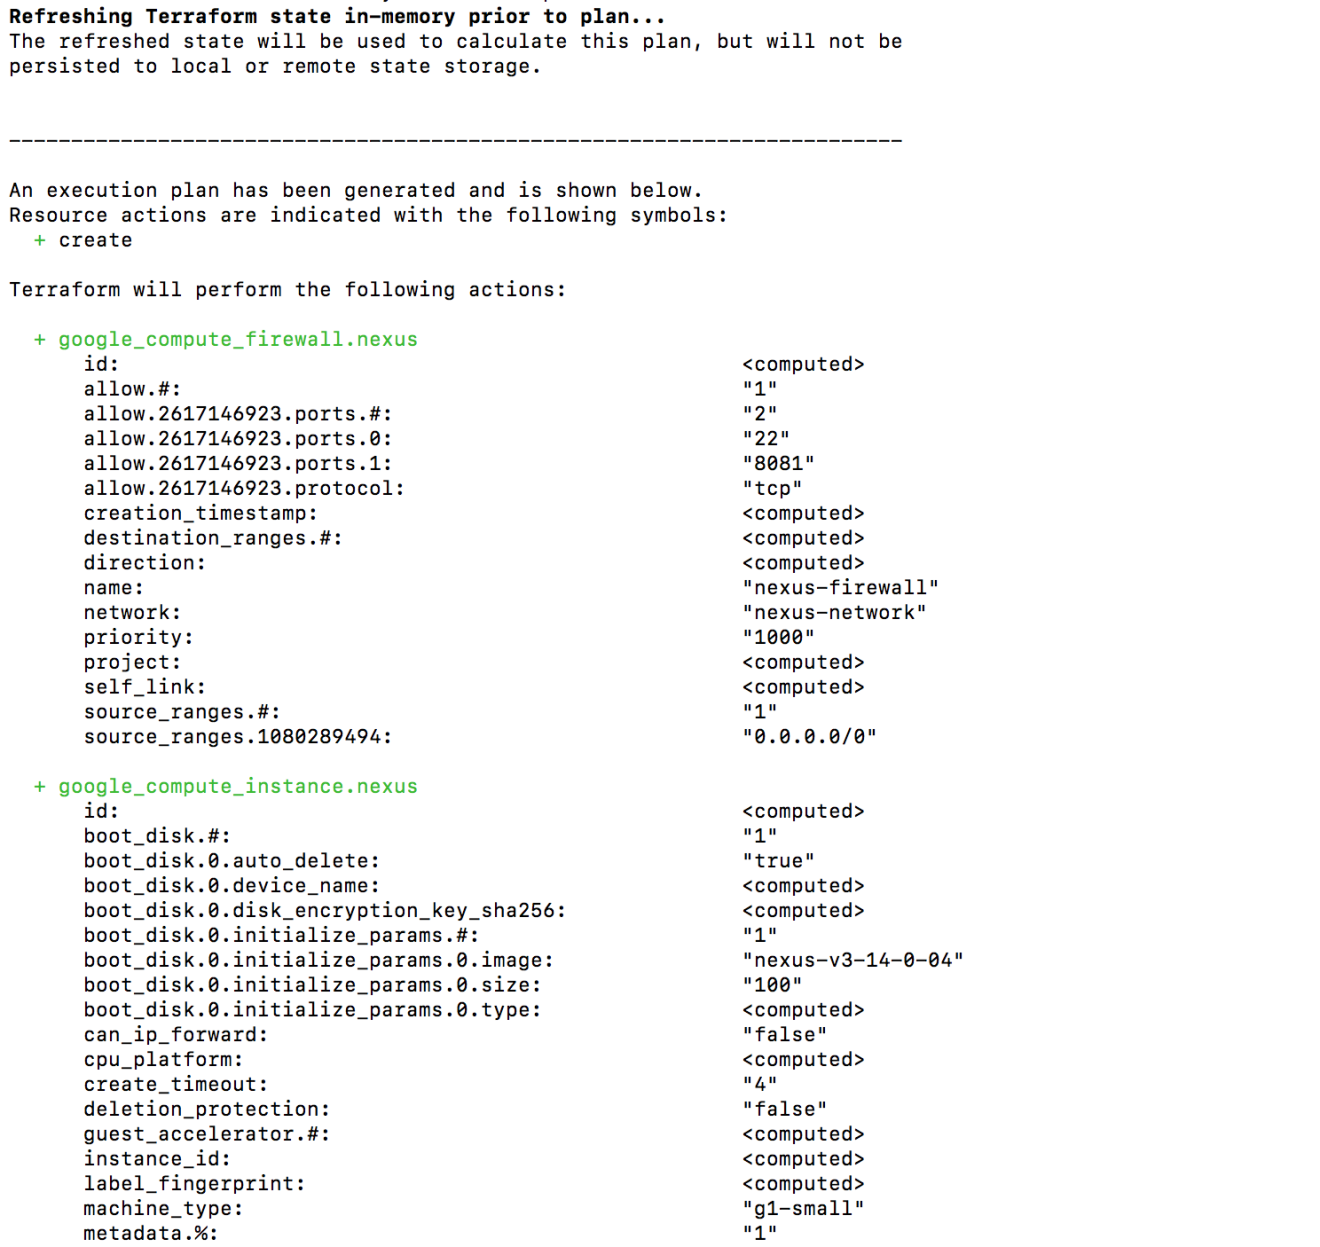
Now we are ready to deploy Nexus, we will create a Nexus server based on the machine image we baked with Packer. The template file is self-explanatory, it creates a set of firewall rules to allow inbound traffic on port 8081 (Nexus GUI) and 22 (SSH) from anywhere, and creates a google compute instance based on the Nexus image:
On the terminal, run the terraform init command to download and install the Google provider, shown as follows:
Create an execution plan (dry run) with the terraform plan command. It shows you things that will be created in advance, which is good for debugging and ensuring that you’re not doing anything wrong, as shown in the next screenshot:
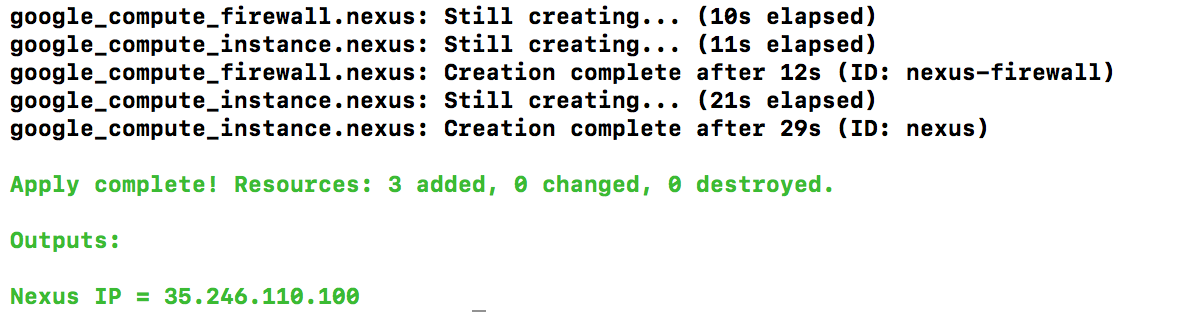
When you’re ready, go ahead and apply the changes by issuing terraform apply:
Terraform will create the needed resources and display the public ip address of the nexus instance on the output section. Jump back to GCP Console, your nexus instance should be created:
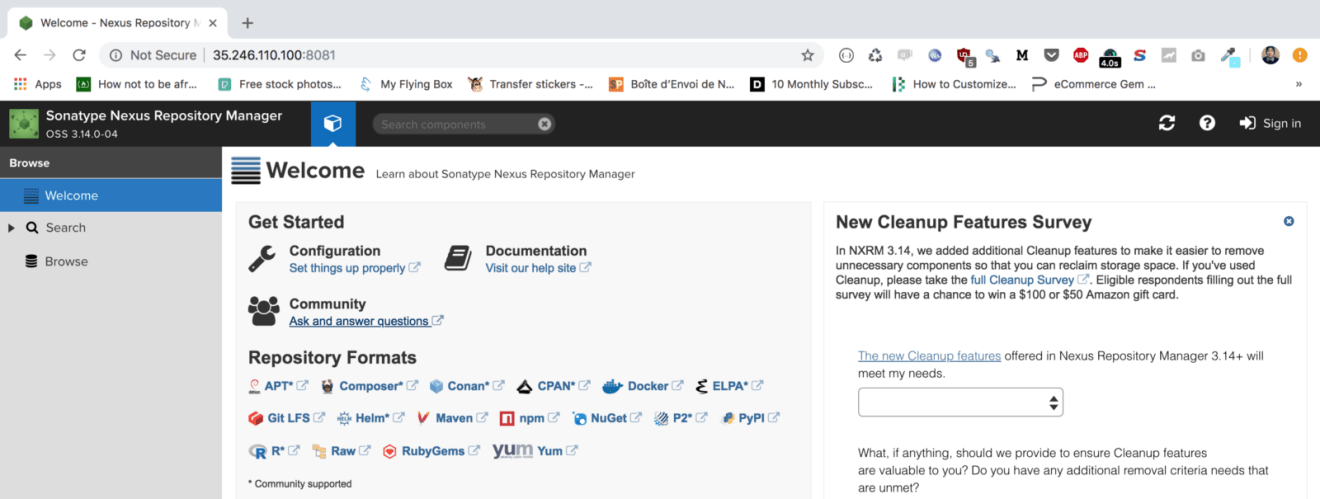
If you point your favorite browser to http://instance_ip:8081, you should see the Sonatype Nexus Repository Manager interface:
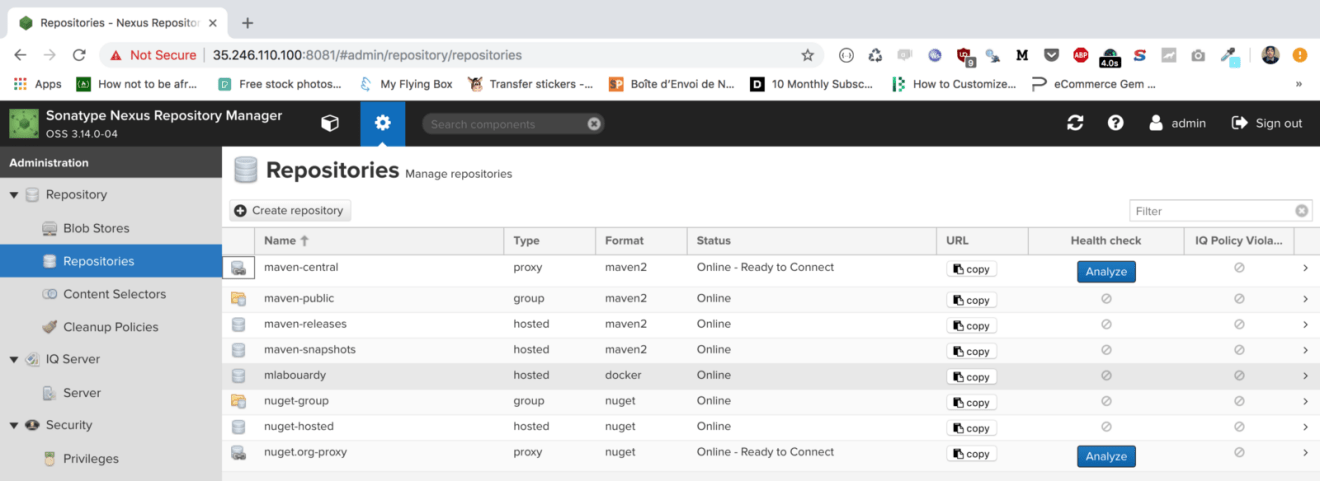
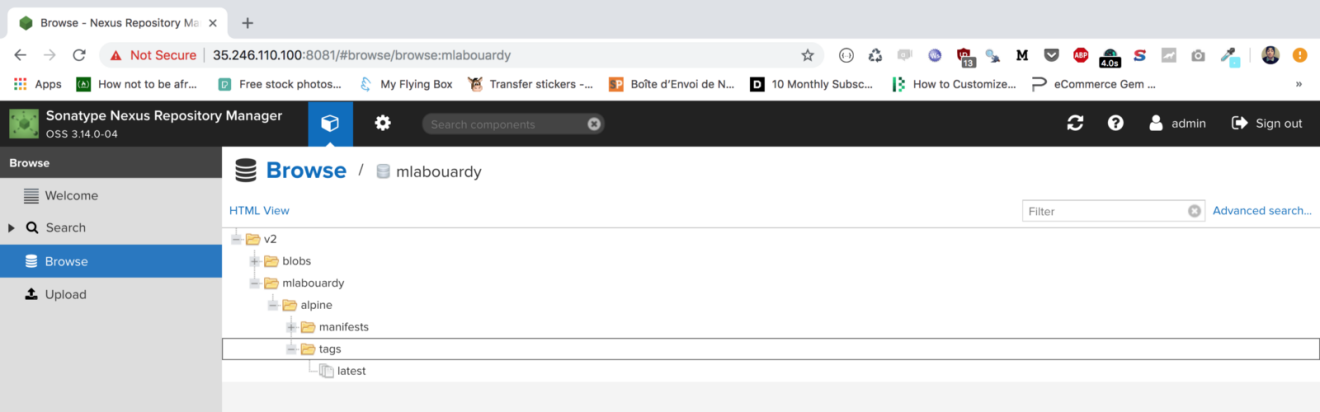
Click the “Sign in” button in the upper right corner and use the username “admin” and the password “admin123”. Then, click on the cogwheel to go to the server administration and configuration section. Navigate to “Repositories”, our private Docker repository should be created as follows:
The docker repository is published as expected on port 5000:
Hence, we need to allow inbound traffic on that port, so update the firewall rules accordingly:
1 2 3 4 5 6 7 8 9 10 11 12 13 14 15
resource "google_compute_firewall" "nexus" { name = "nexus-firewall" network = "${google_compute_network.nexus.name}"
resource "google_compute_network" "nexus" { name = "nexus-network" }
Issue terrafrom apply command to apply the changes:
Your private docker registry is ready to work at instance_ip:5000, let’s test it by pushing a docker image.
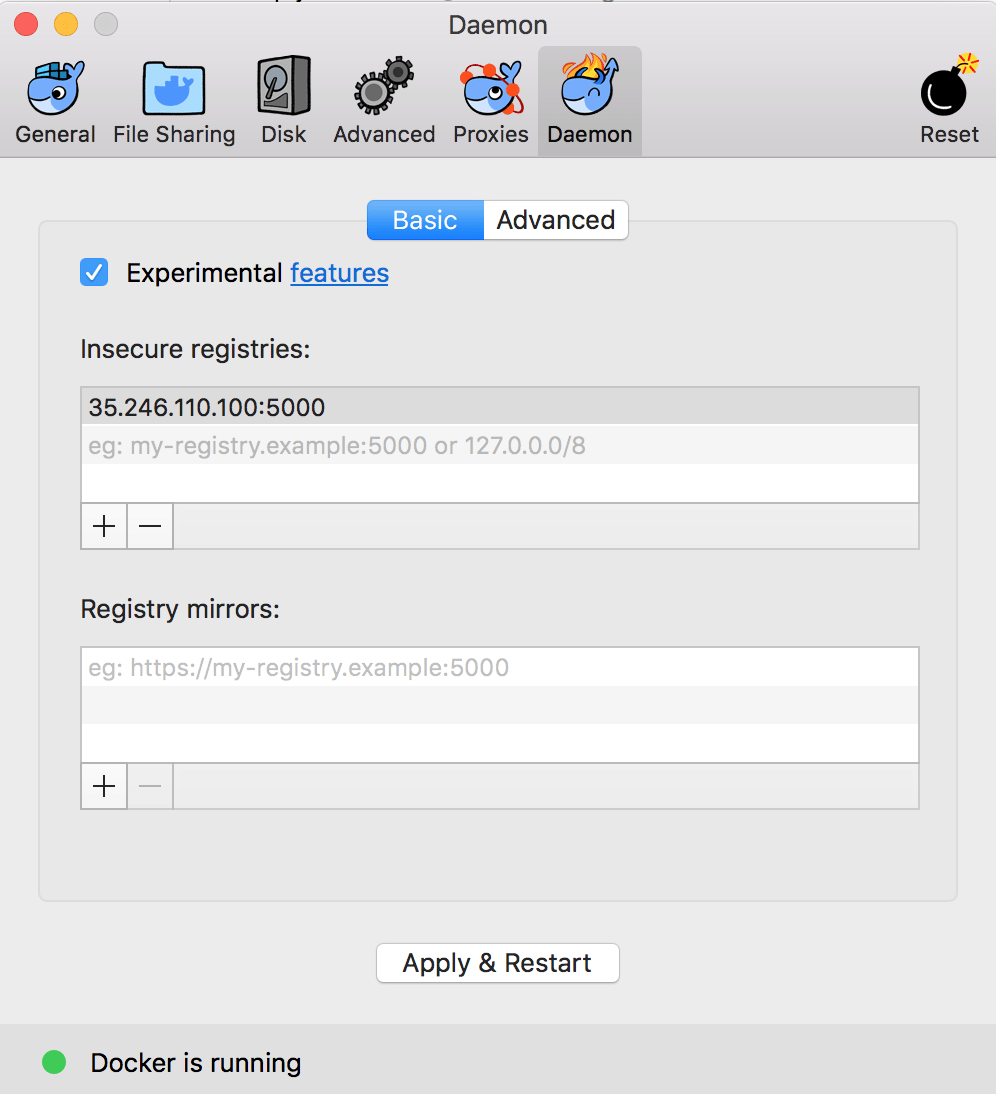
Since we have exposed the private Docker registry on a plain HTTP endpoint, we need to configure the Docker daemon that will act as client to the private Docker registry as to allow for insecure connections.
On Windows or Mac OS X: Click on the Docker icon in the tray to open Preferences. Click on the Daemon tab and add the IP address on which the Nexus GUI is exposed along with the port number 5000 in Insecure registries section. Don’t forget to Apply & Restart for the changes to take effect and you’re ready to go.