
Episode 5:Build a Docker Swarm Cluster on AWS
This is the first video in a 10 part series by Mohamed Labouardy, showing how to build a simple DevOps pipeline, including built-in security at each stage. To follow the series, please join the community to receive notification as each episode is released.
Episode 4:Manage a Secure Private Docker Registry with Sonatype Nexus and ACM
This is the first video in a 10 part series by Mohamed Labouardy, showing how to build a simple DevOps pipeline, including built-in security at each stage. To follow the series, please join the community to receive notification as each episode is released.

How to play PUBG on AWS
AWS GPU instances are known for deep learning purposes but they can also be used for running video games. This tutorial goes through how to set up your own EC2 GPU optimised instance to run the top-selling and most played game “PlayerUnknown’s Battlegrounds (PUBG)”.
To get started, make sure you are in the AWS region closest to you, select Microsoft Windows Server to be the AMI and set the instance type to be g2.2xlarge. The instance is backed by Nvidia Grid GPU (Kepler GK104), 8x hardware hyper-threads from an Intel Xeon E5–2670 and 15GB of RAM.
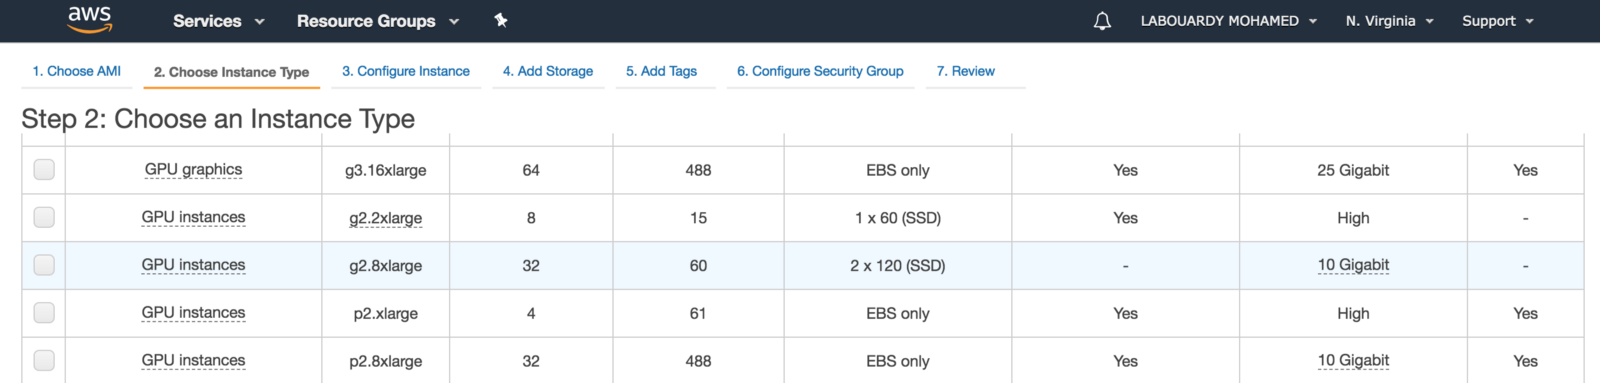
For games with resource-intensive, you should use the next generation of GPU instances: P2, P3 and G3 (have up to 4 NVIDIA Tesla M60 GPUs).
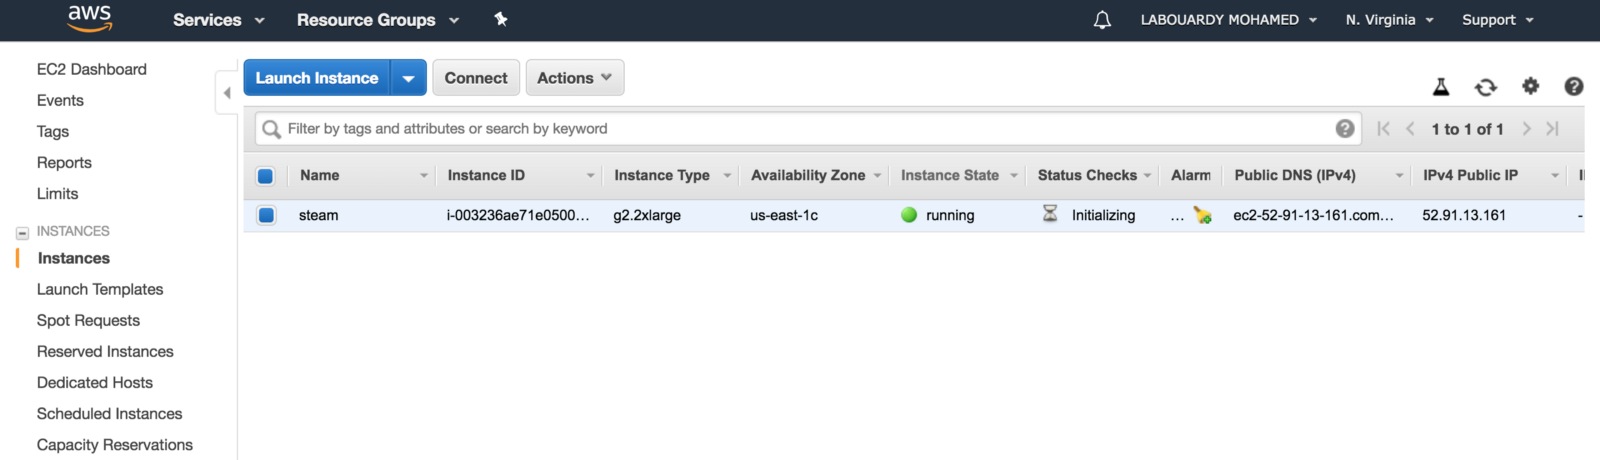
After this is done, click on “Launch Instances”, and you should see a screen showing that your instance is been created:
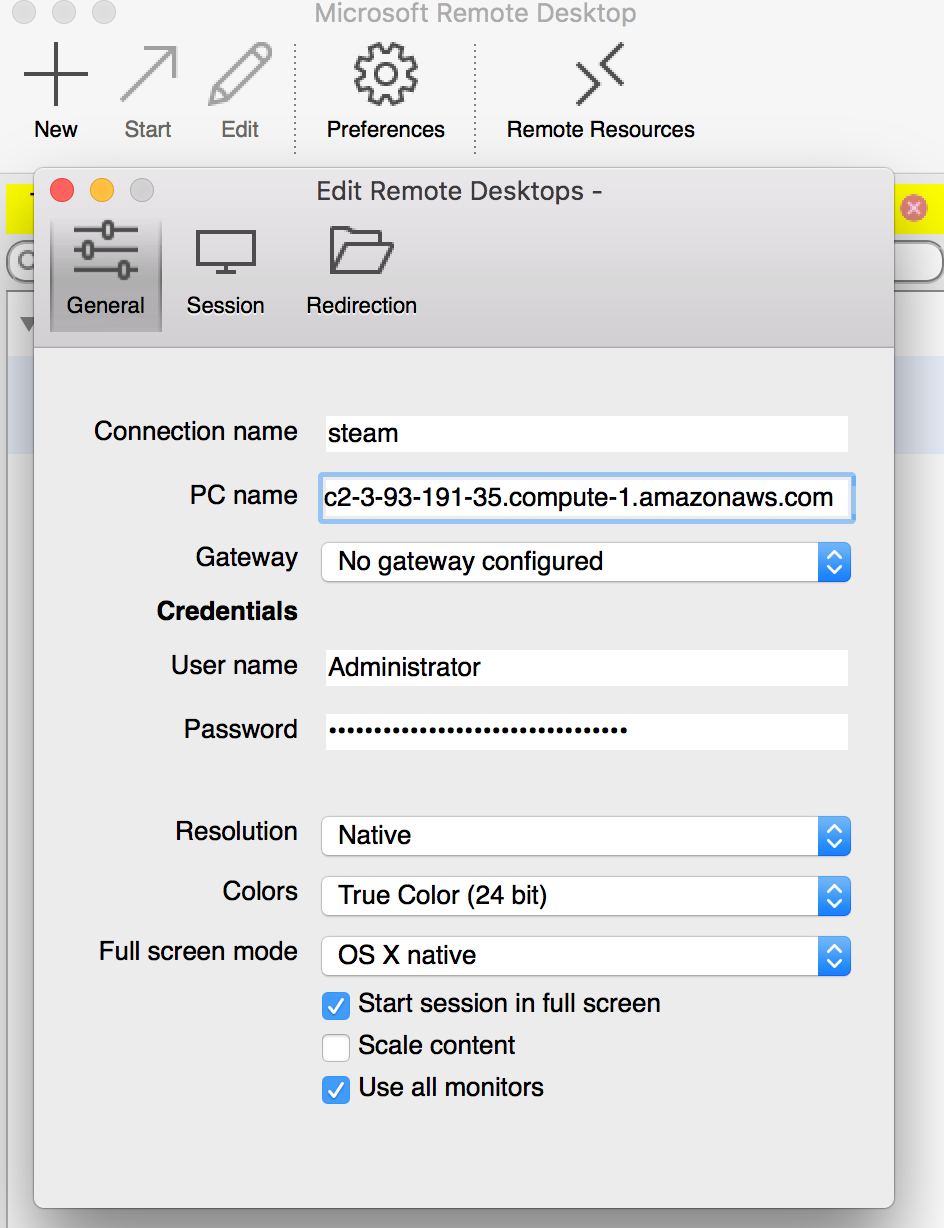
To connect to your Windows instance, you must retrieve the initial administrator password and specify this password when you connect to your instance using Remote Desktop:
Before you attempt to log in using Remote Desktop Connection, you must open port 3389 on the security group attached to your instance
After you connect, install Microsoft Direct X11 after installing Chrome (it saves a lot of time):

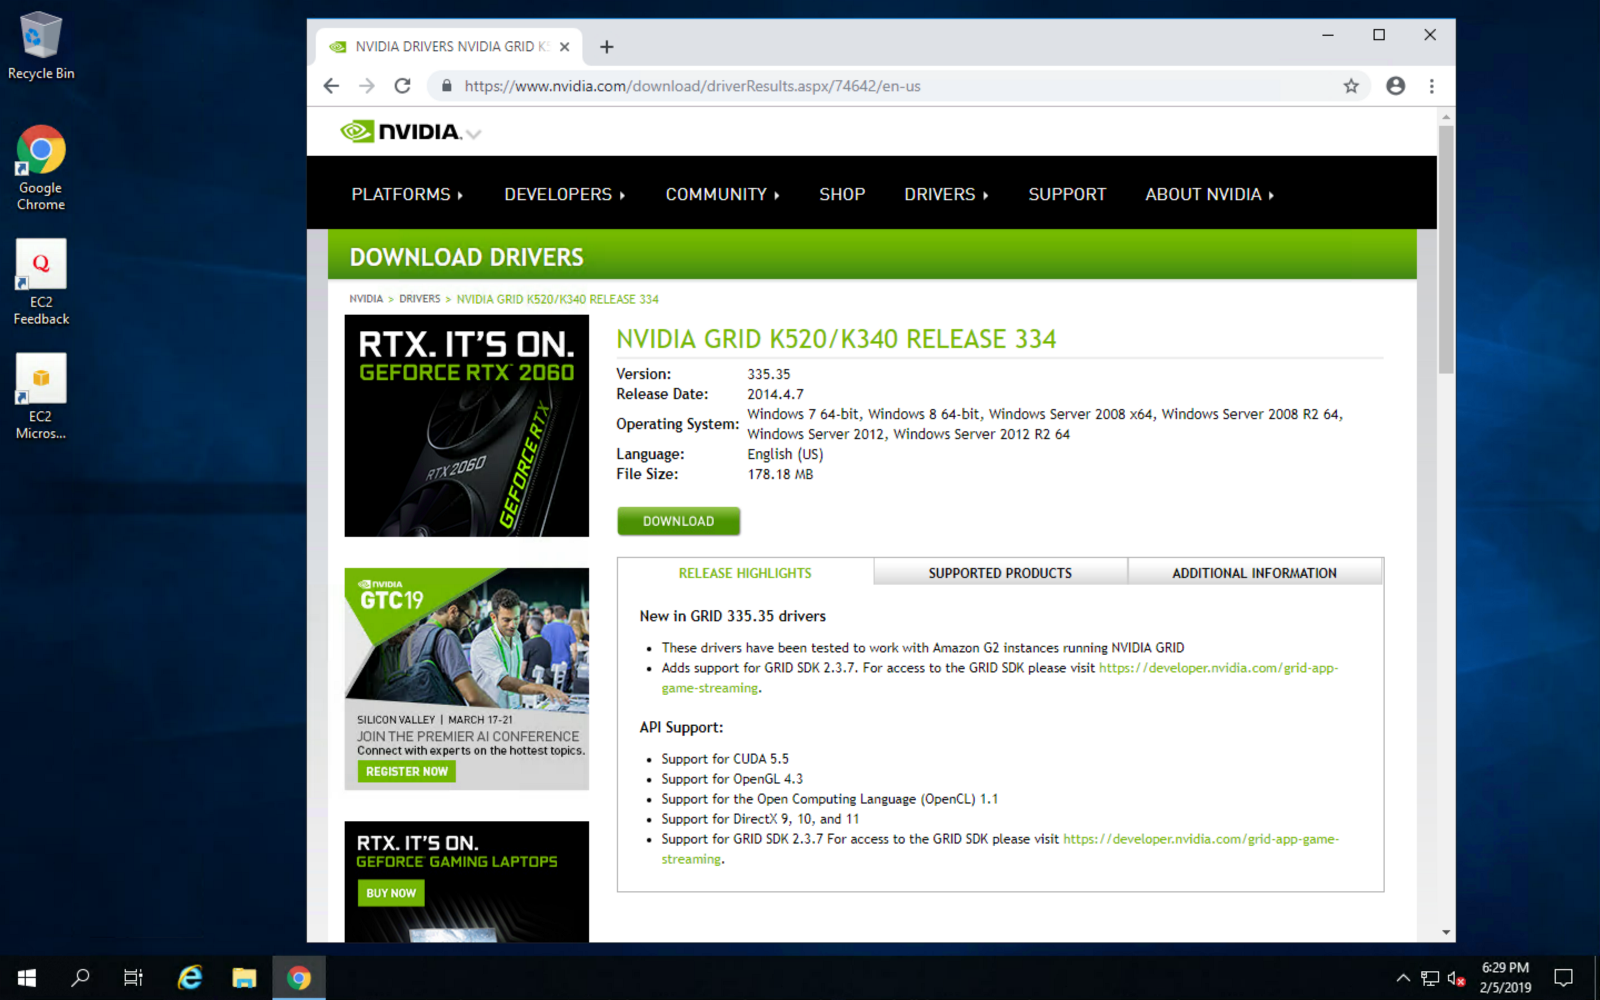
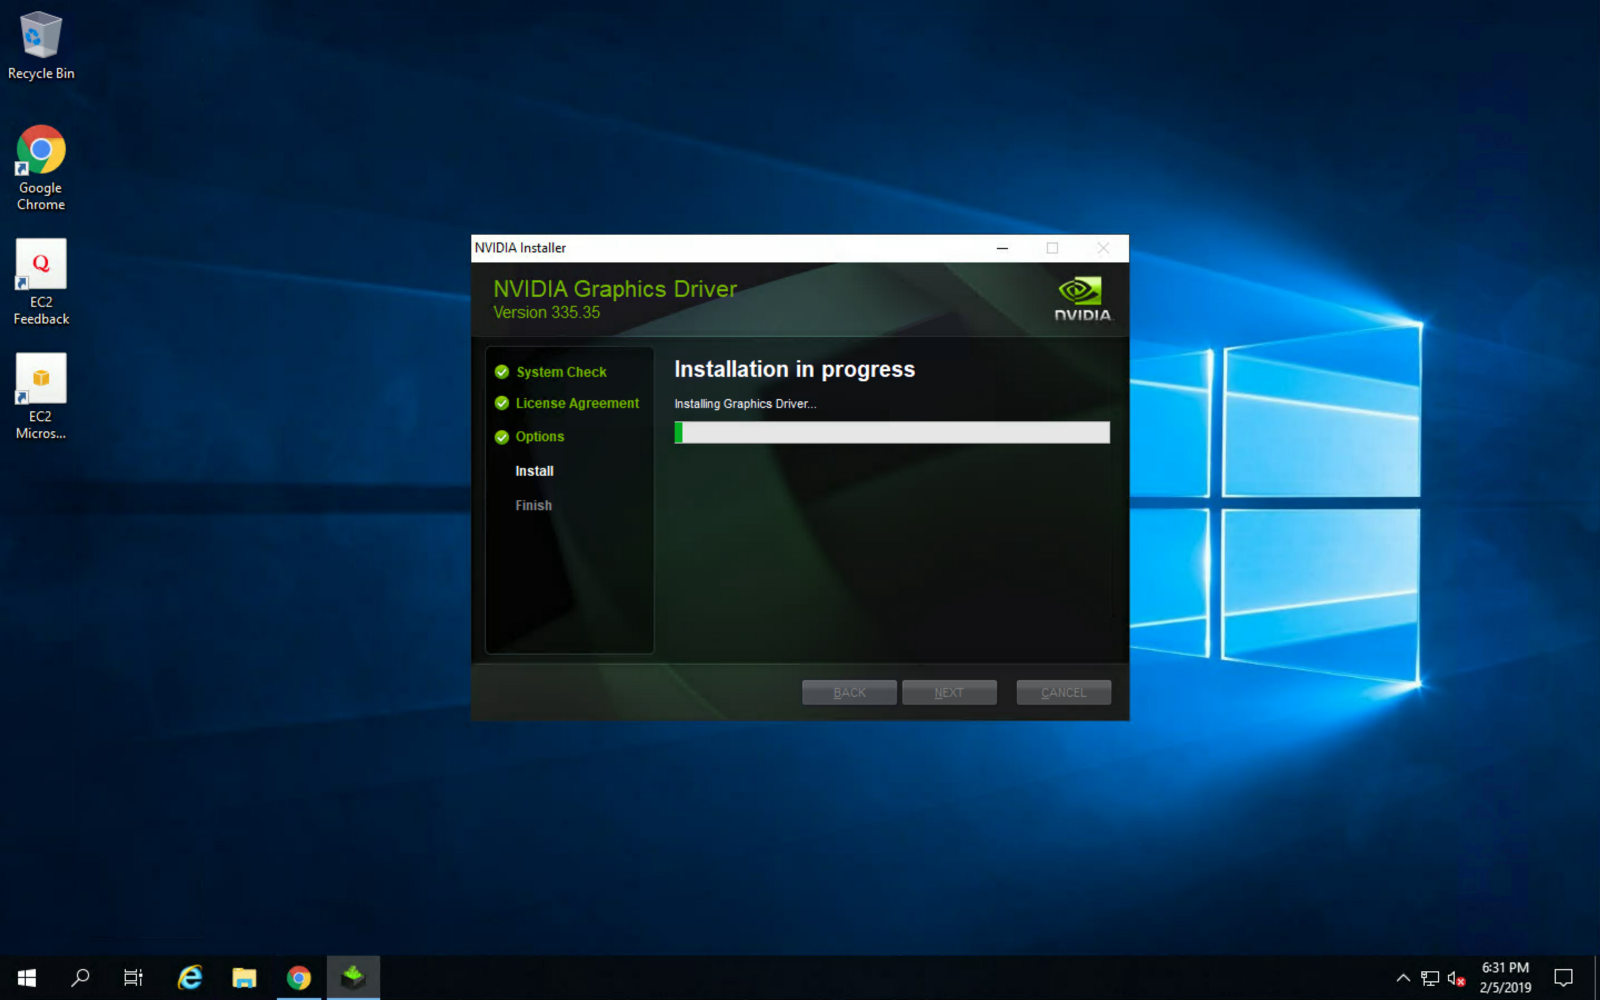
Next, install the graphic driver for maximum gaming performance:
Once installed, make sure to reboot the instance for changes to take effect:
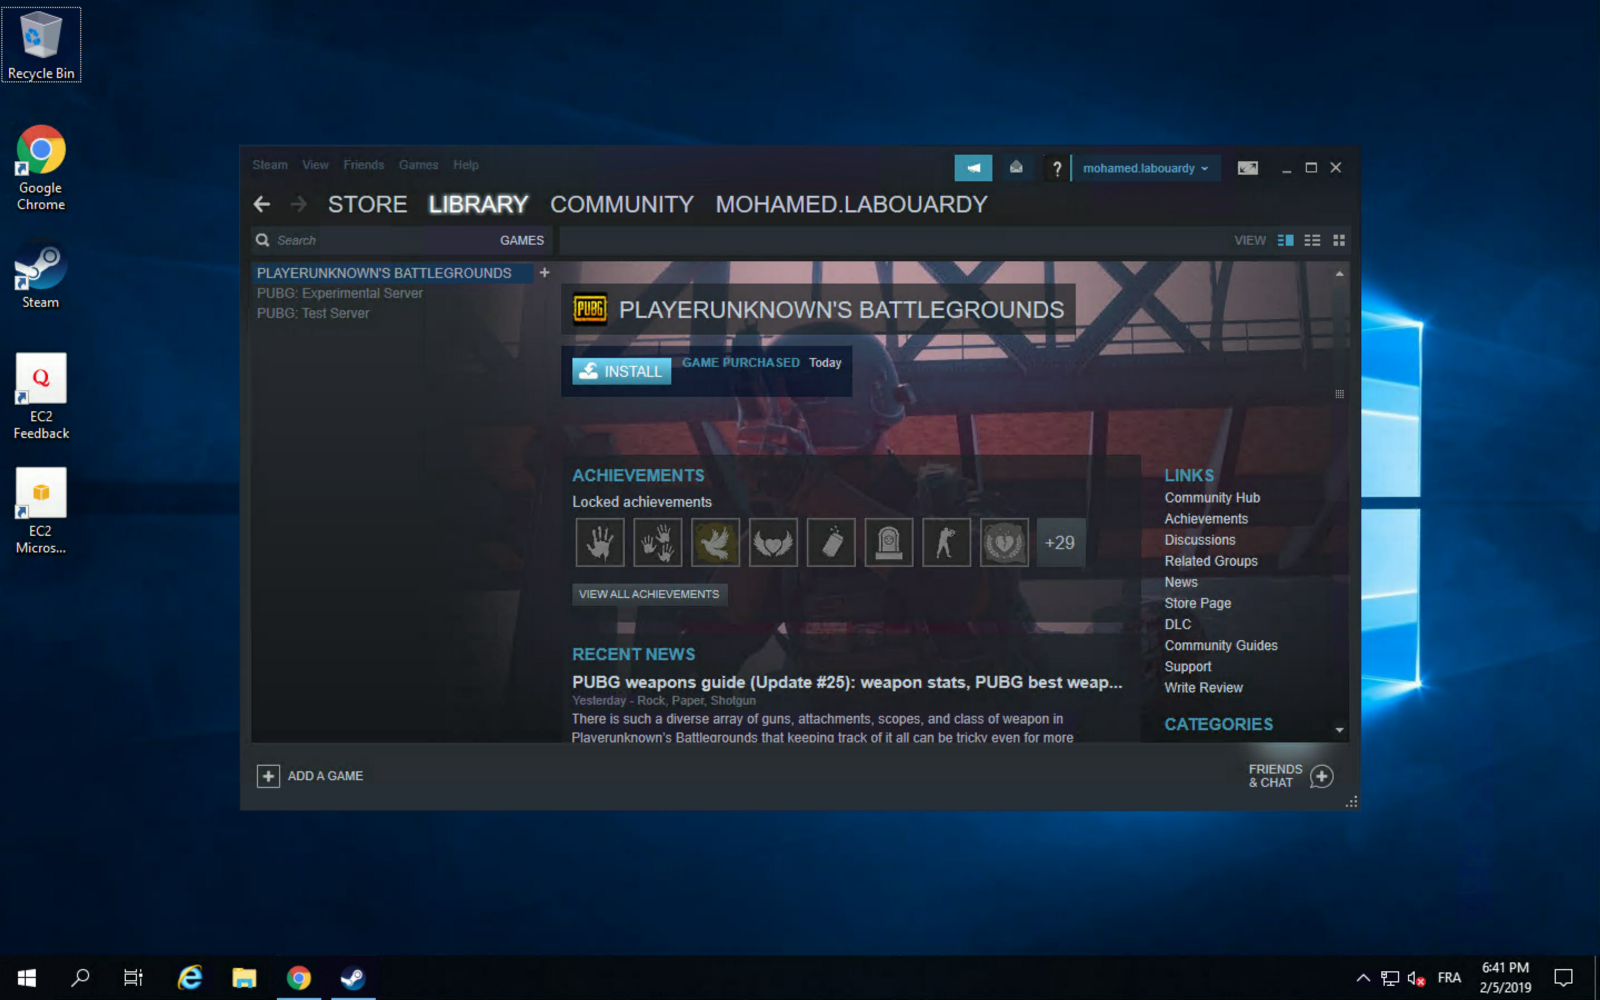
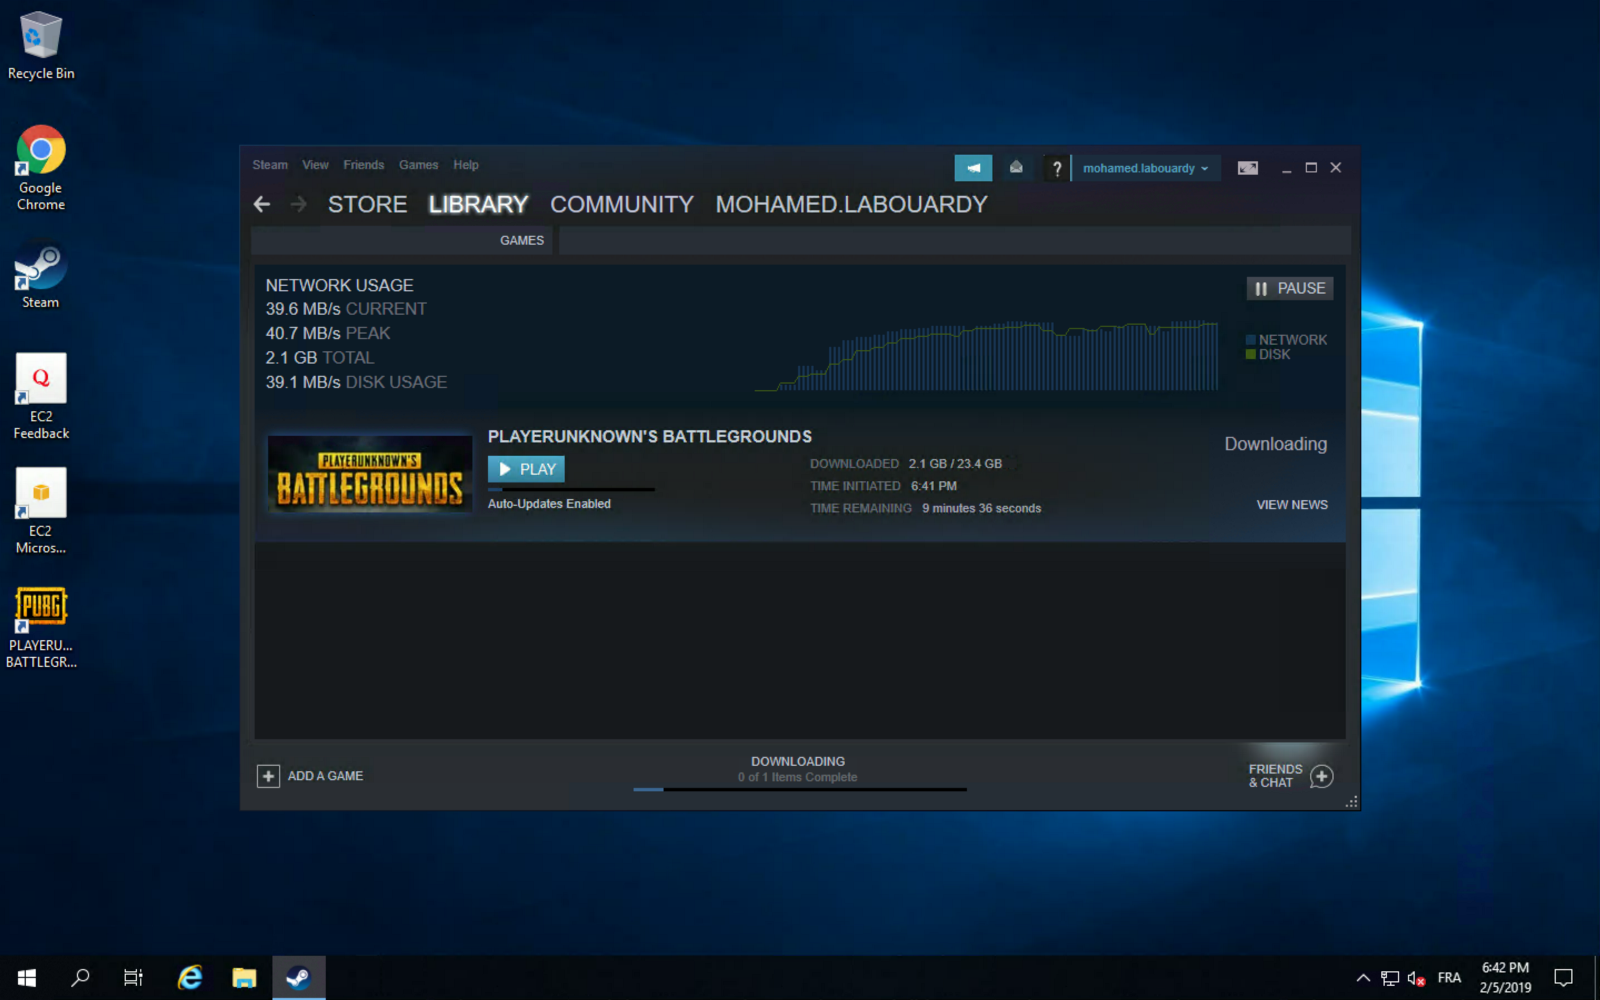
Then, install Steam, login using your account and install PUBG from the “Library” section:
You can take advantage of AWS high network performance (up to 10 Gbps of bandwidth):
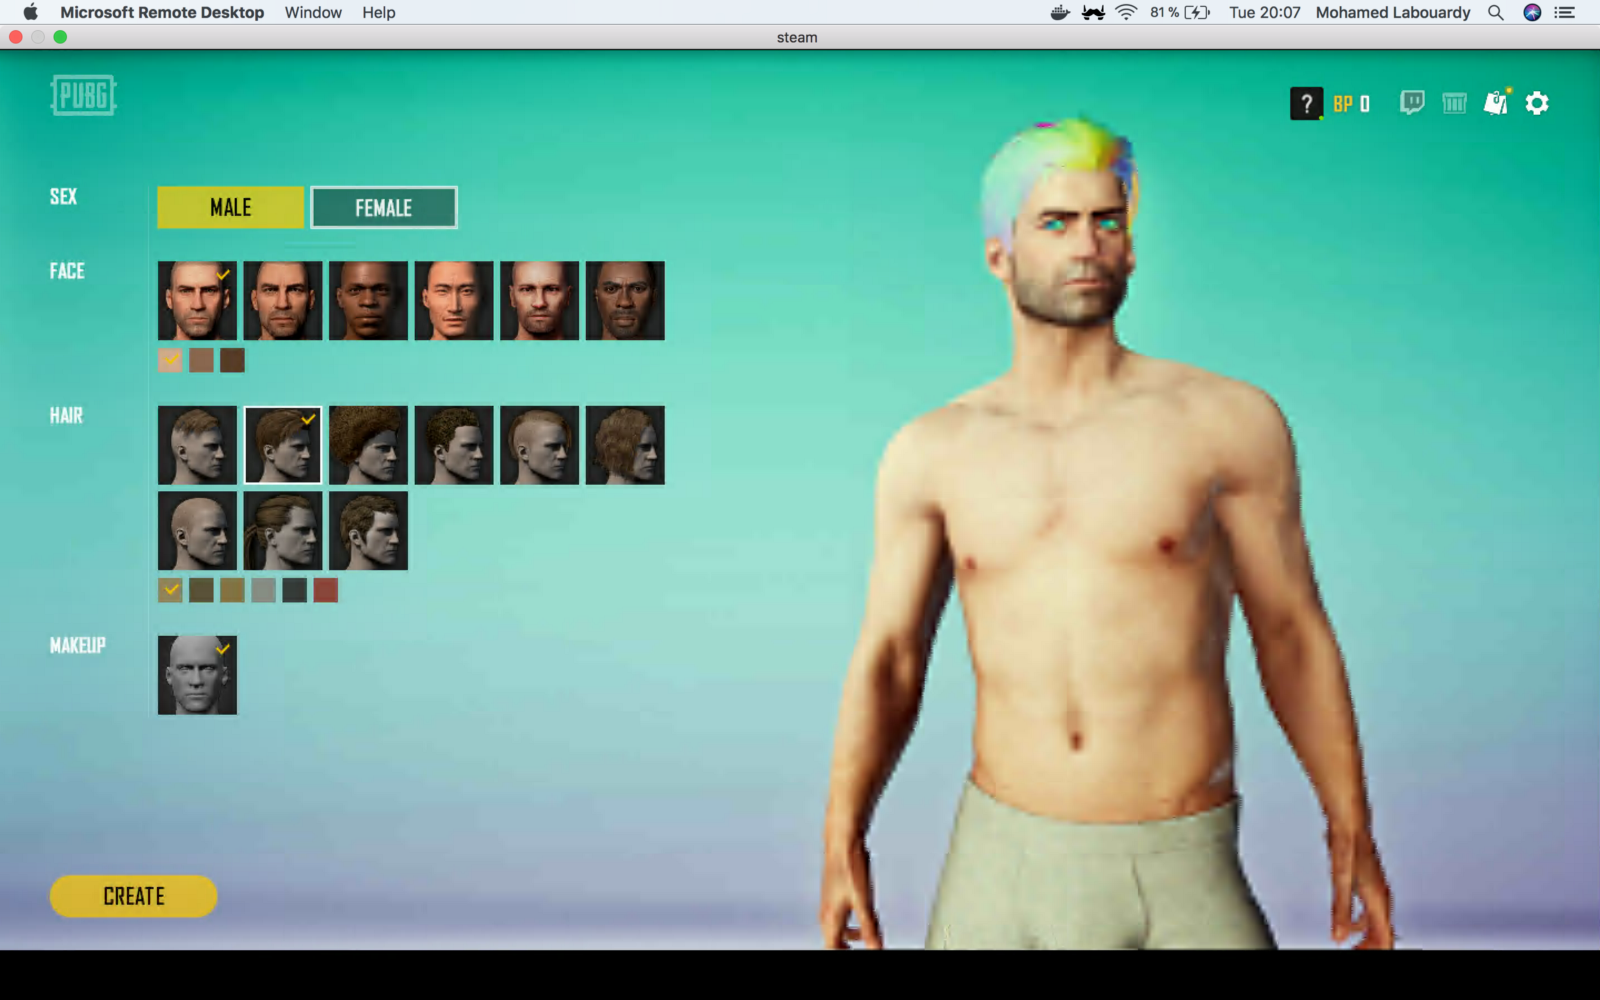
Once the game is installed, you can play PUBG on your virtualized GPU instance:
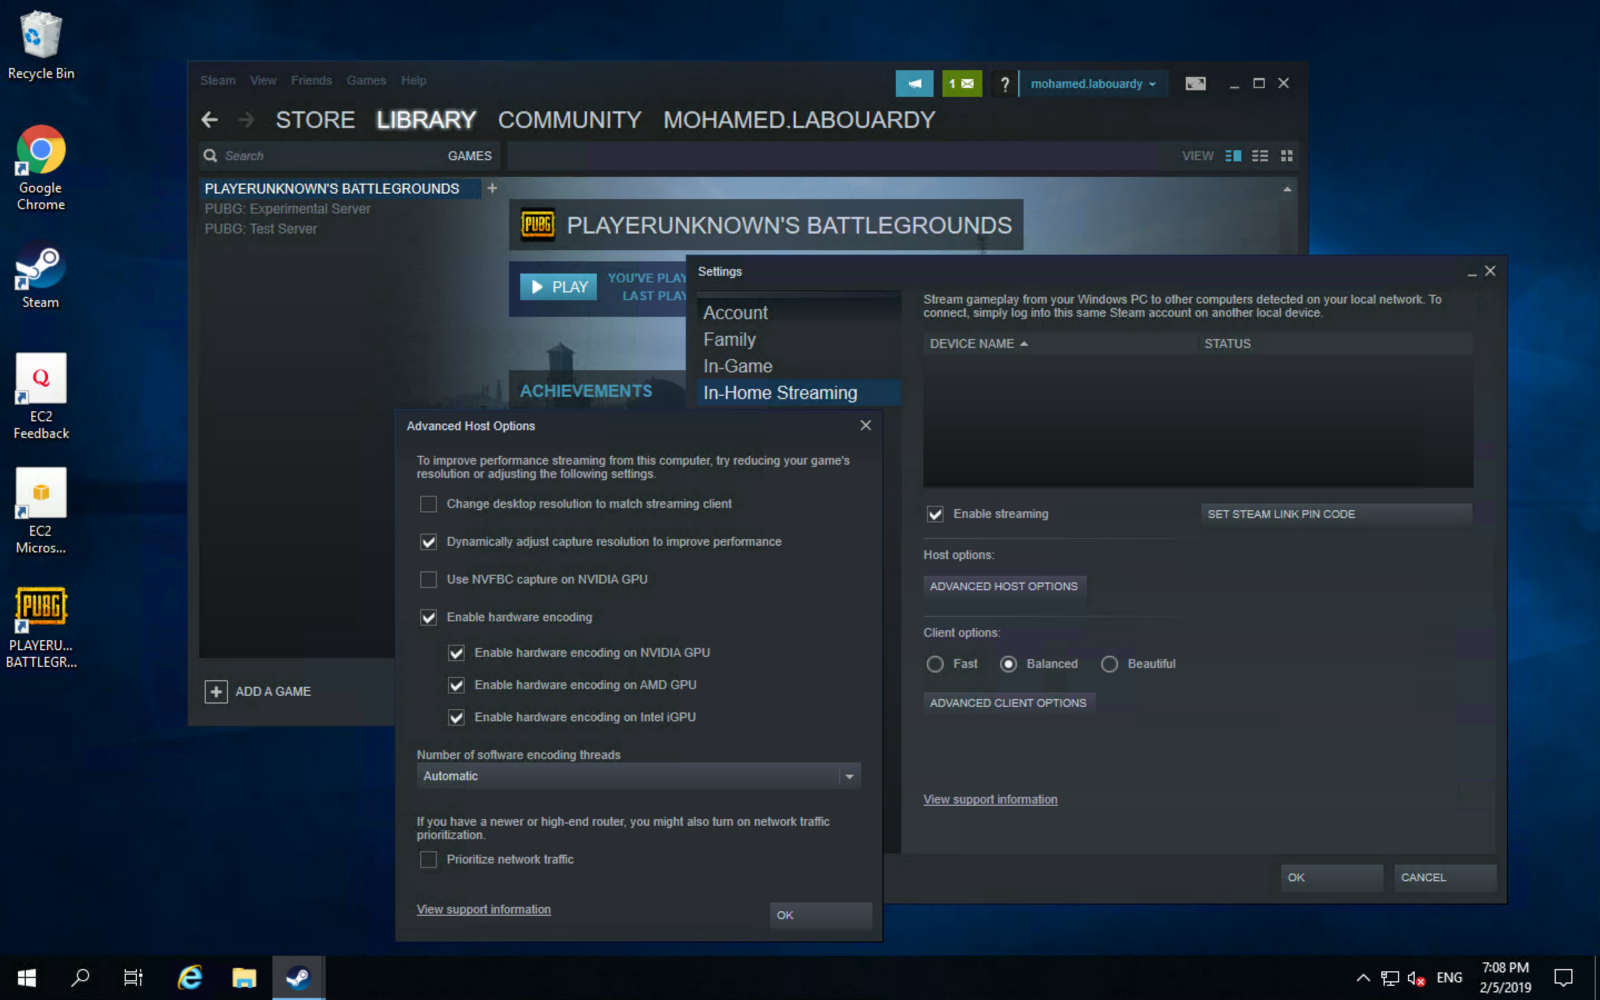
You can take this further, and use Steam In-Home Streaming feature to stream your game from your EC2 instance to your Mac:
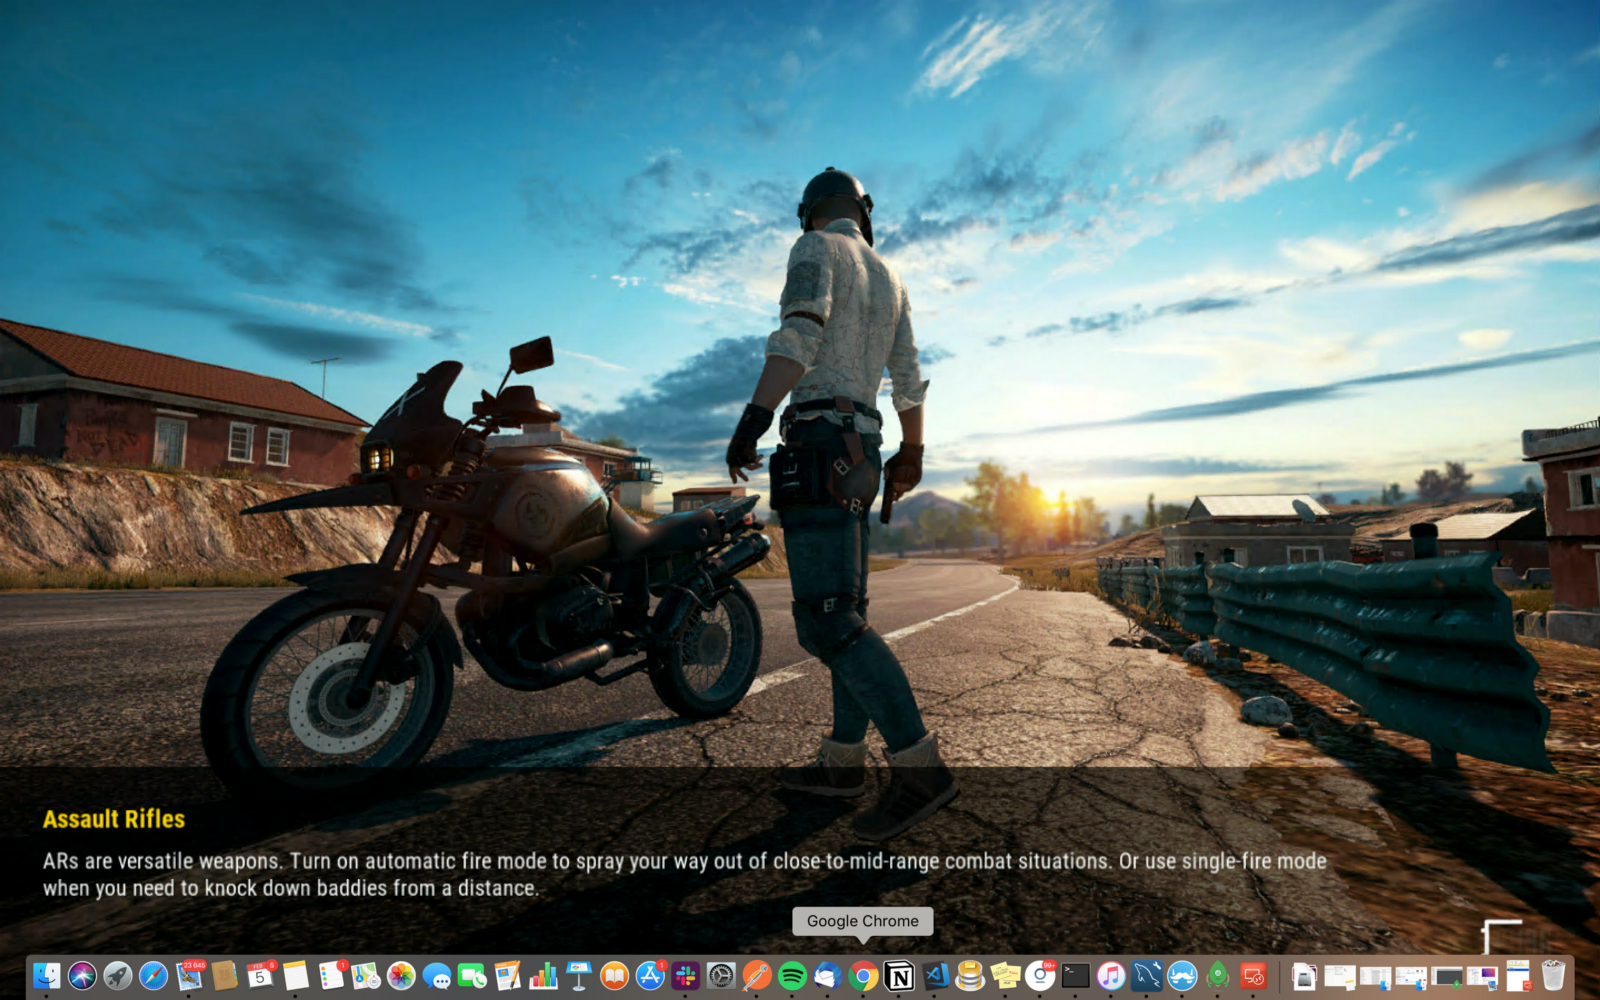
Enjoy the game ! you can now play your games on any device connected to the same network:
You might want to bake an AMI based on your instance to avoid set it up all again the next time you want to play and use spot instances to reduce the instance cost. Also, make sure to stop your instances when you’re done for the day to avoid incurring charges. GPU instances are costly (disk storage also costs something, and can be significant if you have a large disk footprint).
Drop your comments, feedback, or suggestions below — or connect with me directly on Twitter @mlabouardy.
Episode 3:Deploy a Highly Available Jenkins Cluster on AWS
This is the first video in a 10 part series by Mohamed Labouardy, showing how to build a simple DevOps pipeline, including built-in security at each stage. To follow the series, please join the community to receive notification as each episode is released.
Episode 2:Build an AWS VPC using Infrastructure as Code
This is the first video in a 10 part series by Mohamed Labouardy, showing how to build a simple DevOps pipeline, including built-in security at each stage. To follow the series, please join the community to receive notification as each episode is released.
Episode 1:Core Concepts
This is the first video in a 10 part series by Mohamed Labouardy, showing how to build a simple DevOps pipeline, including built-in security at each stage. To follow the series, please join the community to receive notification as each episode is released.
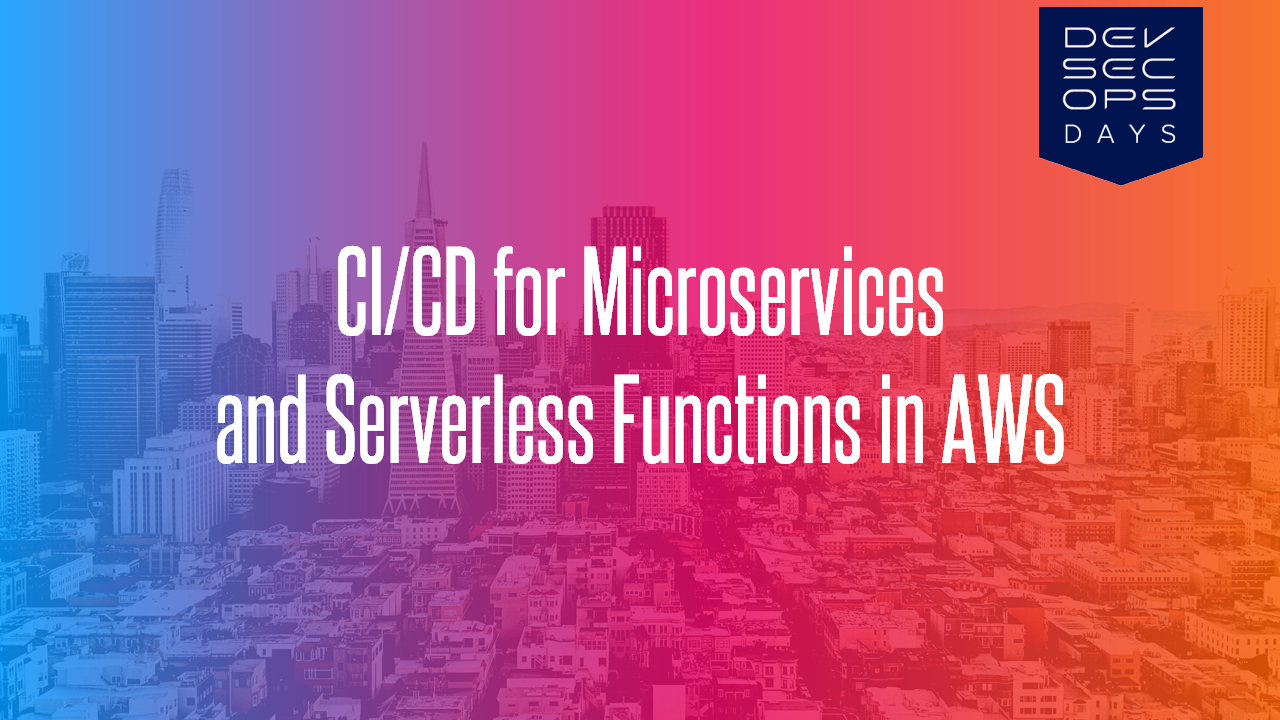
Build a CI/CD pipeline for Dockerized Microservices and Serverless Functions in AWS
Learn DevSecOps best practices with free hands-on labs and workshops. My workshop will focus on a range of subjects from building a CI/CD pipeline in AWS for Dockerized Microservices and Serverless functions to Monitoring and Logging. Join for the rollout this Wednesday, January 16, with new sessions added each week for the next 10 weeks.
There is no cost to participate in the workshops other than your contact information.
Join Here

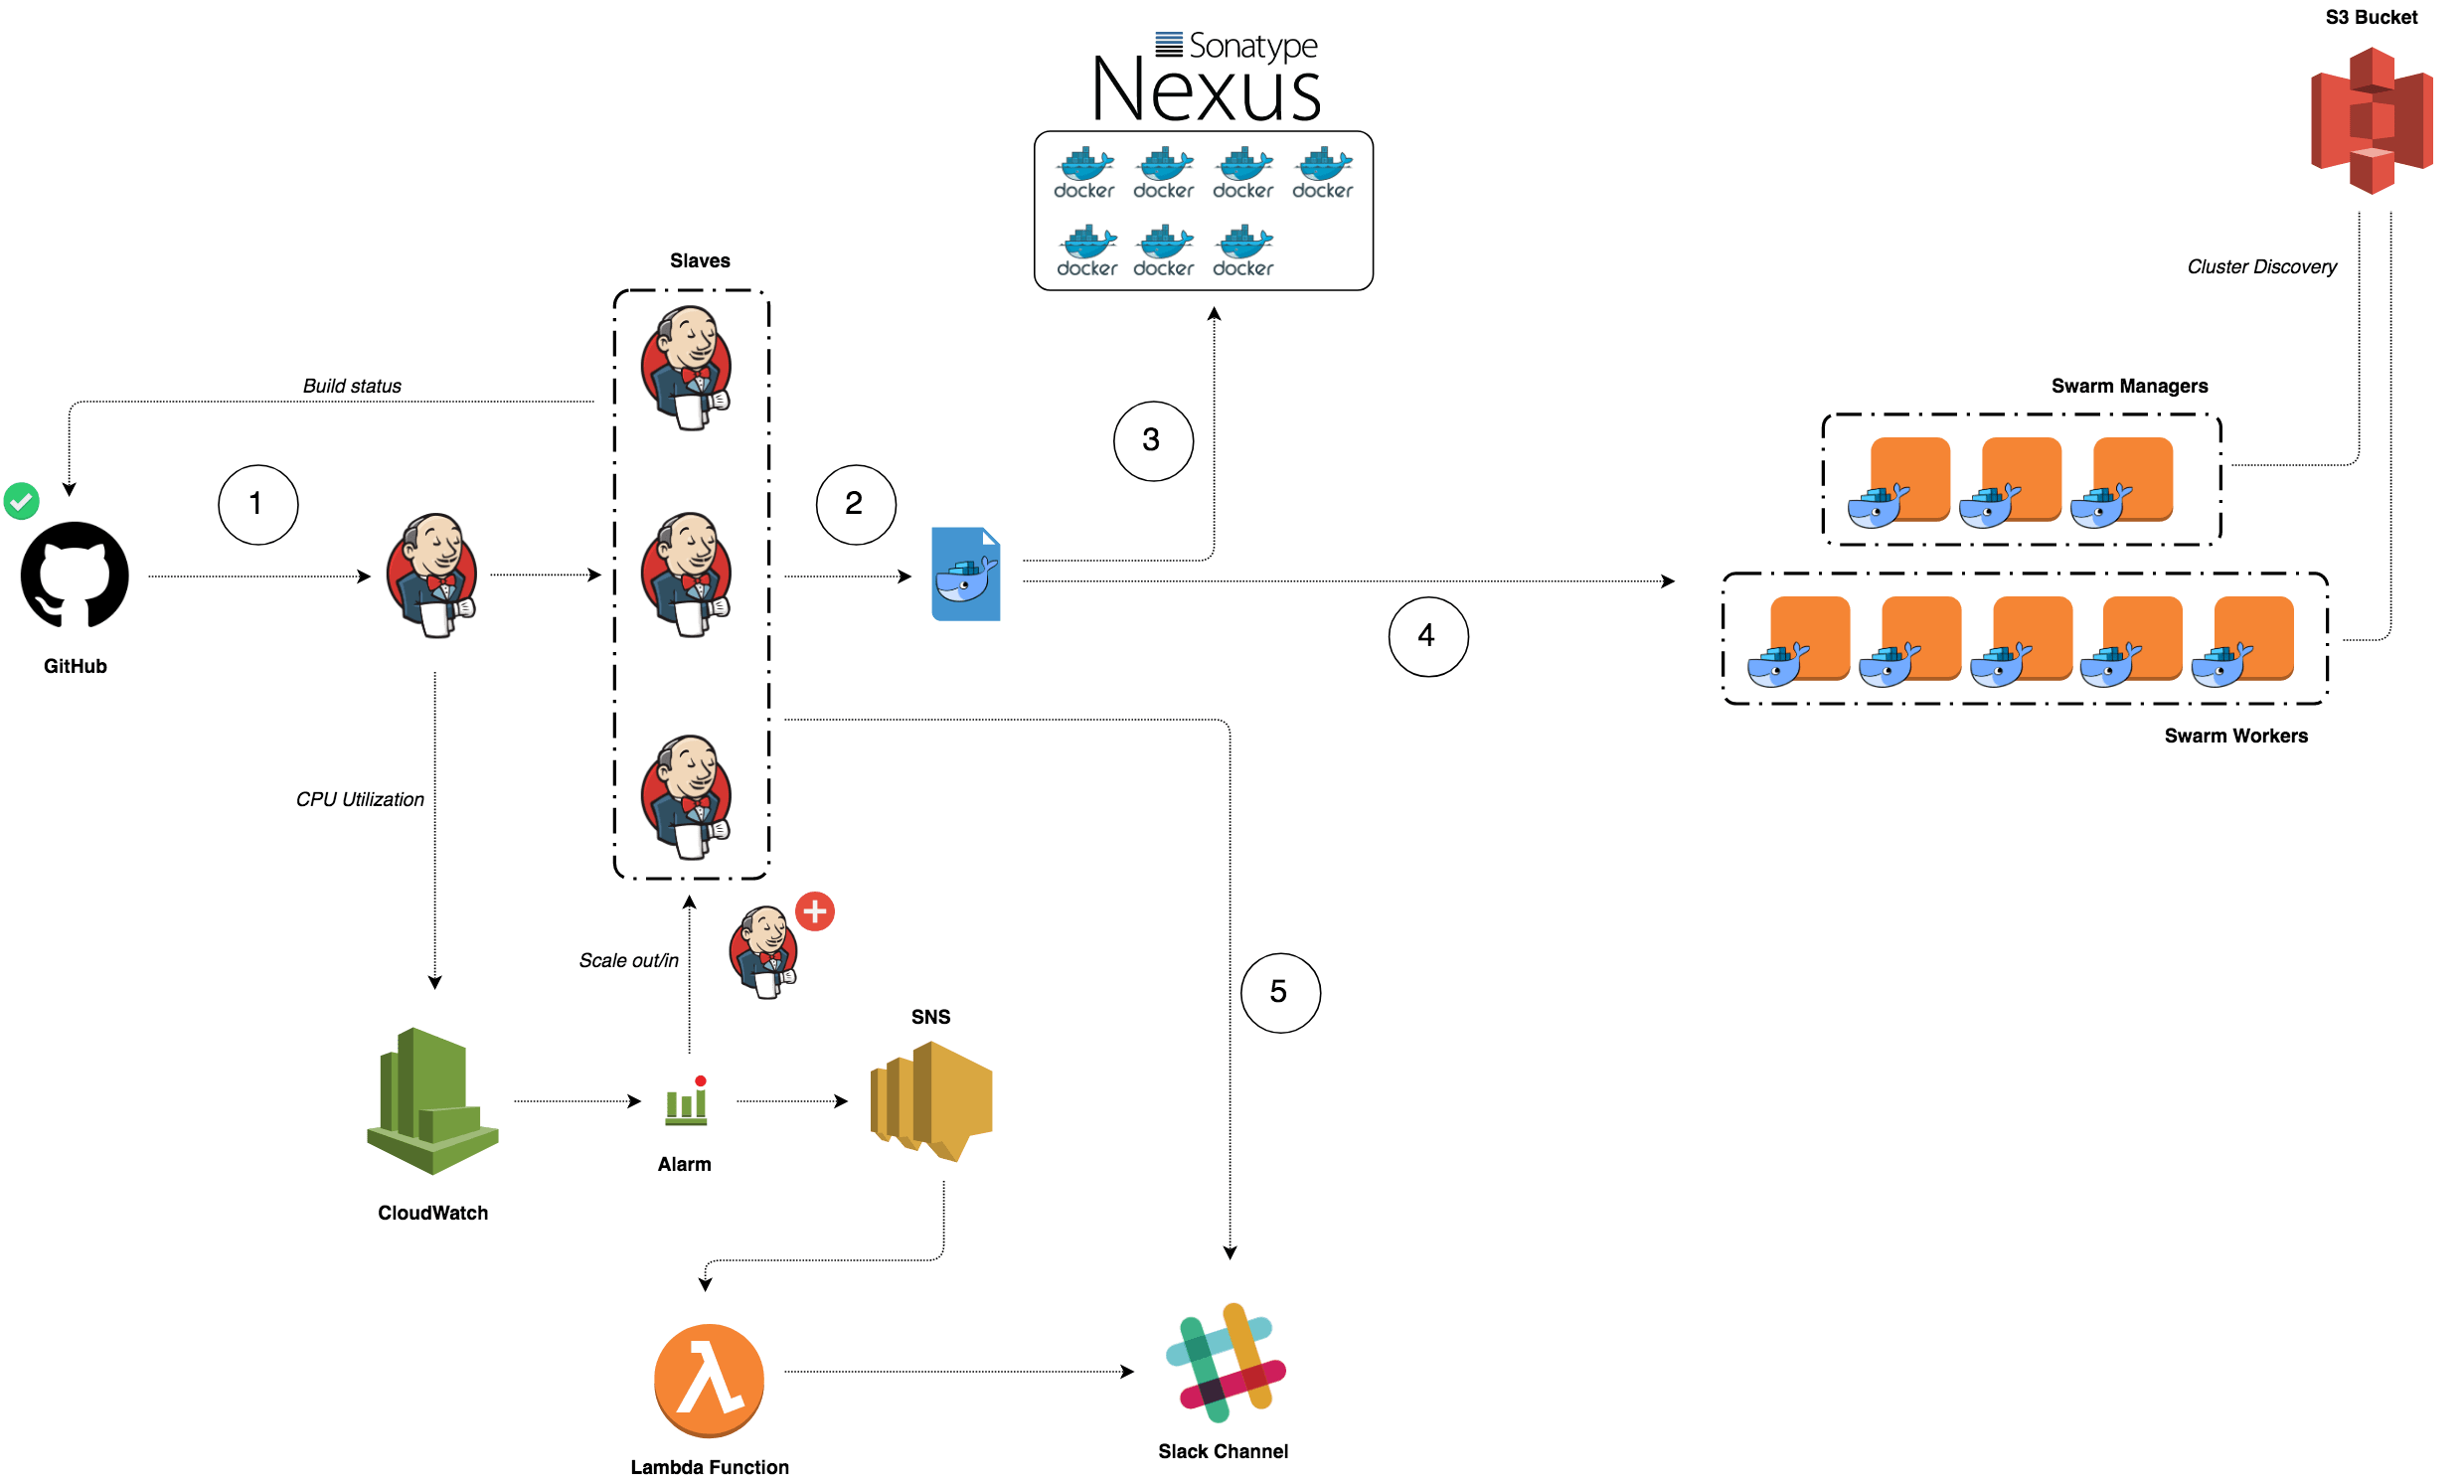
Highly Available Docker Registry on AWS with Nexus
Have you ever wondered how you can build a highly available & resilient Docker Repository to store your Docker Images ?

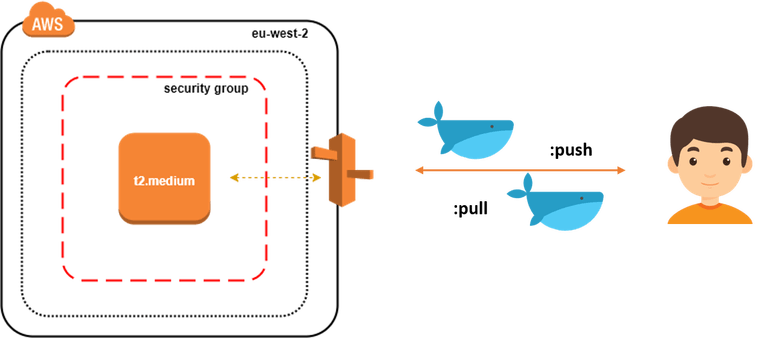
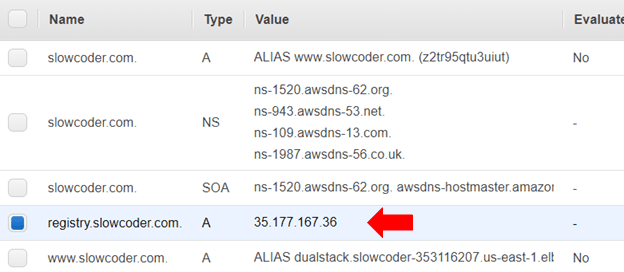
In this post, we will setup an EC2 instance inside a Security Group and create an A record pointing to the server Elastic IP address as follow:
To provision the infrastructure, we will use Terraform as IaC (Infrastructure as Code) tool. The advantage of using this kind of tools is the ability to spin up a new environment quickly in different AWS region (or different IaaS provider) in case of incident (Disaster recovery).
Start by cloning the following Github repository:
1 | git clone https://github.com/mlabouardy/terraform-aws-labs.git |
Inside docker-registry folder, update the variables.tfvars with your own AWS credentials (make sure you have the right IAM policies).
1 | resource "aws_instance" "default" { |
I specified a shell script to be used as user_data when launching the instance. It will simply install the latest version of Docker CE and turn the instance to Docker Swarm Mode (to benefit from replication & high availability of Nexus container)
1 | #!/bin/sh |
Note: Surely, you can use a Configuration Management Tools like Ansible or Chef to provision the server once created.
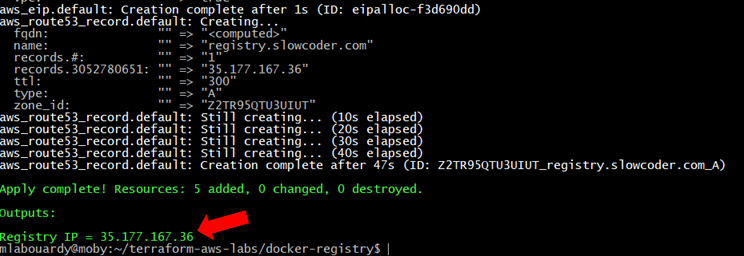
Then, issue the following command to create the infrastructure:
1 | terraform apply -var-file=variables.tfvars |
Once created, you should see the Elastic IP of your instance:
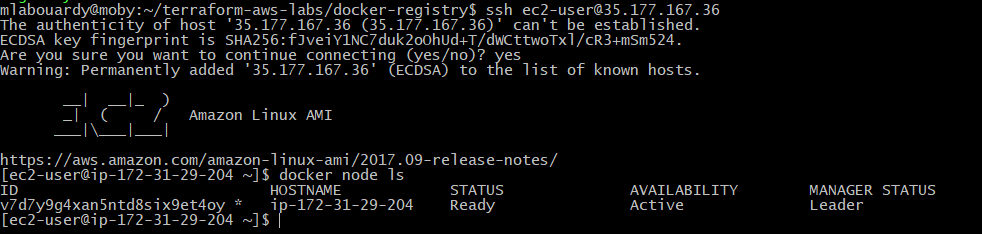
Connect to your instance via SSH:
1 | ssh ec2-user@35.177.167.36 |
Verify that the Docker Engine is running in Swarm Mode:
Check if Nexus service is running:

If you go back to your AWS Management Console. Then, navigate to Route53 Dashboard, you should see a new A record has been created which points to the instance IP address.
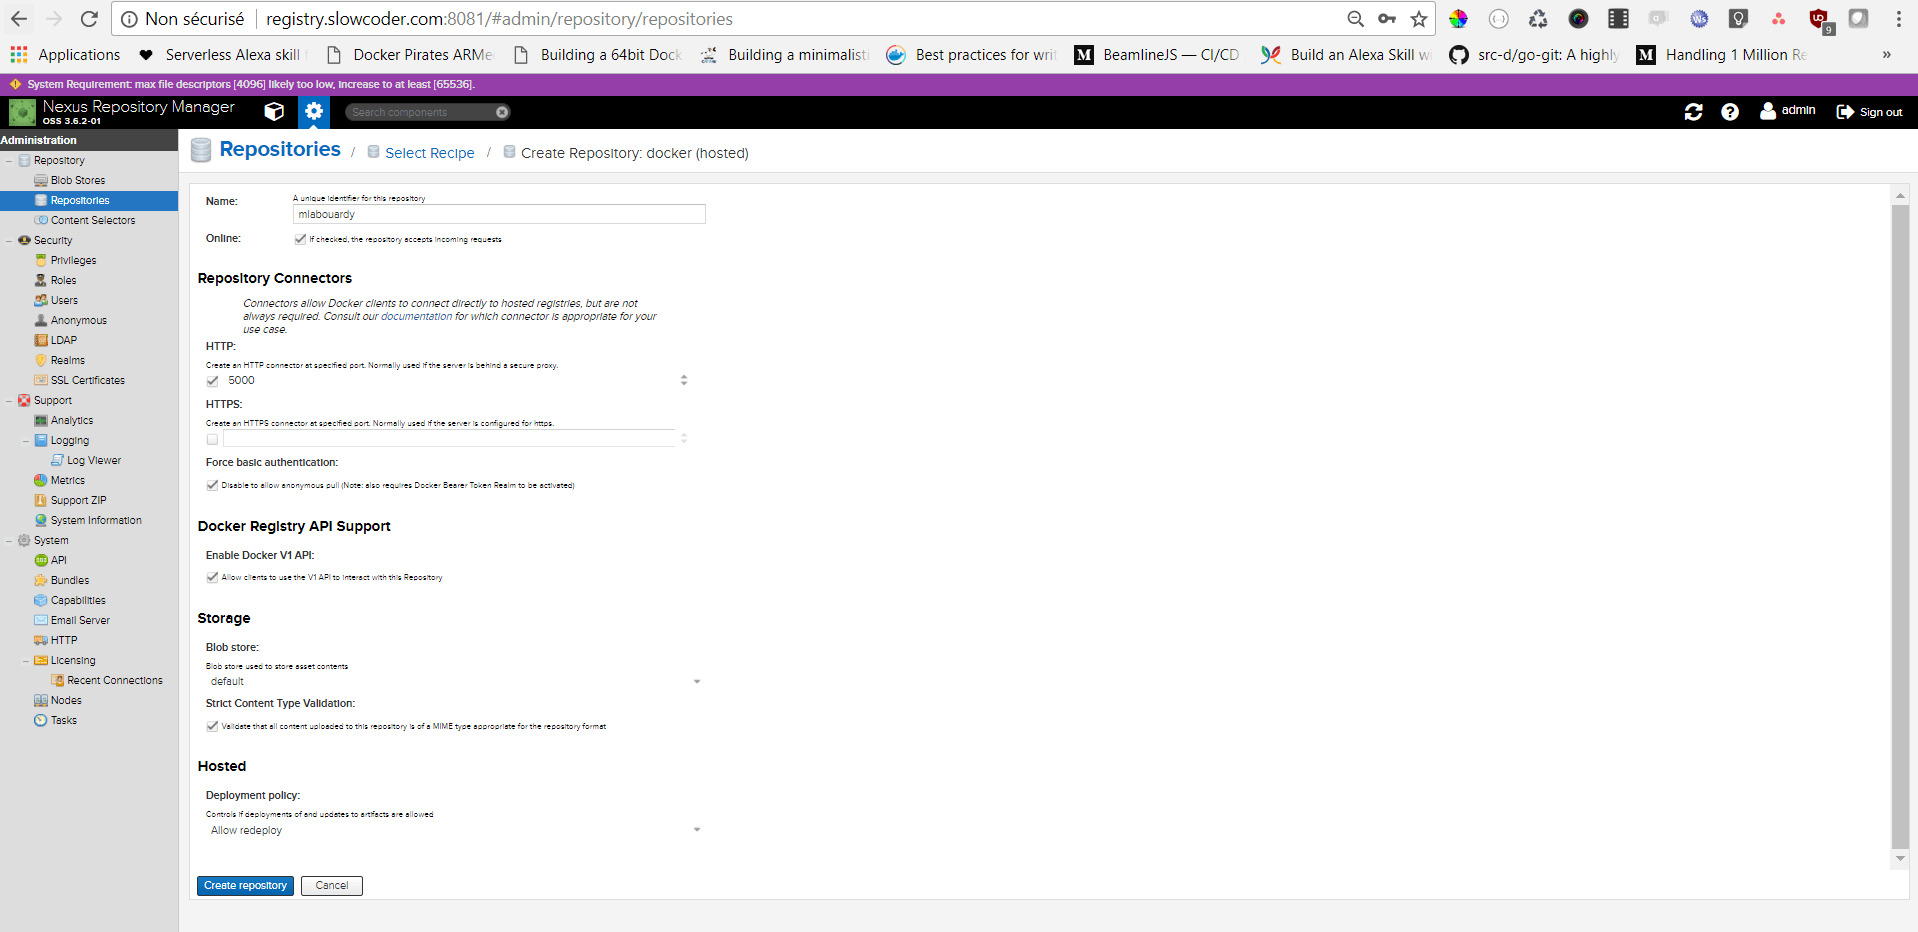
Point your favorite browser to the Nexus Dashboard URL (registry.slowcoder.com:8081). Login and create a Docker hosted registry as below:
Edit the /etc/docker/daemon.json file, it should have the following content:
1 | { |
Note: For production it’s highly recommended to secure your registry using a TLS certificate issued by a known CA.
Restart Docker for the changes to take effect:
1 | service docker restart |
Login to your registry with Nexus Credentials (admin/admin123):

In order to push a new image to the registry:
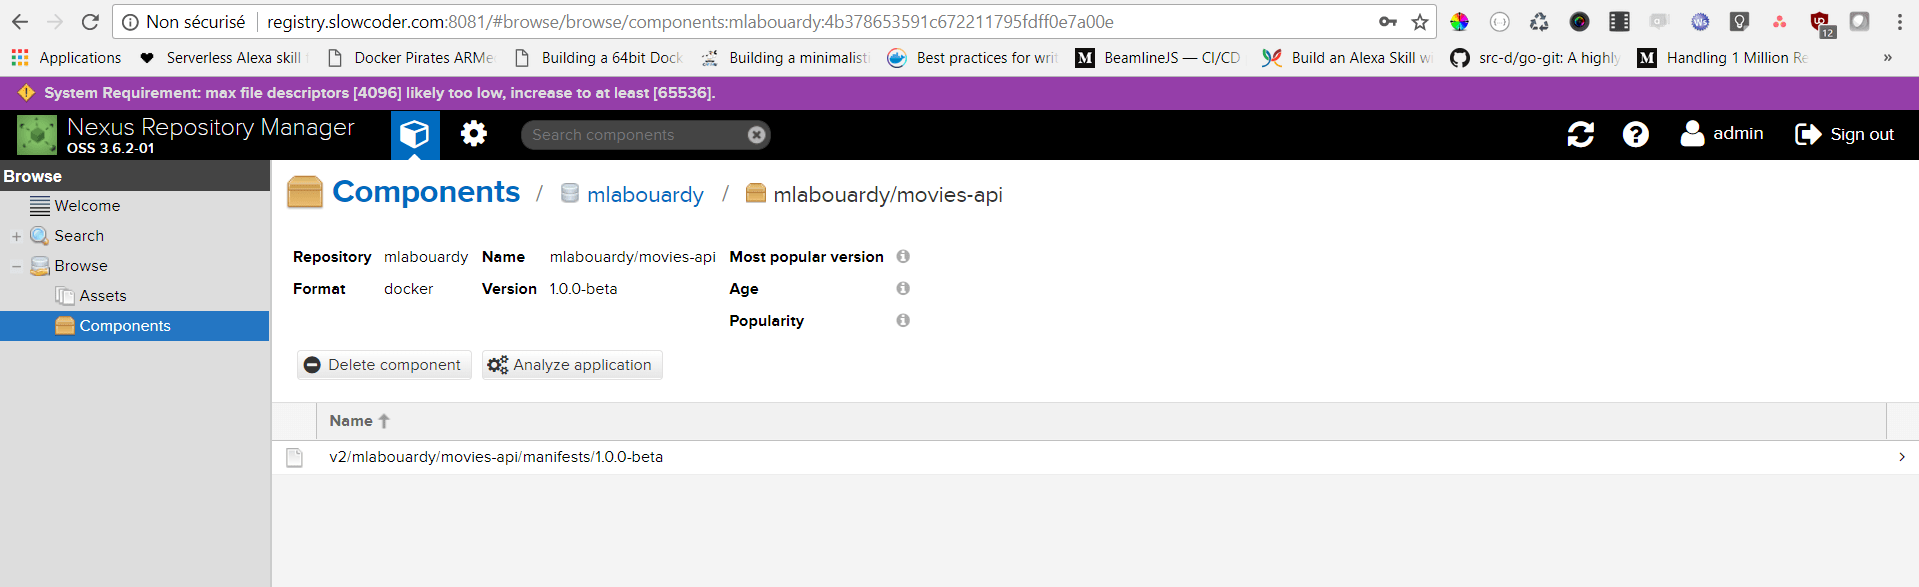
1 | docker push registry.slowcoder.com:5000/mlabouardy/movies-api:1.0.0-beta |

Verify that the image has been pushed to the remote repository:
To pull the Docker image:
1 | docker pull registry.slowcoder.com:5000/mlabouardy/movies-api:1.0.0-beta |

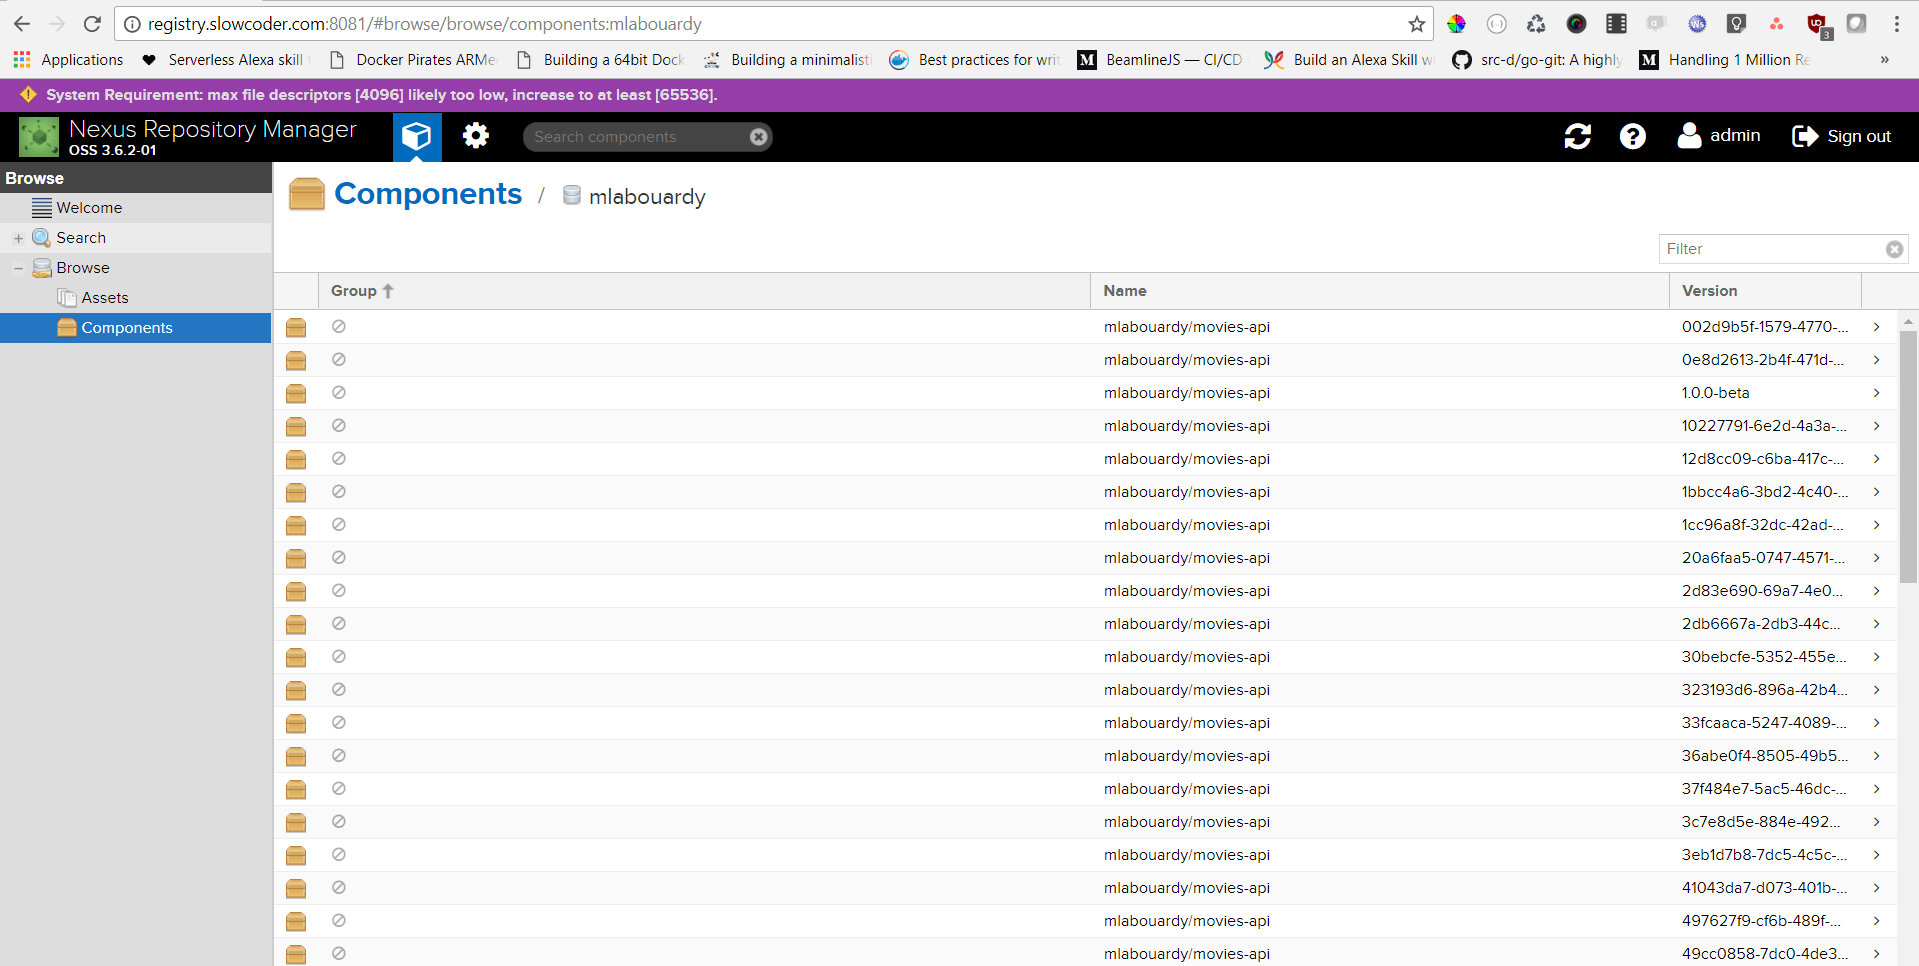
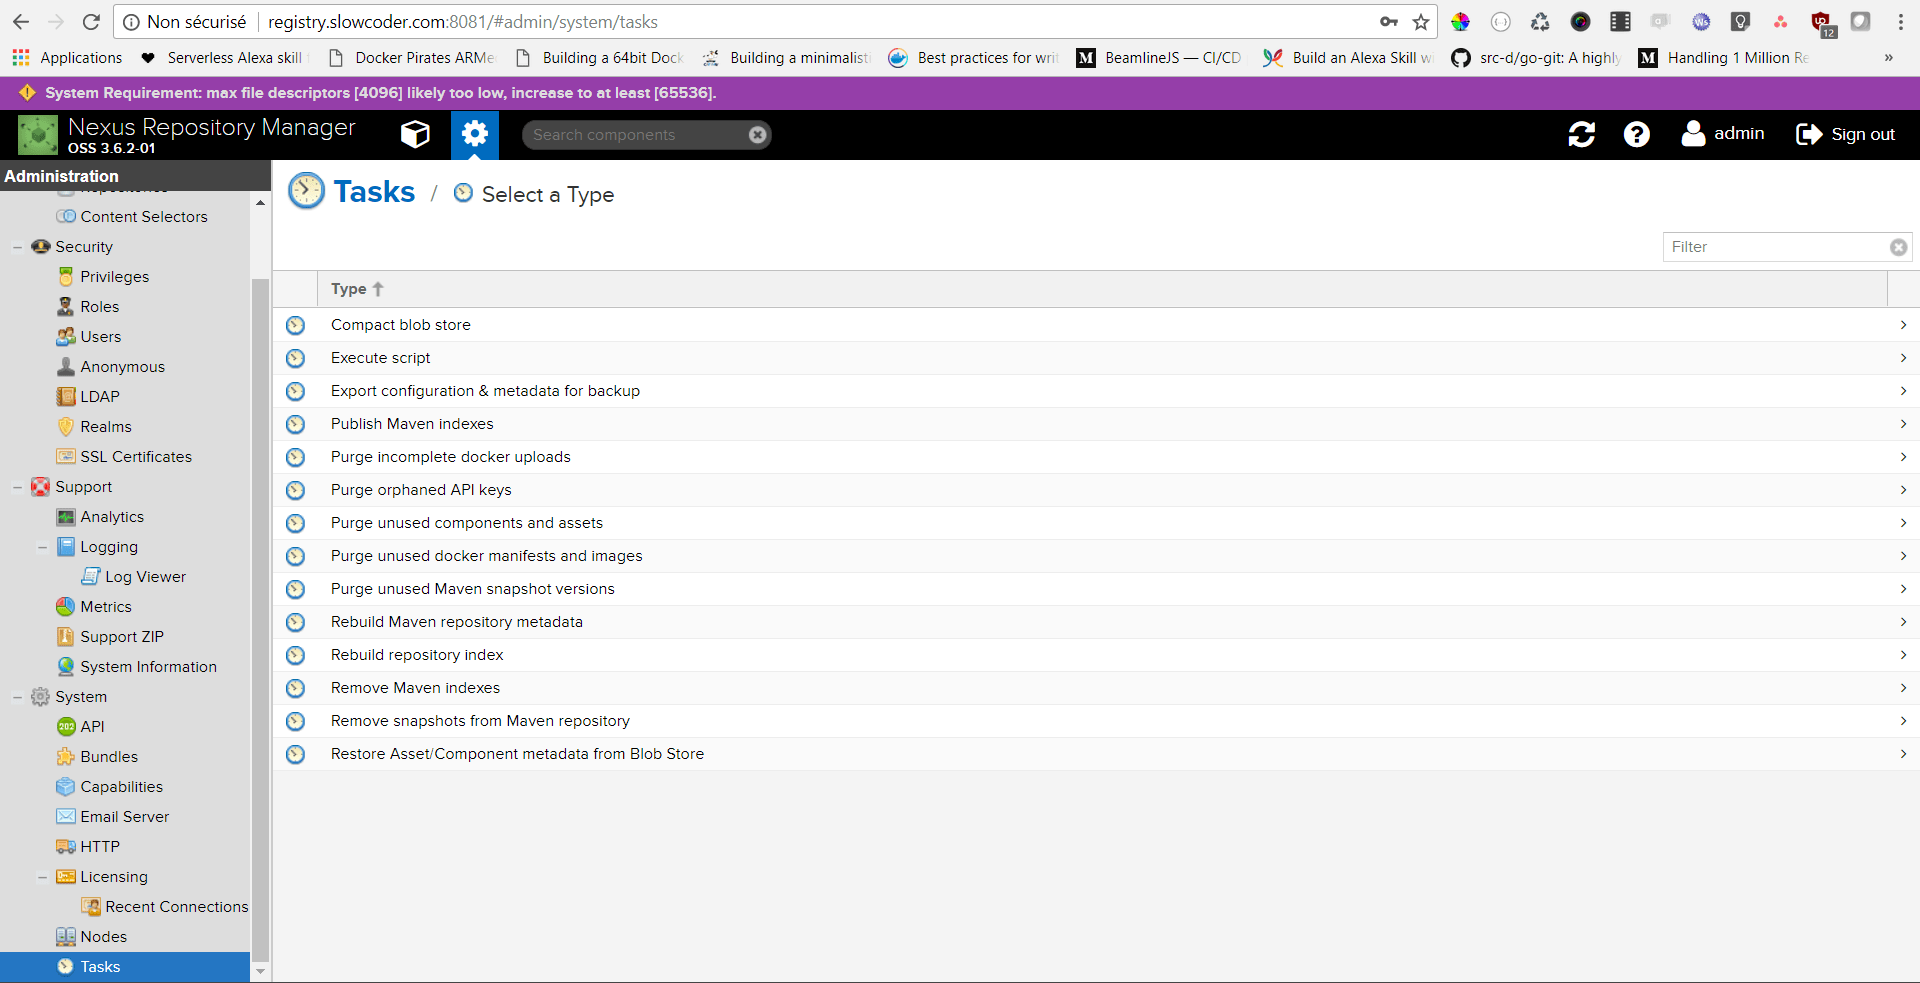
Note: Sometimes you end up with many unused & dangling images that can quickly take significant amount of disk space:
You can either use the Nexus CLI tool or create a Nexus Task to cleanup old Docker Images:
Populate the form as below:
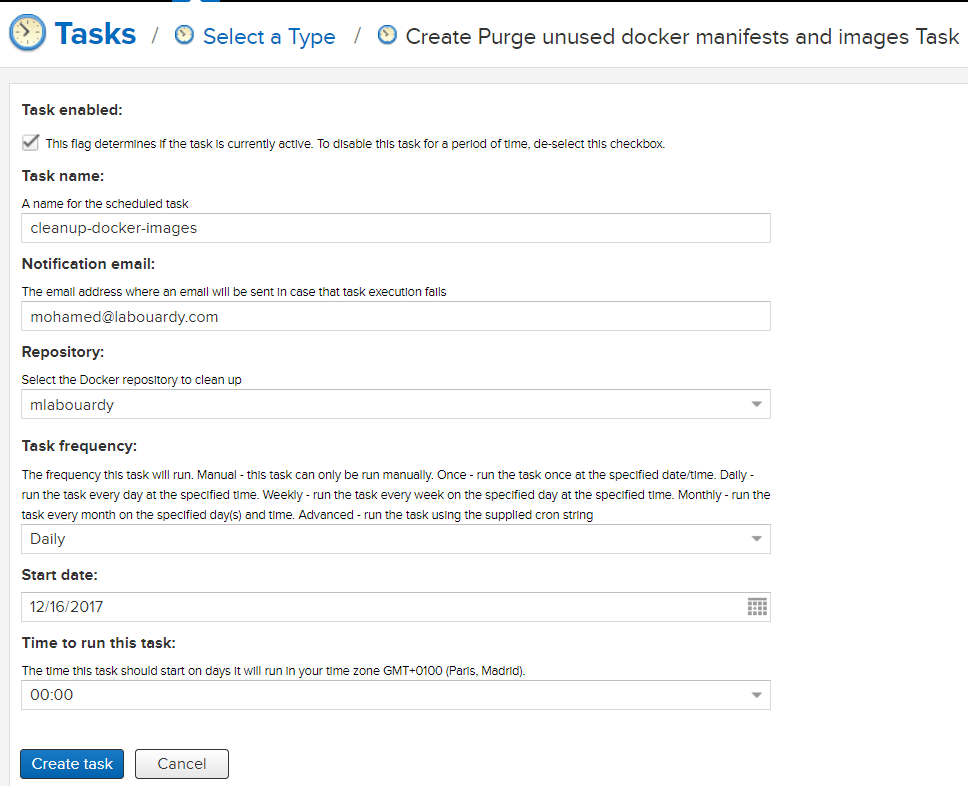
The task above will run everyday at midnight to purge unused docker images from “mlabouardy” registry.
Drop your comments, feedback, or suggestions below — or connect with me directly on Twitter @mlabouardy.
Hosting a Free Static Website on Google Cloud Storage
This guide walks you through setting up a free bucket to serve a static website through a custom domain name using Google Cloud Platform services.
Sign in to Google Cloud Platform, navigate to Cloud DNS service and create a new public DNS zone:
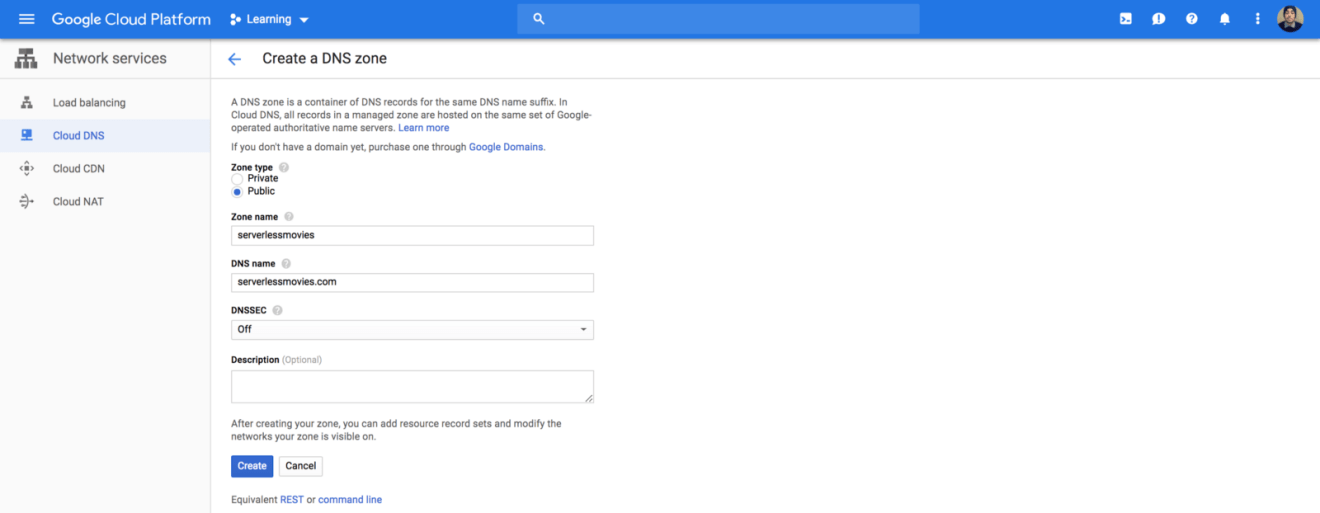
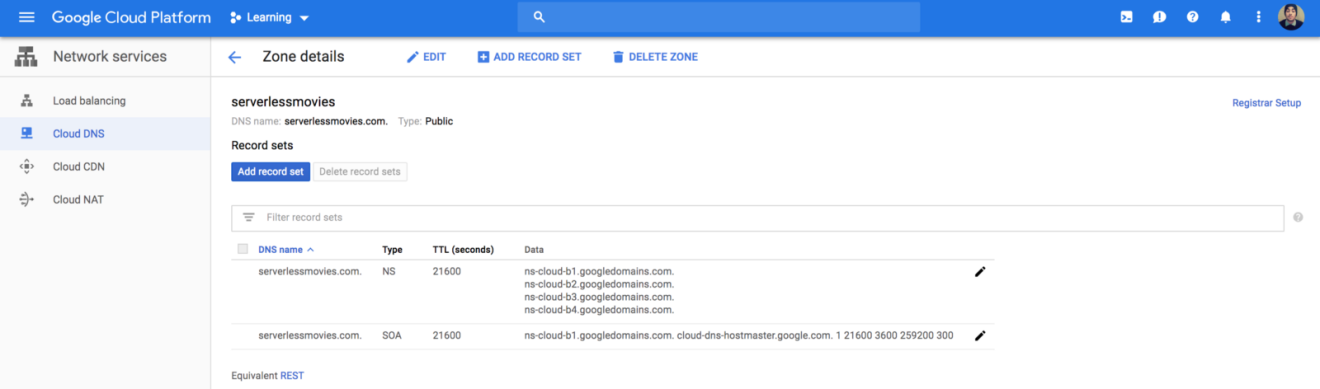
By default it will have a NS (Nameserver) and a SOA (Start of Authority) records:
Go to you domain registrar, in my case I purchased a domain name from GoDaddy (super cheap). Add the nameserver names that were listed in your NS record:
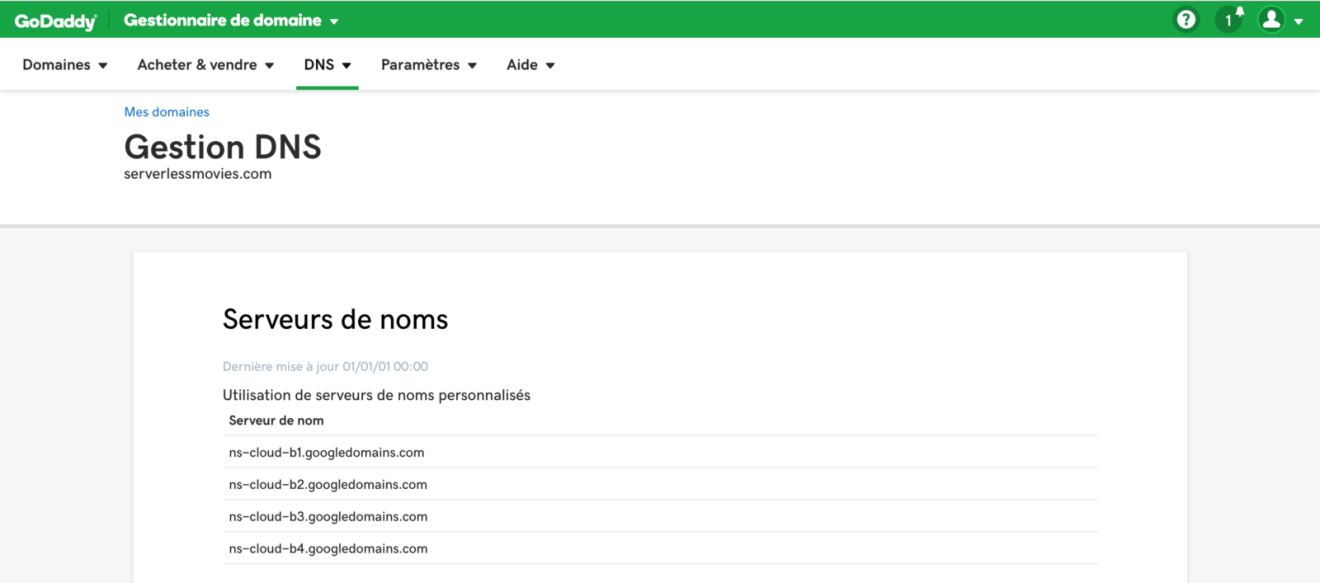
PS: It can take some time for the changes on GoDaddy to propagate through to Google Cloud DNS.
Next, verify you own the domain name using the Open Search Console. Many methods are available (HTML Meta data, Google Analytics, etc). The easiest one is DNS verification through a TXT record:
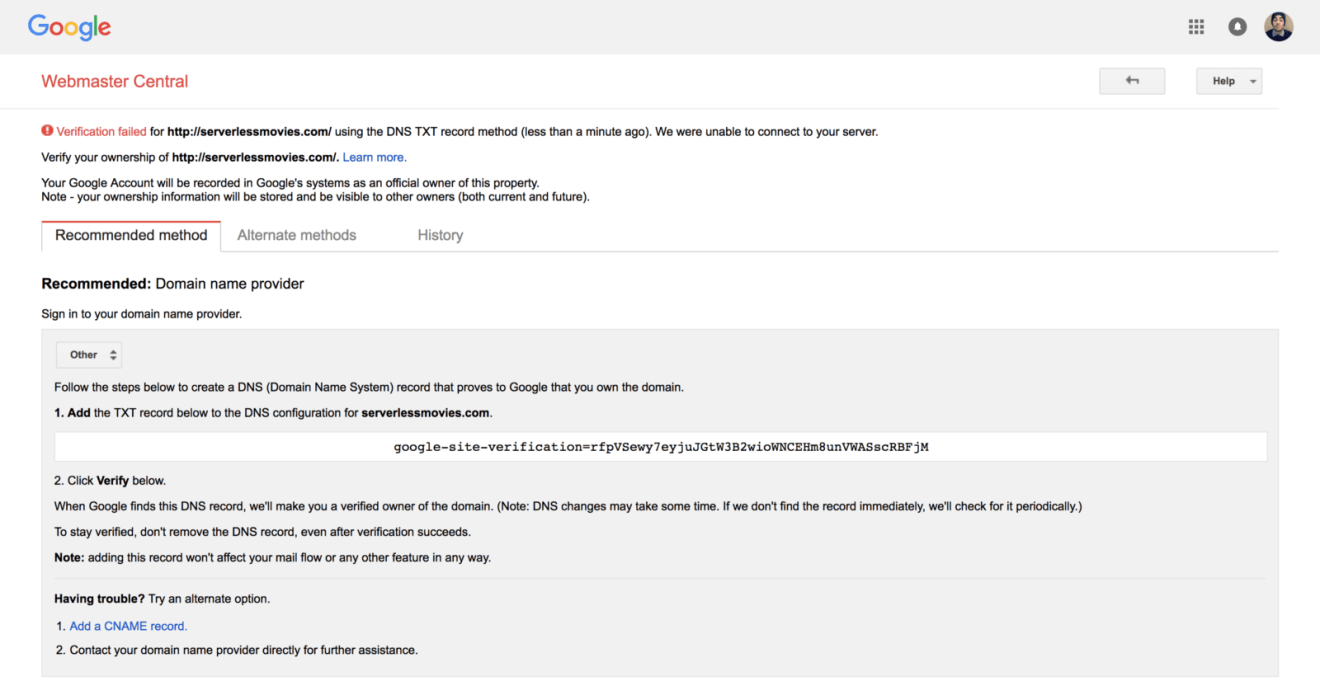
Add the TXT record to your DNS zone created earlier:
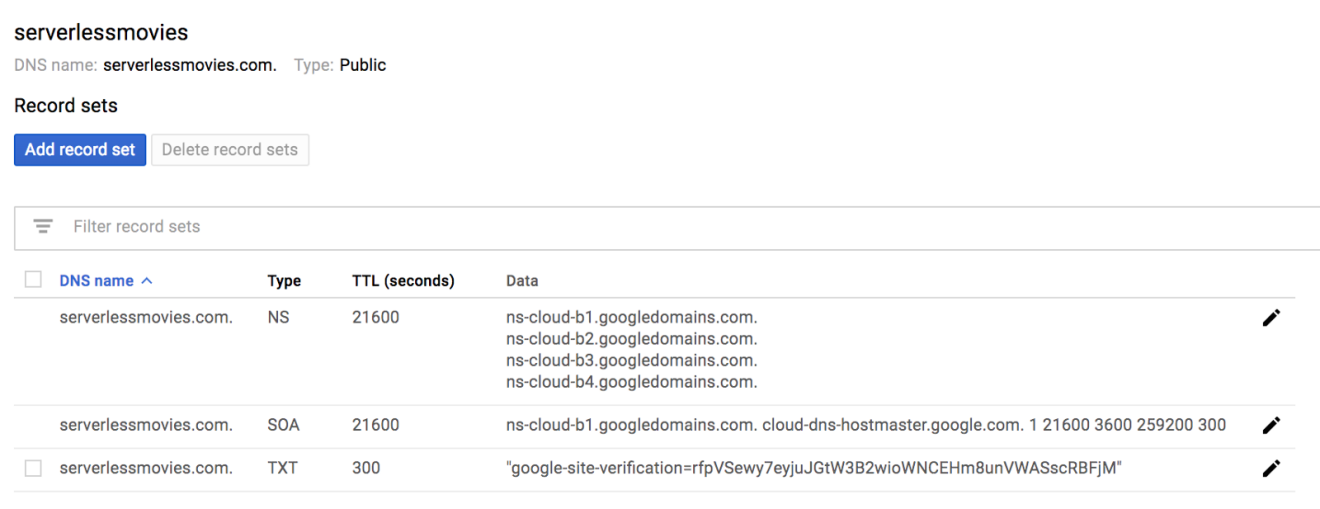
DNS changes might take some time to propagate:

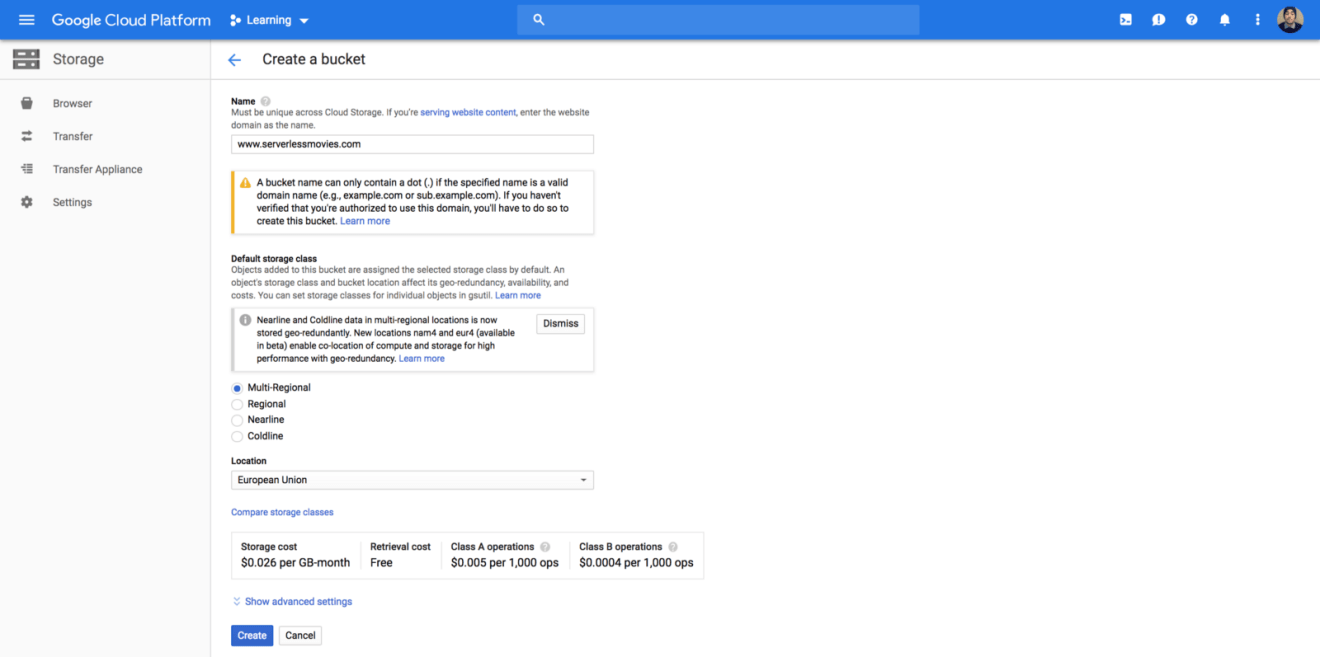
Once you have verified domain, you can create a bucket with Cloud Storage under the verified domain name. The storage class should be “Multi-Regional” (geo redundant bucket, in case of outage) :
Copy the website static files to the bucket using the following command:
1 | gsutil rsync -R . gs://www.serverlessmovies.com/ |
After the upload completes, your static files should be available on the bucket as follows:
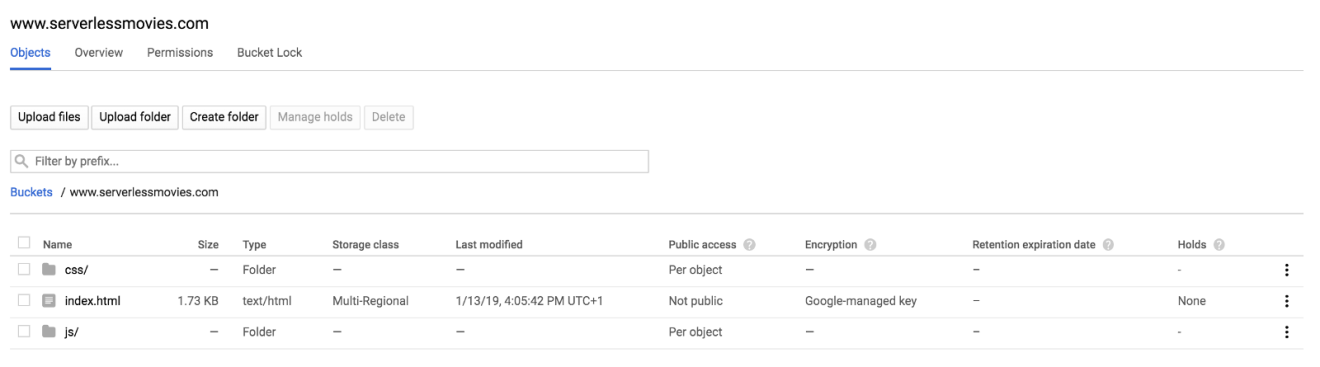
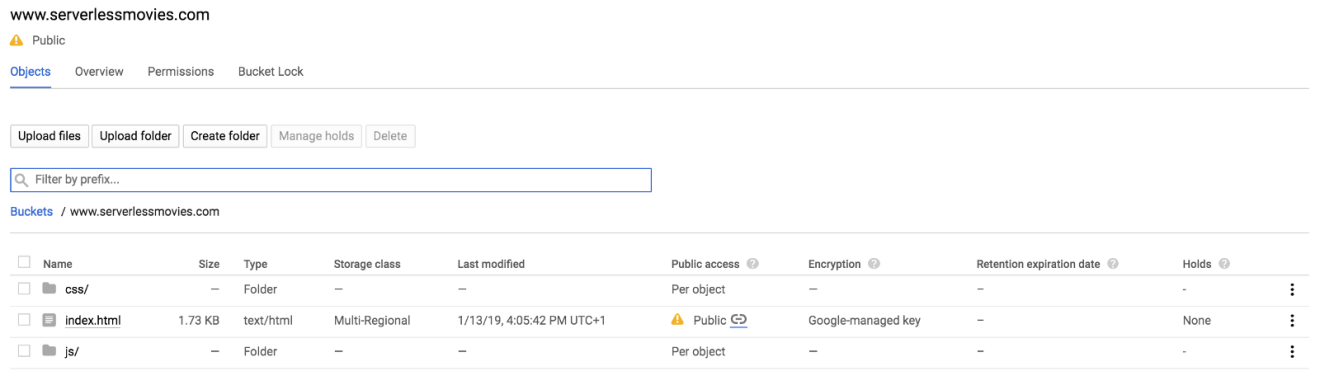
Next, make the files publicly accessible by adding allUsers entity with Object Viewer role to the bucket permissions:

Once shared publicly, a link icon appears for each object in the public access column. You can click on this icon to get the URL for the object:
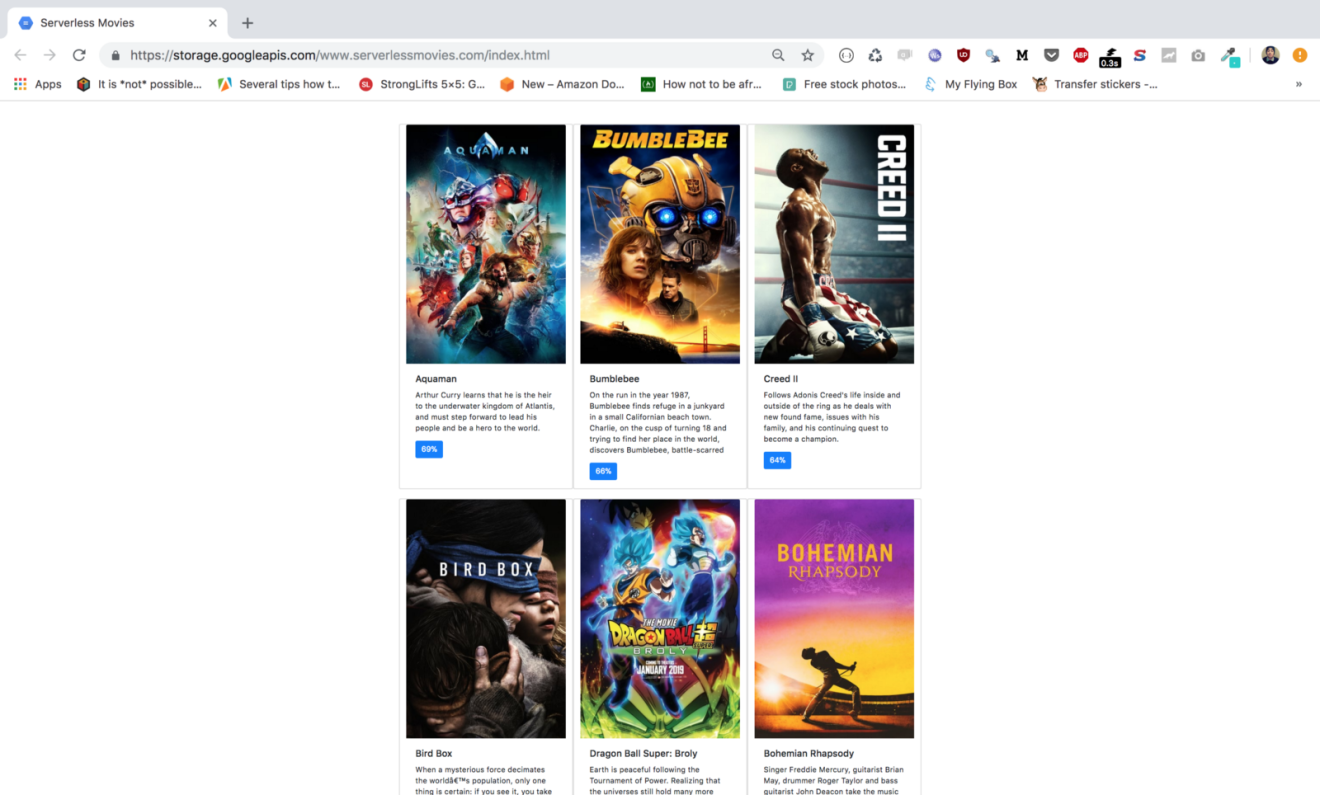
Verify that content is served from the bucket by requesting the index.html link in you browser:
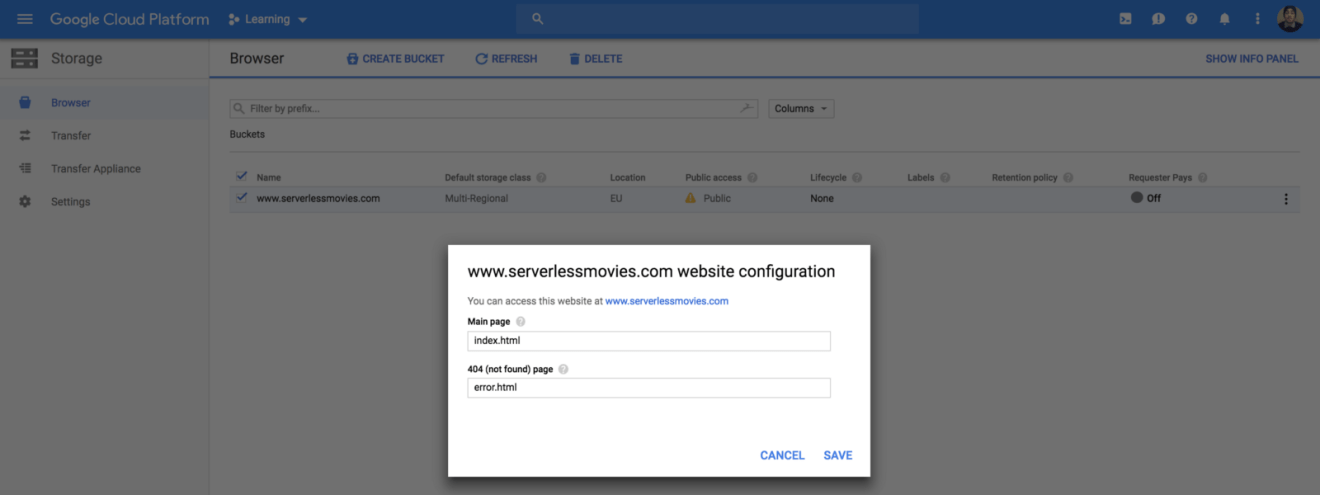
Next, set the main page to be index.html from “Edit website configuration” section:
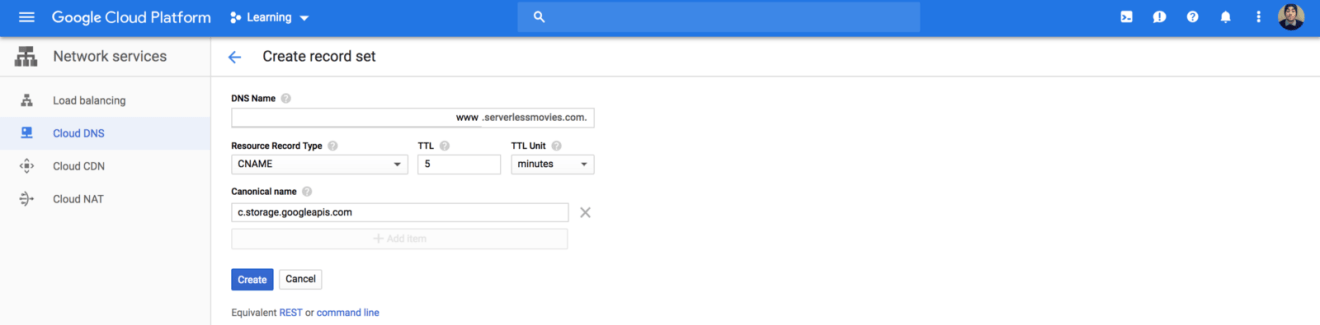
Now, we need to map our domain name with the bucket we created earlier. Create a CNAME record that points to c.storage.googleapis.com:
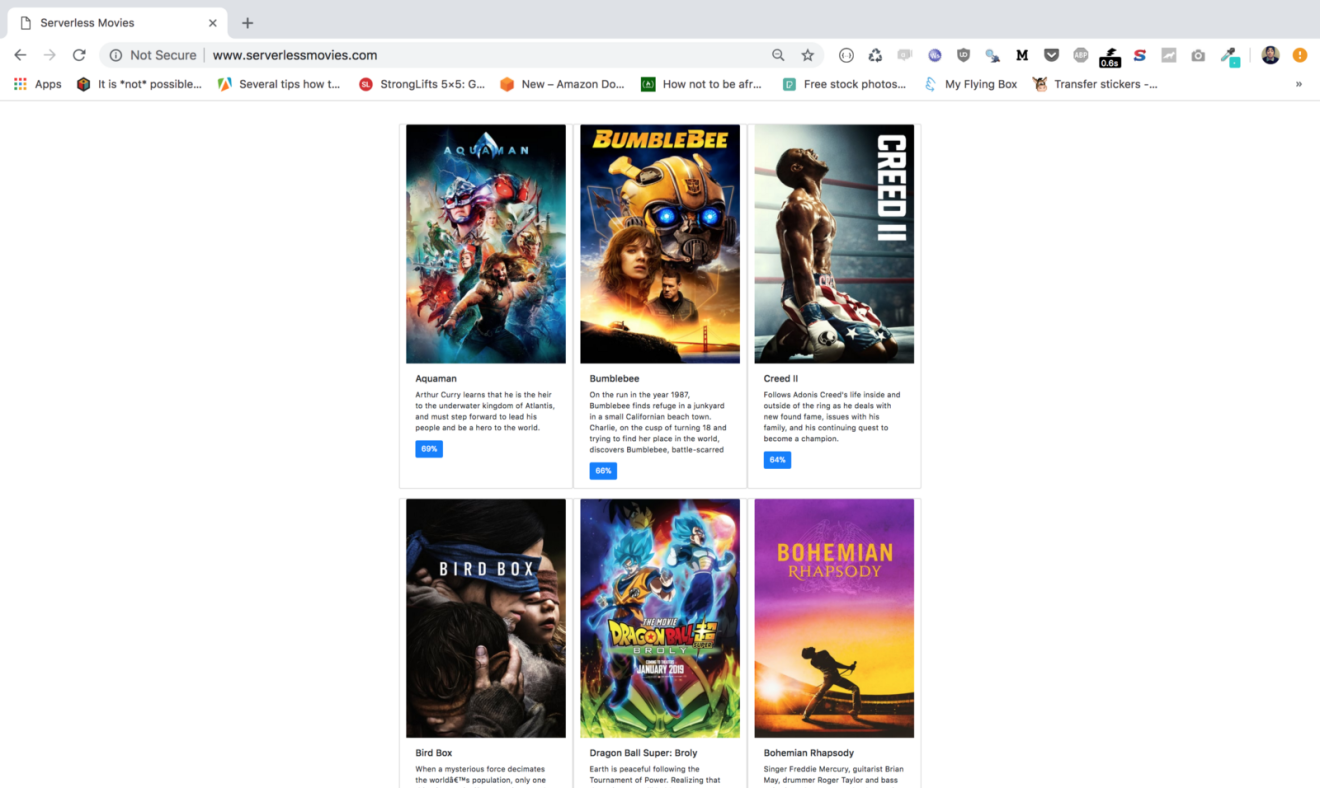
Point your browser to your domain name, your website should be served:
While our solution works like a charm, we can access our content through HTTP only (Google Cloud Storage only supports HTTP when using it through a CNAME record). In the next post, we will serve our content through a custom domain over SSL using a Content Delivery Network (CDN).
Drop your comments, feedback, or suggestions below — or connect with me directly on Twitter @mlabouardy.
Hiring Remote Engineers for Unicorn Startups
Watch my Latest Twitch

Cloud Cost Optimization Tool
Latest Workshop

Pipeline as Code
Building Distributed Applications in Gin
Build Go-Based Lambda Functions
Pipeline as Code
Building Distributed Applications in Gin
Build Go-Based Lambda Functions