Cleanup old Docker images from Nexus Repository

Many of us, are using Nexus as a repository to publish Docker Images. Typically we build images tagged with the commit hash (or using semver ideally) after SCM change automatically in CI and we push them to registry. As result there are many “unneeded” & “old” images that in our case take significant amount of disk space.


I looked around the graphical interface of Nexus and there’s apparently nothing to remove several Docker images at the same time. Or even, a scheduled task to clean up old hosted Docker images, and to also clean up layers which are no longer used by any hosted images.


So I have come up with a simple bash script which uses Docker Registry API to purge Docker images and keep the last X images and delete all other. But, is there a better solution ? YES ! I built a Nexus CLI.

To install Nexus CLI, find the appropriate package for your system and download it. For linux:

1
wget https://s3.eu-west-2.amazonaws.com/nexus-cli/1.0.0-beta/linux/nexus-cli

After downloading Nexus CLI. Add the execution permission to the binary:

1
chmod +x nexus-cli


Note: For Windows make sure that nexus-cli binary is available on the PATH. This page contains instructions for setting the PATH on Windows.

After installing, verify the installation worked, by opening a new terminal session and checking if nexus-cli is available :


Once done, configure the Nexus credentials:

1
nexus-cli configure


Through nexus-cli configure, the Nexus CLI will prompt you for four pieces of information. The Username and Password are your account credentials. Nexus Hostname & Docker repository name.

That should be it. Try out the following command from your cmd prompt and, if you have any images, you should see them listed

1
nexus-cli image ls


Display image tags:

1
nexus-cli image tags -name IMAGE_NAME


Image description:

1
nexus-cli image info -name IMAGE_NAME -tag TAG


To remove a specific image:

1
nexus-cli image delete -name IMAGE_NAME -tag TAG


To keep only the last X images and delete all other:

1
nexus-cli image delete -name IMAGE_NAME -keep X


That’s it ! Let’s go back to Nexus Dashboard:


As you can see, Nexus kept only the last 4 images and deleted the others.


The CLI is still in its early stages, so you are welcome to contribute to the project in GitHub.

Drop your comments, feedback, or suggestions below — or connect with me directly on Twitter @mlabouardy.

Add new users to EC2 and give SSH Key access

In this quick post, I will show you how to add a new user to an EC2 instance and SSH with your own private key rather than having to authenticate using the private key generated by AWS.


Connect via SSH into your instance using its public IP:


Next, create a new user using the following command:

1
sudo adduser labouardy


Next, we switch the shell session to the new account:

1
sudo su labouardy

Create .ssh directory, and change the directory permission to 700 (only the file owner can read, write or open the directory):

1
2
mkdir .ssh
chmod 700 .ssh

Note: ensure you are in the new user’s home directory (example: /home/labouardy)

Create an empty file called authorized_keys in the .ssh directory and change its permissions to 600 (only the file owner can read or writ eto the file)

1
2
touch authorized_keys
chmod 600 authorized_keys


Finally, edit the authorized_keys file and past in your public key:


Once you’ve done this, exist out back to your machine, then try to SSH using the the new credential and user account you’ve created:


We now are logged in as user labouardy 😄

Drop your comments, feedback, or suggestions below — or connect with me directly on Twitter @mlabouardy.

Docker Swarm Networking and Dynamic Reverse Proxy

This post will show you how to setup a Swarm Cluster, deploy a couple of microservices, and create a Reverse Proxy Service (with Traefik) in charge of routing requests on their base URLs.


If you haven’t already, create a Swarm cluster, you could use the shell script below to setup a cluster with 3 nodes (1 Manager & 2 Workers)

1
2
3
4
5
6
7
8
9
10
11
12
13
14
15
16
17
18
19
20
21
22
#!/bin/sh

for i in 1 2 3; do
docker-machine create -d virtualbox node-$i
done

eval $(docker-machine env node-1)

docker swarm init --advertise-addr $(docker-machine ip node-1)

TOKEN=$(docker swarm join-token -q worker)

for i in 2 3; do
eval $(docker-machine env node-$i)
docker swarm join --token $TOKEN $(docker-machine ip node-1):2377
done

echo "Swarm cluster has been successfuly created !";

eval $(docker-machine env node-1)

docker node ls

Issue the following command to execute the script:

1
2
chmod +x setup.sh
./setup.sh

The output of the above command is as follows:


At this moment, we have 3 nodes:


Our example microservice application consists of two parts. The Books API and the Movies API. For both parts I have prepared images for you that can be pulled from the DockerHub.

The Dockerfiles for both images can be found on my Github.

Create docker-compose.yml file with the following content:

1
2
3
4
5
6
7
8
9
10
11
12
13
14
15
16
17
18
19
20
21
22
23
24
25
26
27
28
29
30
31
32
33
34
35
36
37
38
39
40
41
42
43
44
45
46
47
48
49
50
51
52
53
version: "3.3"

services:
traefik:
image: traefik:1.4
ports:
- 80:80
- 8080:8080
networks:
- traefik-net
volumes:
- /var/run/docker.sock:/var/run/docker.sock
configs:
- source: traefik-config
target: /etc/traefik/traefik.toml
deploy:
placement:
constraints:
- node.role == manager

books:
image: mlabouardy/books-api
networks:
- traefik-net
deploy:
placement:
constraints:
- node.role == worker
labels:
- "traefik.port=5000"
- "traefik.backend=books"
- "traefik.frontend.rule=Path:/books"

movies:
image: mlabouardy/movies-api
networks:
- traefik-net
deploy:
placement:
constraints:
- node.role == worker
labels:
- "traefik.port=5000"
- "traefik.backend=movies"
- "traefik.frontend.rule=Path:/movies"

networks:
traefik-net:
driver: overlay

configs:
traefik-config:
file: config.toml
  • We use an overlay network named traefik-net, on which we add the services we want to expose to Traefik.
  • We use constraints to deploy the APIs on workers & Traefik on Swarm manager.
  • Traefik container is configured to listen on port 80 for the standard HTTP traffic, but also exposes port 8080 for a web dashboard.
  • The use of docker socket (/var/run/docker.sock) allows Traefik to listen to Docker Daemon events, and reconfigure itself when containers are started/stopped.
  • The label traefik.frontend.rule is used by Træfik to determine which container to use for which Request Path.
  • The configs part create a configuration file for Traefik from config.toml (it enables the Docker backend)
1
2
3
4
5
6
7
8
9
10
logLevel="DEBUG"
debug=true

[web]
address=":8080"

[docker]
endpoint="unix://var/run/docker.sock"
watch=true
swarmmode=true

In order to deploy our stack, we should execute the following command:

1
docker stack deploy --compose-file docker-compose.yml api

Let’s check the overlay network:

1
docker network ls


Traefik configuration:

1
docker config ls


To display the configuration content:

1
docker config inspect api_traefik-config --pretty


And finally, to list all the services:

1
docker stack ps api


In the list of above, you can see that the 3 containers are being running on node-1, node-2 & node-3 :


If you point your favorite browser (not you IE 😂) to the Traefik Dashboard URL (http://MANAGER_NODE_IP:8080) you should see that the frontends and backends are well defined:


If you check http://MANAGER_NODE_IP/books, you will get a list of books


If you replace the base URL with /movies:


What happens if we want to scale out the books & movies APIs. With the docker service scale command:


We can confirm that:


Obviously Traefik did recognise that we started more containers and made them available to the right frontend automatically:


In the diagram below, you will find that the manager has decied to schedule the new containers on node-2 (3 of them) and node-3 (4 of them) using the Round Robin strategy


Drop your comments, feedback, or suggestions below — or connect with me directly on Twitter @mlabouardy.

Attach an IAM Role to an EC2 Instance with CloudFormation

CloudFormation allows you to manage your AWS infrastructure by defining it in code.

In this post, I will show you guys how to create an EC2 instance and attach an IAM role to it so you can access your S3 buckets.

First, you’ll need a template that specifies the resources that you want in your stack. For this step, you use a sample template that I already prepared:

1
2
3
4
5
6
7
8
9
10
11
12
13
14
15
16
17
18
19
20
21
22
23
24
25
26
27
28
29
30
31
32
33
34
35
36
37
38
39
40
41
42
43
44
45
46
47
48
49
50
51
52
53
54
55
56
57
58
59
60
61
62
63
64
65
66
67
68
69
70
71
72
73
74
75
76
77
78
79
80
81
82
83
84
85
86
87
88
89
90
91
92
93
94
95
96
97
98
99
100
101
102
103
104
105
106
107
108
109
110
111
112
113
114
115
116
117
118
119
120
121
122
123
124
125
126
127
128
129
130
131
132
133
134
135
136
137
138
139
140
141
142
143
144
145
146
147
148
149
150
151
152
153
154
155
156
157
158
159
160
161
162
163
164
165
{
"AWSTemplateFormatVersion" : "2010-09-09",
"Description" : "Attach IAM Role to an EC2",
"Parameters" : {
"KeyName" : {
"Description" : "EC2 Instance SSH Key",
"Type" : "AWS::EC2::KeyPair::KeyName"
},
"InstanceType" : {
"Description" : "EC2 instance specs configuration",
"Type" : "String",
"Default" : "t2.micro",
"AllowedValues" : ["t2.micro", "t2.small", "t2.medium"]
}
},
"Mappings" : {
"AMIs" : {
"us-east-1" : {
"Name" : "ami-8c1be5f6"
},
"us-east-2" : {
"Name" : "ami-c5062ba0"
},
"eu-west-1" : {
"Name" : "ami-acd005d5"
},
"ap-southeast-2" : {
"Name" : "ami-8536d6e7"
}
}
},
"Resources" : {
"Test" : {
"Type" : "AWS::EC2::Instance",
"Properties" : {
"InstanceType" : {
"Ref" : "InstanceType"
},
"ImageId" : {
"Fn::FindInMap" : [
"AMIs",
{
"Ref" : "AWS::Region"
},
"Name"
]
},
"KeyName" : {
"Ref" : "KeyName"
},
"IamInstanceProfile" : {
"Ref" : "ListS3BucketsInstanceProfile"
},
"SecurityGroupIds" : [
{
"Ref" : "SSHAccessSG"
}
],
"Tags" : [
{
"Key" : "Name",
"Value" : "Test"
}
]
}
},
"SSHAccessSG" : {
"Type" : "AWS::EC2::SecurityGroup",
"Properties" : {
"GroupDescription" : "Allow SSH access from anywhere",
"SecurityGroupIngress" : [
{
"FromPort" : "22",
"ToPort" : "22",
"IpProtocol" : "tcp",
"CidrIp" : "0.0.0.0/0"
}
],
"Tags" : [
{
"Key" : "Name",
"Value" : "SSHAccessSG"
}
]
}
},
"ListS3BucketsInstanceProfile" : {
"Type" : "AWS::IAM::InstanceProfile",
"Properties" : {
"Path" : "/",
"Roles" : [
{
"Ref" : "ListS3BucketsRole"
}
]
}
},
"ListS3BucketsPolicy" : {
"Type" : "AWS::IAM::Policy",
"Properties" : {
"PolicyName" : "ListS3BucketsPolicy",
"PolicyDocument" : {
"Statement" : [
{
"Effect" : "Allow",
"Action" : [
"s3:List*"
],
"Resource" : "*"
}
]
},
"Roles" : [
{
"Ref" : "ListS3BucketsRole"
}
]
}
},
"ListS3BucketsRole" : {
"Type" : "AWS::IAM::Role",
"Properties" : {
"AssumeRolePolicyDocument": {
"Version" : "2012-10-17",
"Statement" : [
{
"Effect" : "Allow",
"Principal" : {
"Service" : ["ec2.amazonaws.com"]
},
"Action" : [
"sts:AssumeRole"
]
}
]
},
"Path" : "/"
}
}
},
"Outputs" : {
"EC2" : {
"Description" : "EC2 IP address",
"Value" : {
"Fn::Join" : [
"",
[
"ssh ec2-user@",
{
"Fn::GetAtt" : [
"Test",
"PublicIp"
]
},
" -i ",
{
"Ref" : "KeyName"
},
".pem"
]
]
}
}
}
}

The template creates a basic EC2 instance that uses an IAM Role with S3 List Policy. It also creates a security group which allows SSH access from anywhere.

Note: I used also the Parameters section to declare values that can be passed to the template when you create the stack.

Now we defined the template. Sign in to AWS Management Console then navigate to CloudFormation, and click on “Create Stack“. Upload the JSON file:


You would be asked to assign a name to this stack, and choose your EC2 specs configuration & SSH KeyPair:


Make sure to check the box “I ackownledge the AWS CloudFormation might create IAM resources” in order to create the IAM Policy & Role:


Once launched, you will get the following screen with launching process events:


After a while, you will get the CREATE_COMPLETE message in the status tab:


Once done, on the output tab, you should see how to connect via SSH to your instance:


If you point your terminal to the value shown in the output tab, you should be able to connect via SSH to server:

1
ssh ec2-user@52.91.239.135 -i key.pem


Let’s check if we can list the S3 buckets using the AWS CLI:

1
aws s3 ls


Awesome ! so we are able to list the buckets, but what if we want to create a new bucket:


It didn’t work, and it’s normal because the IAM Role attached to the instance doesn’t have enough permission (CreateBucket action).

Drop your comments, feedback, or suggestions below — or connect with me directly on Twitter @mlabouardy.

Build a Serverless Memes Function with OpenFaaS

In this quick post, I will show you how to build a Serverless function in Go to get the latest 9Gag Memes using OpenFaaS.


This tutorial assume that you have:

  • faas-cli installed – The easiest way to install the faas-cli is through cURL:
1
curl -sSL https://cli.openfaas.com | sudo sh
  • Swarm or Kubernetes environment configured – See Docs.

1 – Create a function

Create a handler.go file with the following content:

1
2
3
4
5
6
7
8
9
10
11
12
13
14
15
16
17
18
19
20
21
22
package main

import (
"encoding/json"
"fmt"
"io/ioutil"
"log"
"os"

"github.com/mlabouardy/9gag"
)

func main() {
tag, err := ioutil.ReadAll(os.Stdin)
if err != nil {
log.Fatalf("Unable to read standard input: %s", err.Error())
}
gag9 := gag9.New()
memes := gag9.FindByTag(string(tag))
rawJson, _ := json.Marshal(memes)
fmt.Println(string(rawJson))
}

The code is self-explanatory, it uses 9Gag Web Crawler to parse the website and fetch memes by their tag.

2 – Docker Image

I wrote a simple Dockerfile using the Multi-stage builds technique to reduce the image size down:

1
2
3
4
5
6
7
8
9
10
11
12
13
14
15
FROM golang:1.9.1 AS builder
MAINTAINER mlabouardy <mohamed@labouardy.com>
WORKDIR /go/src/github.com/mlabouardy/Memes9Gag
RUN go get -d -v github.com/mlabouardy/9gag
COPY handler.go .
RUN CGO_ENABLED=0 GOOS=linux go build -a -installsuffix cgo -o app .

FROM alpine:latest
RUN apk --no-cache add ca-certificates
ADD https://github.com/openfaas/faas/releases/download/0.5.1-alpha/fwatchdog /usr/bin
RUN chmod +x /usr/bin/fwatchdog
WORKDIR /root/
COPY --from=builder /go/src/github.com/mlabouardy/Memes9Gag/app .
ENV fprocess="/root/app"
CMD ["fwatchdog"]

3 – Configuration file

1
2
3
4
5
6
7
8
9
provider:
name: faas
gateway: http://localhost:8080

functions:
memes-9gag:
lang: Dockerfile
handler: ./function
image: mlabouardy/memes-9gag

Note: If pushing to a remote registry change the name from mlabouardy to your own Hub account.

4 – Build

Issue the following command:

1
faas-cli build -f ./stack.yml

5 – Deploy

1
2
faas-cli push -f ./stack.yml
faas-cli deploy -f ./stack.yml

6 – Tests

Once deployed, you can invoke the function via:

cURL:

1
curl http://localhost:8080/function/memes-9gag -d "GoT"

FaaS CLI:

1
echo "GoT" | faas-cli invoke memes-9gag

UI:


Note: all code used in this demo, is available on my GitHub 😍

Drop your comments, feedback, or suggestions below — or connect with me directly on Twitter @mlabouardy.

Preventing race conditions in Docker

It’s easy to get race conditions with Compose & Docker. Take for example, if you have a common pattern when you have the application server depends on the database, but since the database server didn’t have time to configure itself and application has already started it would just failed connecting for it.

A race condition example with NodeJS app & MySQL:

1
2
3
4
5
6
7
8
9
10
11
12
13
14
15
16
17
18
19
20
21
22
23
24
25
var MySQL = require('mysql'),
express = require('express'),
app = express();

var connection = MySQL.createConnection({
host : process.env.MYSQL_HOST || 'localhost',
user : process.env.MYSQL_USER || '',
password : process.env.MYSQL_PASSWORD || ''
});

connection.connect(function(err){
if(err){
console.log('error connecting:', err.stack);
process.exit(1);
}
console.log('connected as id:', connection.threadId);
})

app.get('/', function(req, res){
res.send('Hello world :)');
})

app.listen(3000, function(){
console.log('Server started ....');
})

To build the application container, I used the following Dockerfile:

1
2
3
4
5
6
7
8
9
10
11
12
FROM node:8.7.0
MAINTAINER mlabouardy <mohamed@labouardy.com>

WORKDIR /app

RUN npm install mysql express

COPY server.js .

EXPOSE 3000

CMD node server.js

To deploy the stack, I used docker-compose:

1
2
3
4
5
6
7
8
9
10
11
12
13
14
15
16
17
18
19
20
21
22
23
24
version: "3.0"

services:
mysql:
image: mysql:5.6
environment:
- MYSQL_ROOT_PASSWORD=root
networks:
- db-net

app:
build: .
ports:
- 3000:3000
environment:
- MYSQL_HOST=mysql
- MYSQL_USER=root
- MYSQL_PASSWORD=root
networks:
- db-net

networks:
db-net:
driver: bridge

Let’s build the image:

1
docker-compose build


Then, create the containers:

1
docker-compose up -d 


Let’s see the status:

1
docker-compose ps


The application failed to start, lets see why ?

1
docker-compose logs -f app


RACE CONDITION ! The application container come up before the DB and tried to connect to MySQL database and fail with a database connection error. To avoid that, There are many solutions:

  • Adding a mechanism in the code to wait for DB to be up and setup before starting to connect to it
  • Using restart policy – Docker Docs
  • Holding the container until the database is up and running

I will go with the 3rd solution, an open source tool called Dockerize, the advantage of this tool is that’s its pretty fast to just look over the opening the socket until it’s getting open and then launch the web app.

Note: Dockerize gives you the ability to wait for services on a specified protocol (file, tcp, tcp4, tcp6, http, https and unix)

So just update the Dockerfile to install Dockerize:

1
2
3
4
5
6
7
8
9
10
11
12
13
14
15
16
17
18
19
FROM node:8.7.0
MAINTAINER mlabouardy <mohamed@labouardy.com>

RUN apt-get update && apt-get install -y wget

ENV DOCKERIZE_VERSION v0.5.0
RUN wget https://github.com/jwilder/dockerize/releases/download/$DOCKERIZE_VERSION/dockerize-linux-amd64-$DOCKERIZE_VERSION.tar.gz \
&& tar -C /usr/local/bin -xzvf dockerize-linux-amd64-$DOCKERIZE_VERSION.tar.gz \
&& rm dockerize-linux-amd64-$DOCKERIZE_VERSION.tar.gz

WORKDIR /app

RUN npm install mysql express

COPY server.js .

EXPOSE 3000

CMD dockerize -wait tcp://mysql:3306 -timeout 1m && node server.js

Then, build the new image:


1
2
docker-compose up -d
docker-compose ps


1
docker-compose logs -f app


Its working !

Drop your comments, feedback, or suggestions below — or connect with me directly on Twitter @mlabouardy.

Highly Available Bastion Hosts with Route53

Instances in a private subnet don’t have a public IP address, and without a VPN or a DirectConnect option, Bastion Host (JumpBox) is the expected mechanism to reach your servers. Therefore, we should make it Highly Available.

In this quick post, I will show you how to setup a Highly Available Bastion Hosts with the following targets :

  • Bastion hosts will be deployed in two Availability Zones to support immediate access across the VPC & withstand an AZ failure.
  • Elastic IP addresses are associated with the bastion instances to make sure the same trusted Elastic IPs are used at all times.
  • Bastion Hosts will be reachable via a permanent DNS entry configured with Route53.


In order to easily setup the infrastructure described above, I used Terraform:

1
2
git clone https://github.com/mlabouardy/terraform-aws-labs
cd bastion-highavailability

Note: I did a tutorial on how to the setup a VPC with Terraform so make sure to read it for more details.

Update the variables.tfvars file with your SSH Key Pair name and an existing Hosted Zone ID. Then, issue the following command:

1
terraform apply -var-file=variables.tfvars

That will bring up the VPC, and all the necessary resources:


Now in your AWS Management Console you should see the resources created:

EC2 Instances:


DNS Record:


Finally, create an SSH tunnel using the DNS record to your private instance:

1
ssh -f ec2-user@bastion.slowcoder.com -i /d/aws/vpc.pem -L 2800:10.0.3.218:22 -N

Once done, you should now be able to access to your private instances via SSH:

1
ssh ec2-user@localhost -p 2800 -i /d/aws/vpc.pem


Take it further ? instead of defining number of bastion hosts, we could use a bastion host inside an autoscaling group with min target set to 1.

Drop your comments, feedback, or suggestions below — or connect with me directly on Twitter @mlabouardy.

Create Front-End for Serverless RESTful API

In this post, we will build an UI for our Serverless REST API we built in the previous tutorial, so make sure to read it before following this part.

Note: make sure to enable CORS for the endpoint. In the API Gateway Console under Actions and Enable CORS:


The first step is to clone the project:

1
git clone https://github.com/mlabouardy/movies-dynamodb-lambda.git

Head into the ui folder, and modify the js/app.js with your own API Gateway Invoke URL:

1
2
3
4
5
6
7
8
9
10
11
12
13
14
15
16
17
18
19
20
21
22
23
24
25
26
27
angular.module('app', [])
.controller('MainCtrl', function($scope, $http){
var self = $scope;
var apiUrl = 'https://kbouwyuvoc.execute-api.us-east-1.amazonaws.com/prod/movies'; // replace with API Gateway Invoke URL

self.movies = [];
self.movie = {};
self.error = '';

self.getMovies = function(){
$http.get(apiUrl).then(function(res){
self.movies = res.data;
})
}

self.create = function(){
$http.post(apiUrl, self.movie).then(function(res){
self.getMovies();
self.movie = '';
self.error = '';
}, function(err){
self.error = err.data.status;
});
}

self.getMovies();
});


Once done, you are ready to create a new S3 bucket:

1
aws s3 mb s3://movies-tutorial

Copy all the files in the ui directory into the bucket:

1
aws s3 cp ui/ s3://movies-tutorial --recursive -grants read=uri=http://acs.amazonaws.com/groups/global/AllUsers

Finally, turns website hosting on for your bucket:

1
aws s3 website s3://movies-tutorial --index-document index.html

After running this command all of our static files should appear in our S3 bucket:


Your bucket is configured for static website hosting, and you now have an S3 website url like this http://<bucket_name>.s3-website-us-east-1.amazonaws.com


Drop your comments, feedback, or suggestions below — or connect with me directly on Twitter @mlabouardy.

Setup AWS Lambda with Scheduled Events

This post is part of my “Serverless” series. In this part, I will show you how to setup a Lambda function to send mails on a defined scheduled event from CloudWatch.

1 – Create Lambda Function

So start by cloning the project :

1
git clone https://github.com/mlabouardy/schedule-mail-lambda.git

I implemented a simple Lambda function in NodeJS to send an email using MailGun library

1
2
3
4
5
6
7
8
9
10
11
12
13
14
15
16
'use strict';
var mg = require('mailgun-js')({
apiKey: process.env.MAILGUN_API_KEY || 'YOUR_API_KEY',
domain: process.env.MAILGUN_DOMAIN || 'DOMAIN_NAME'
});

exports.sendEmail = function(event, context, callback){
mg.messages().send({
from: 'mohamed.labouardy@gmail.com',
to: 'mohamed@labouardy.com',
subject: 'Hello',
text: 'Sent from lambda on a defined schedule'
}, function(err, body){
callback(err, body)
})
}

Note: you could use another service like AWS SES or your own SMTP server

Then, create a zip file:


Next, we need to create an Execution Role for our function:

1
2
3
4
5
6
7
8
{
"Version": "2012-10-17",
"Statement": [{
"Effect": "Allow",
"Principal": { "AWS" : "*" },
"Action": "sts:AssumeRole"
}]
}
1
aws iam create-role --role-name lambda_execution --assume-role-policy-document file://lambda_role_policy.json


Execute the following Lambda CLI command to create a Lambda function. We need to provide the zip file, IAM role ARN we created earlier & set MAILGUN_API_KEY and MAILGUN_DOMAIN as parameters.

1
2
3
4
aws lambda create-function --region us-east-1 --function-name mail-scheduler \
--zip-file fileb://schedule-mail-lambda.zip --role arn:aws:iam::3XXXXXXX3:role/lambda_execution \
--handler index.sendEmail --runtime nodejs6.10 \
--environment Variables="{MAILGUN_API_KEY=key-6XXXXXXXXXXXXXXXXXXXXXX5,MAILGUN_DOMAIN=sandboxXXXXXXXXXXXXXX.mailgun.org}"

Note: the –runtime parameter uses Node.JS 6.10 but you can also specify Node.JS 4.3

Once created, AWS Lambda returns function configuration information as shown in the following example:


Now if we go back to AWS Lambda Dashboard we should see our function has been successfuly created:


2 – Configure a CloudWatch Rule

Create a new rule which will trigger our lambda function each 5 minutes:


Note: you can specify the value as a rate or in the cron expression format. All schedules use the UTC time zone, and the minimum precision for schedules is one minute

If you go back now to the Lambda Function Console and navigate to the Trigger tab, you should see the CloudWatch has been added:


After 5 minutes, CloudWatch will trigger the Lambda Function and you should get an email notification:


Drop your comments, feedback, or suggestions below — or connect with me directly on Twitter @mlabouardy.

How ChatOps can help you DevOps better !

When people hear DevOps, they often relate it to “automation”, “team work” and many “tools”, which is right. DevOps is all about CAMS : a culture of automation, measurement and sharing. The purpose of this article is to show how can ChatOps boost DevOps by bringing CAMS to everyday practice.

What is DevOps ?

Set of practices that emphasize the collaboration and communication of both Software Engineers and IT & Infrastructure Operations to reduce the time to market of a Product. One main goal of DevOps is to deploy features into production quickly and to detect and correct problems when they occur, without disrupting other services (Self-healing, Blue/Green deployment, Canary updates …)

There are several guidelines in order to achieve DevOps maturity, here are a few you need to know:

  • Continuous Integration is the practice of integrating, building and testing code within the development environment. It requires developers team to integrate code into a shared repository (Version Control System). Checks out the code and runs all the pre-deployment tests (Do not require code to be deployed to a server). In case it passed compile and package the code into an Artifact (JAR, Docker Image, gem …). Push it into an Artifact Repository Manager. The Artifact is deployed then inside an immutable container to a test environment (Quality Assurance). Once deployed post-deployment tests (Functional, integration & performance tests) are executed.
  • Continuous Delivery is an extension to continuous integration pipeline. It aims to make any change to the system releasable, it requires a person or business rule to decide when the final push to production should occur.
  • Continuous Deployment is an advanced evolution of continuous delivery. It’s the practice of deploying all the way into production without any human intervention.

In addition to those practices discussed above. Today, most DevOps teams embrace collaborative messaging platforms, such as Slack, to communicate with each other. And get real time updates about the system through online chat. And that’s certainly the spirit behind ChatOps.

What is ChatOps ?

“Placing tools directly in the middle of the conversation” — Jesse Newland, GitHub

Collaboration and conversation are a force that let work and learn together to produce new things. And this is happening in an exponential way that accelerates every year.

ChatOps (an amalgamation of chat and operations) is an emerging movement that led to ease the integration between teams and various tools/platforms of DevOps and others. It is about conversation driven development by bringing the tools into conversations. Robots are today members of your team to whom you can send a request and get an instant response.

ChatOps is a model where people, tools, process and automation are connected in a transparent flow. It also helps collaborate and control pipelines in one window.

Today, DevOps practices toolchain puts in many grades of tools, including : development software, networks and servers management, tests, monitoring, etc. Collaborating and controlling the practices’ pipelines in one window has helped developers teams work in more efficient and agile way.

Three main components in Chatops:
Collaboration tool: It’s the Chat Client where stakeholders and teams are connected between them and to the systems they work on. The are several chat platforms :

  • Slack: a leading chat platform for teams which accumulated more that 4 million daily active users. It is also one of the first platforms that integrated bots into its system.
  • HipChat by Atlassian is a group chat, file sharing, video chat & screen sharing built for teams & business.

Bot: It is the core of chatops methodology. The Bot comes in the middle of the collaboration tool and the Devops tools.
The Bot receives requests from team members, retrieves information from integrated systems by executing set of commands (scripts).

  • Hubot, a leading bot tool for ChatOps. It is a valuable open source robot (CoffeeScript) for automating chat rooms by Github made back in 2013. Hubot is useful and powerful via Scripts. They define the skills of your Hubot instance. Hundreds of them are written and maintained by the community and you can create your own. It mainly helps to automate most of ops-related tasks.
  • Lita is a framework for bots dedicated to company chat rooms written in Ruby. It is heavily inspired from Hubot. This framework can be used to build operational task automations and has a very comprehensive list of plugins which means that it can be integrated in many chat platforms as : Slack, Facebook Messenger and others.
  • Cog, made by Operable, is another chatbot framework to help automate DevOps workflows. It’s designed to be chat platform and language agnostic, and uses a Unix-style pipeline to activate complex functionality.
  • ErrBot is a chatbot daemon that generates bots that are in the middle of a chat platform and DevOps tools. It is written in Python and aims to make integrating and tool that provides an API, easily to a chat platform via commands.

System integration: Third key element in ChatOps. Simply put, it is the DevOps tools allowing more productivity. Such as :

  • Issue tracking: JIRA, OTRS, TeamForge …
  • Version Control Systems: Github, Gitlab, Bitbucket …
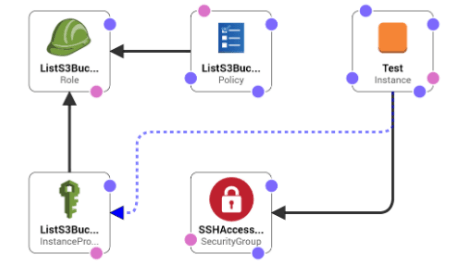
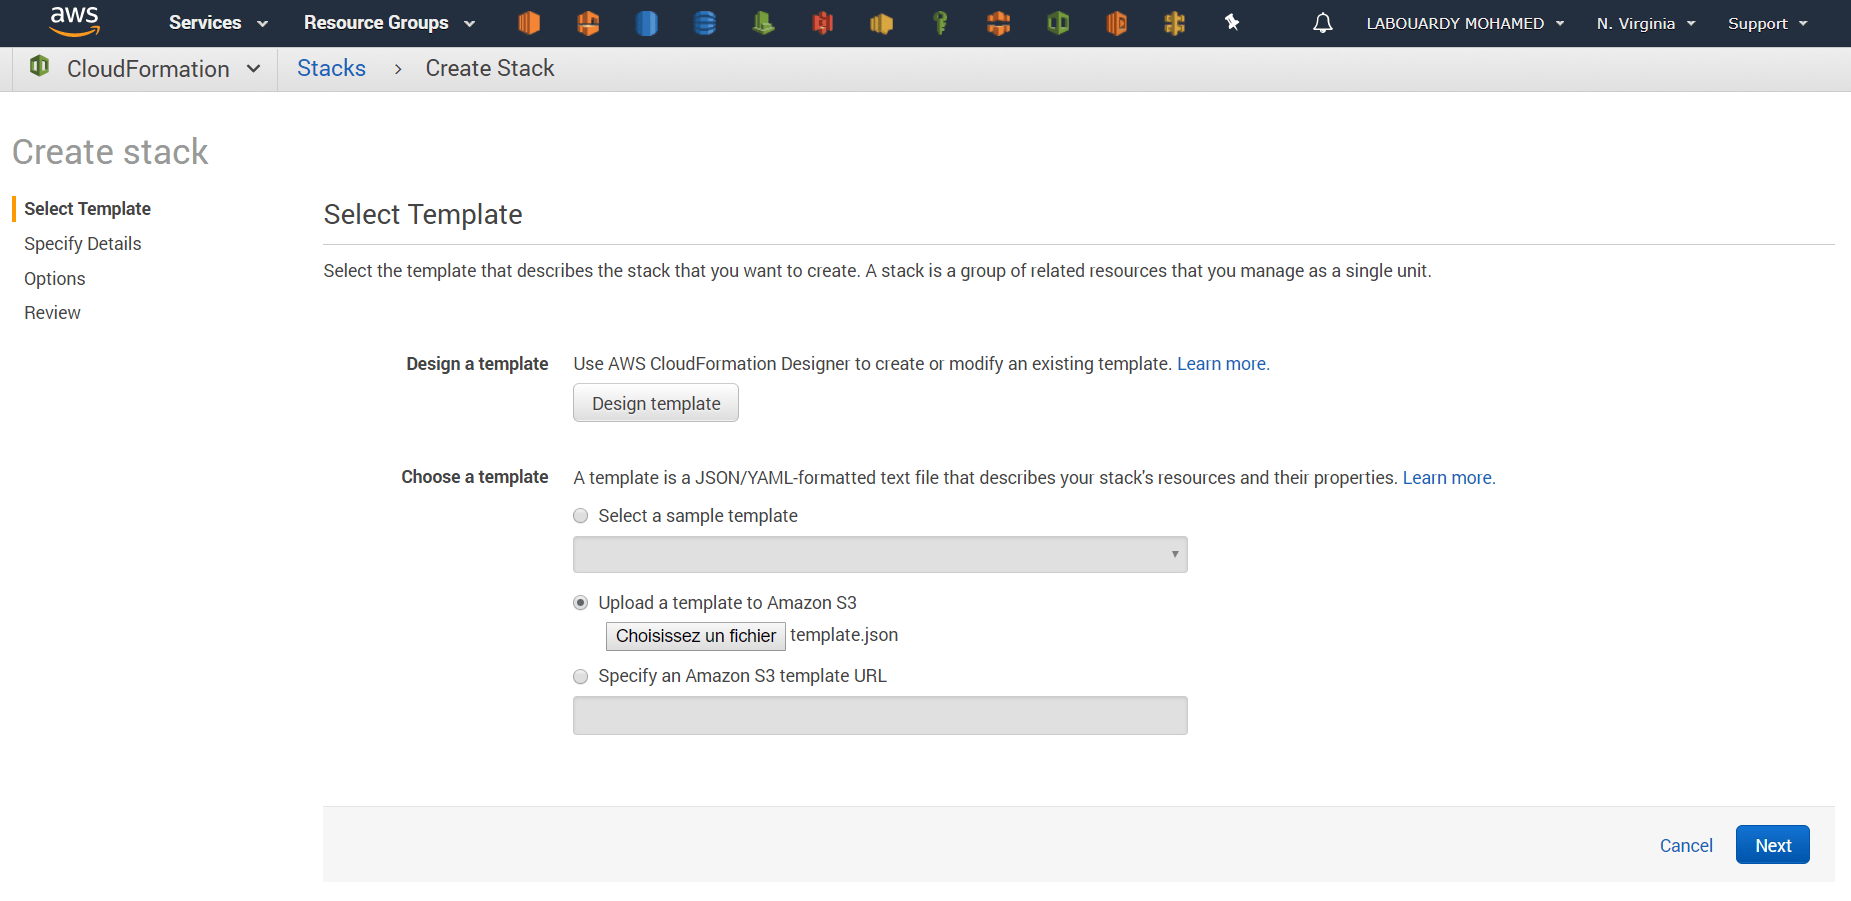
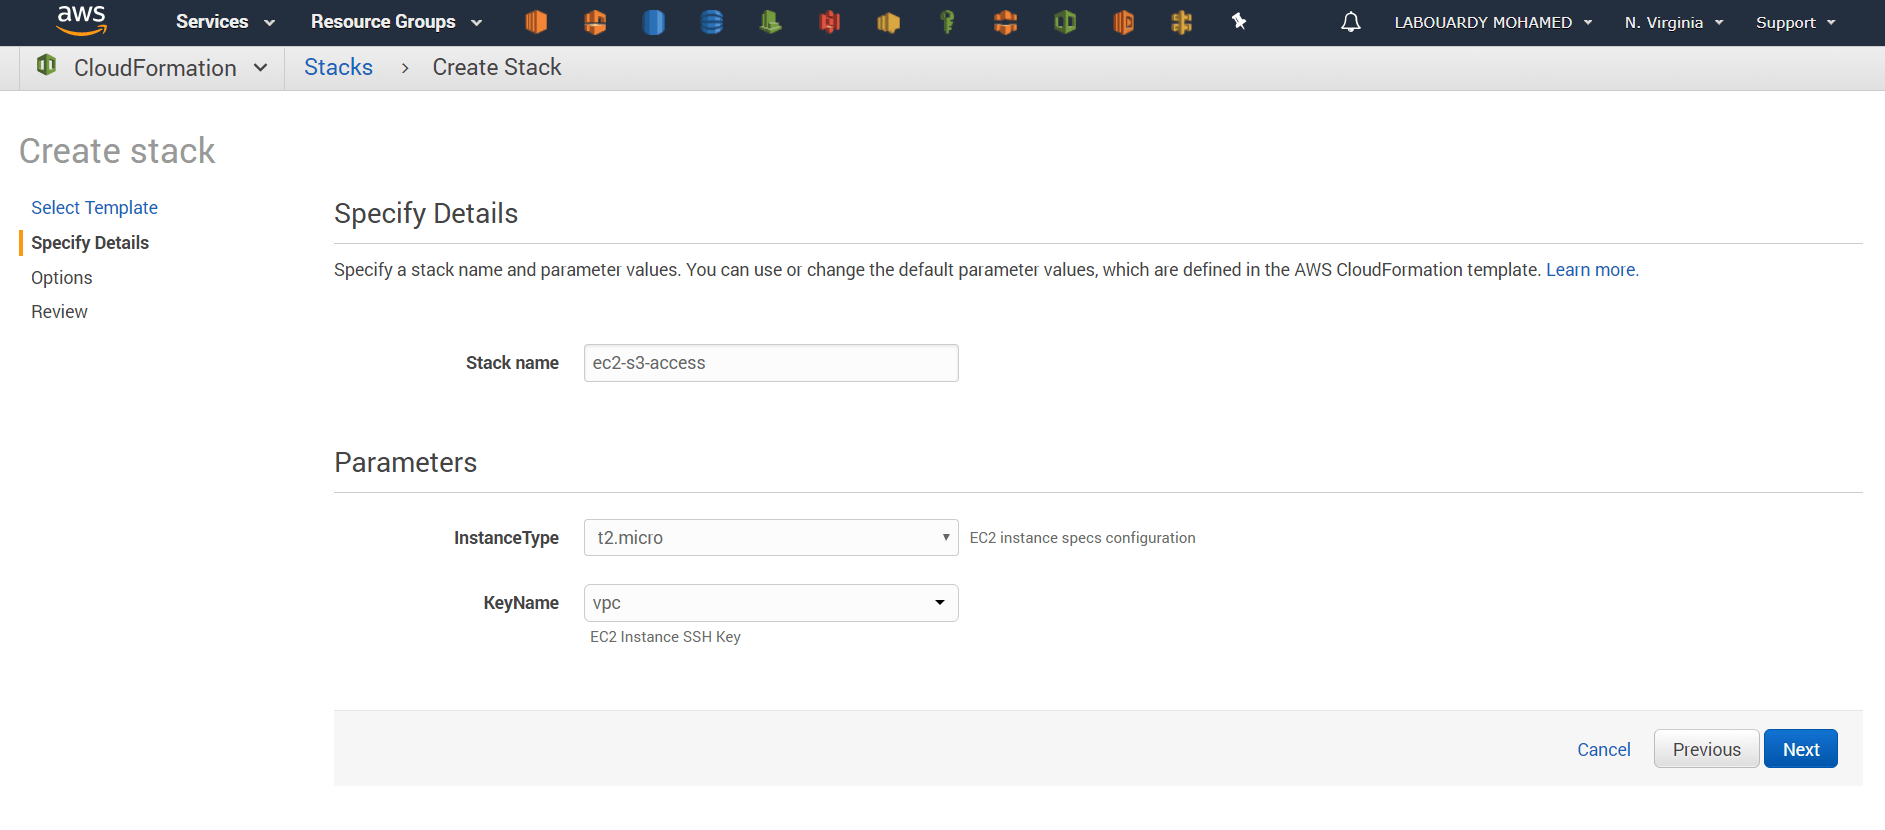
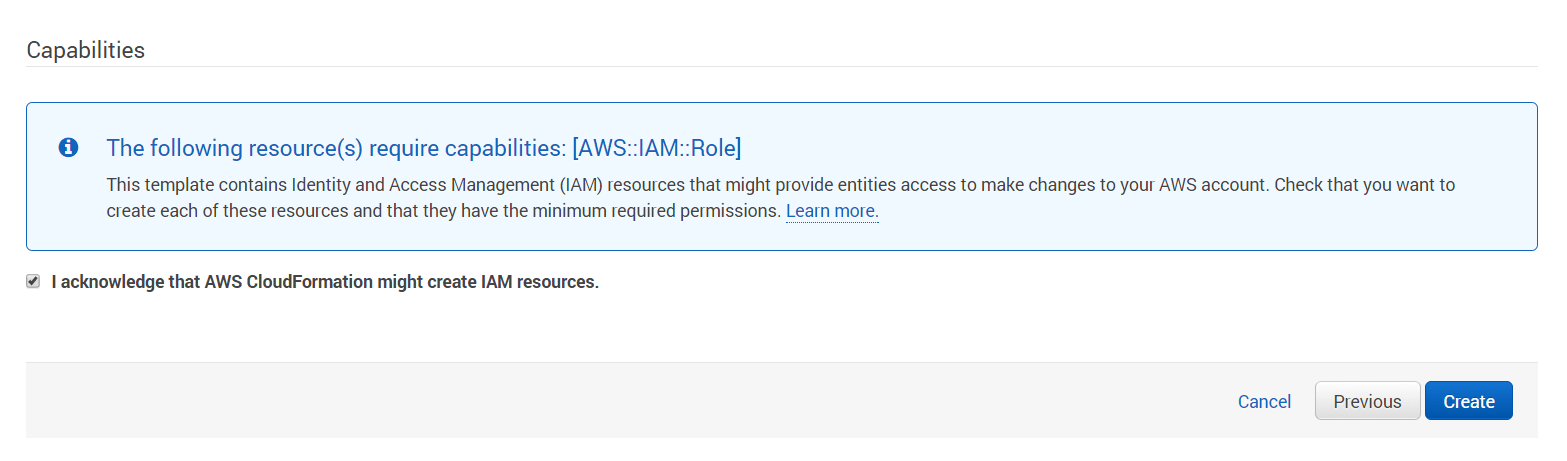
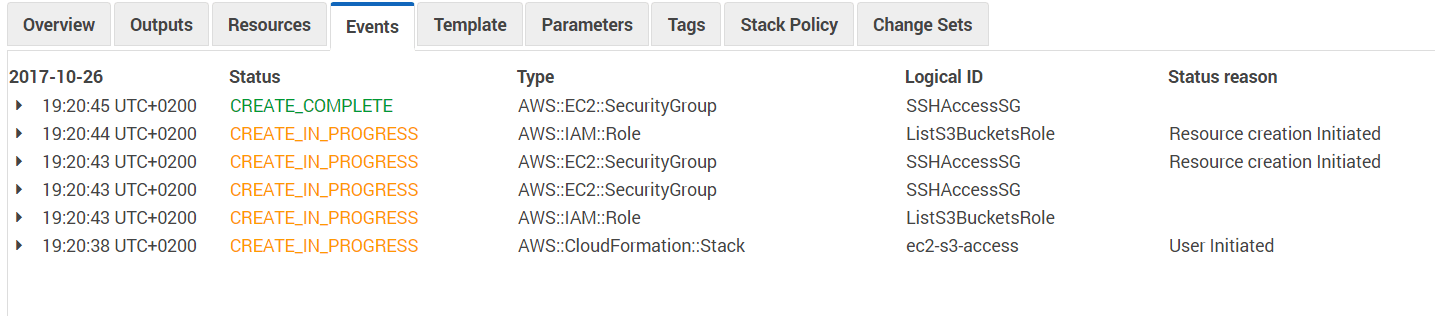
  • Infrastructure as Code (IaC): Terraform, Vagrant, Packer, Swarm, Kubernetes, Docker, AWS CloudFormation …
  • Configuration Management tools (Provisioning): Ansible, Salt, Chef, Puppet …
  • Continuous Integration Servers: Jenkins, Travis CI, Bamboo …
  • Monitoring: Grafana, Kibana, Prometheus …

Nowadays ChatOps are operational. Several teams around the world already connected their chat platforms to their build systems to get notifications, query and execute processes on their continuous integration servers. Same thing happens in QA (Quality Assurance) teams, support teams and the rest.

With ChatOps, trust is build among the team especially that work is shared and brought into the foreground by putting it all in one place. Your chat platform is your new command line.

Conversation-driven collaboration is not new, but with ChatOps, we observed a combination of the oldest form of collaboration and the newest techies. We are not surprised that this combination have changed the way staff members work. This should make people often think of making software that allows this collaboration to be more contributory , soft and secure.

For further Information on DevOps and ChatOps approaches, check out our DevOps Wiki on Github.

Thanks for reading,

Your browser is out-of-date!

Update your browser to view this website correctly. Update my browser now

×